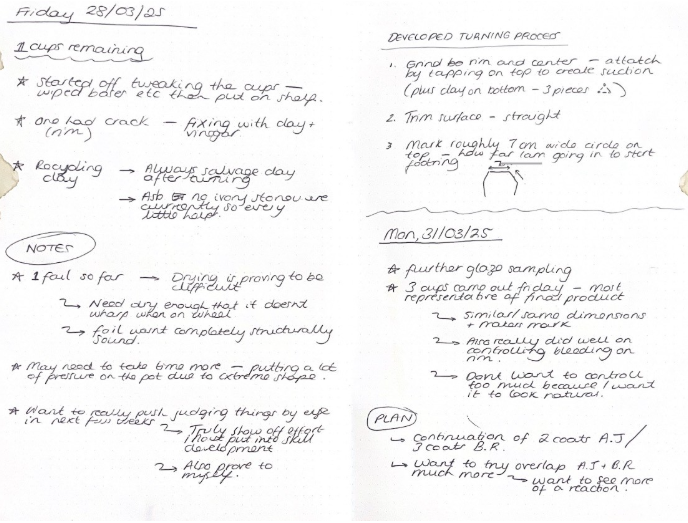
To start off the year, before uni started I wanted to get into the studio just so that I could get back into the swing of it. One thing that I decided to do before anything was choose a different wheel. I have always been on one of the larger wheels in the studio as I believed it was my 'lucky wheel'. However, I realised that if I was going to move into the real ceramic world with ease, I should move onto one of the more modern wheels.
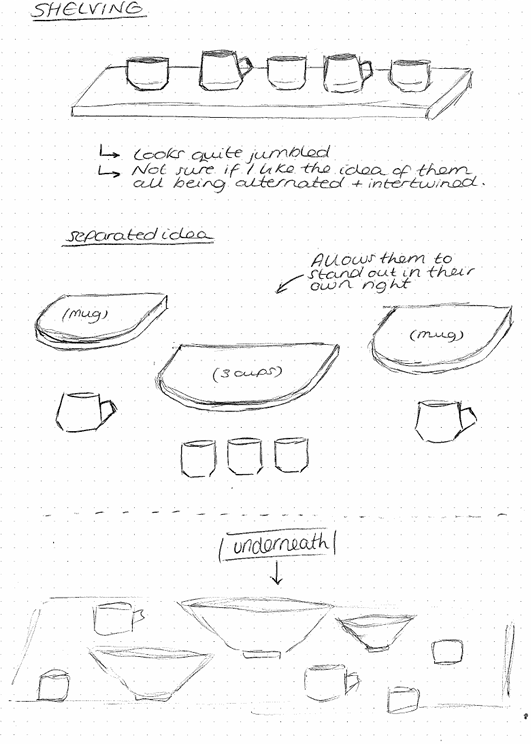
I went into this session with no clear aim in relation to specific form, the only thing that was on my mind was how I wanted to make a series of pieces that could be used to share food. Before coming to uni, I had never really had a large group of people in my social circle. Once I came to uni, I had so many amazing people around me! In summer I was invited to a BBQ, when I got there, I was filled with so much happiness seeing people chatting and sharing food, I felt so fulfilled. One of my first thoughts was how amazing it would be to crate vessels and dishes to facilitate this communication and interpersonal connection. Without realising, this is what sparked my interest into larger vessels as in my eyes, the larger the vessel, the more people it could feed. See below for the outcomes of my making session:
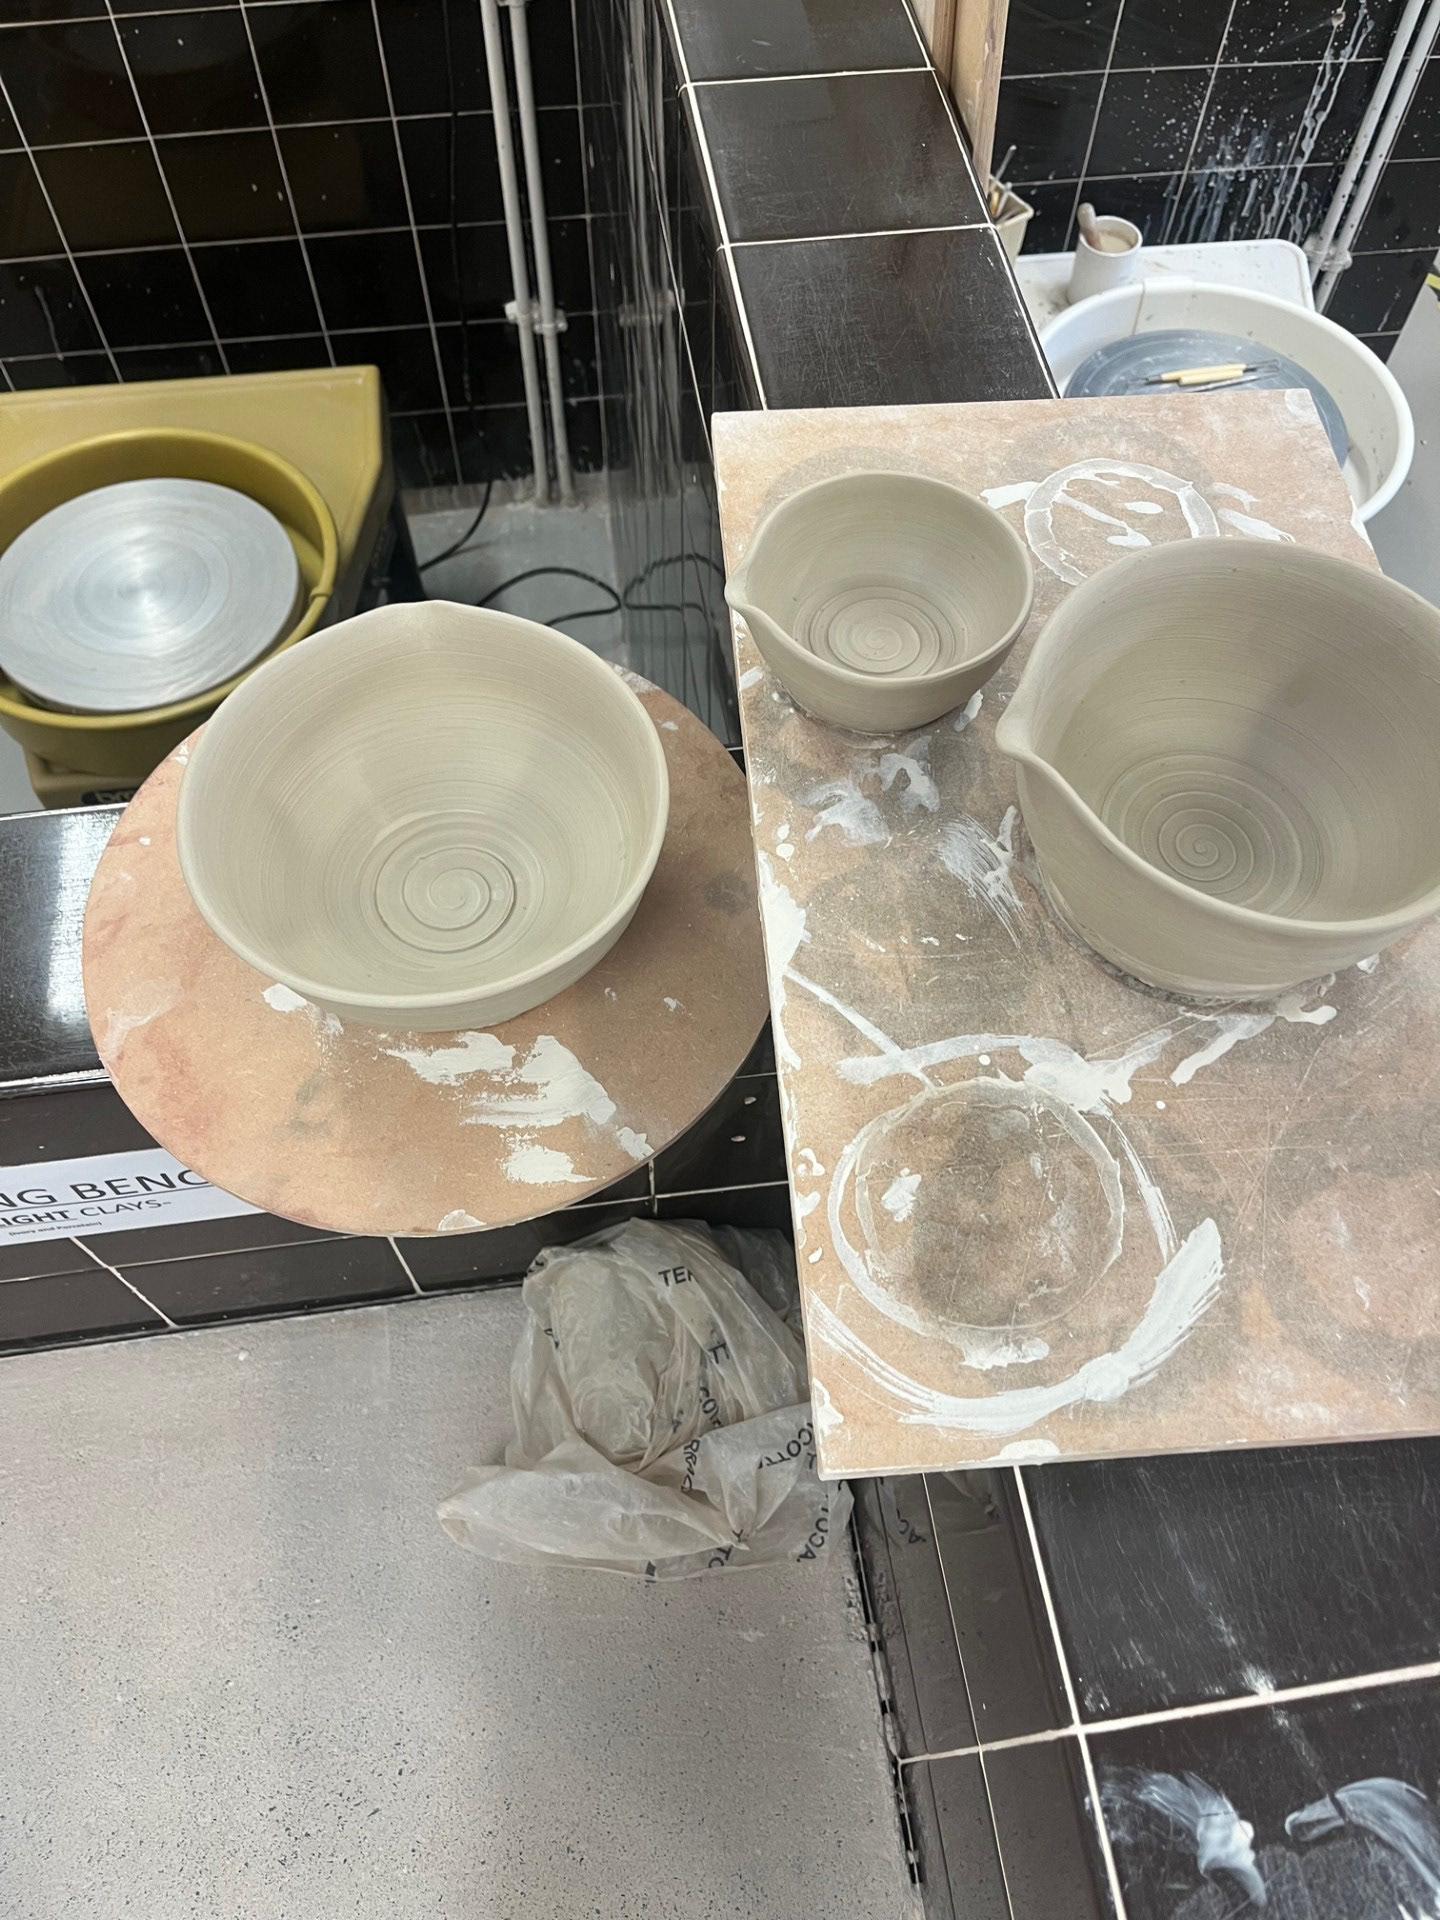
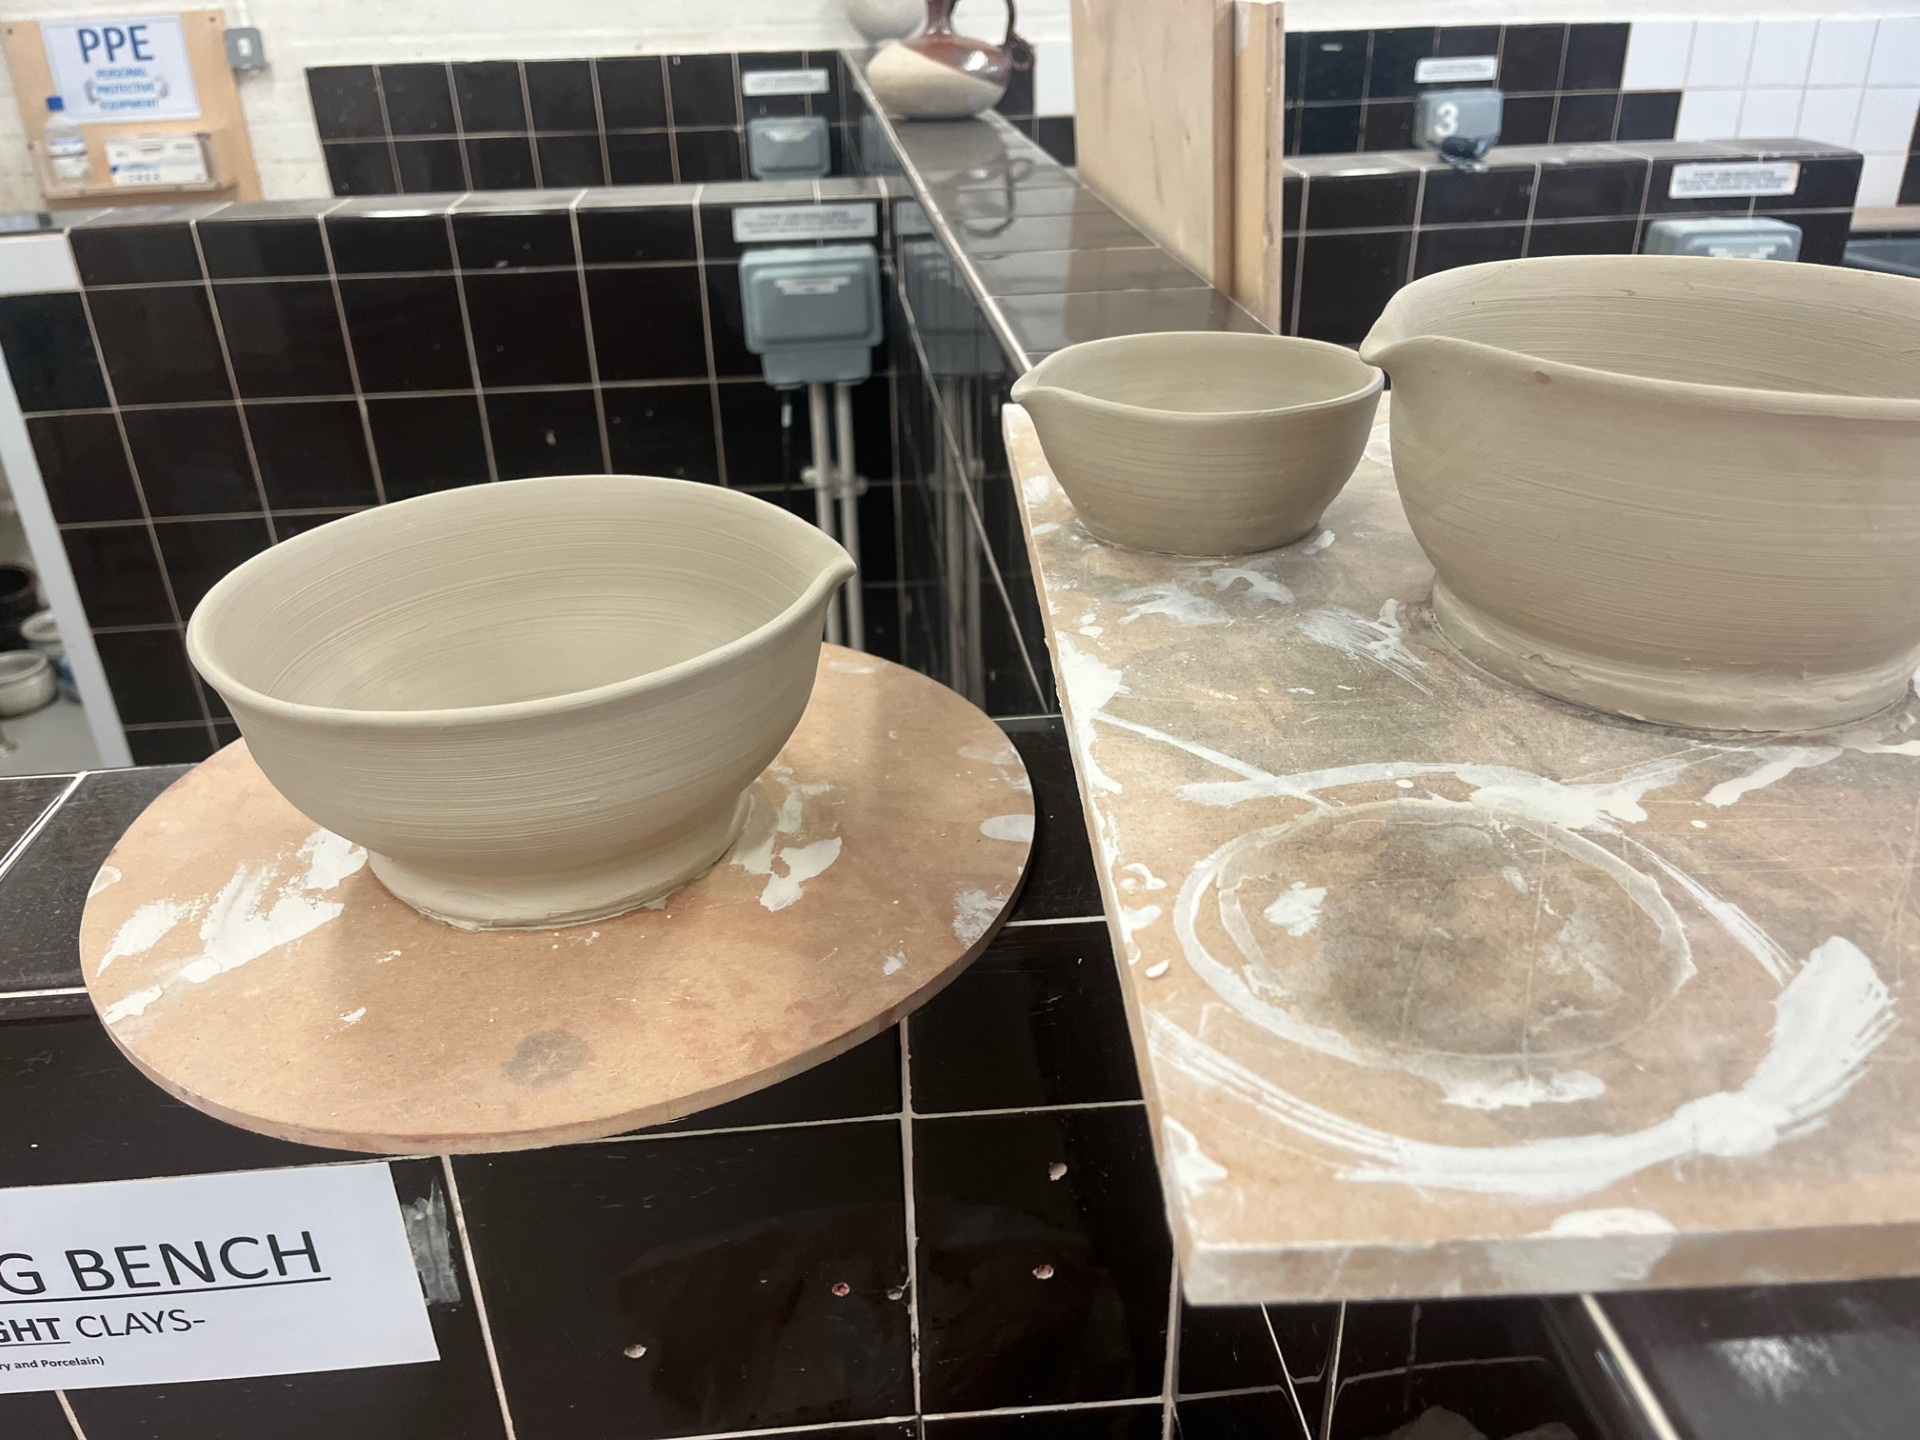
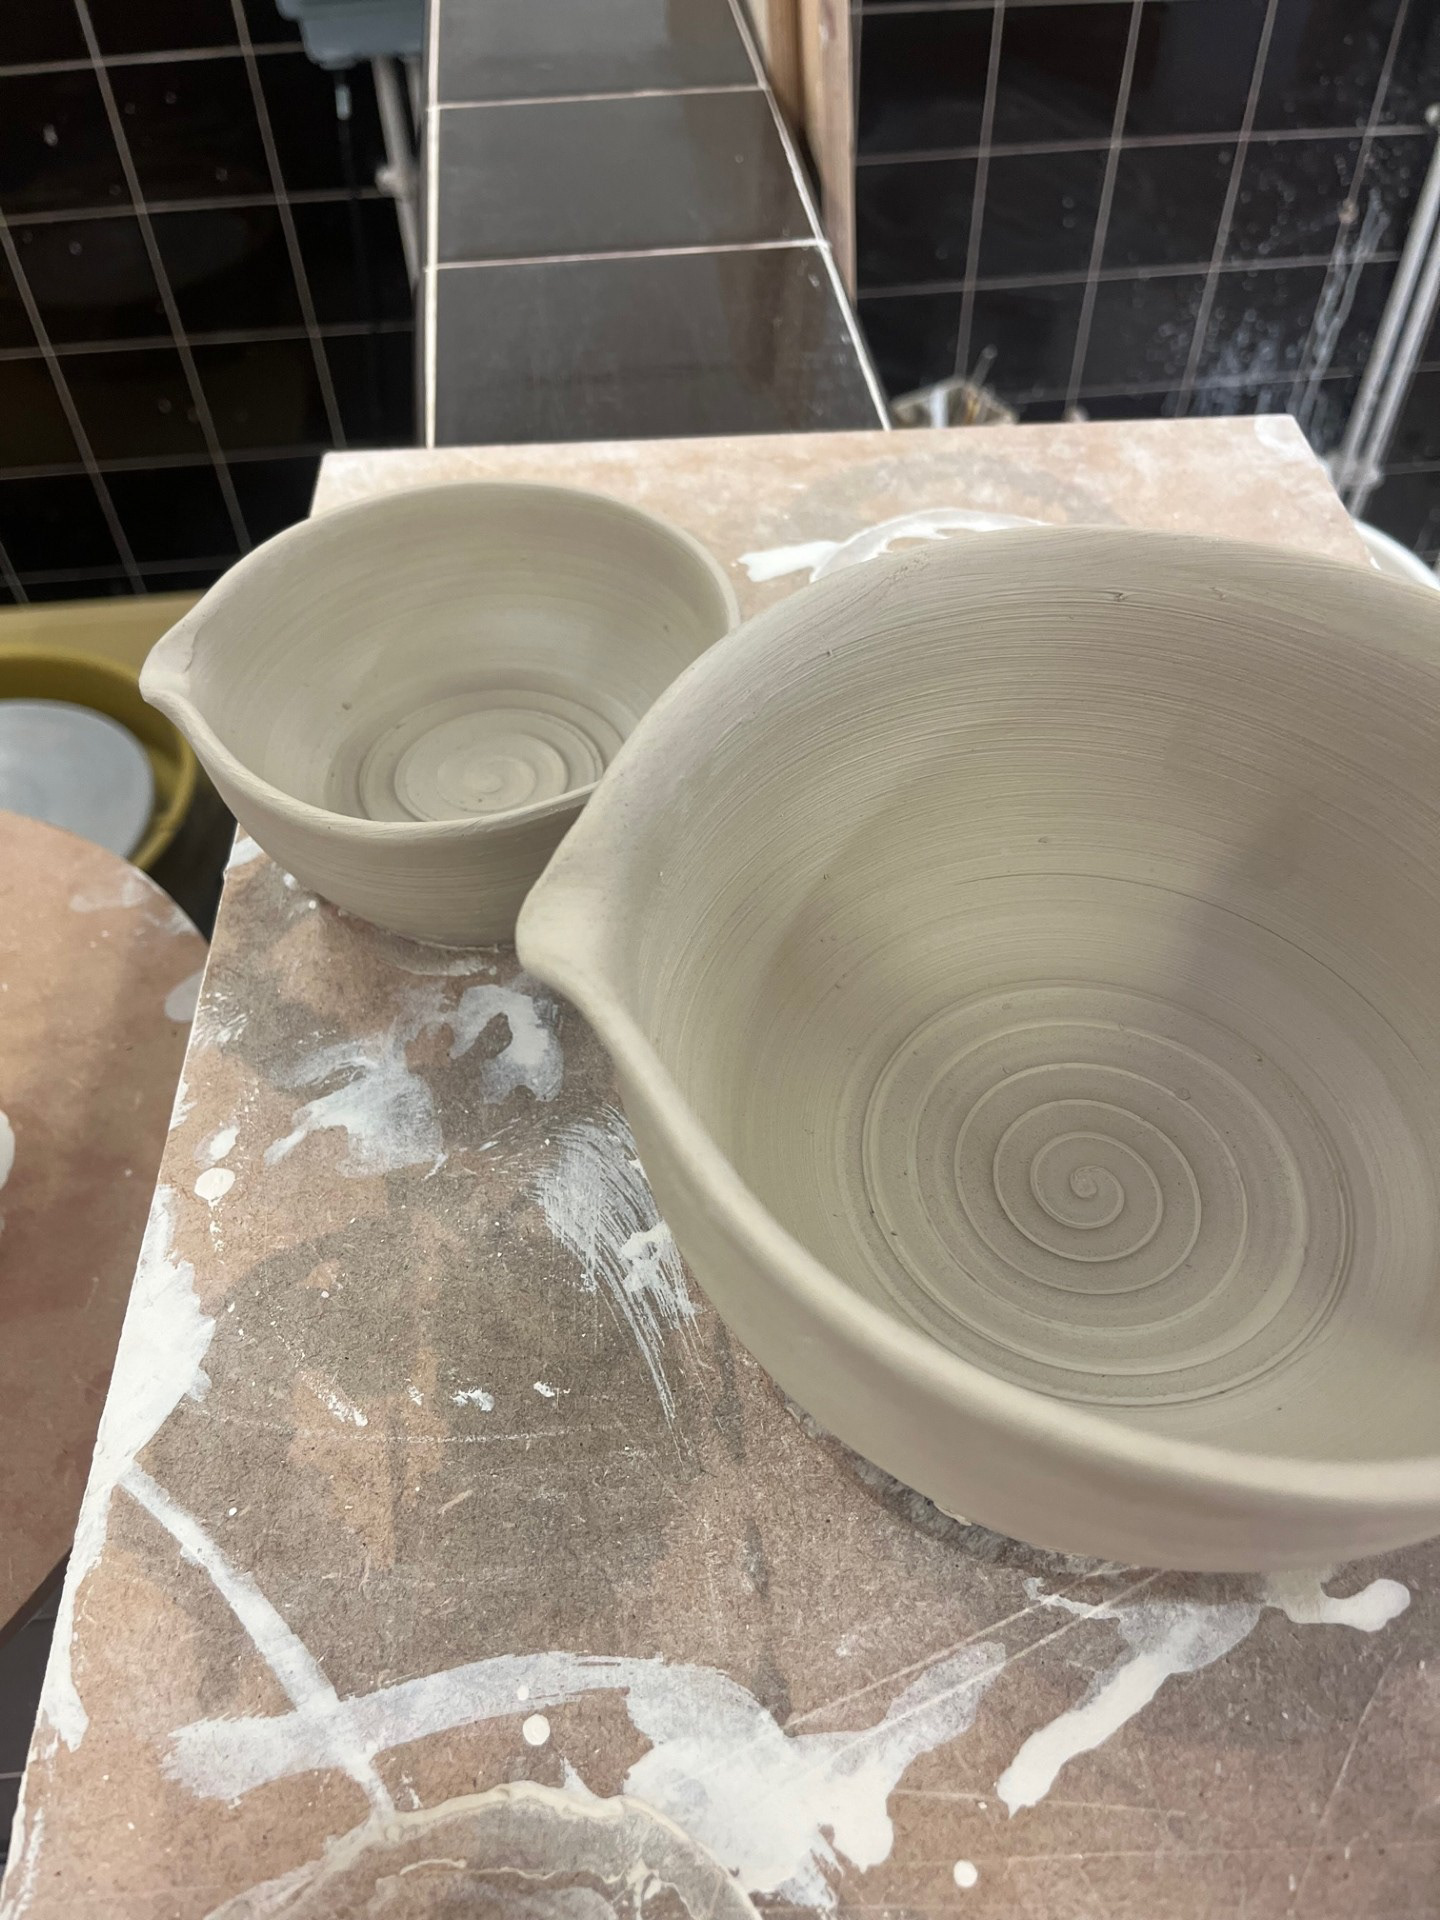
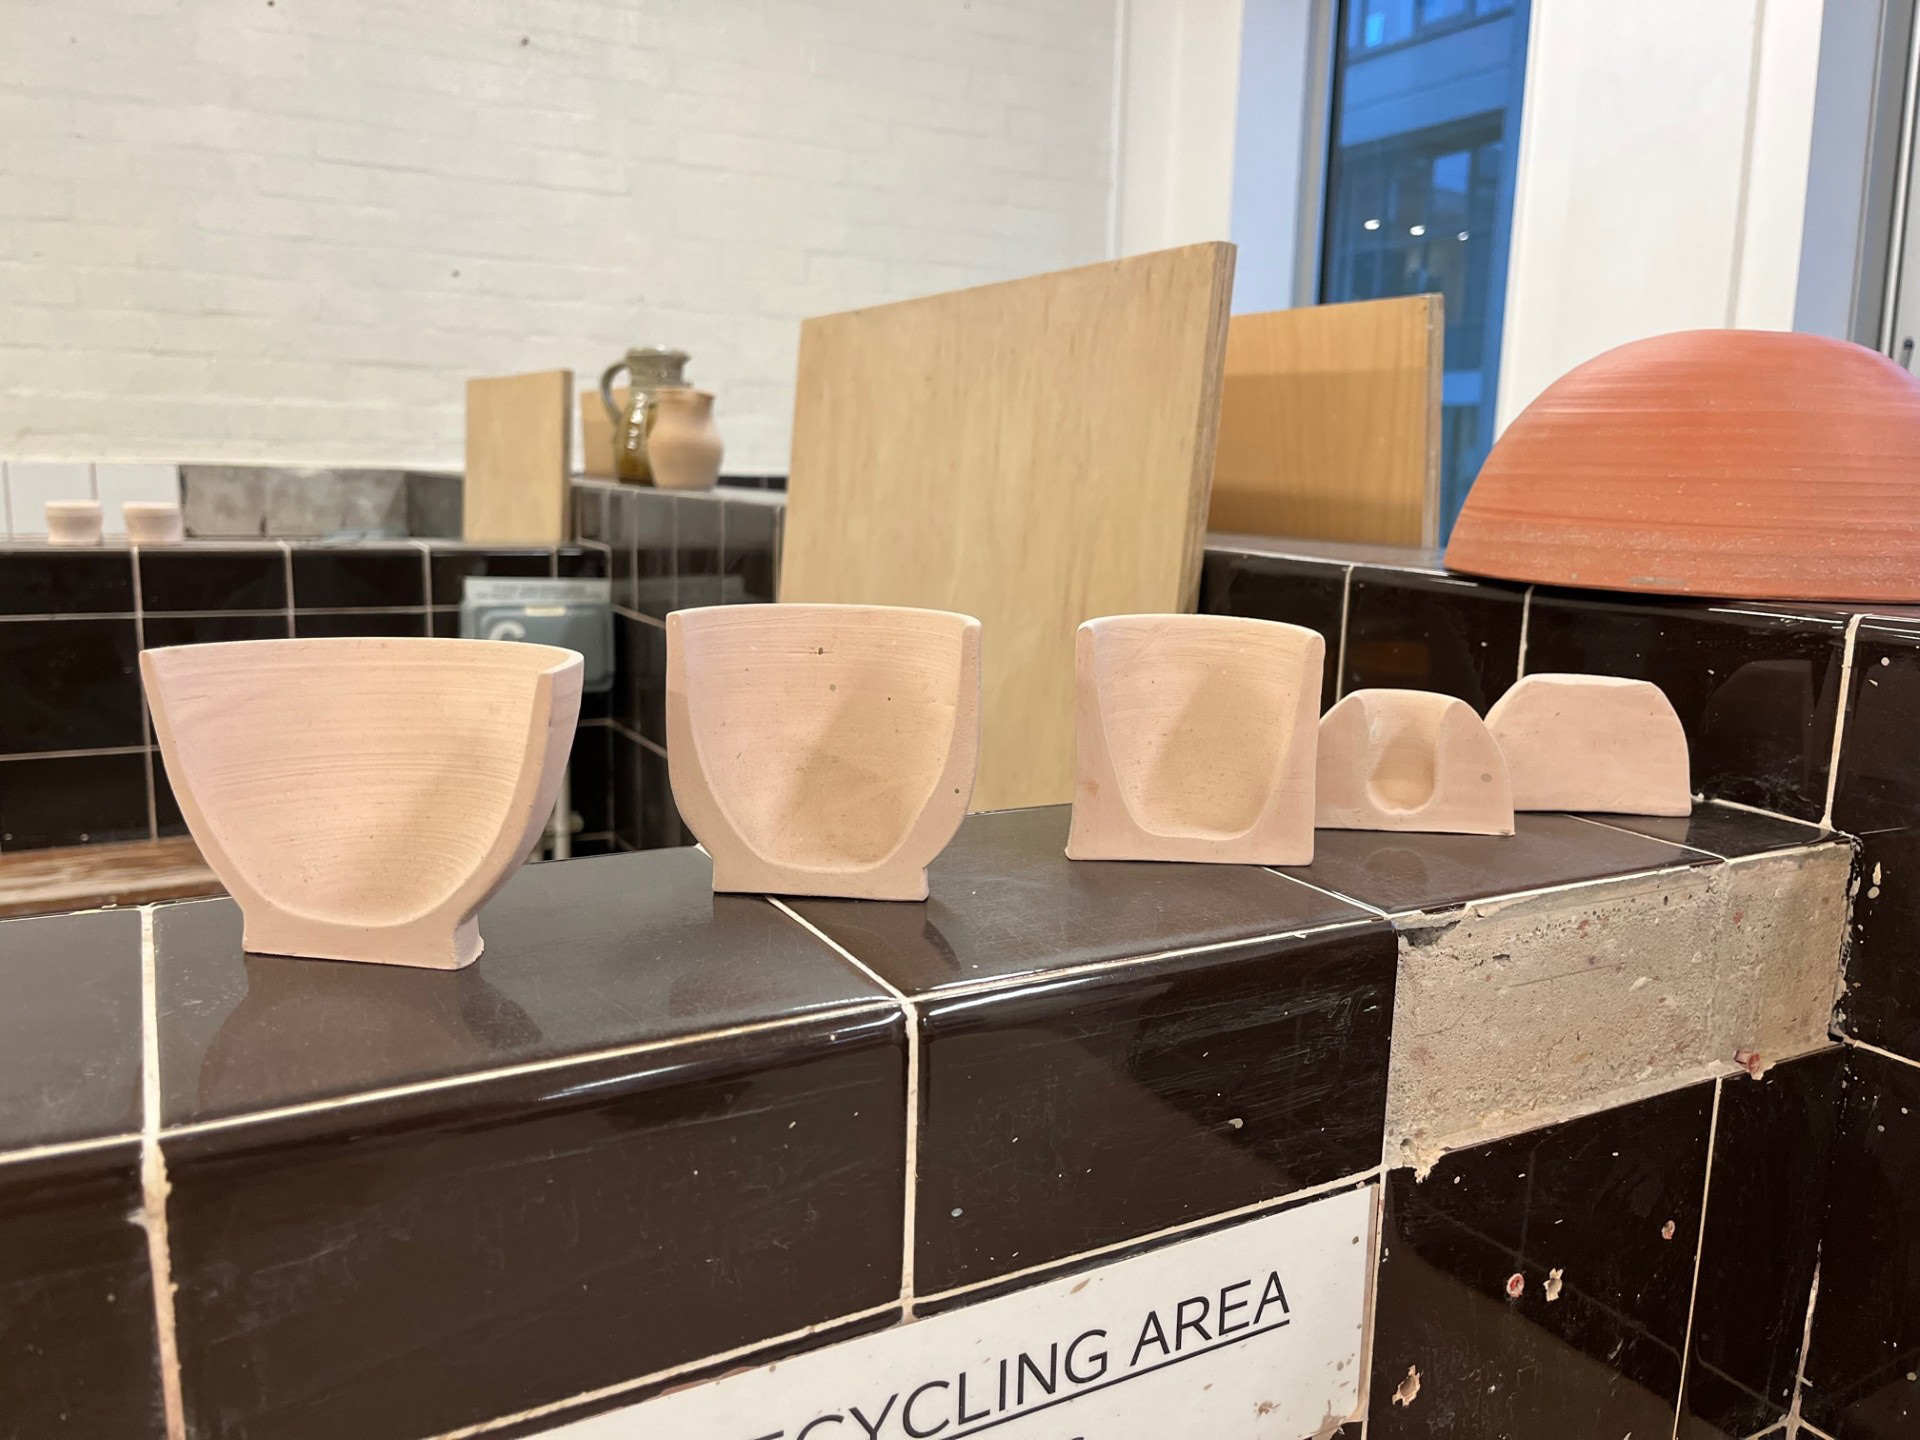
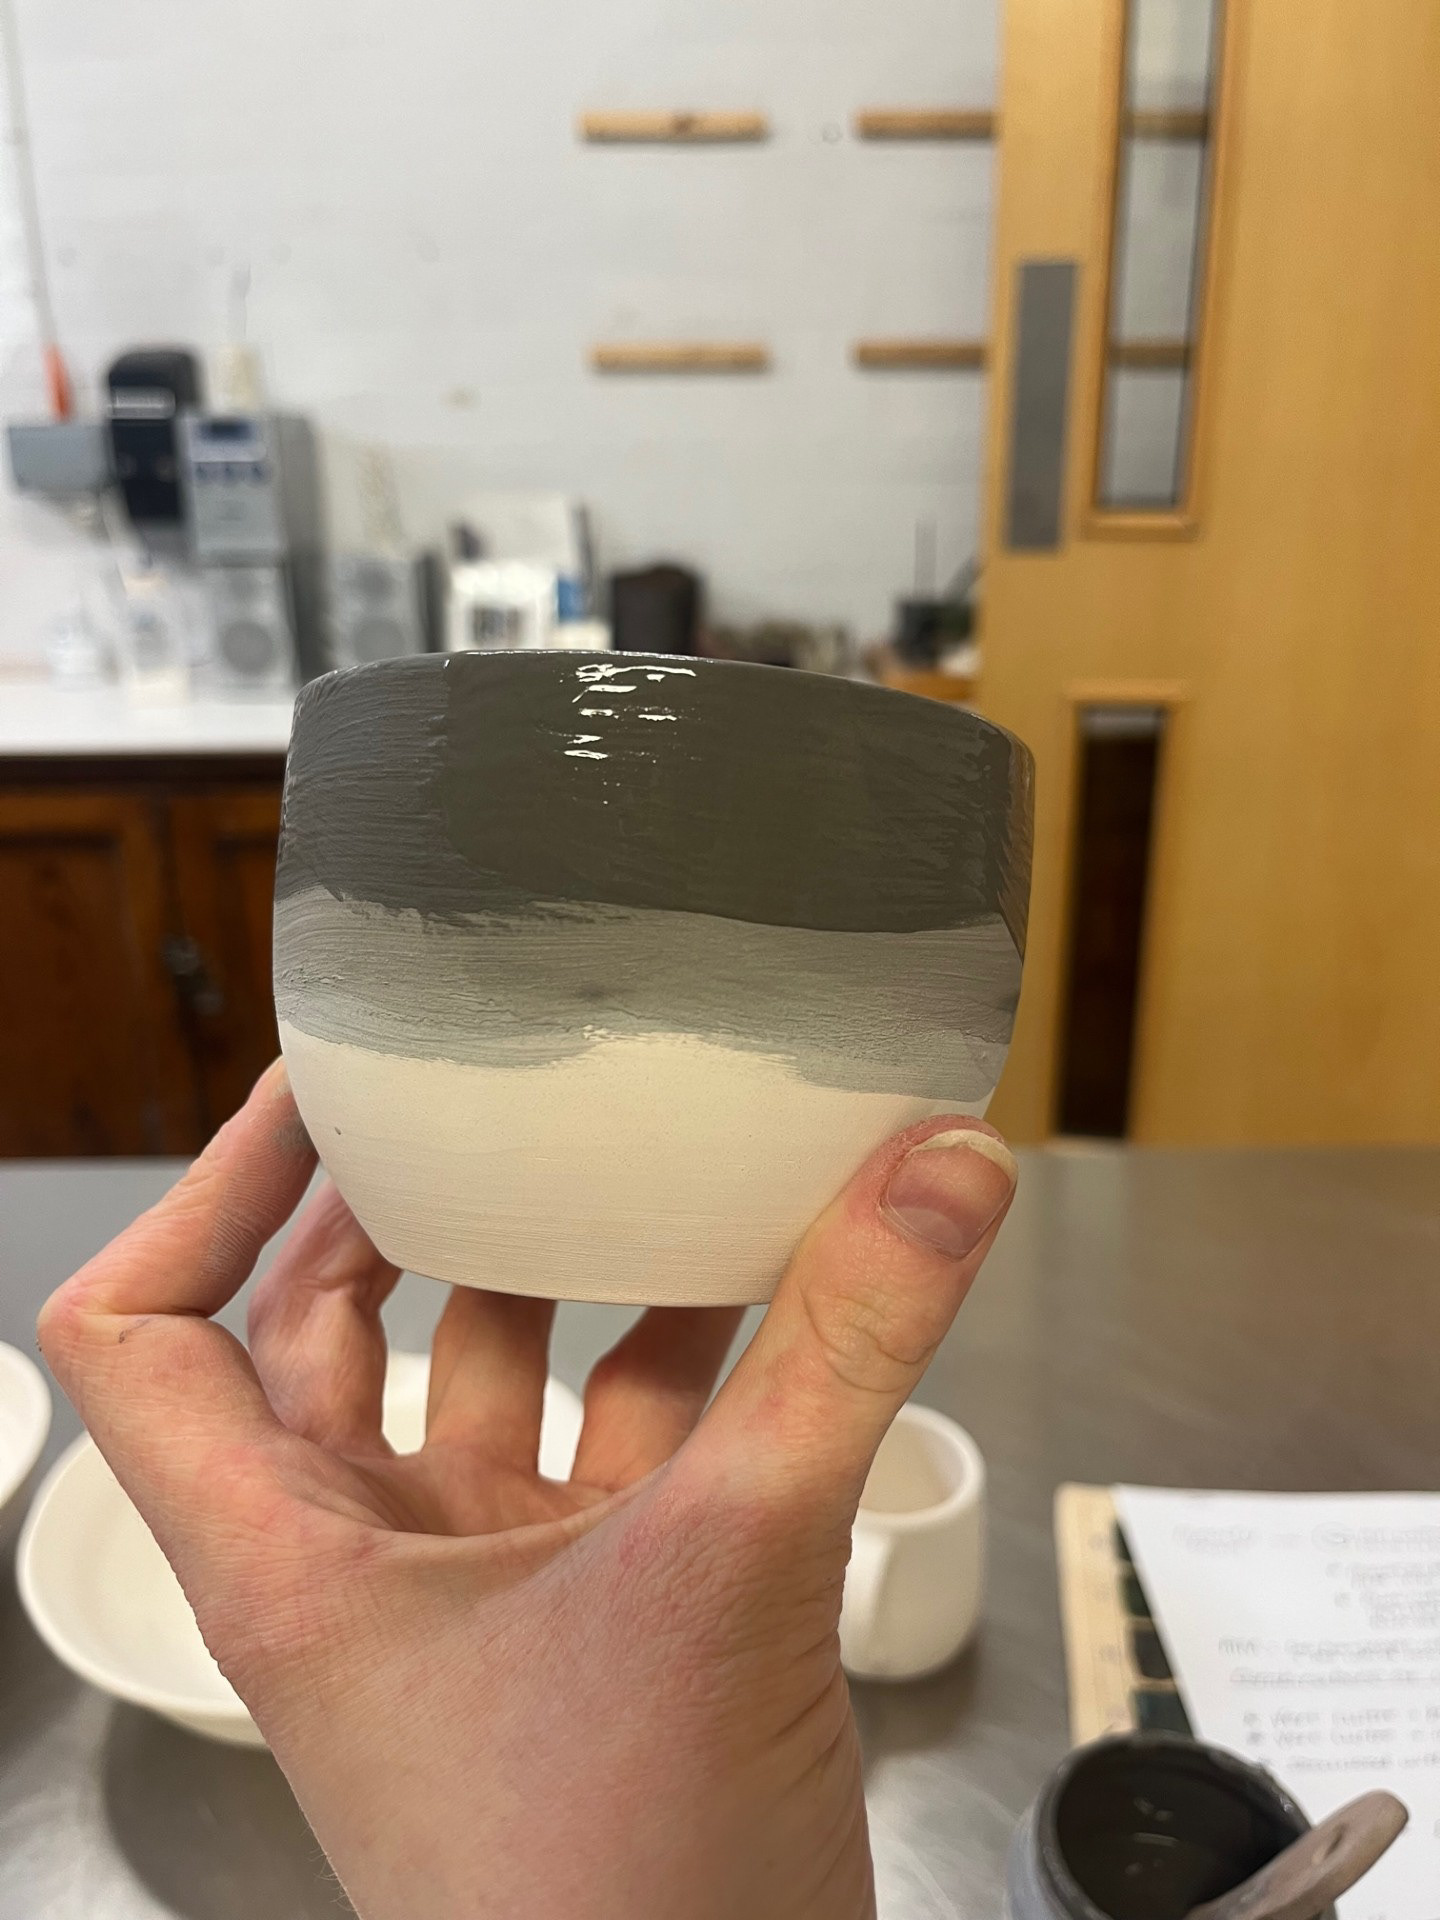
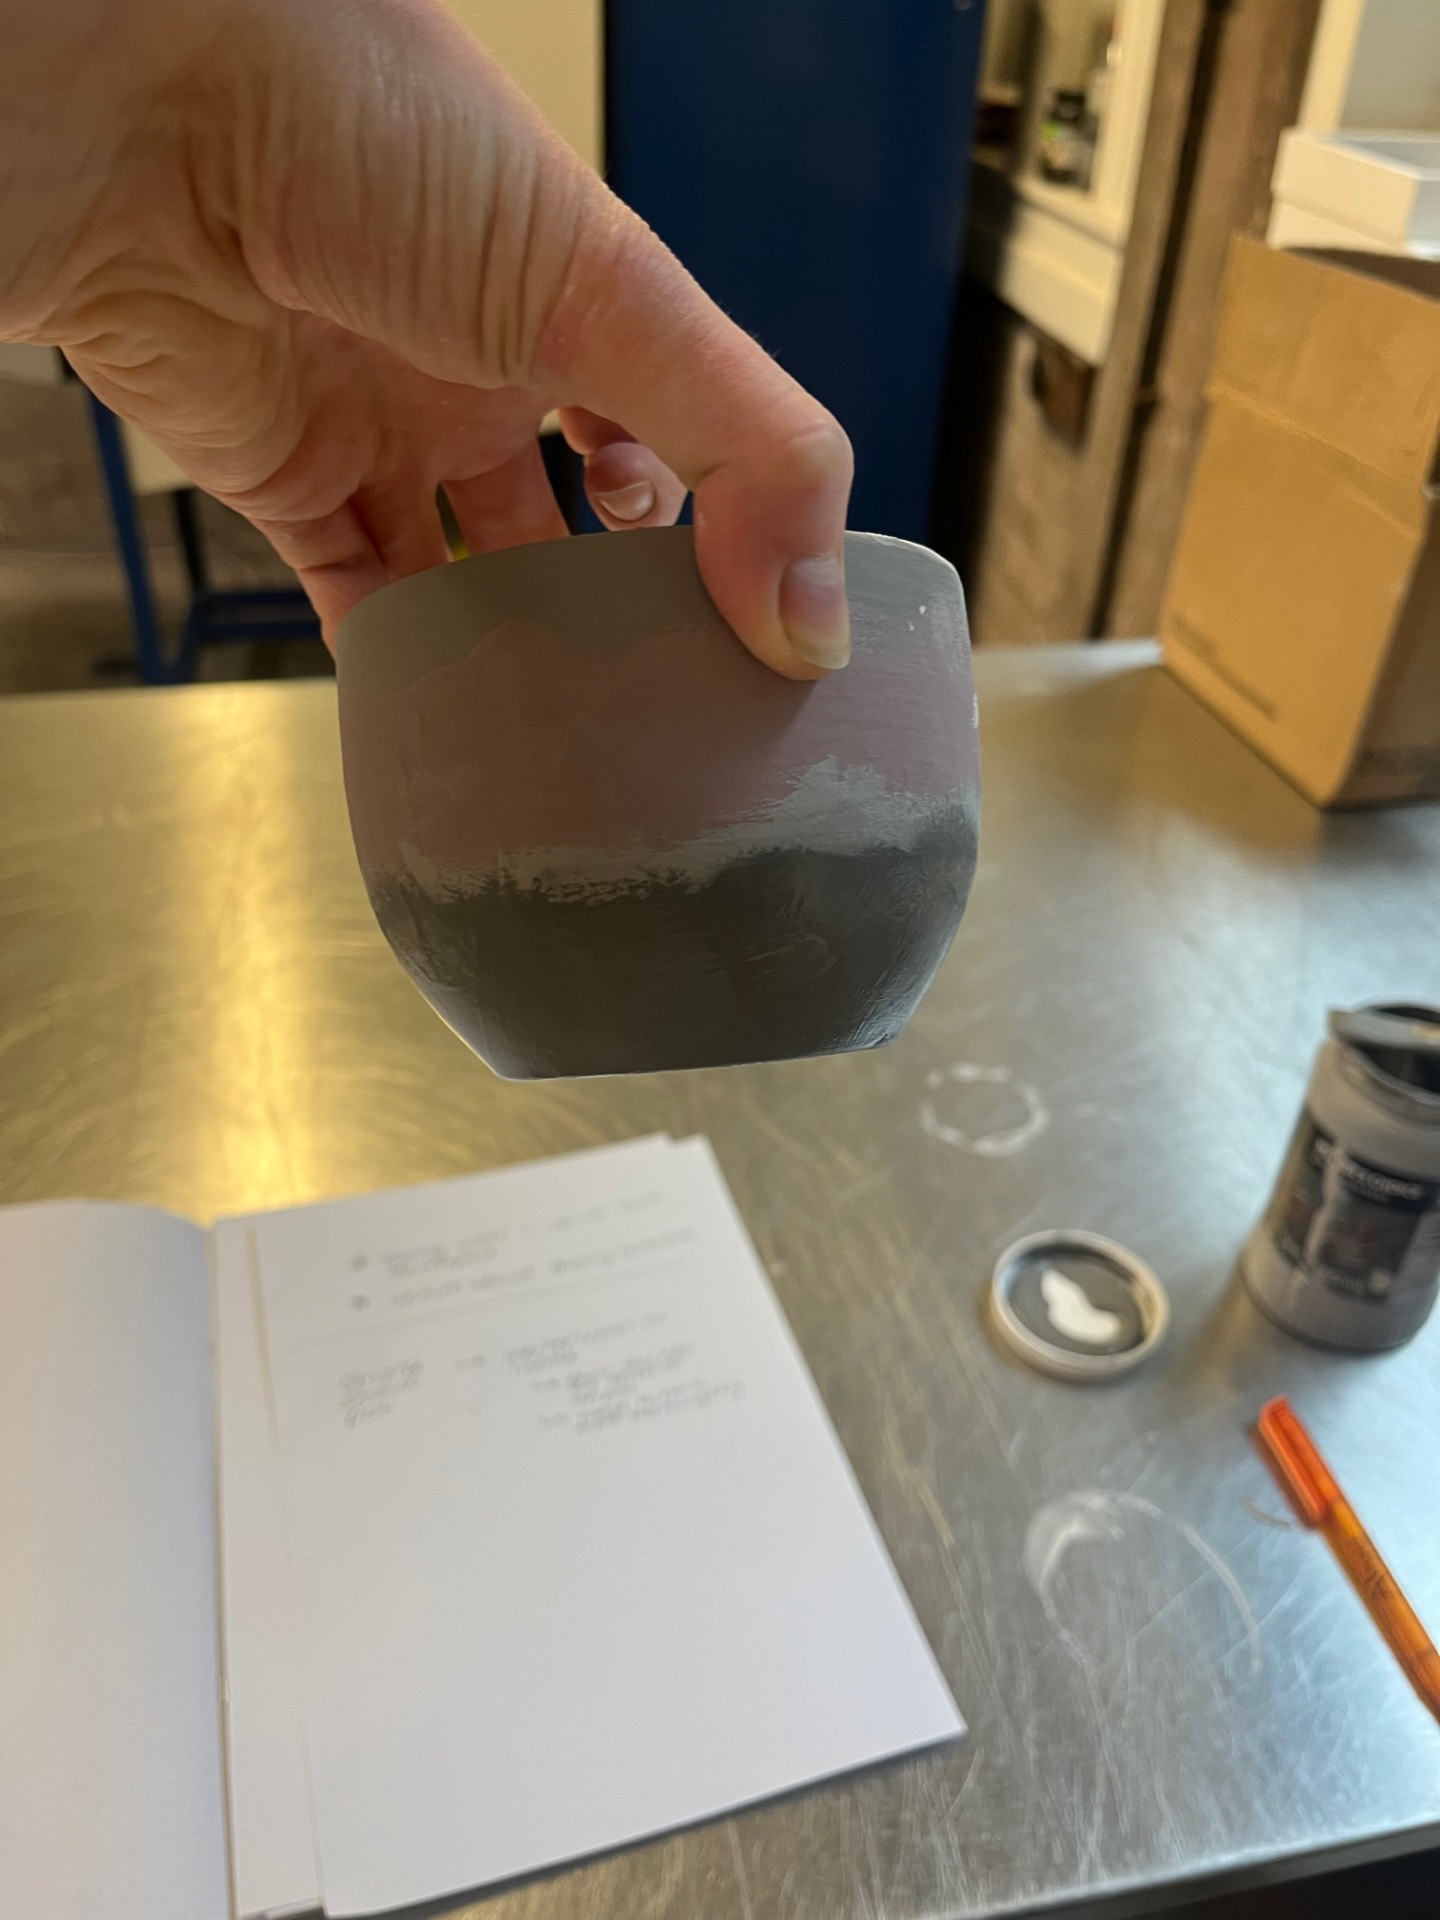
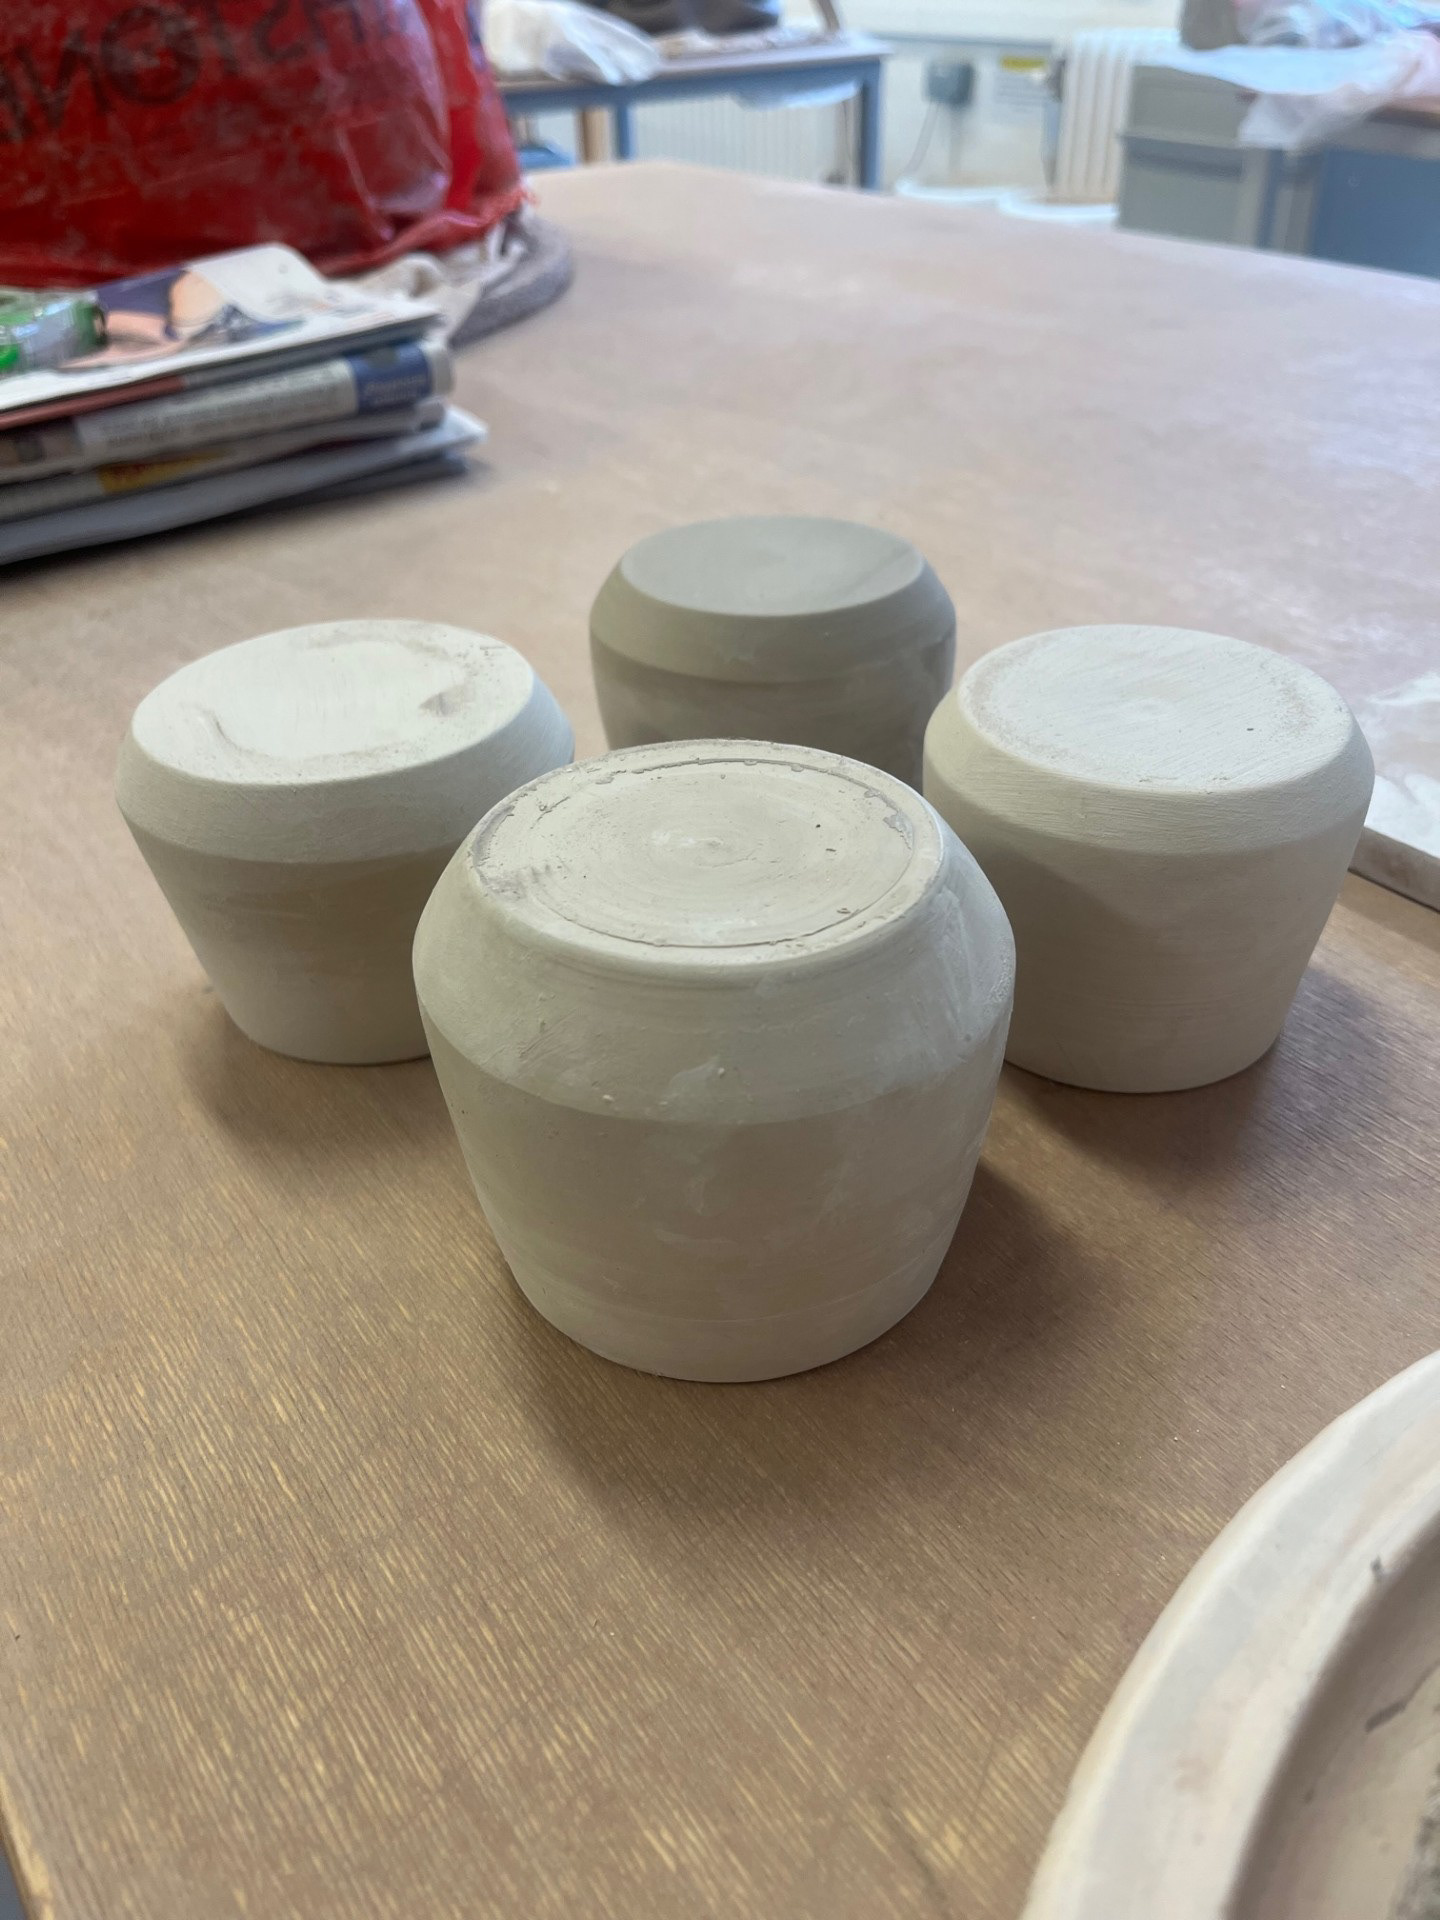
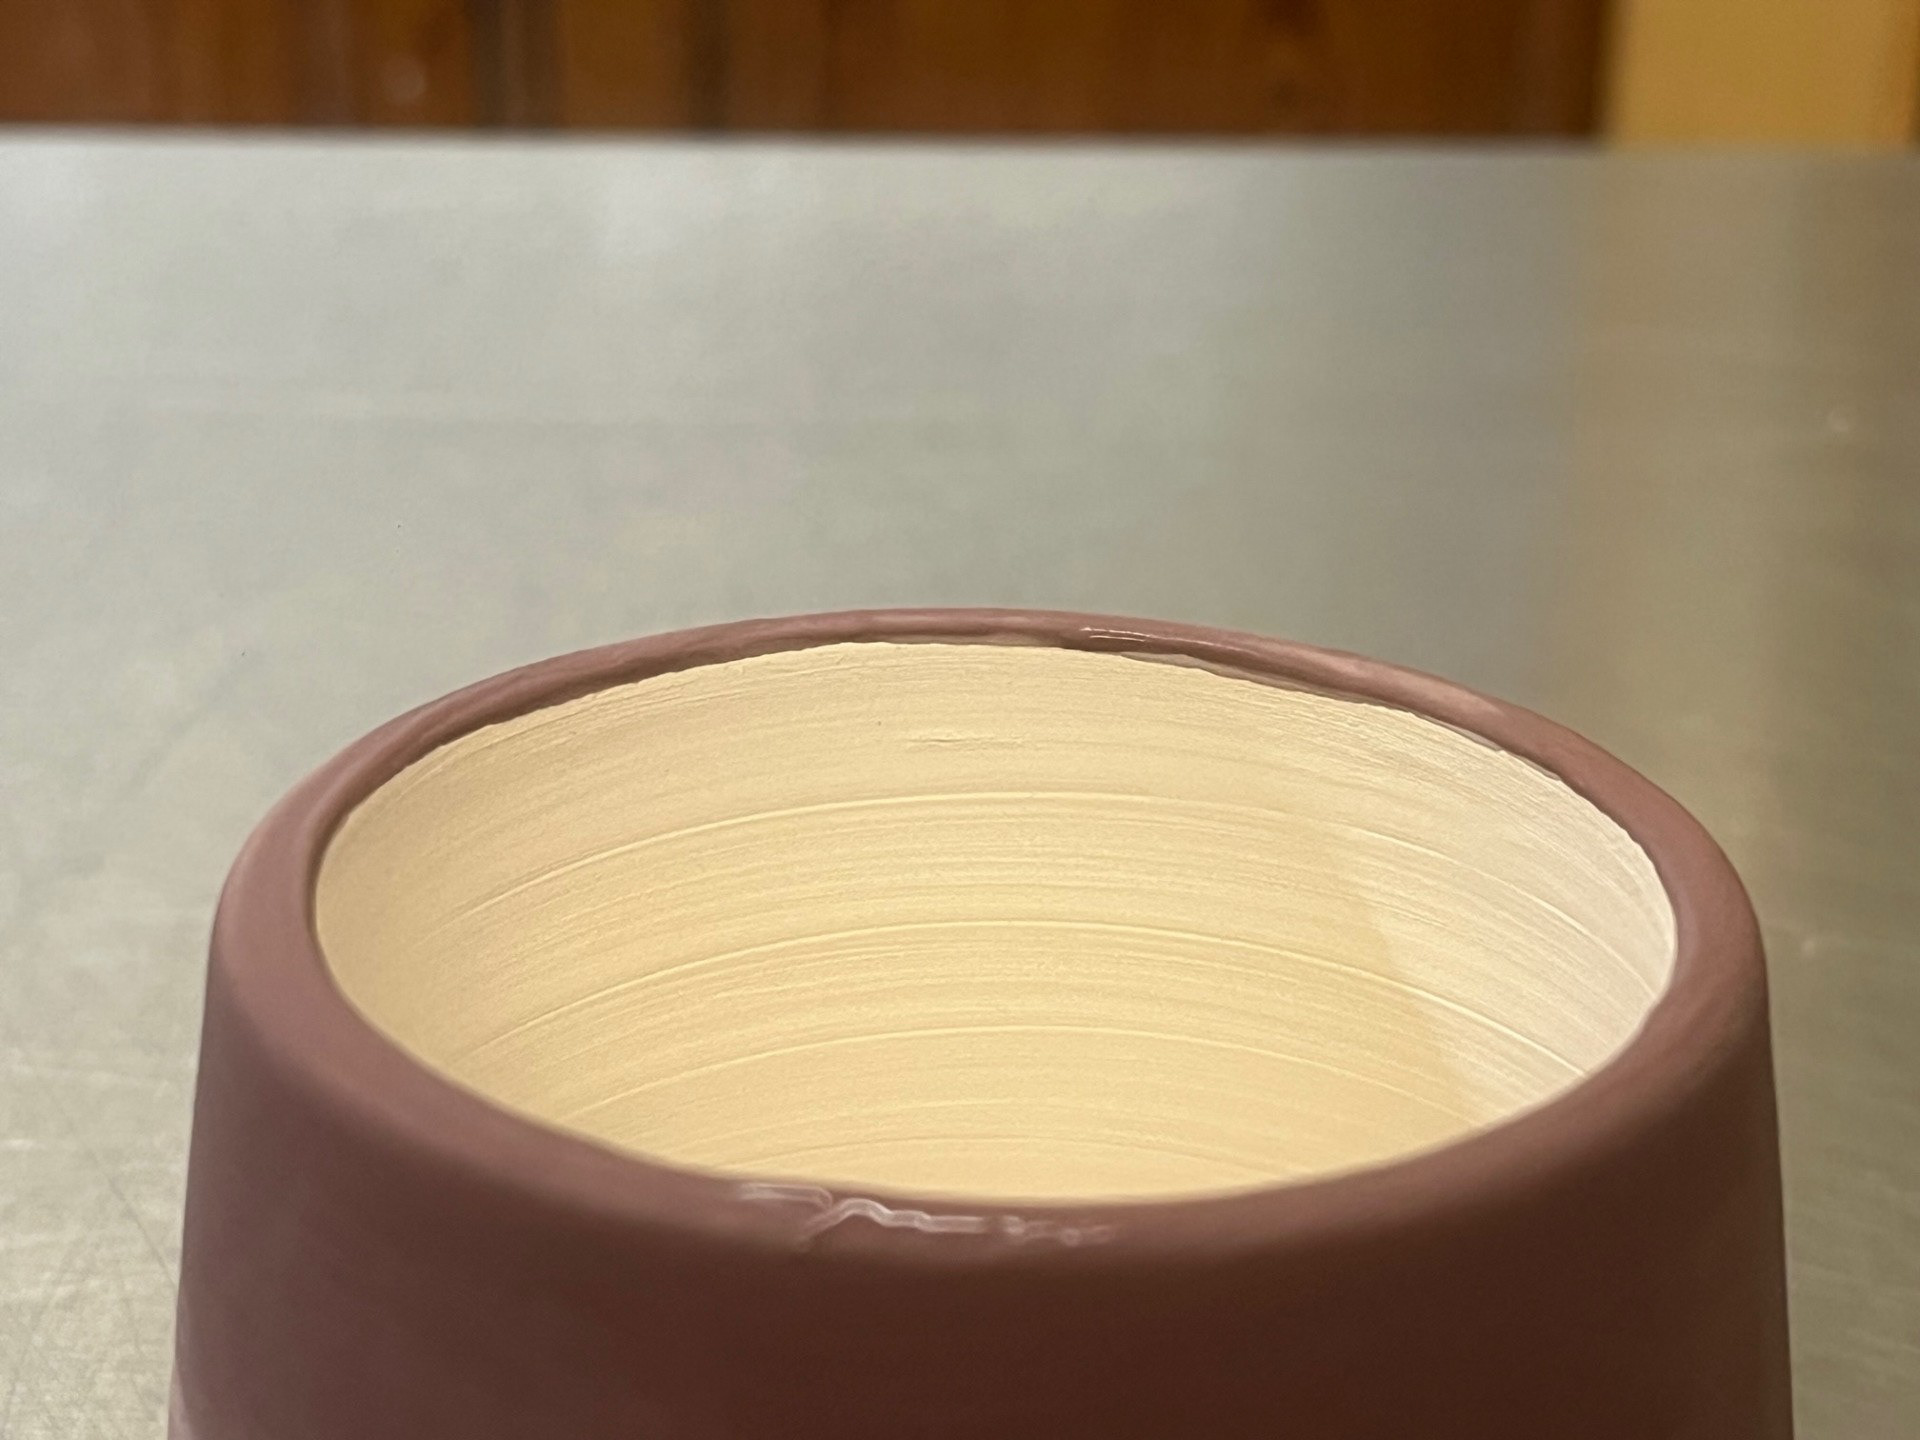
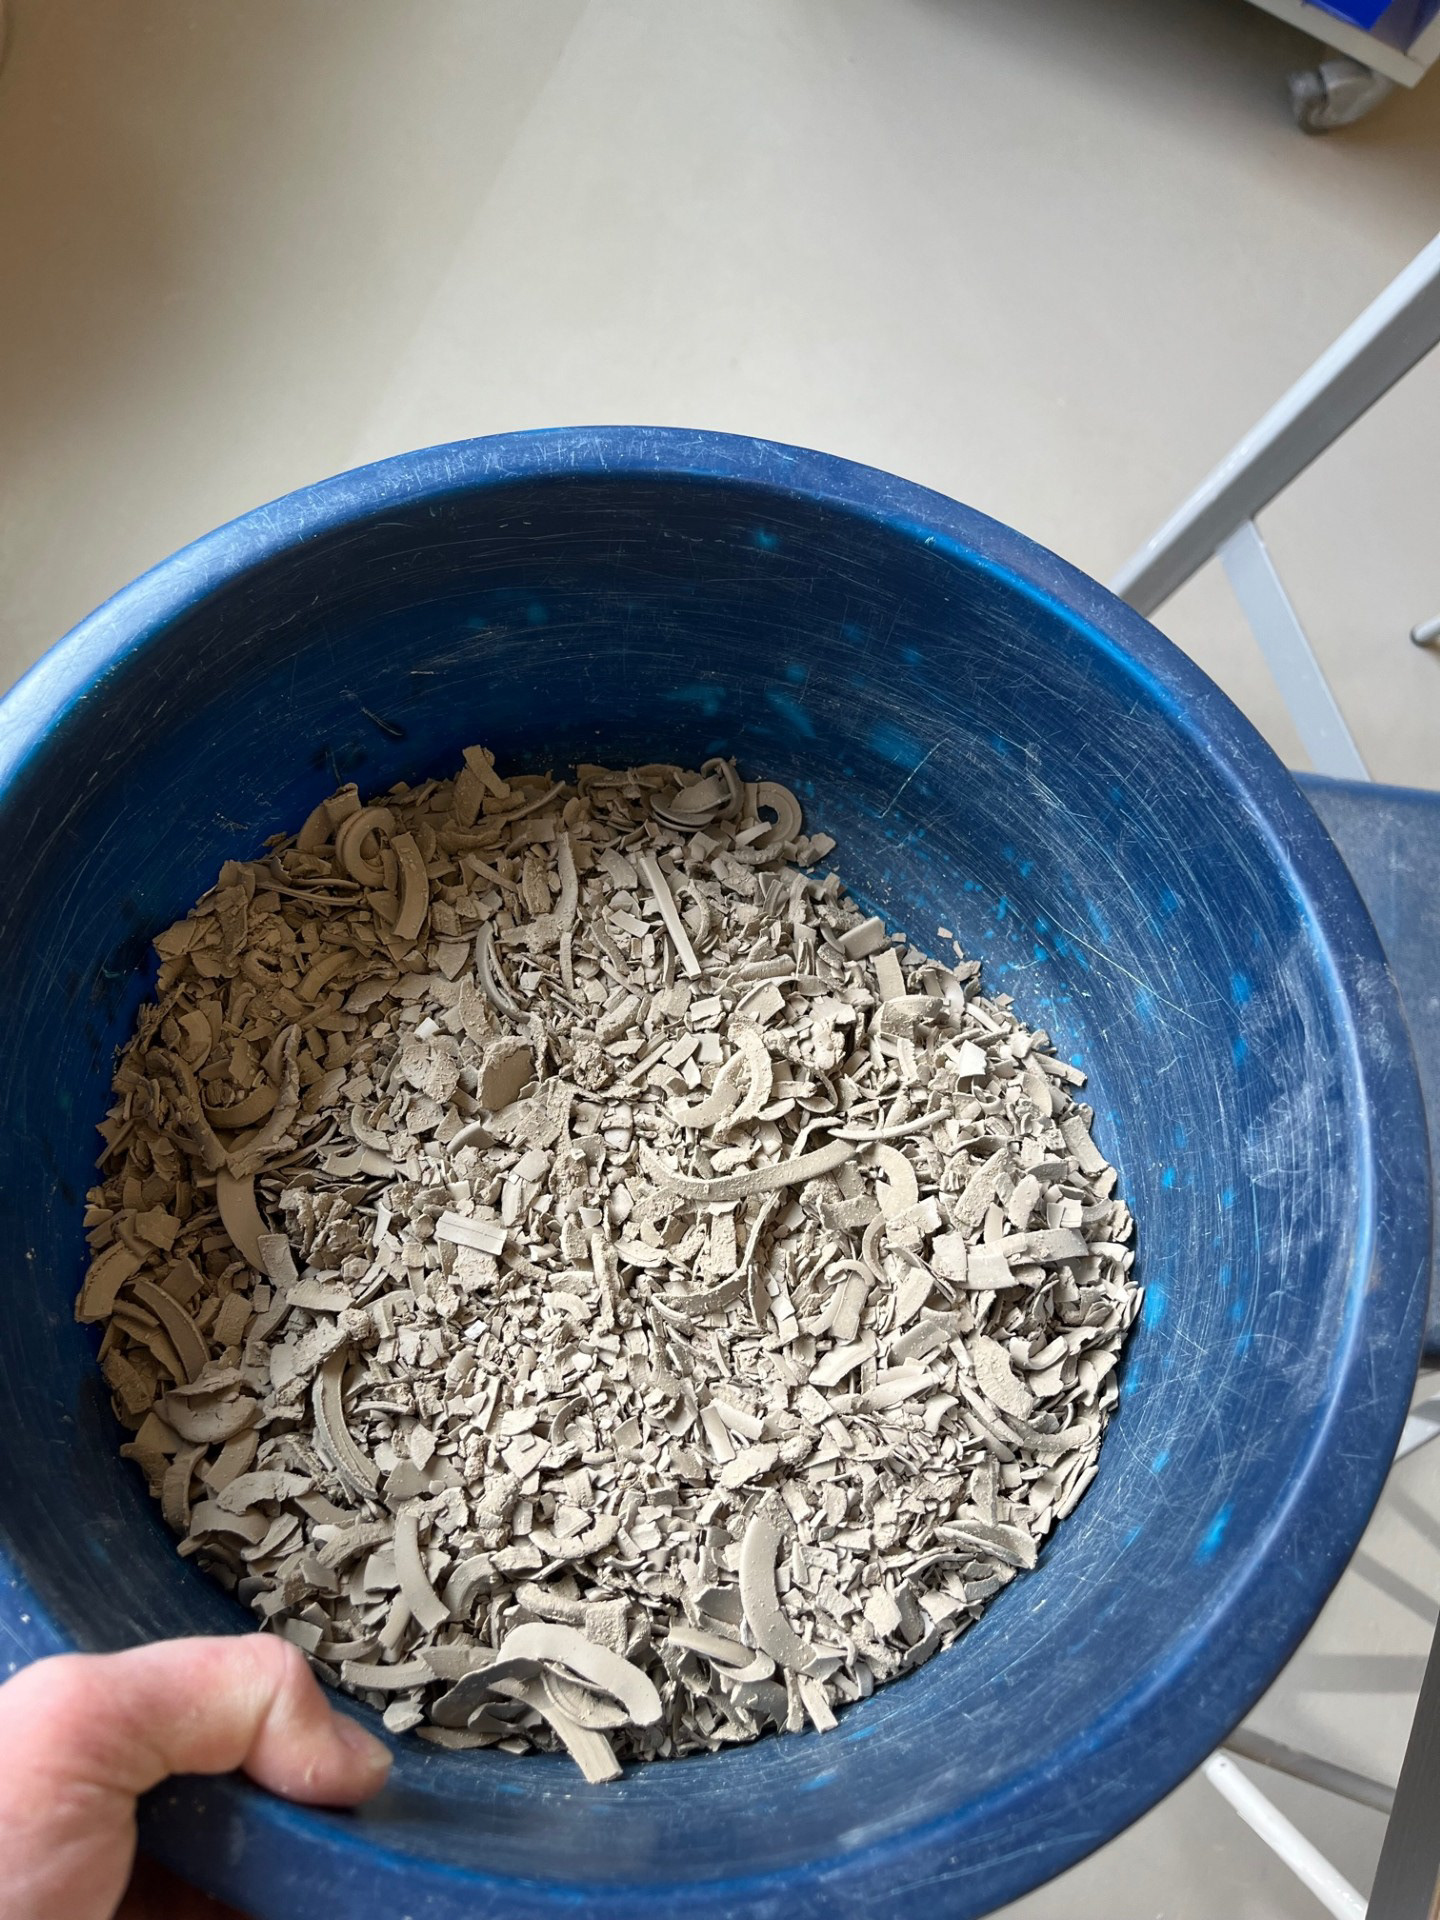
Fore these initial vessels, I wedged and made around 4 clay balls that all increased in size. my rationale behind this was that I wanted to push myself and just see what I could create. I knew that I wanted to make an eclectic range of vessels so I decided to just dive right in. When I made the first vessel, I chose to experiment by putting a spiral in the base when I was throwing the piece. I actually really liked this so I chose to continue it in the rest of the vessels as a small design flare. Once I had thrown the pieces, I was looking at them and I thought that there was something missing. I asked myself, what could I add to make them more suited to their function. I chose to add small spouts to most of the vessels because I though they would be good for resting a spoon on as well as allowing things to be poured out of it - linking to the idea of sharing food.
Reflection on Process:
As a maker, I respond really well to dedicating sessions to just free making because it allows my creativity to flow. I find that when I just go with the flow of the process, I create styles of vessels that I would never imagine trying to design. I believe that when I do sessions like this, it is as if I am sketching through making. I really enjoy putting the investigation and ideation through the actual material instead of severing the connection by putting it on paper first. Making these vessels with the notion of using them for facilitating connection behind them made this process so much more interesting to me. The idea that I could make vessels for people to conversate over was really what was driving me, it exited me. I think that this notion is something that really drove me and I would definitely like to take this through to the rest of my project.
In relation to the technical side, I am really proud of these vessels because they were of a much higher quality than I thought I could produce after having a long Christmas break. although aesthetically these look good, I still think that there are a lot of things that I can work on with regards to my technique as one thing that I couldn't achieve was consistency. In the following weeks. I intend to further work on repeatability and consistency, really trying to focus on making the work that I produce of a much higher quality; which is something that is my main goal for preparing me to enter the design world.
WEEK 1: 27/01/25, Monday
After proposing my idea of using mingei and folk craft as an inspiration for my design ethos, I have identified a few elements that I will be taking forward into my own practical work. In the last project, I put a big focus on the need for my objects to be in the realm of personal meaningful objects for the consumer. From reading about mingei, I was able to realise that the only true way to have my objects enter this realm is longevity. To make my objects structurally sound and durable so that they can last the test of time and grace through people, memories and generations. Something that I intend to also work towards is linking the idea of creating purely utilitarian objects. This links to the longevity aspect as I want my objects to be used and experienced for as long as possible with a high ease of comfort and use. One other element that I will be linking in to my practical is the idea everyday objects and their potential ability to bring immense beauty into our everyday lives. Since the start of university, I have always said that no matter what I make, I will never allow it to be seen in a glass case. The idea of making objects to be used and experienced is so at the core of my design ethos and I think that everyday objects are a perfect opportunity for people to experience art and beauty through daily routines and rituals.
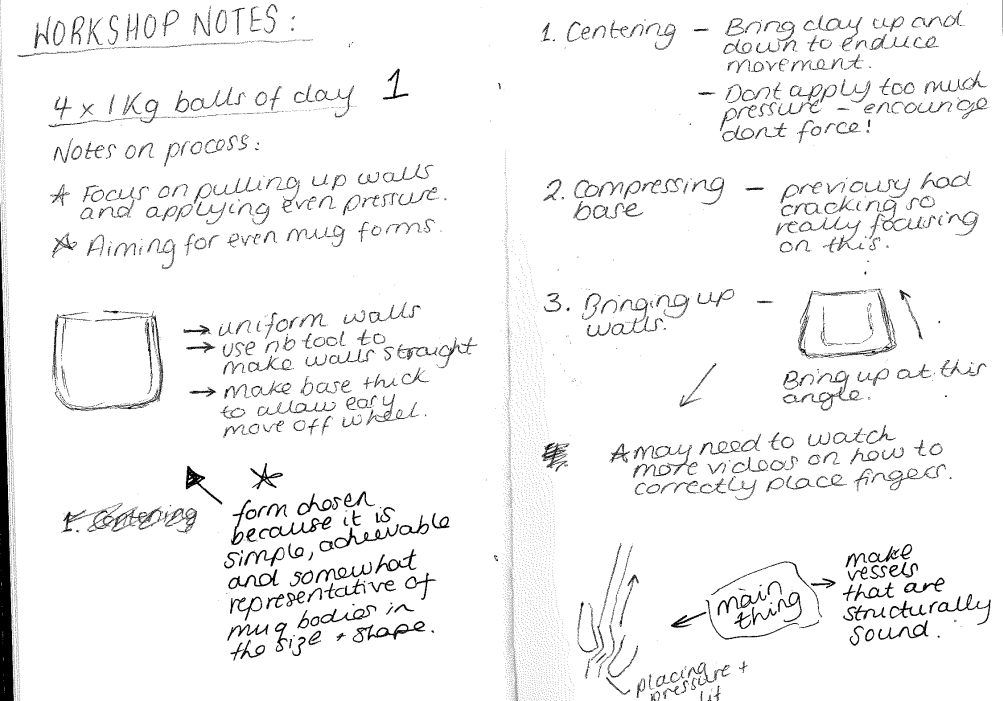
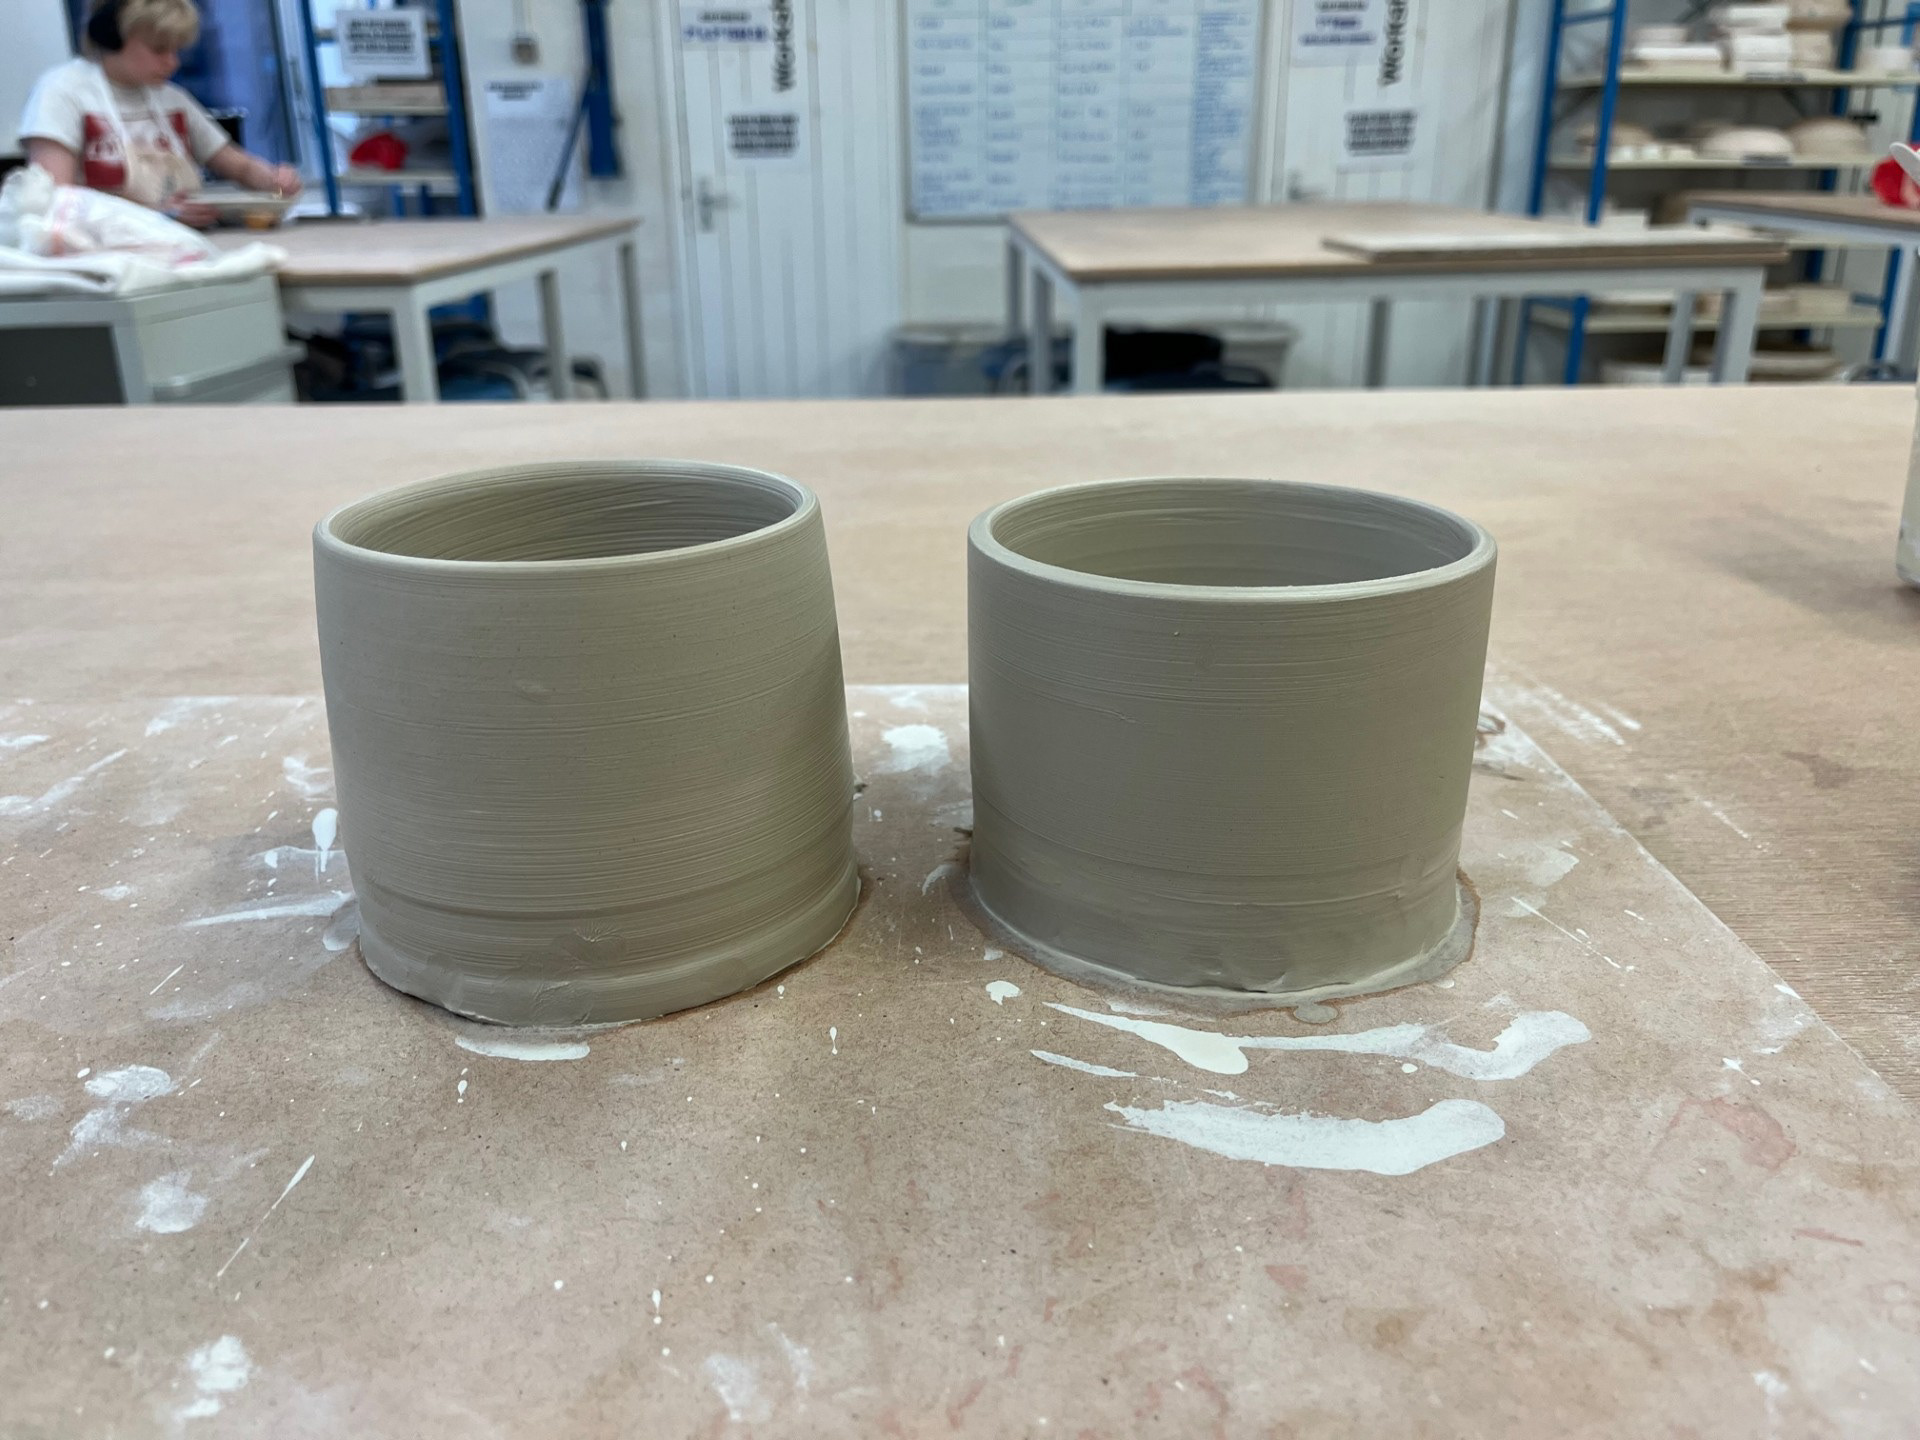
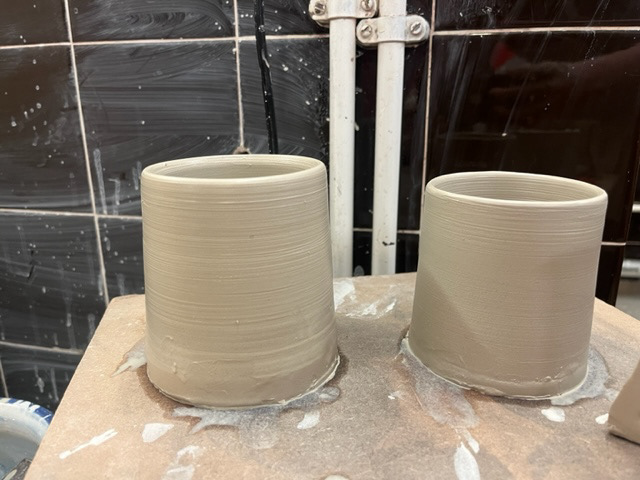
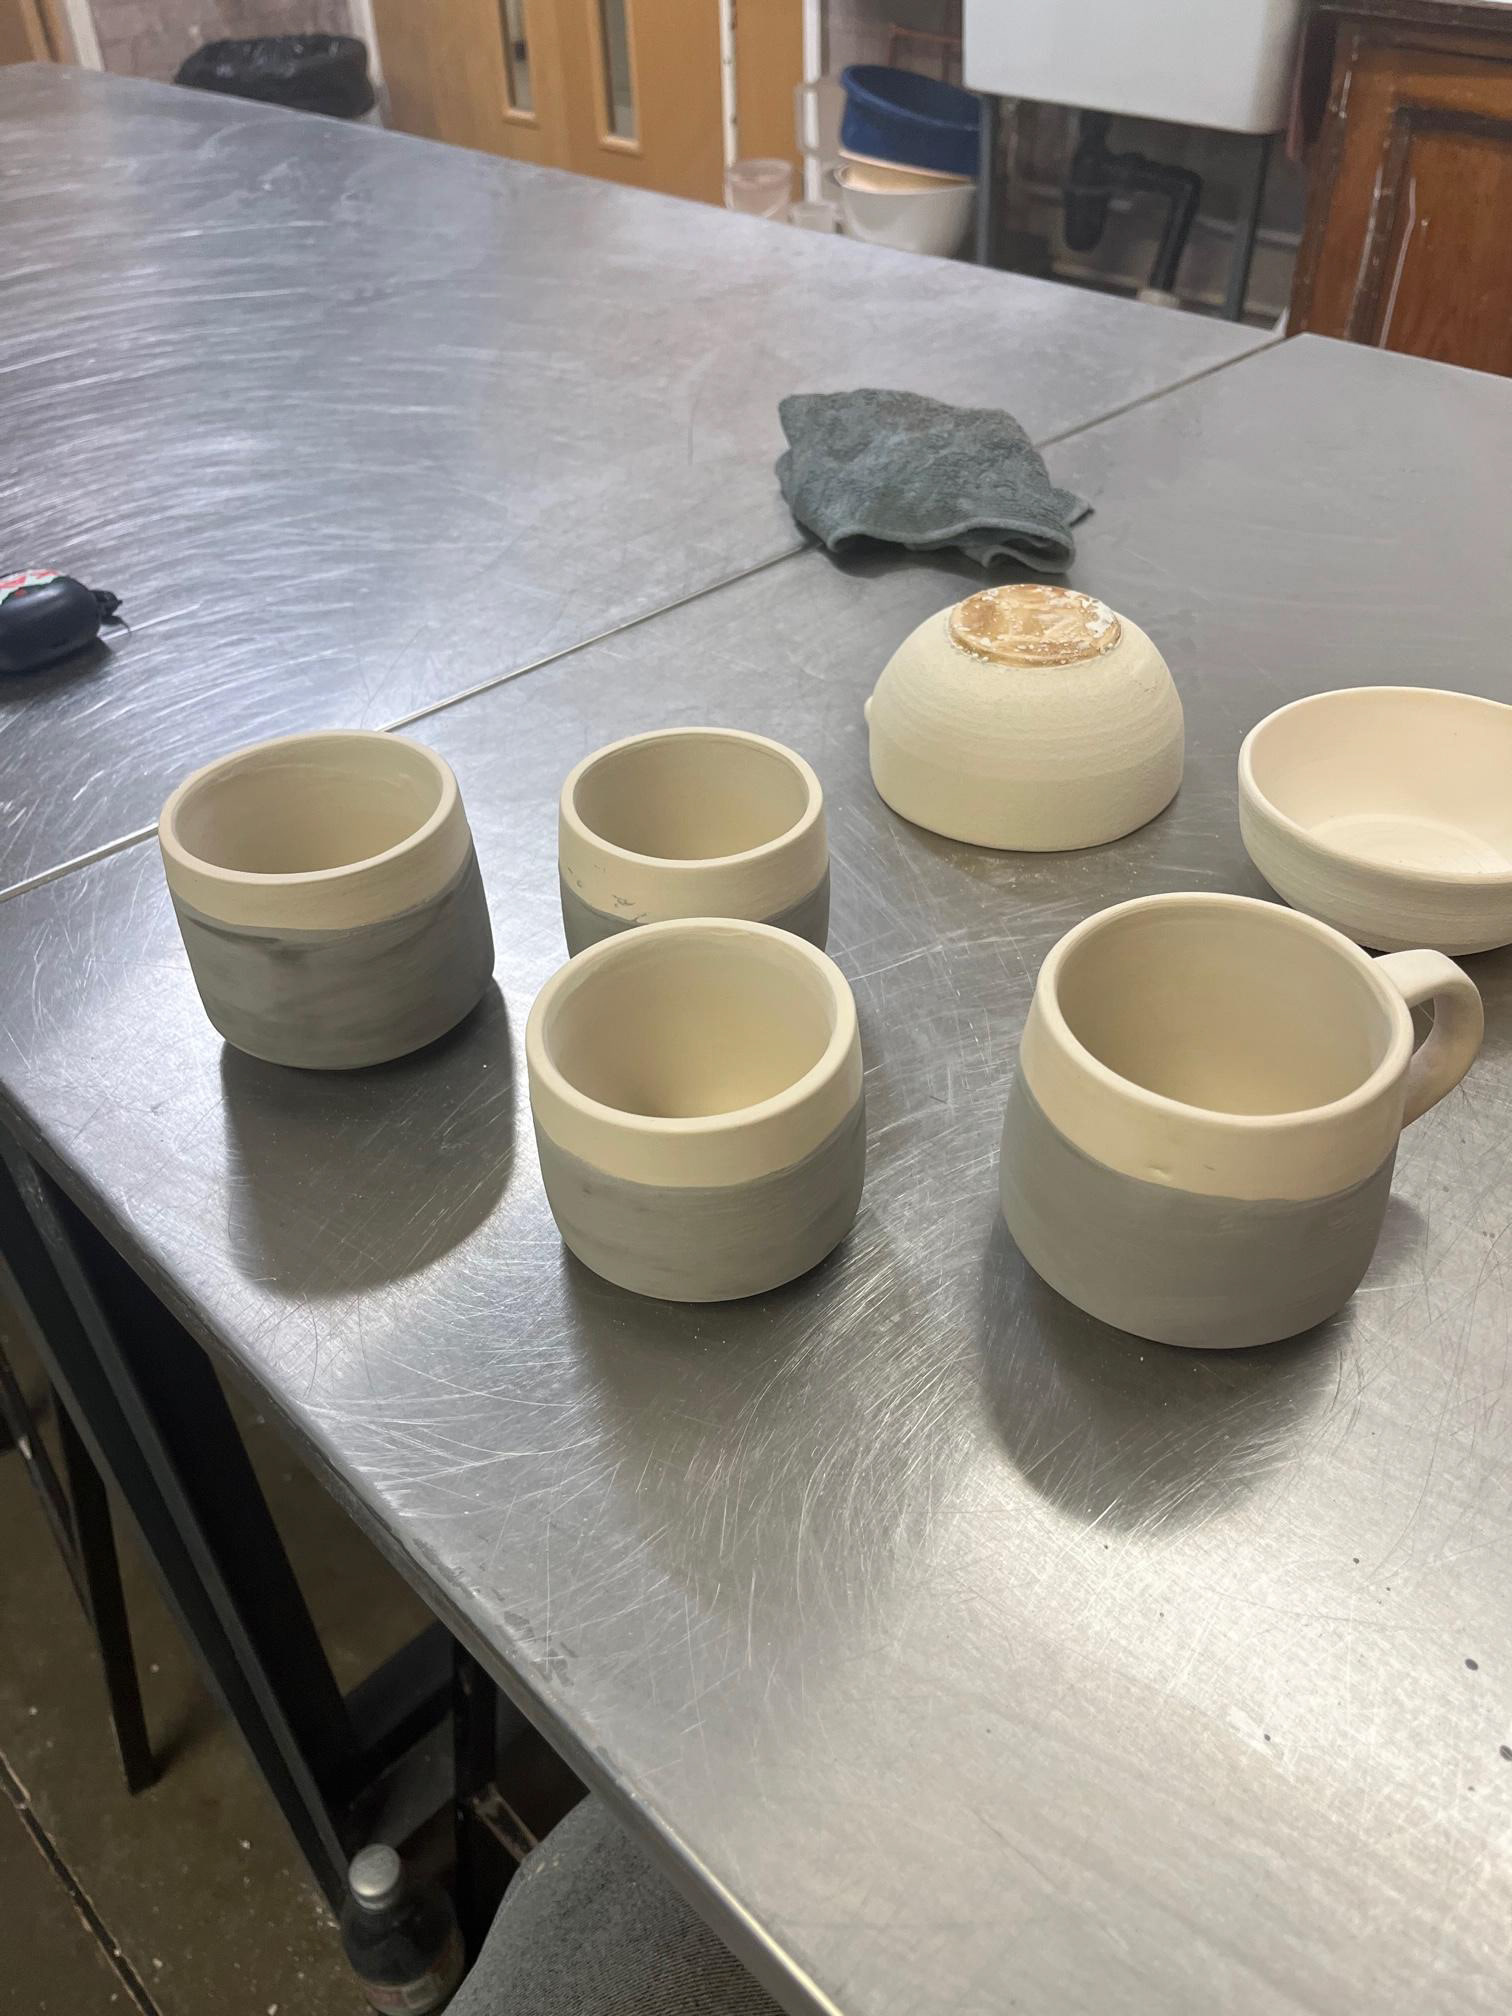
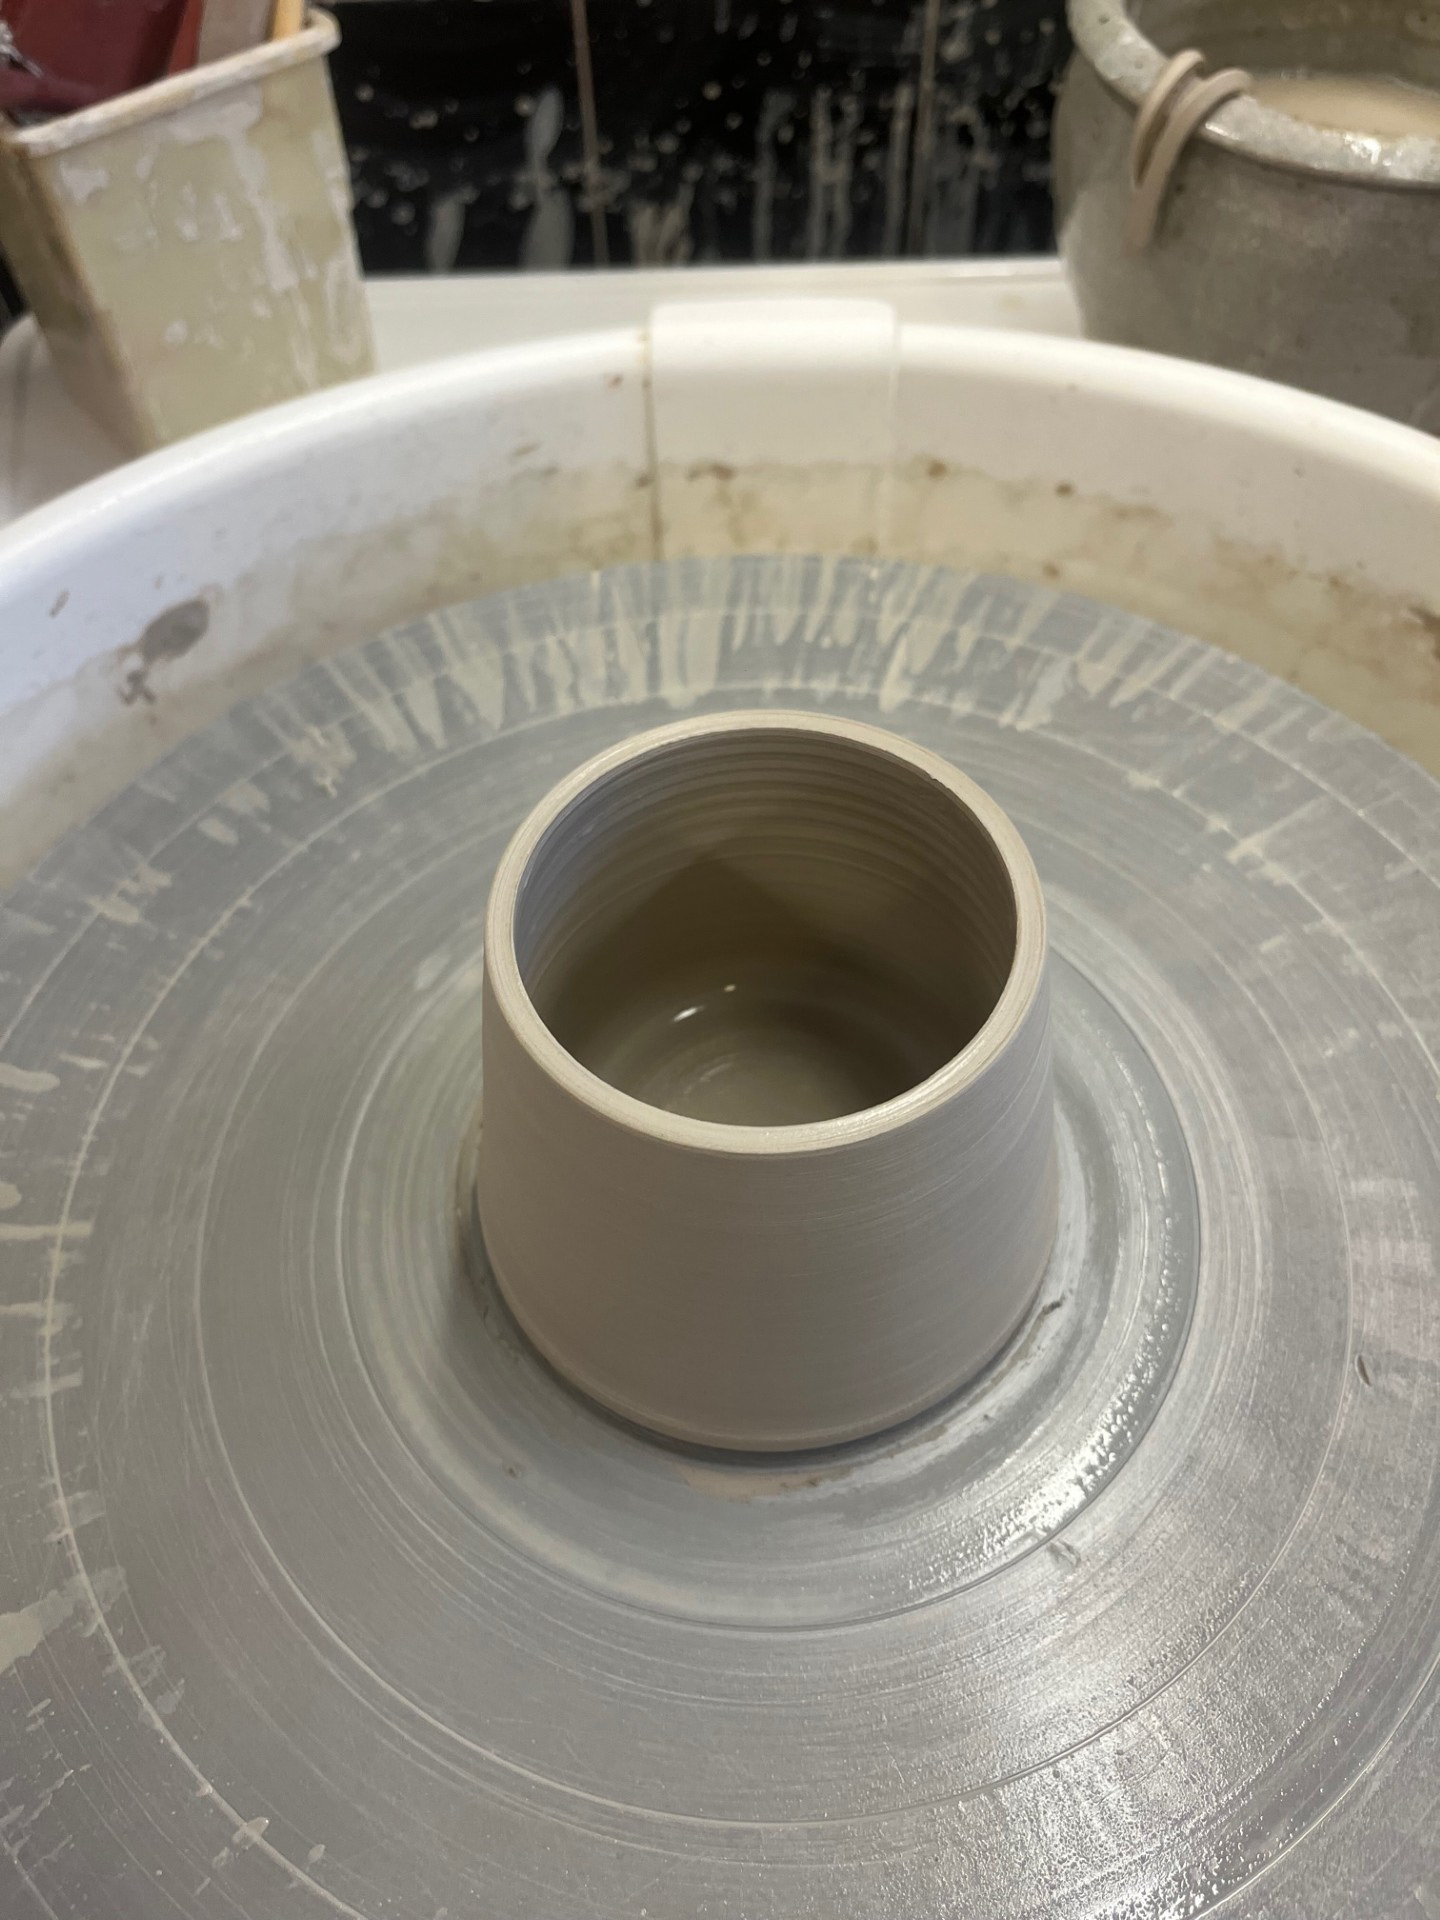
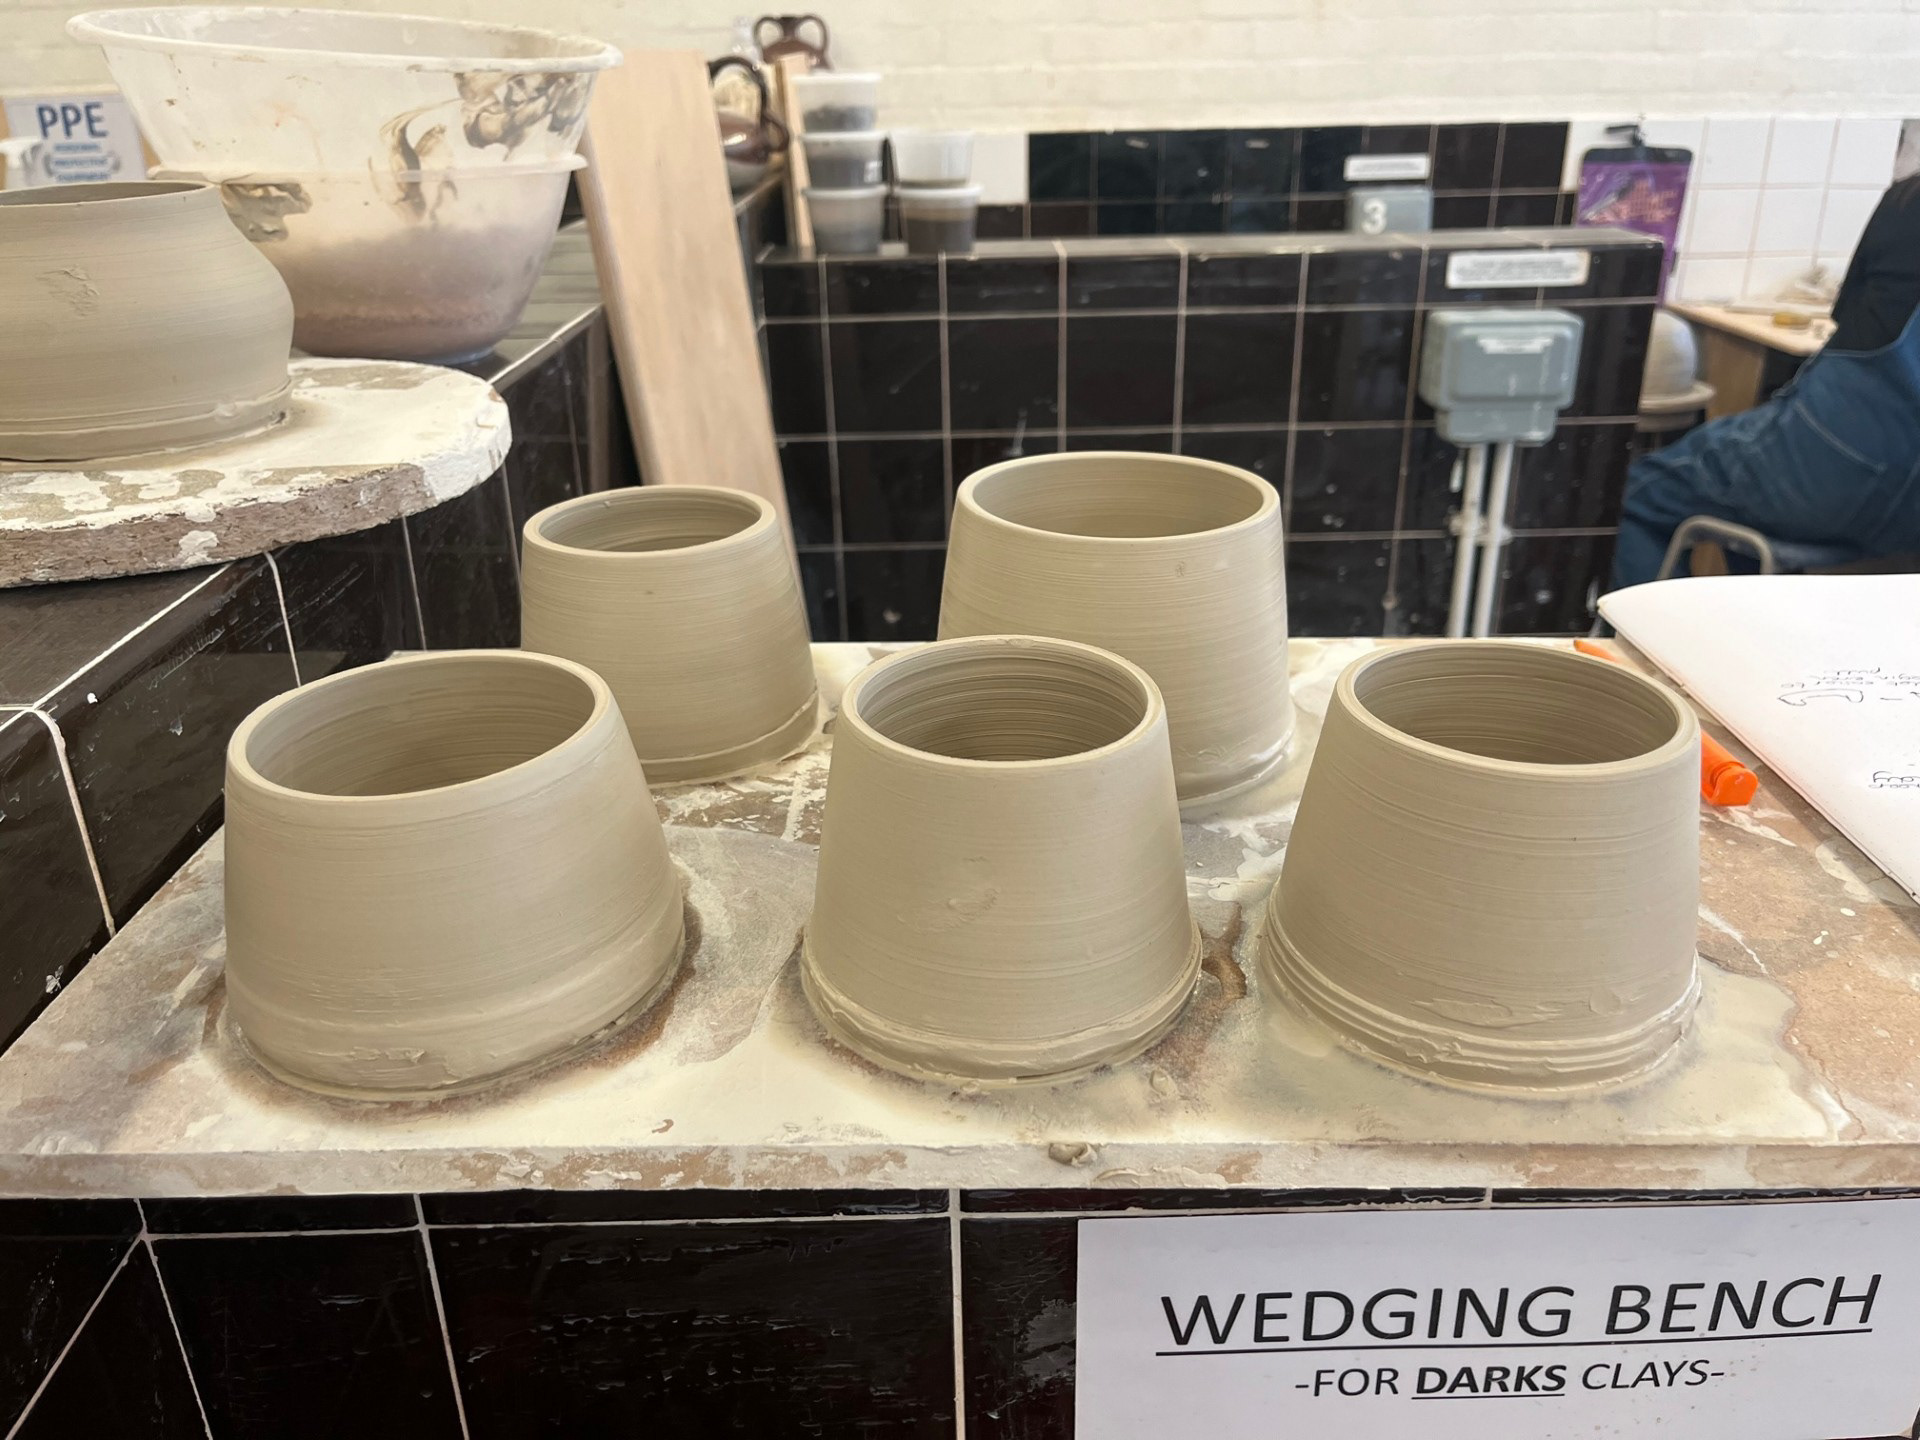
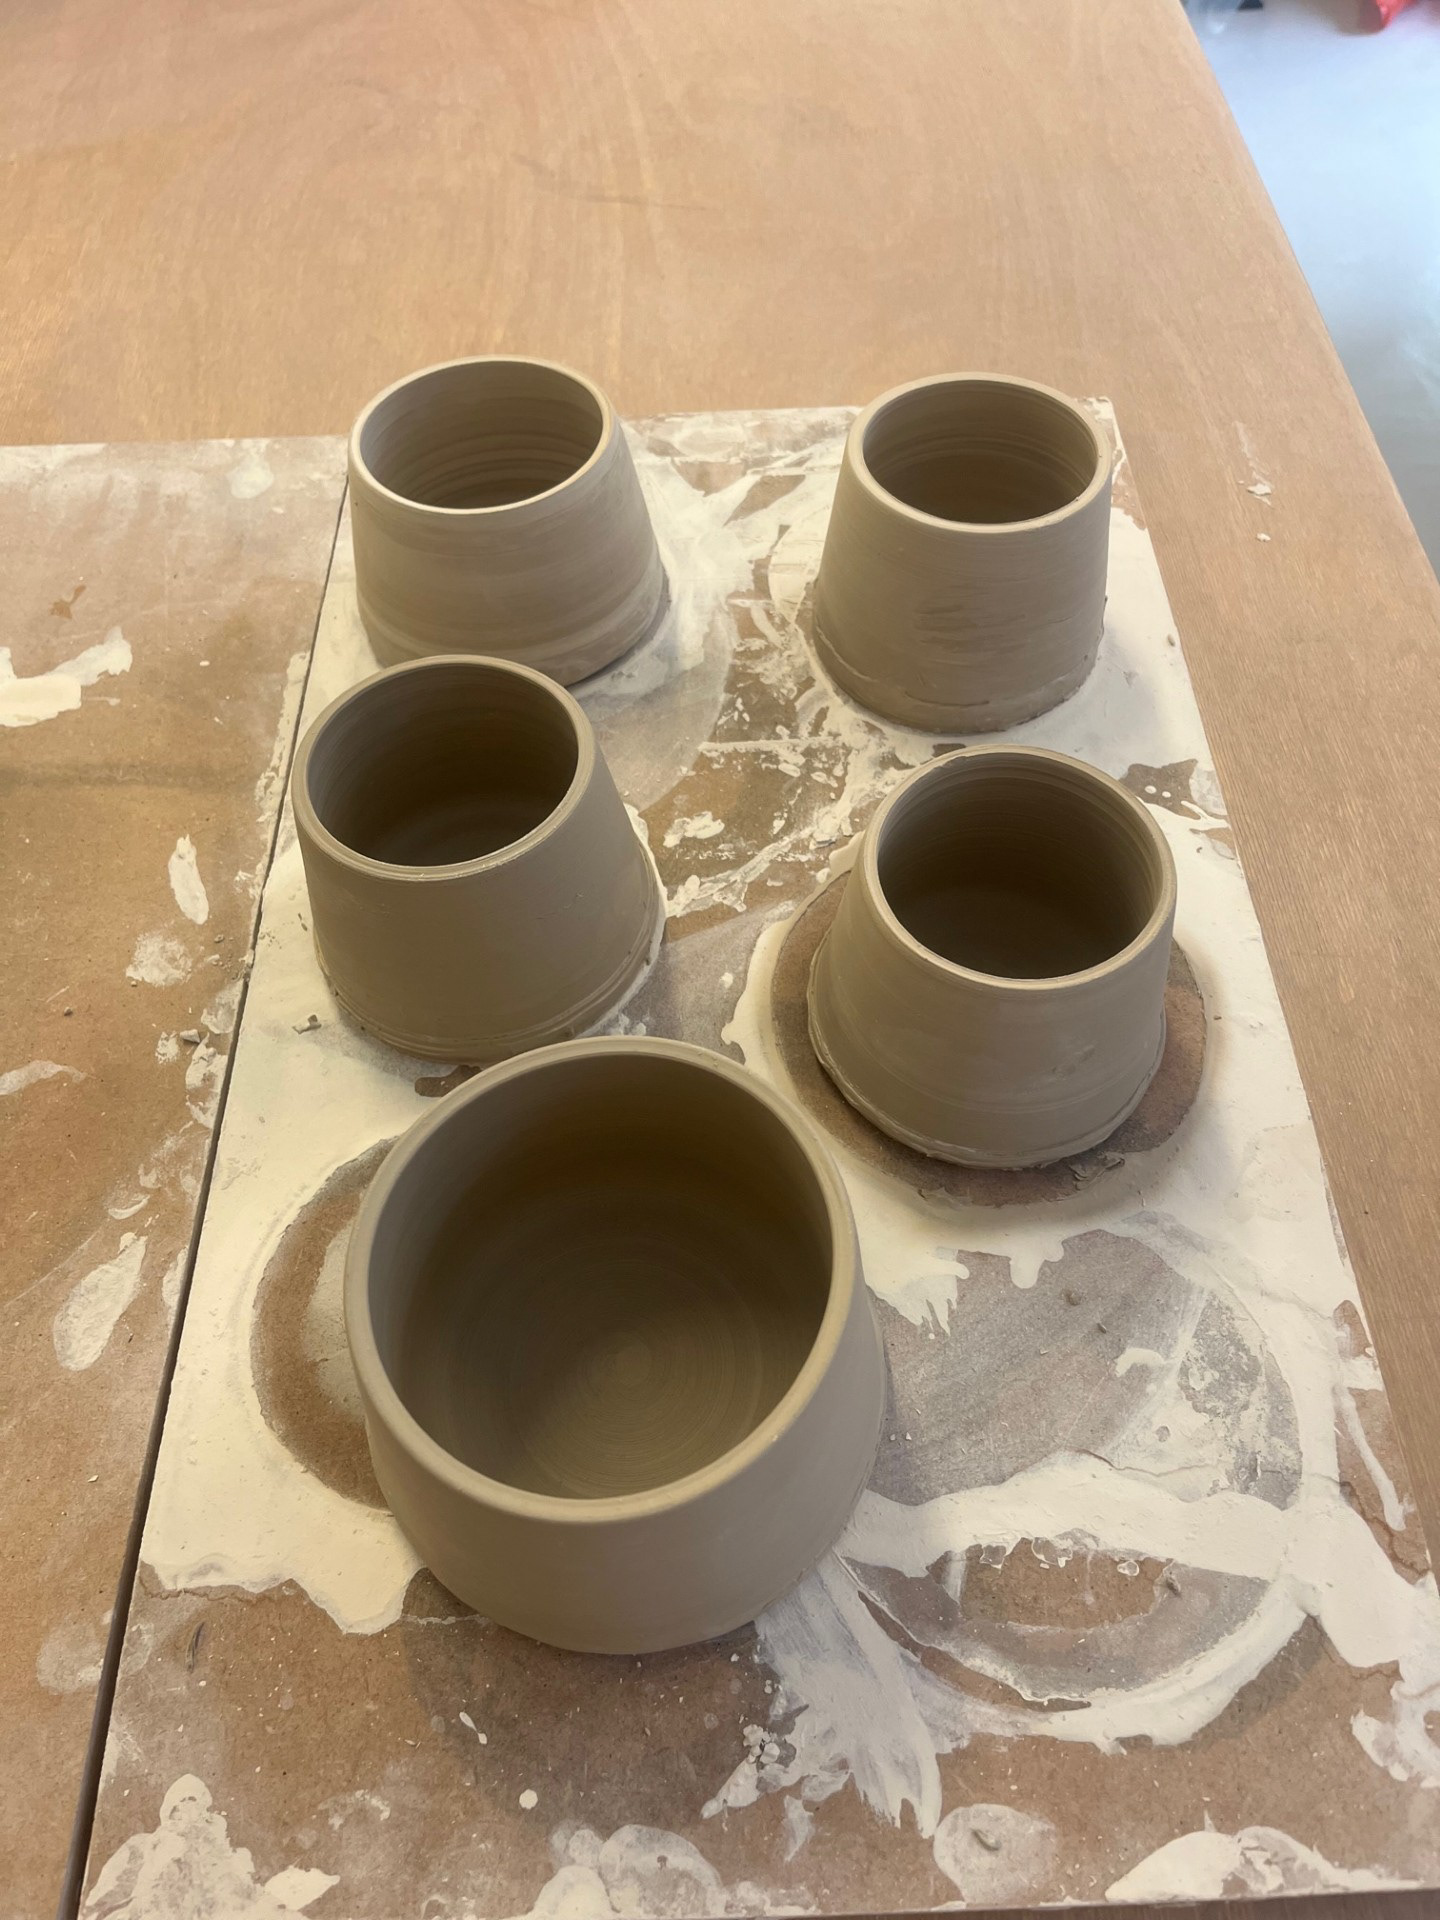
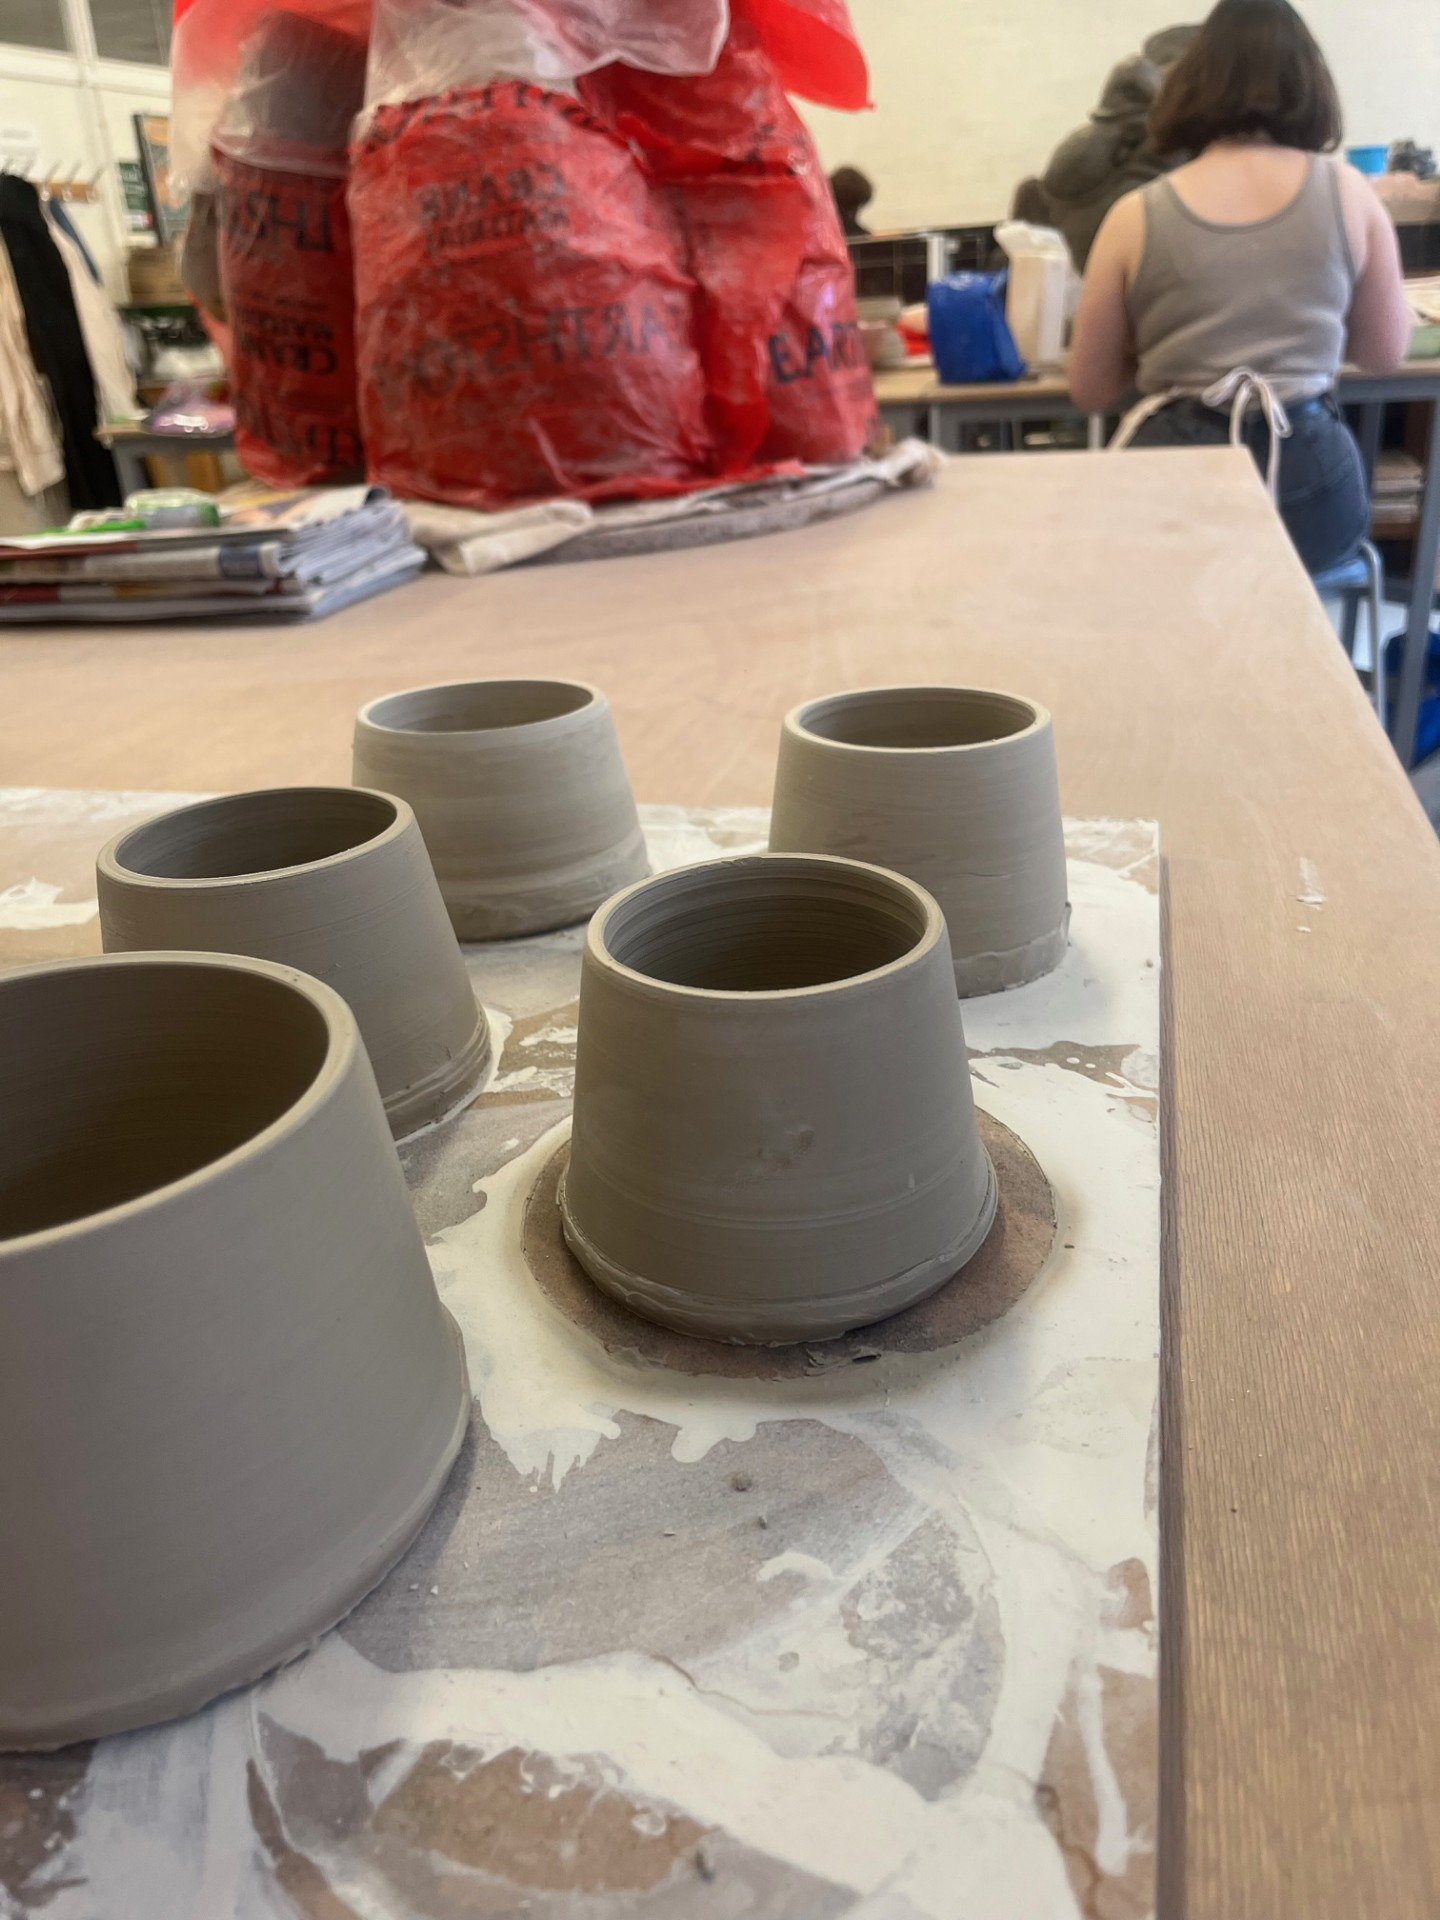
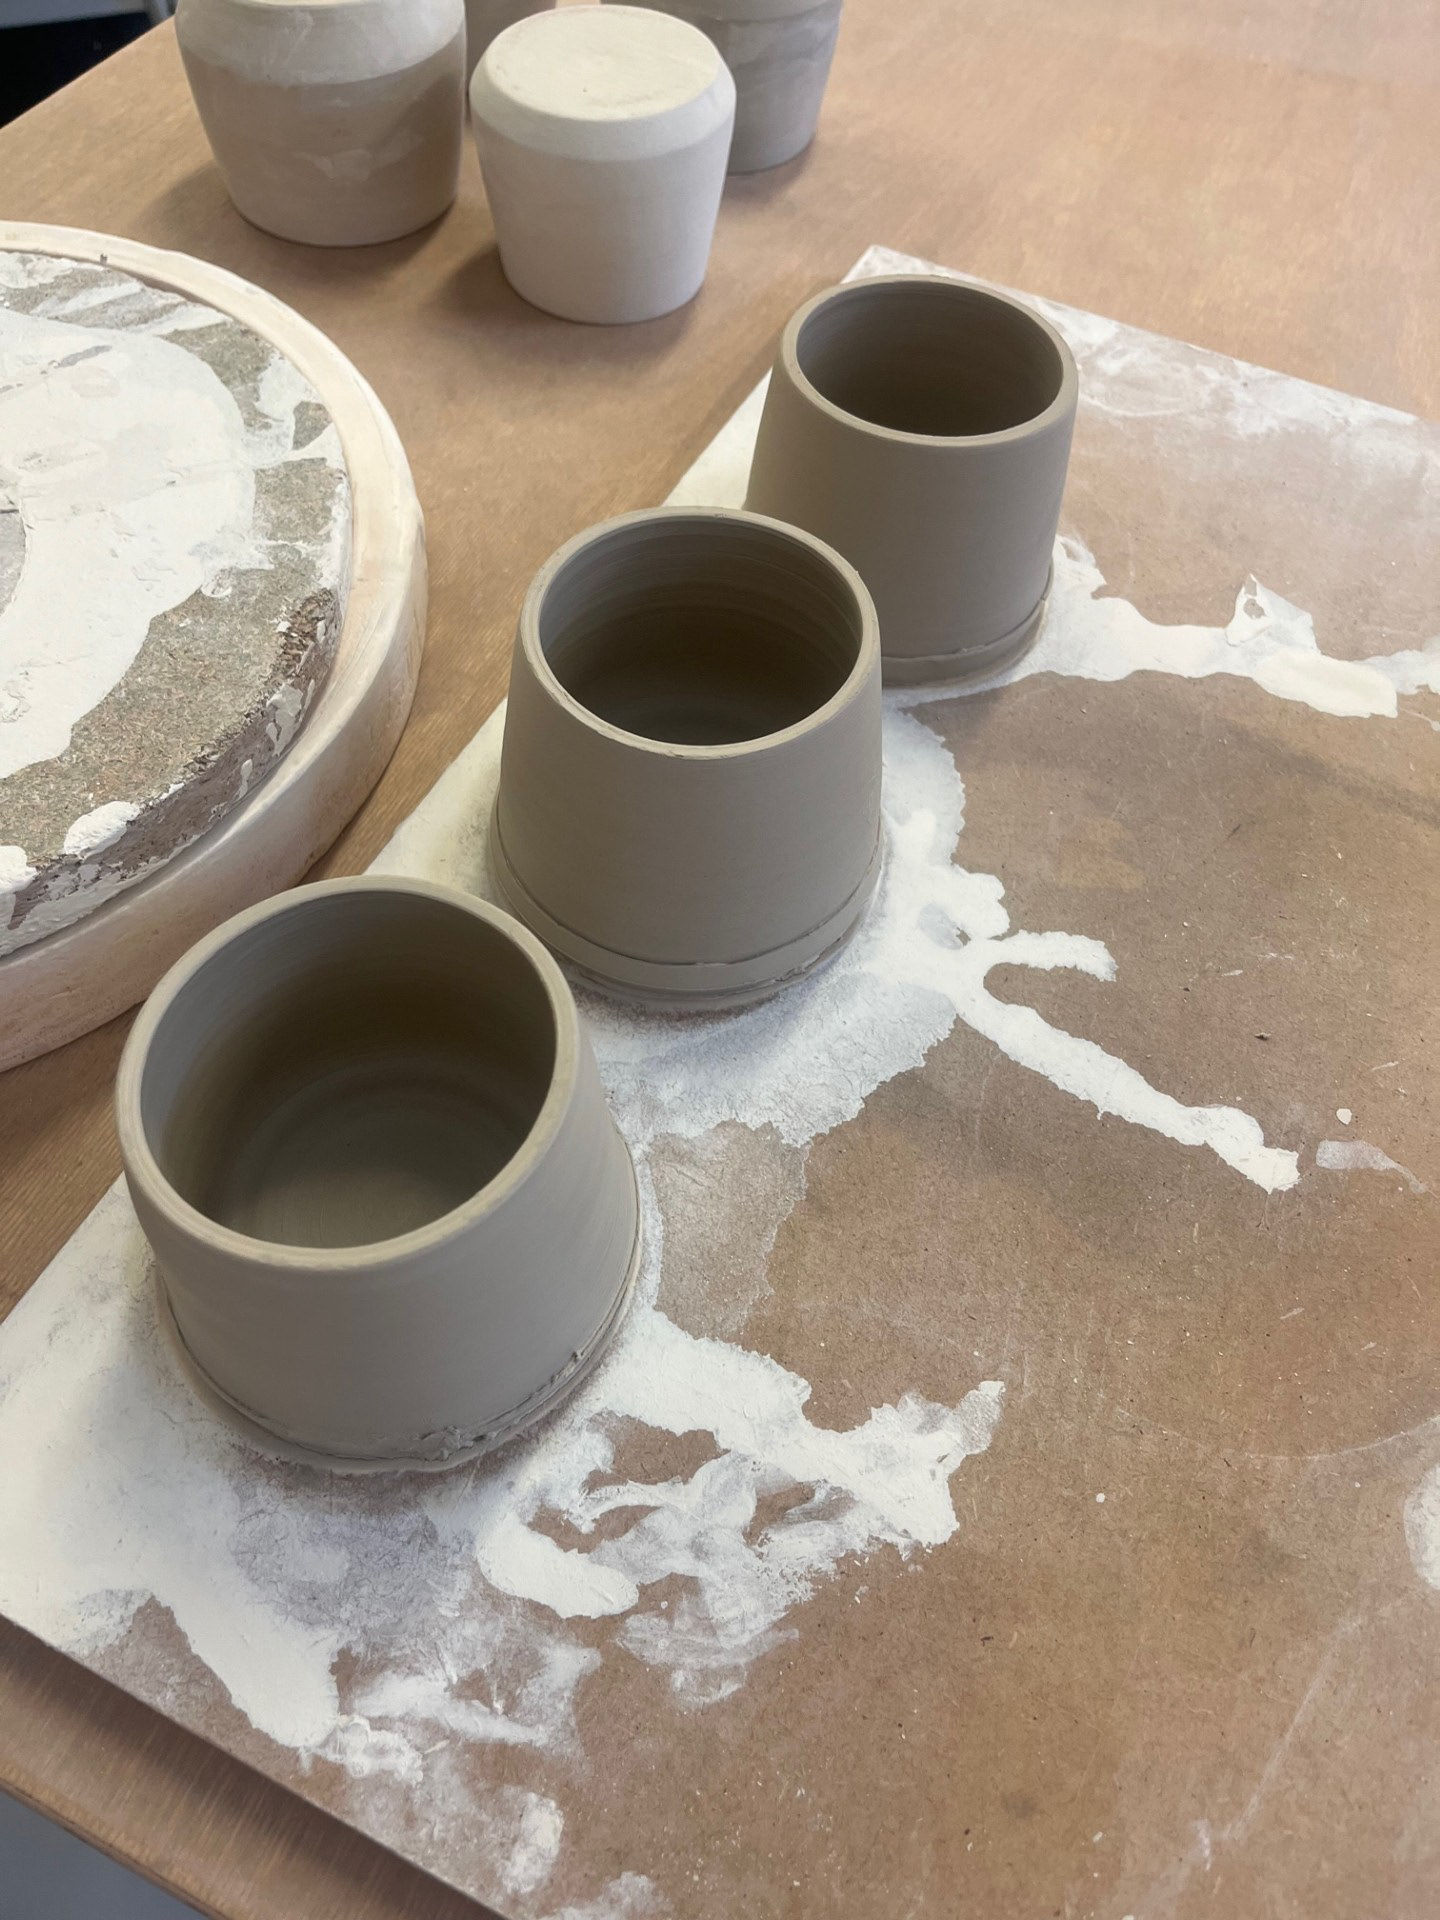
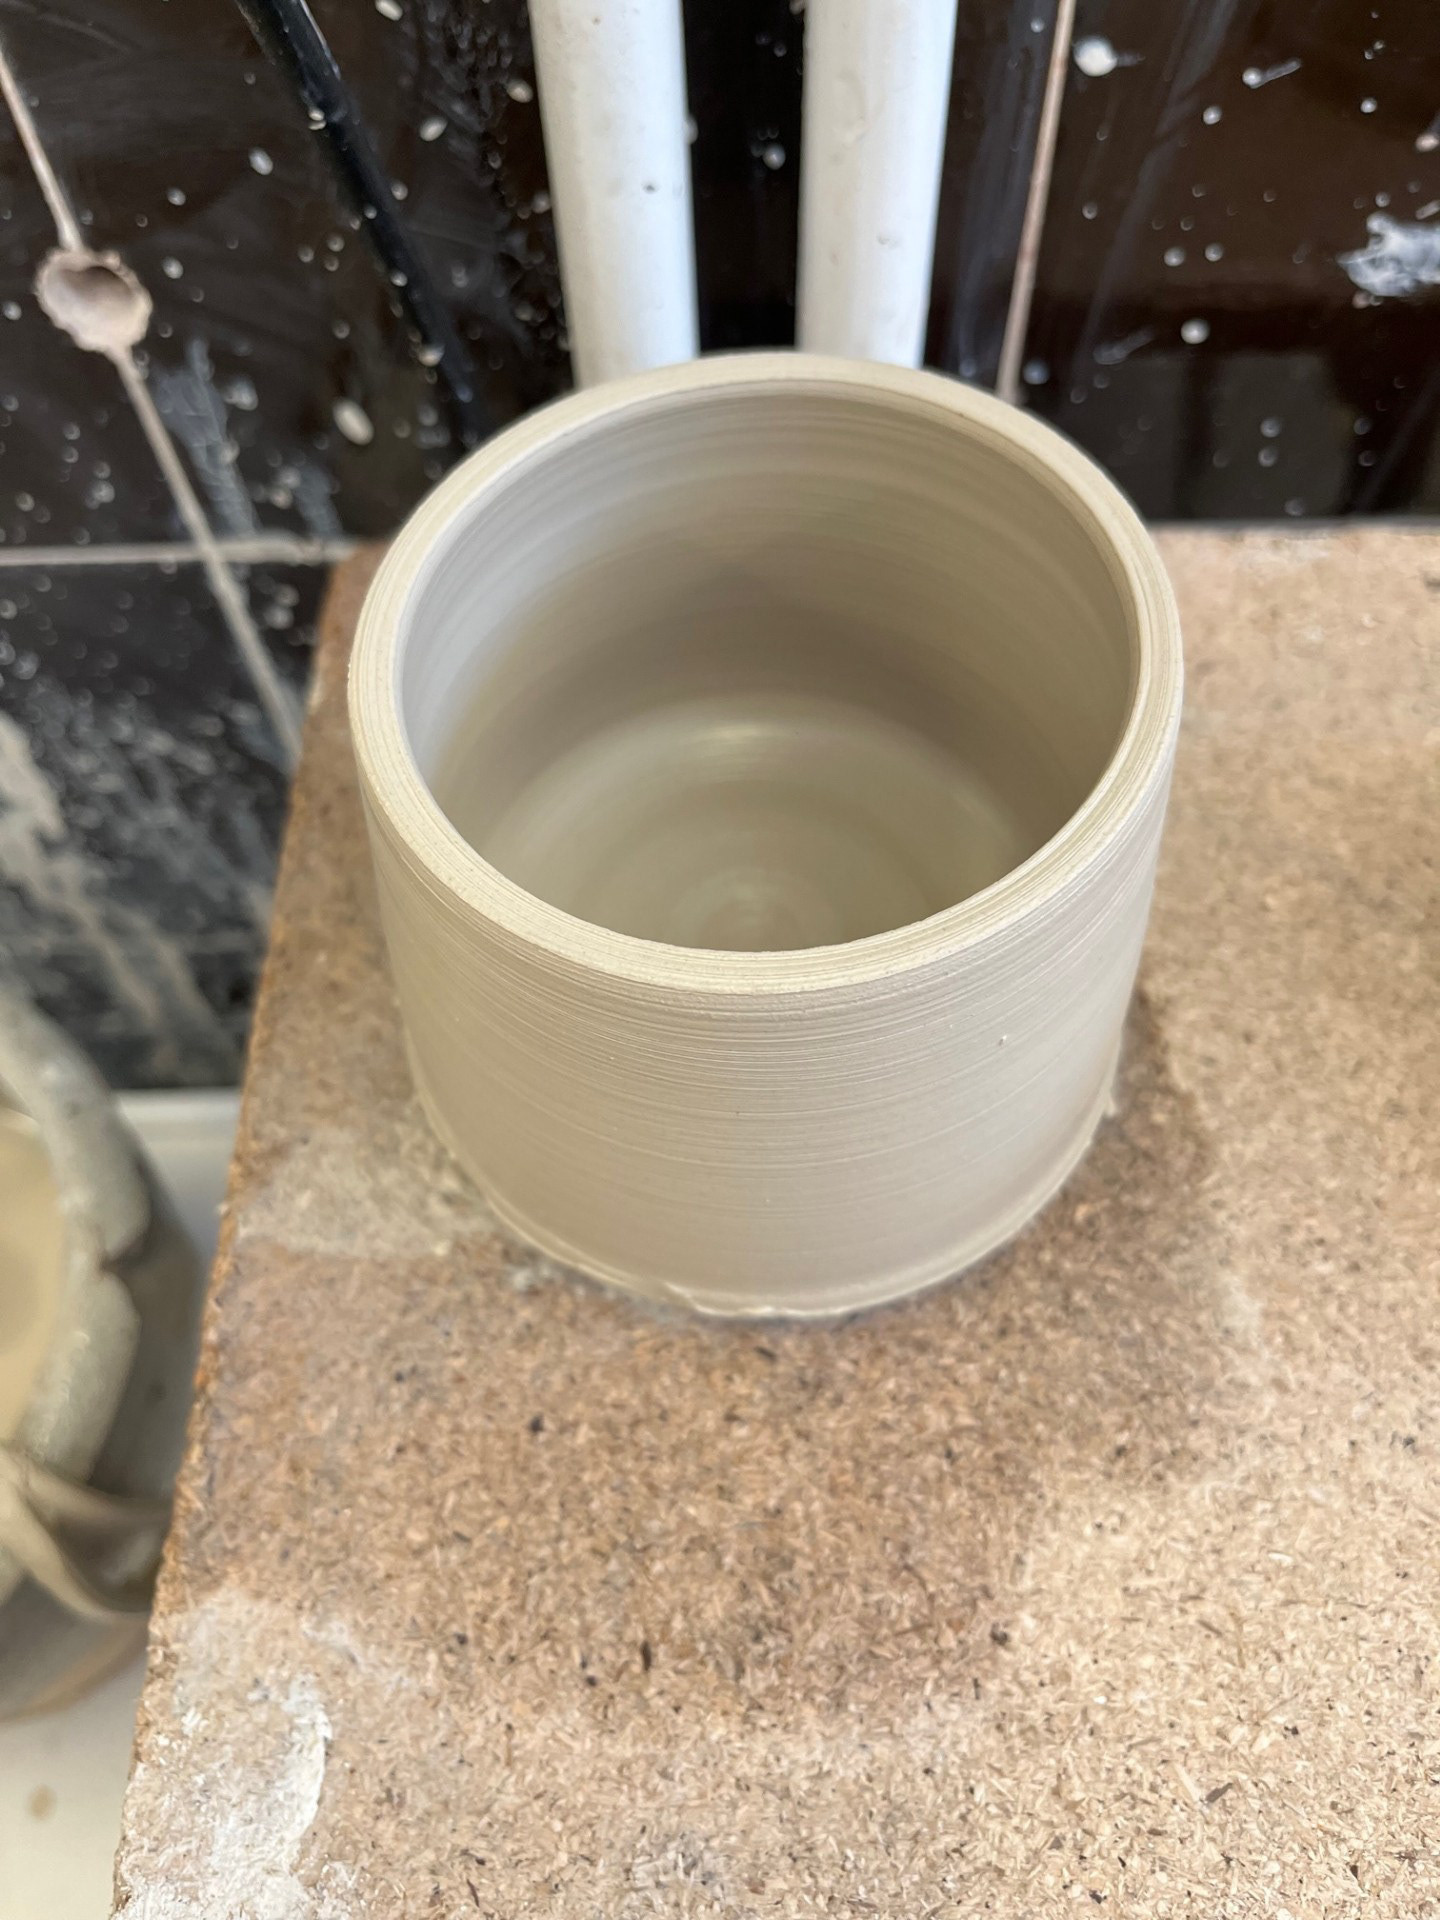
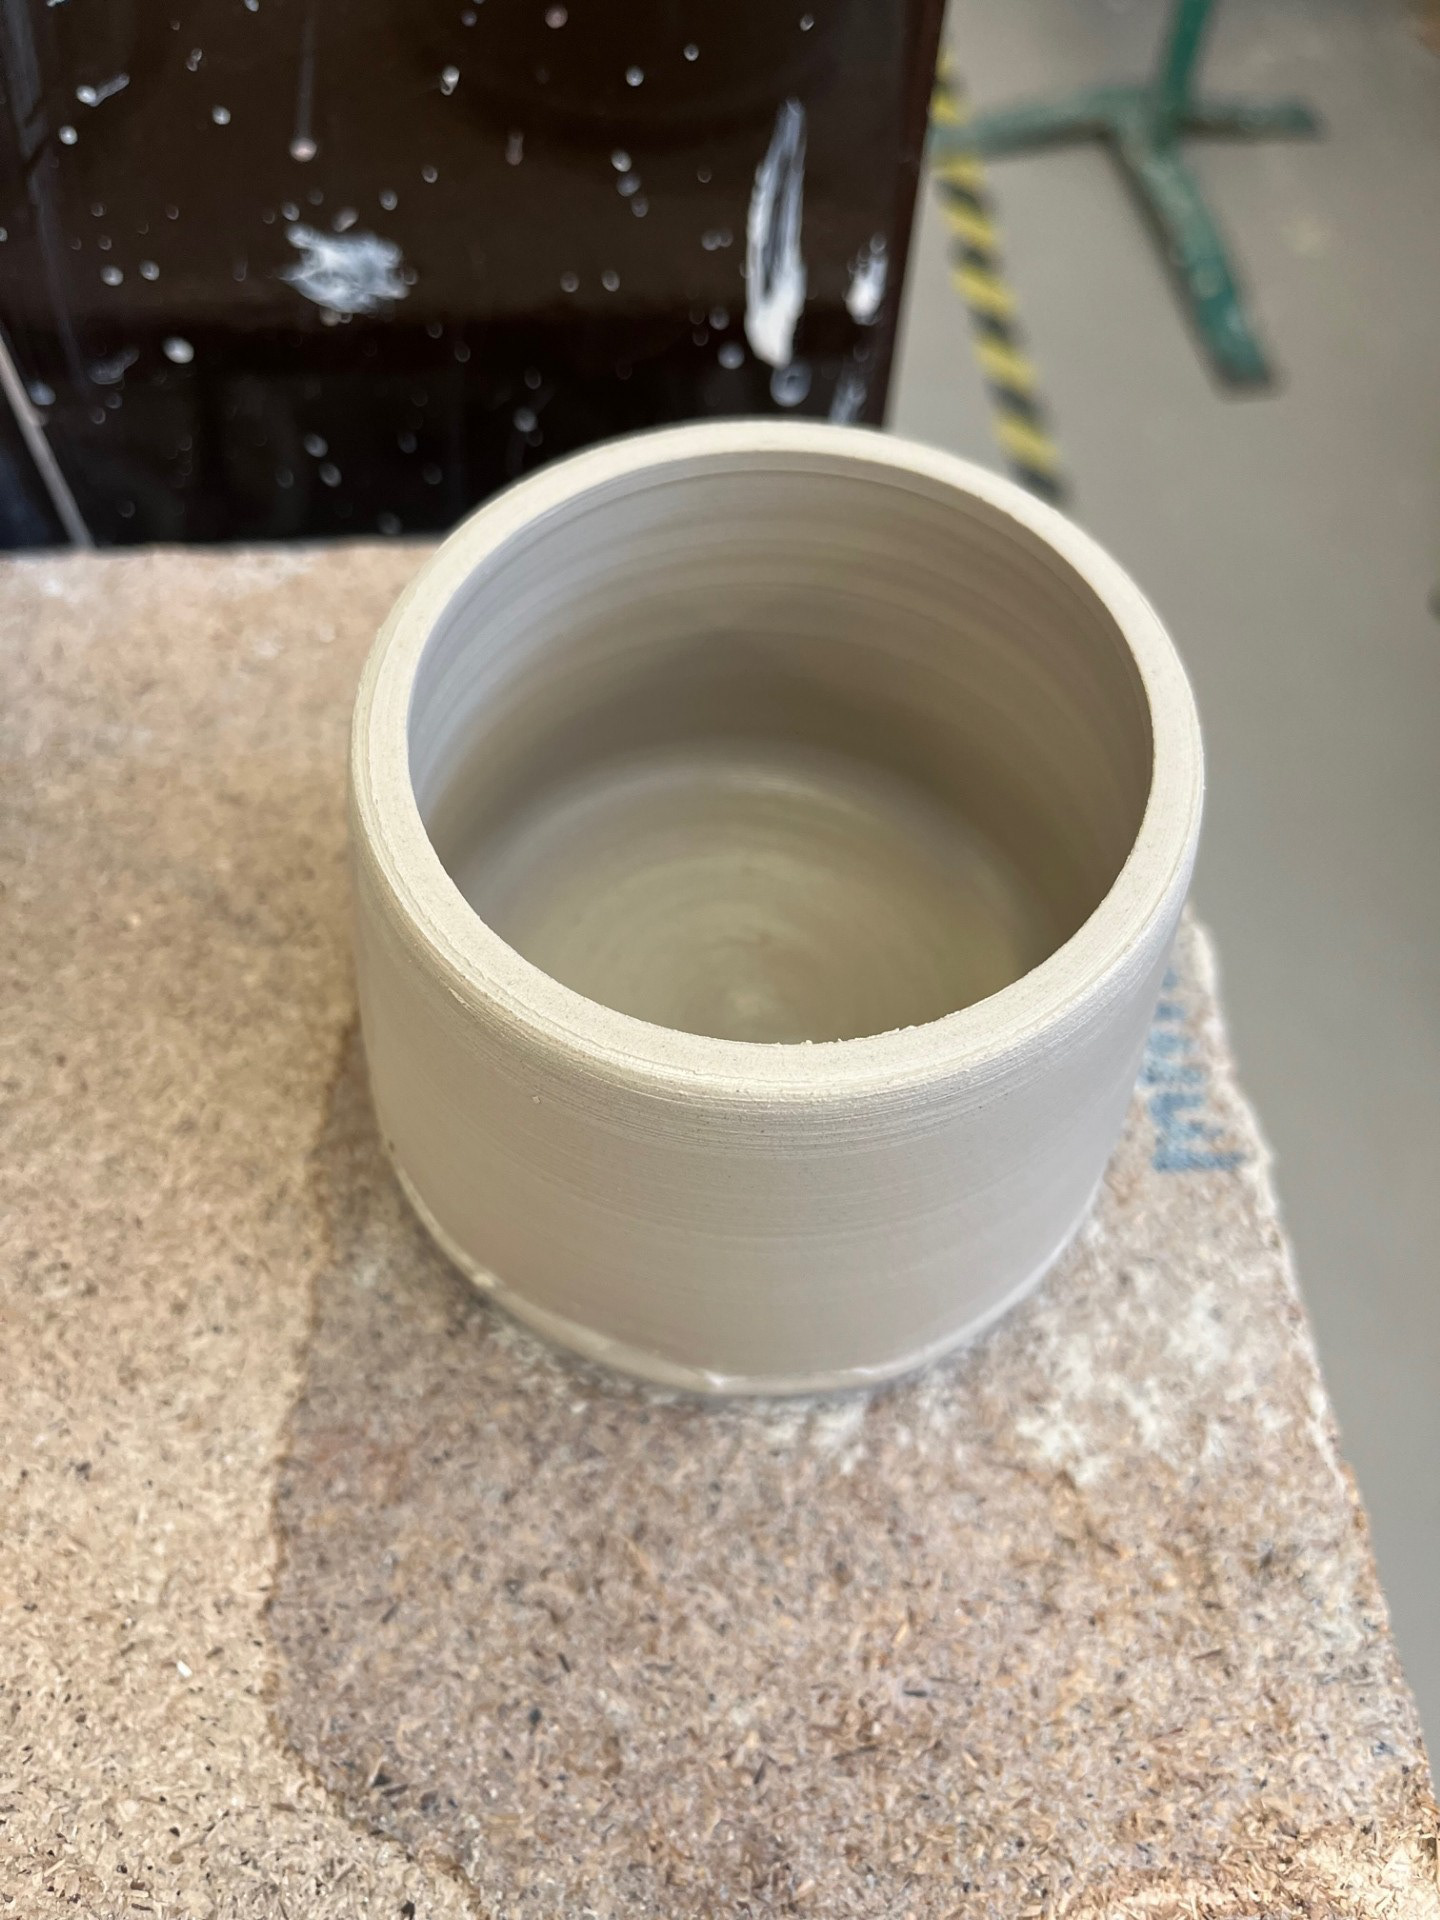
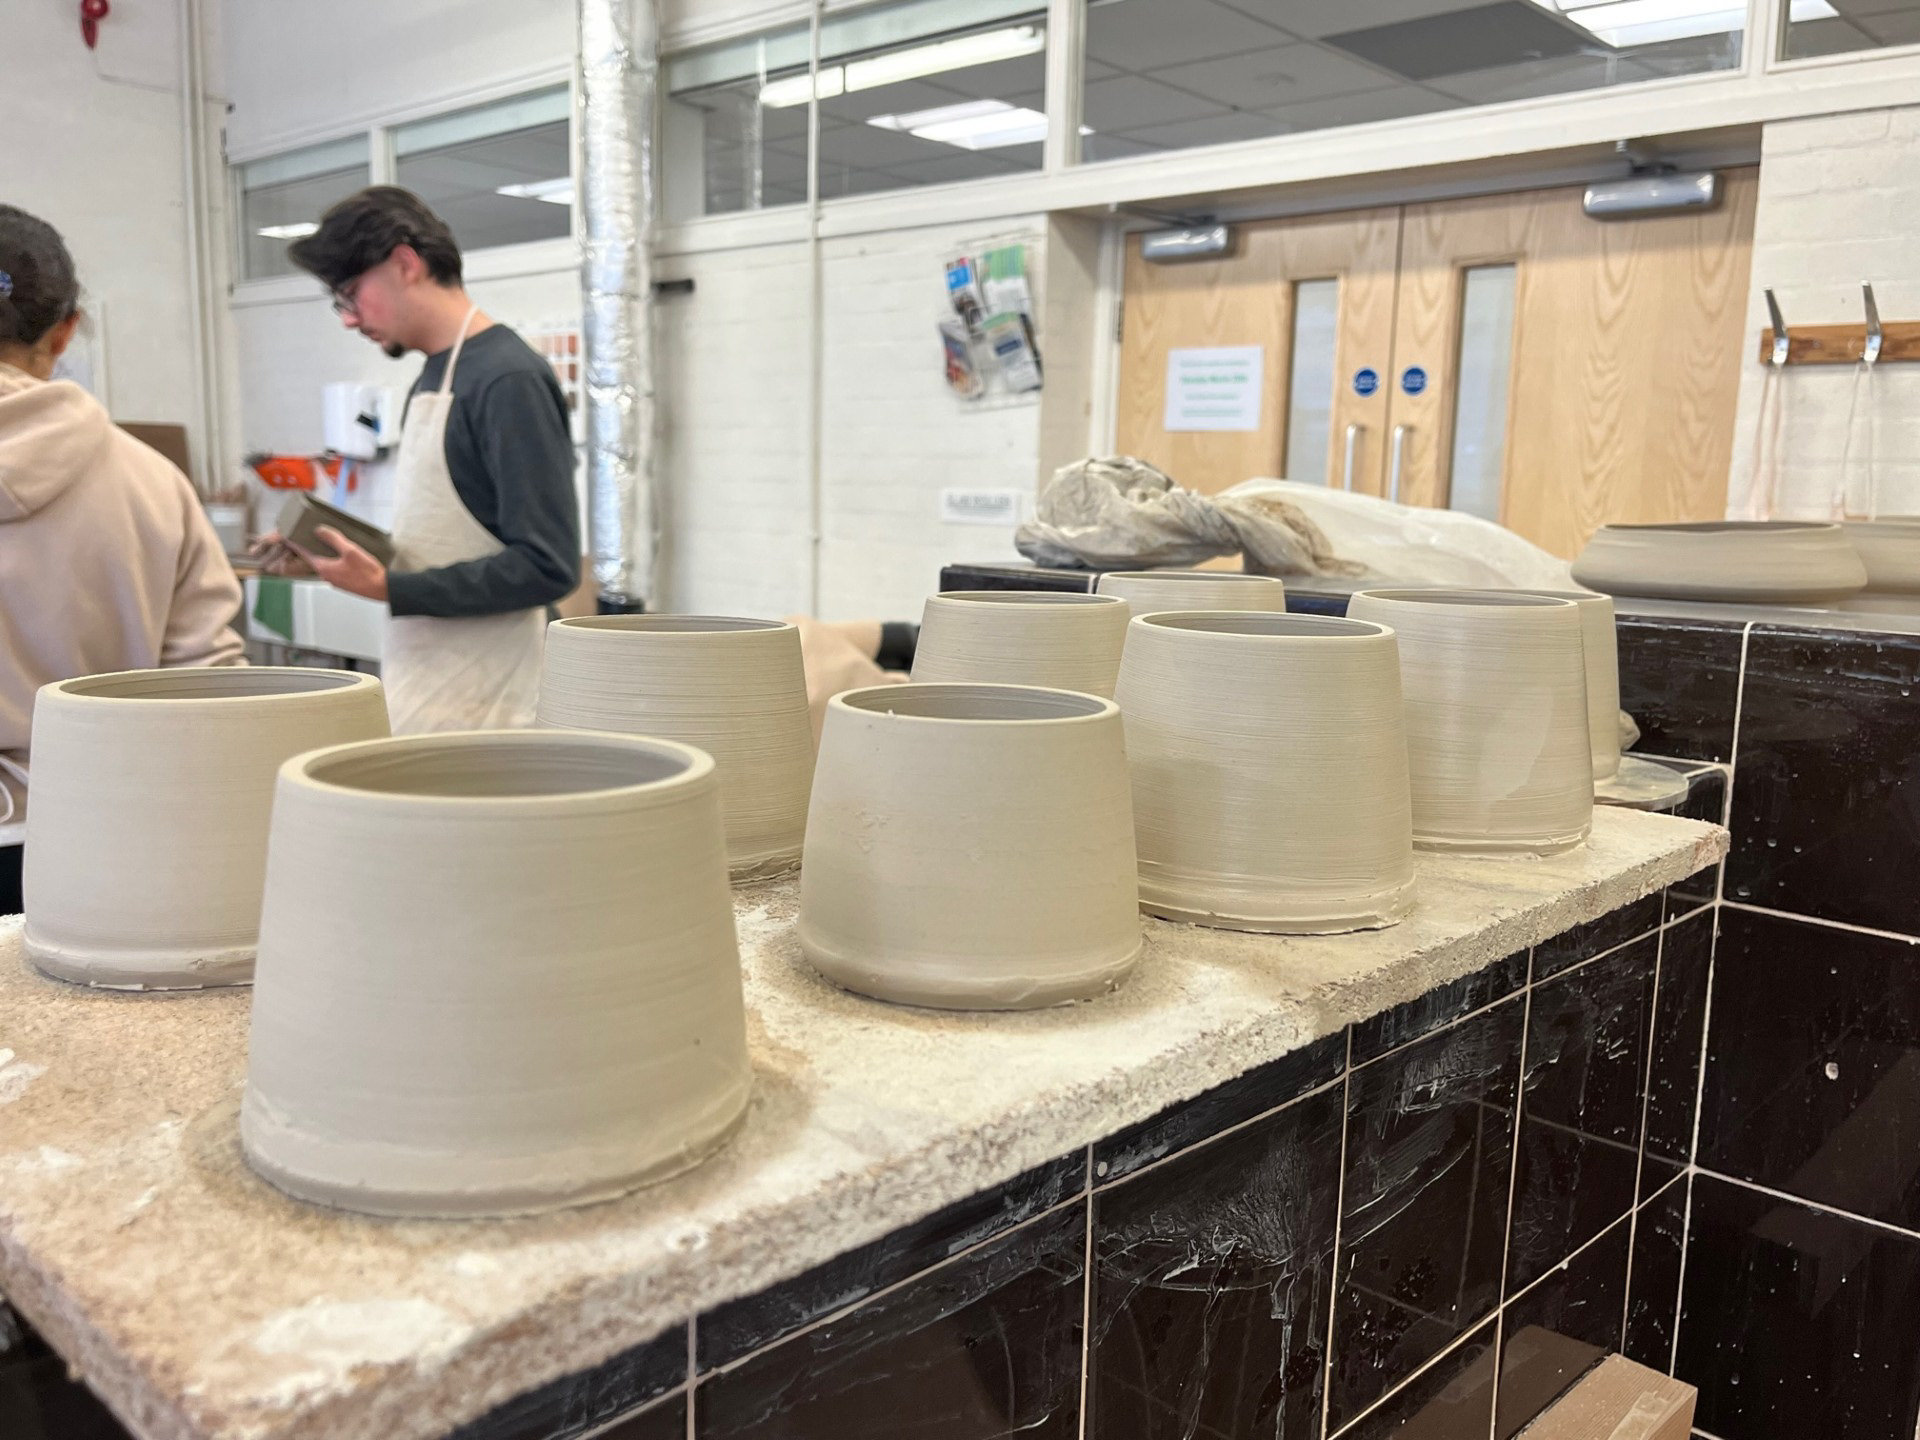
Going into the first week of directed making, I want my main focus to be on the longevity element of my craft. In this final term, I purely want to make my practice as refined and generally as sound as possible. For this session, I wanted to continue with one of my running aims throughout the year which was improving my repeatability. For me, I think that this is an important element because I want to go into selling functional items. Going into this session, I knew that one of my weaknesses was pulling up the walls so this was the object of my focus. I decided to make straight walled vessels for this session because I think the this is the best was to develop consistency as it is simple and doable.
Images from session:


Reflection on Throwing:
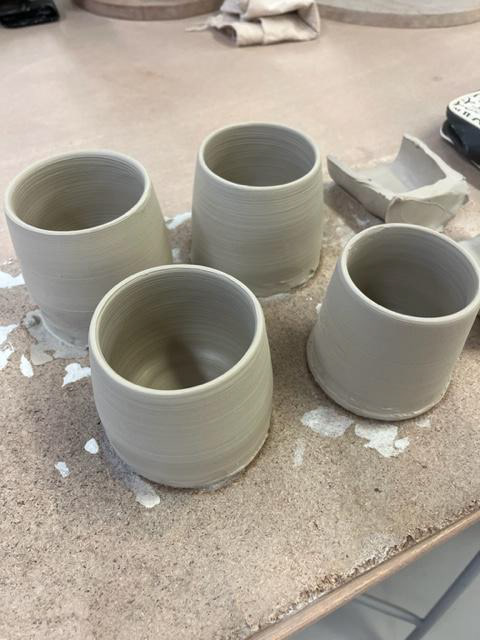
In this session, I was only able to make 2/4 successful cups. the main thing that `I am taking from this session is that if I am looking for repeatability, 1kg of clay is way too much to work with. I have also realised form this session that these were extremely heavy and the walls extremely thick so there would need to be a lot refinement to build up to a point where this is repeatable. However, one positive is that the wall thicknesses were quite even which was one of m aims going into this. I think that working with straight walled pots will be good moving forward as I think that it really helps me focus on the small details of what I am doing; elements such as finger placement and what the clay actually feels like in between my fingers. It's quite hard to achieve throwing successfully with this amount when I am still trying to get to grips with the basics. I think that next time, I am going to try completing this with much less clay; I'm thinking more like 500g as this would be a lot more doable.
Turning Pieces:
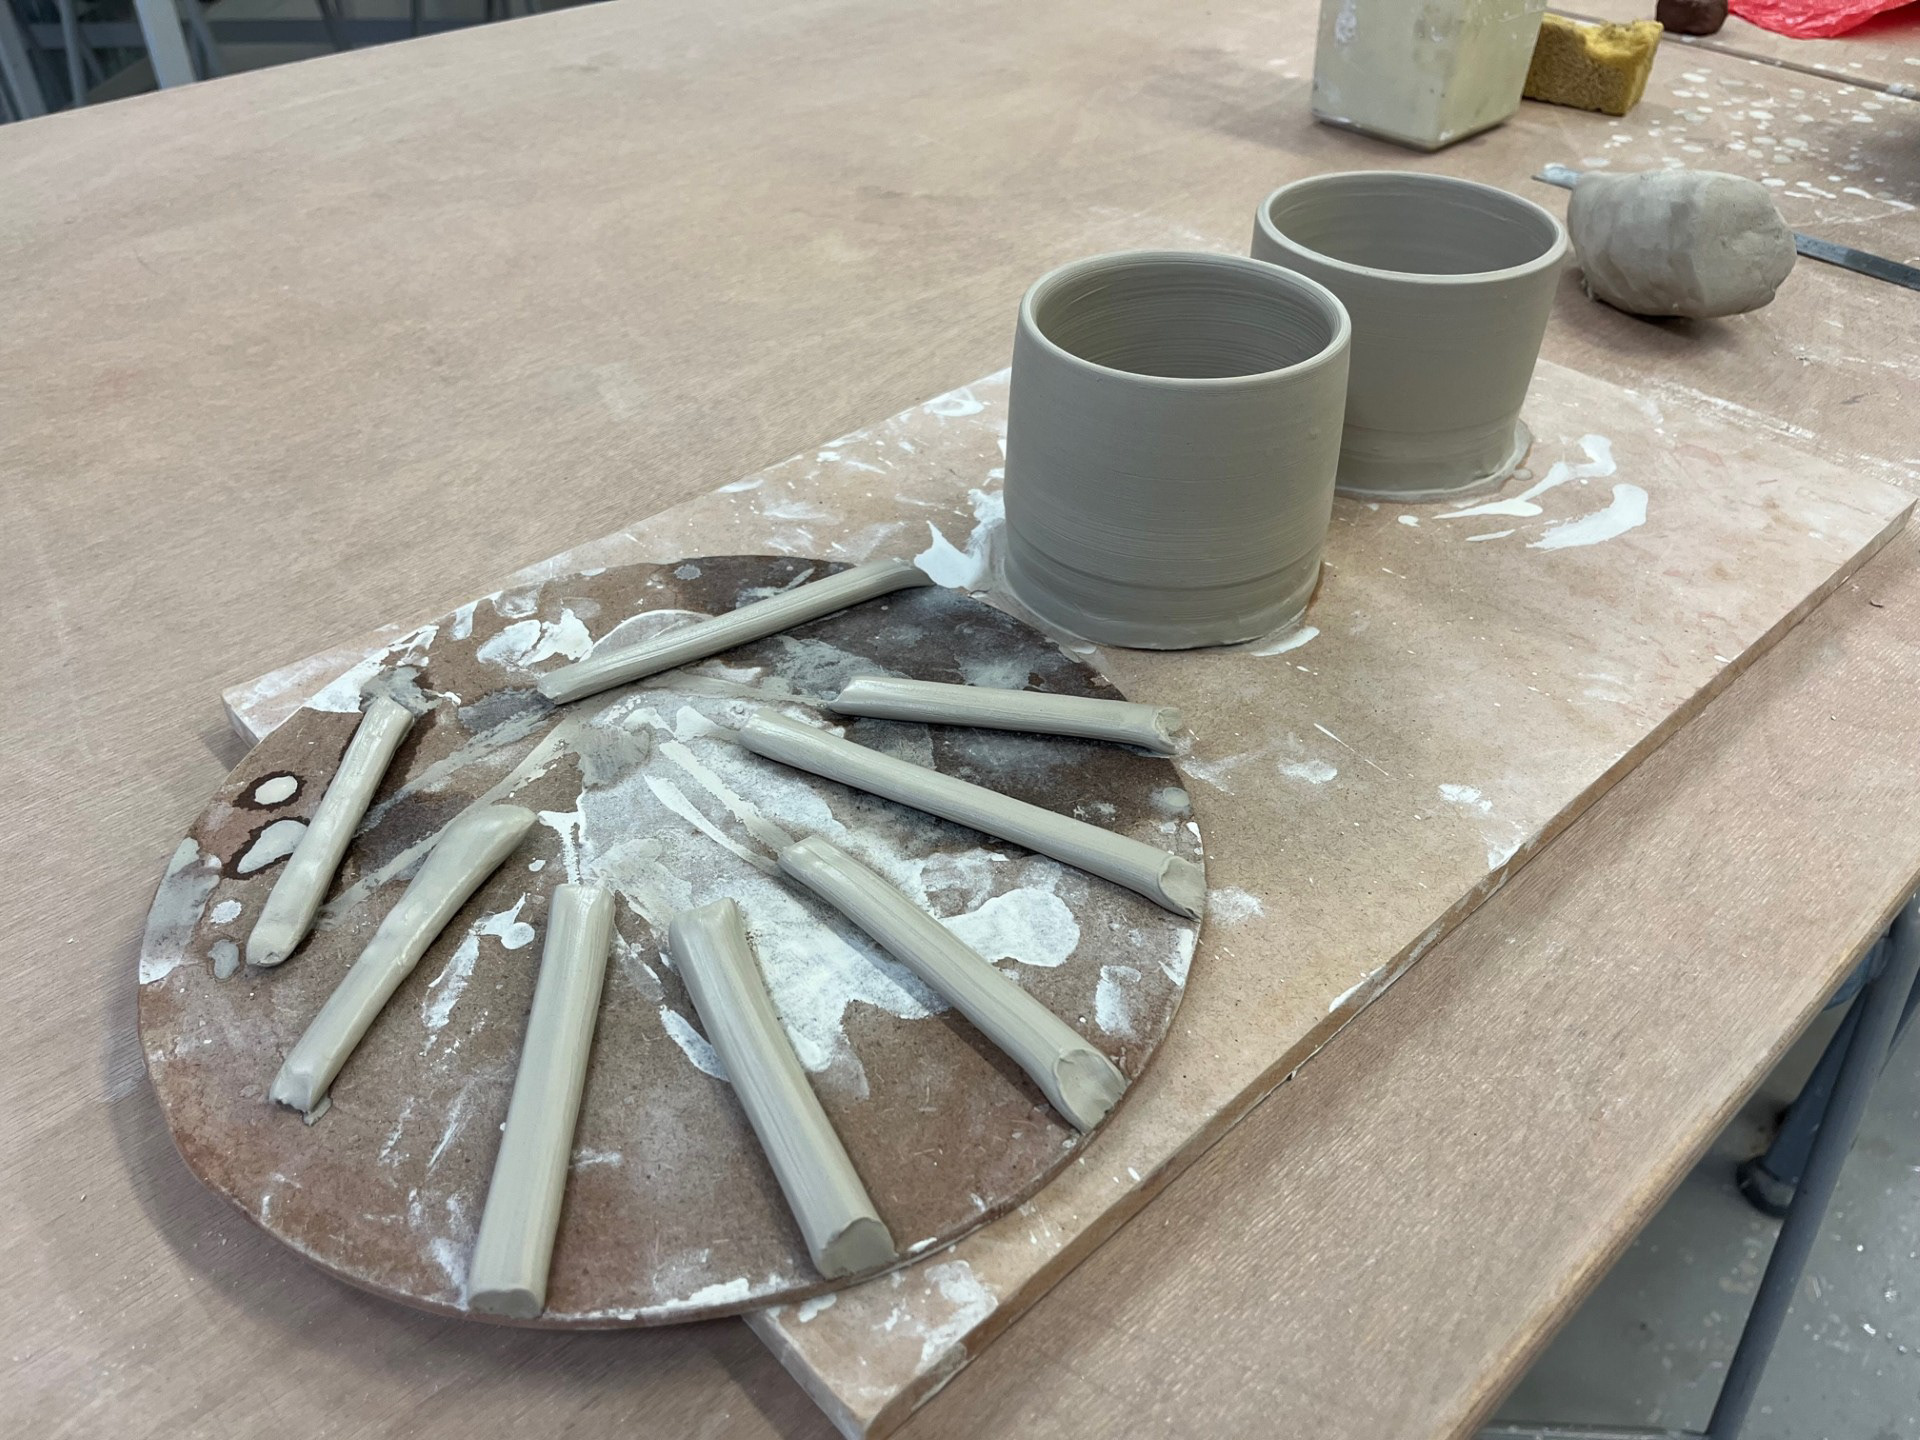
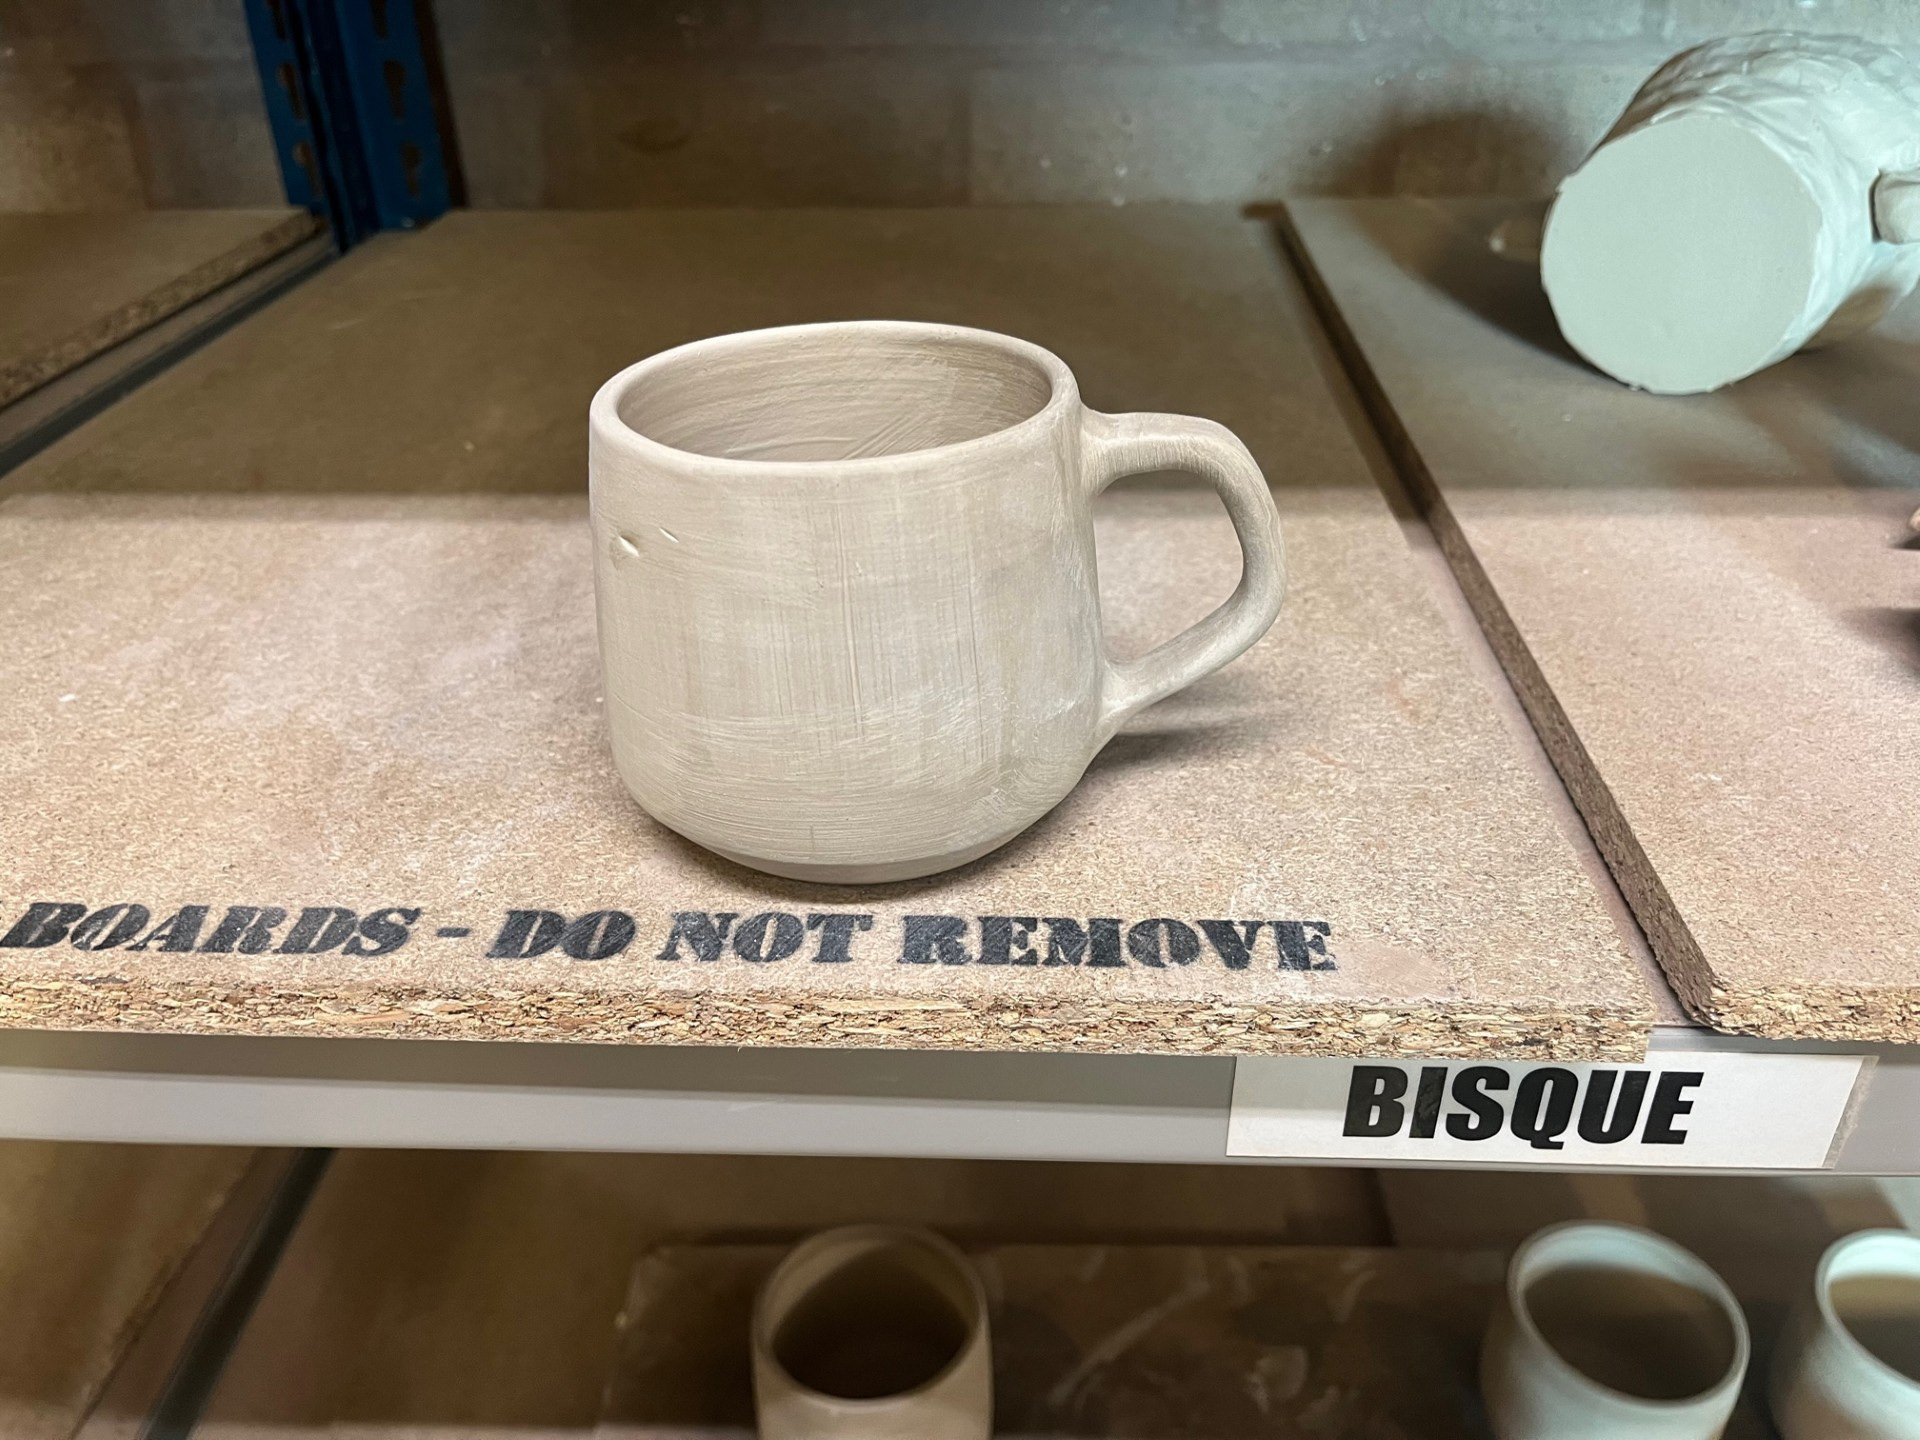
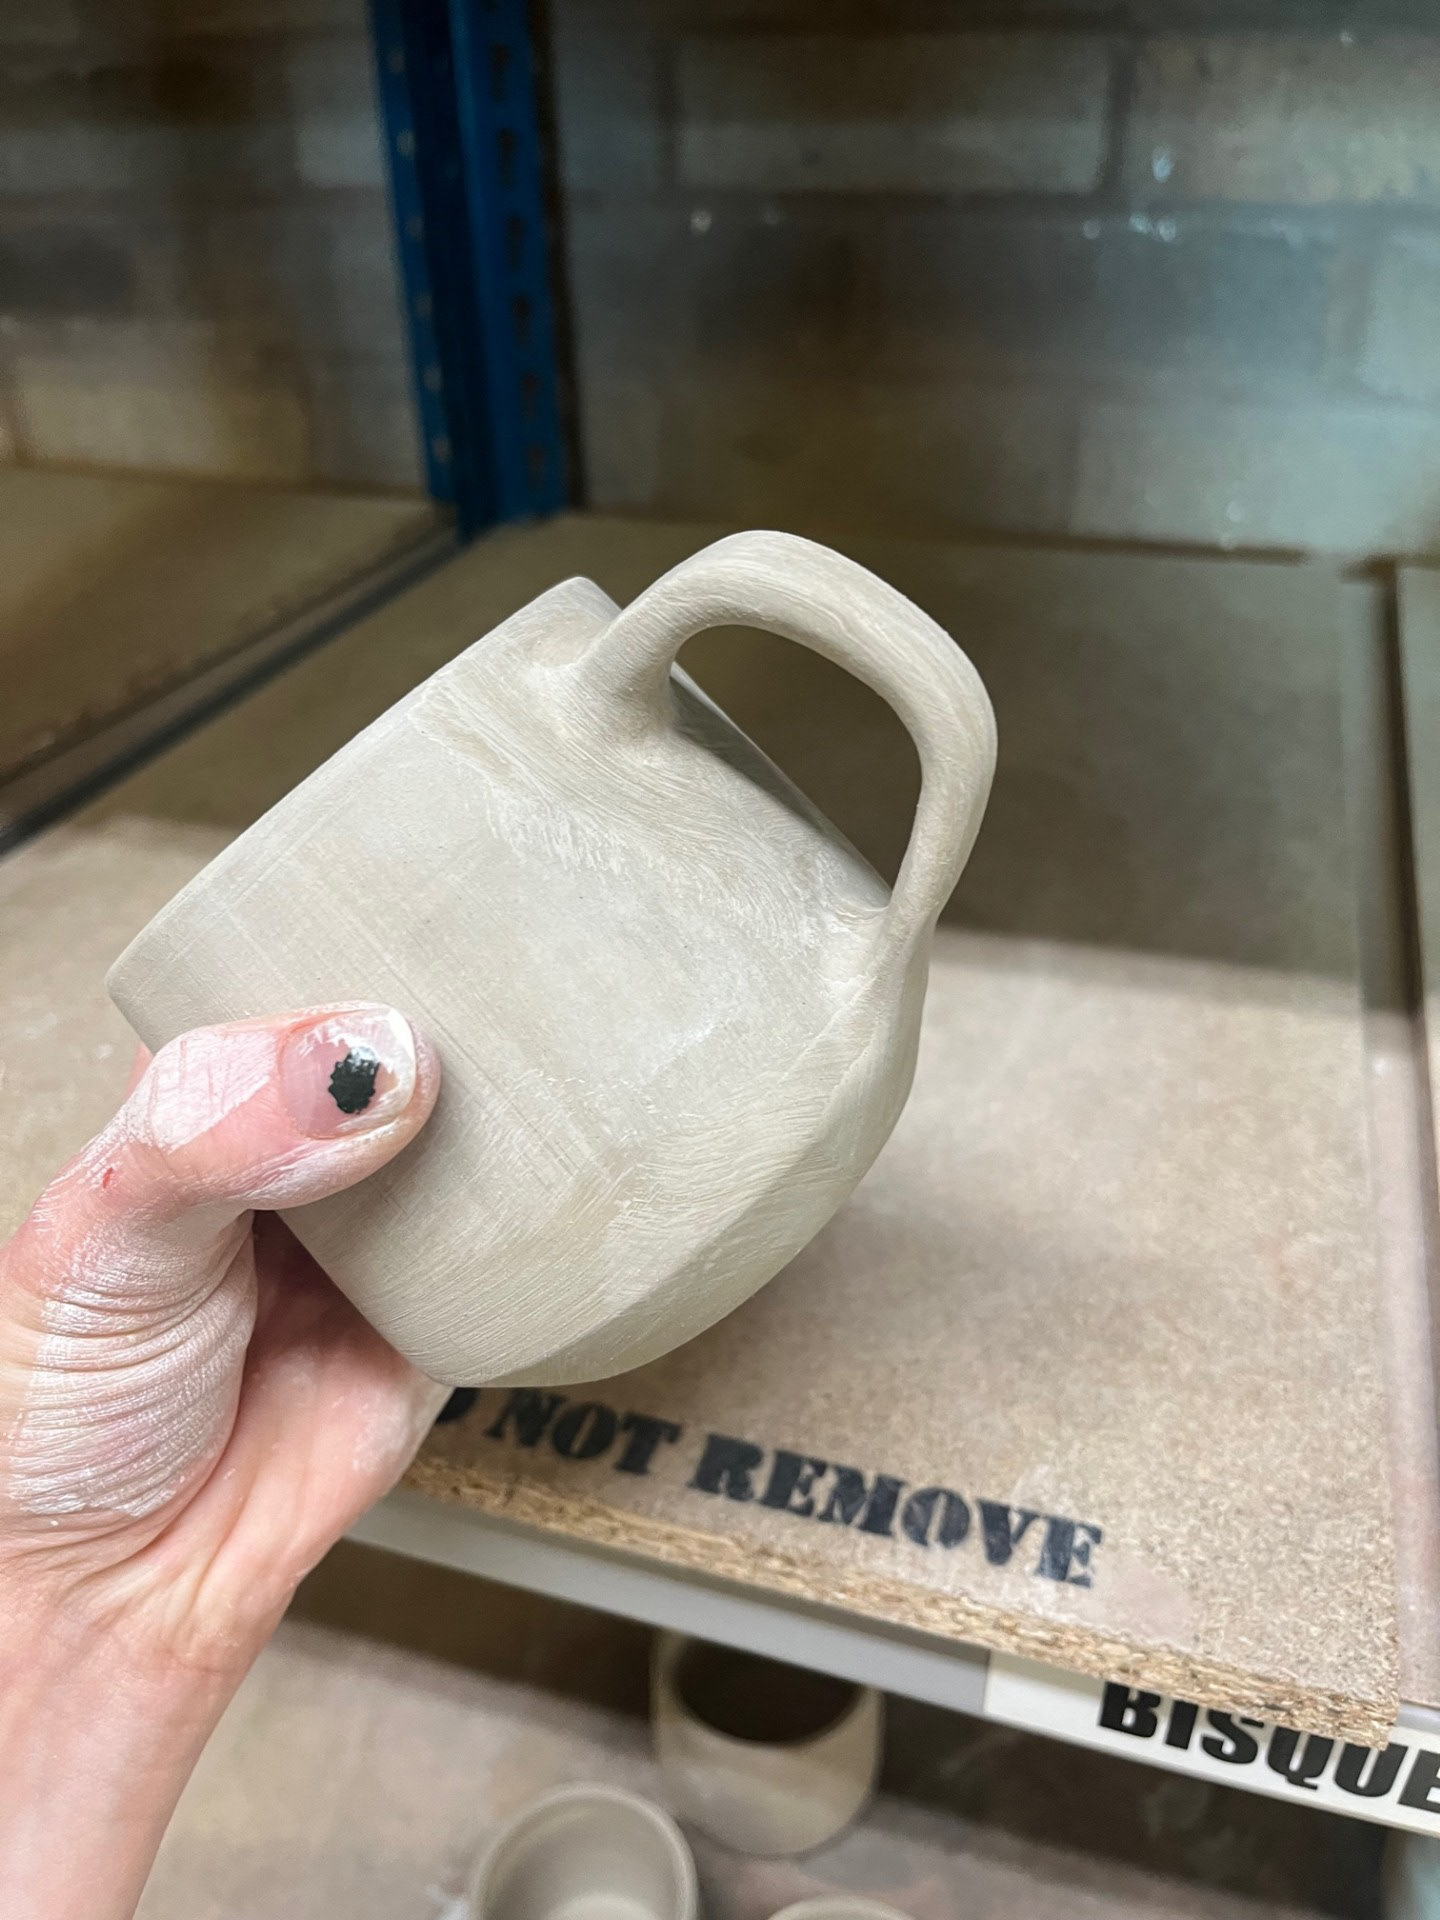
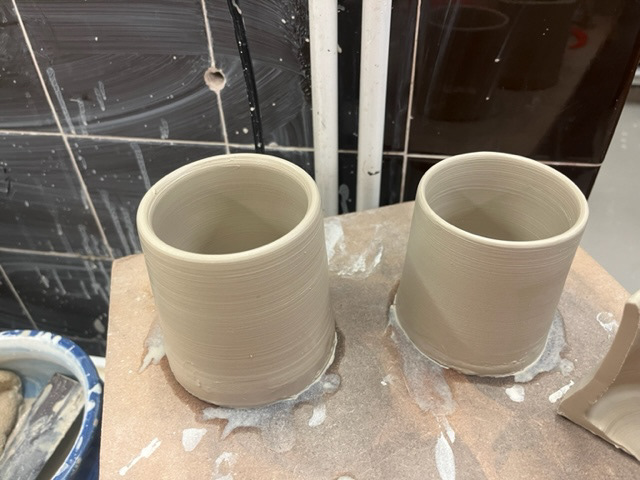
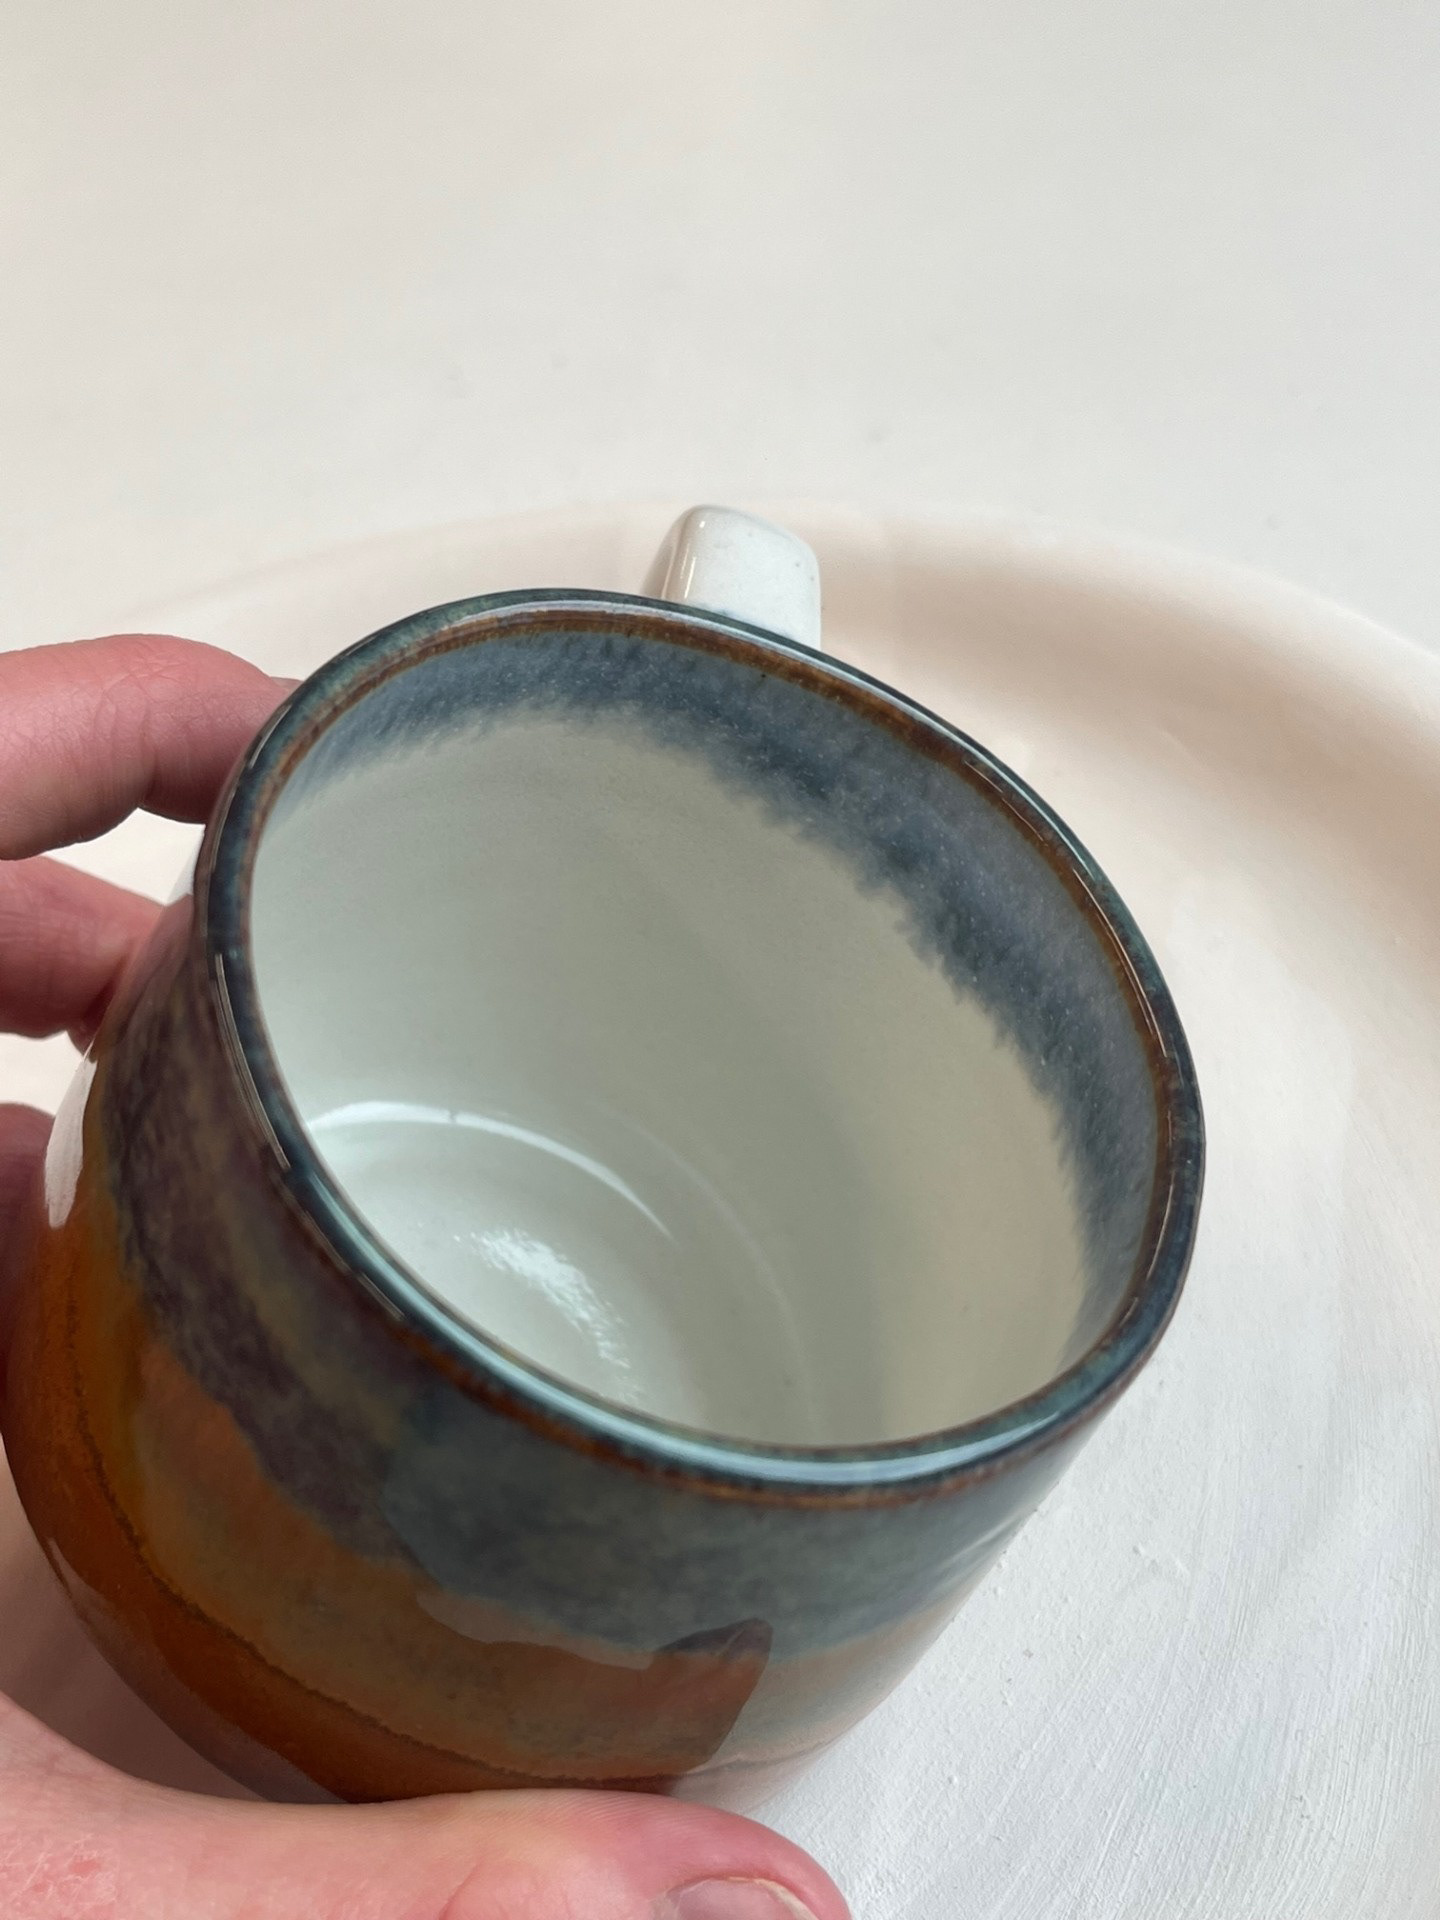
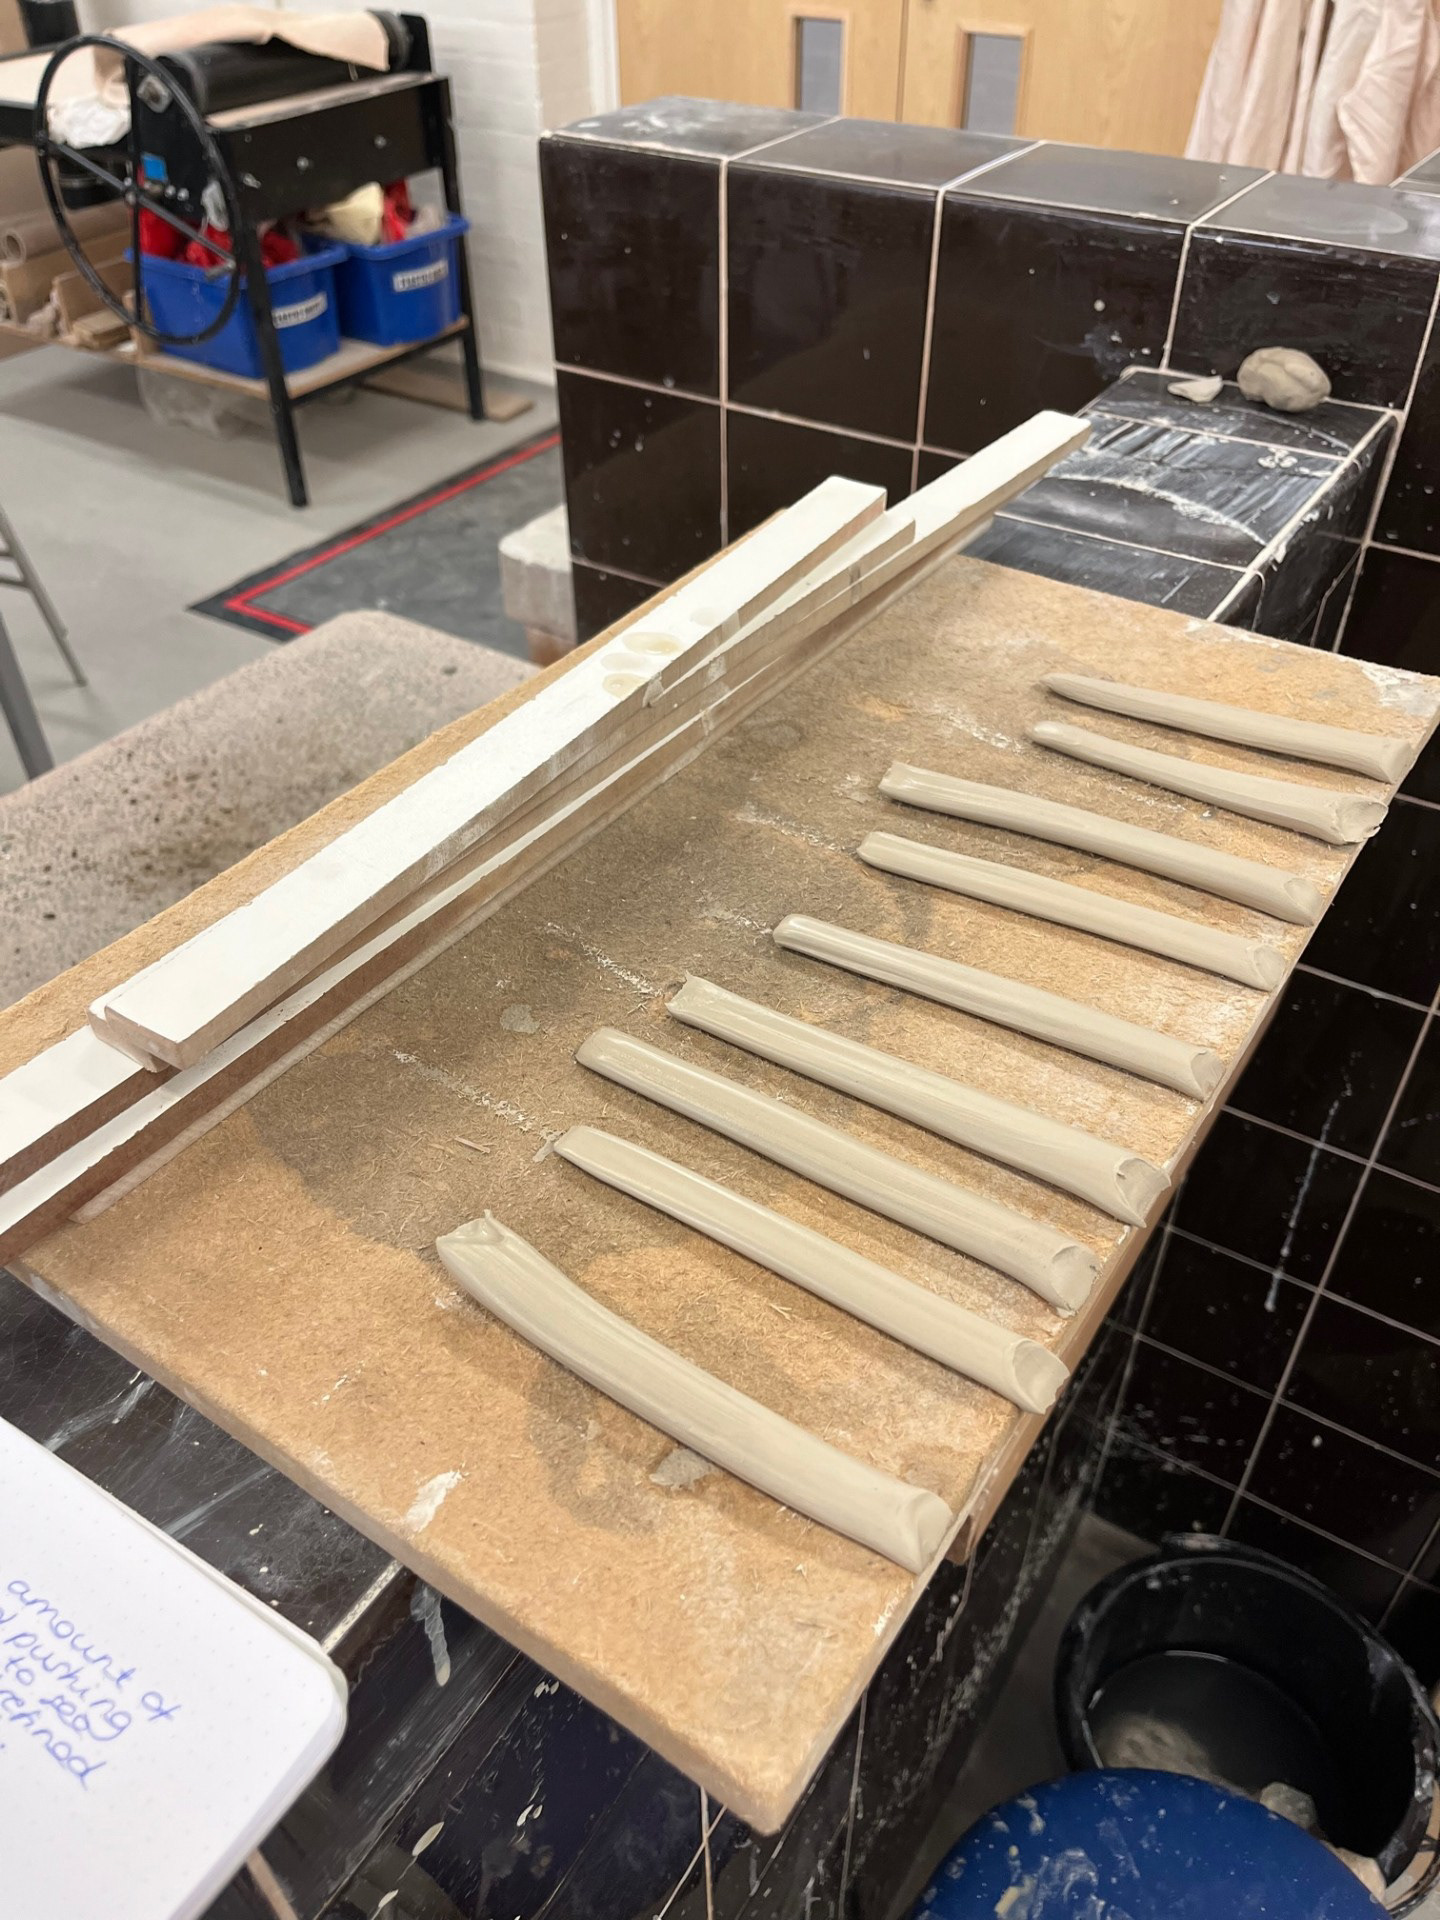
As these vessels were quite thick, I decided to turn them into mugs. I chose to do this because the actual throwing was the main thing that I was trying to gather knowledge on so once that is over I chose to make them into something that I love. Personally, I really enjoy making mugs as I enjoy the meticulousness of the smoothing and refinement; I find it quite a cathartic process. To start the process, I start by pulling the handles. I was shown this method when Joe Hartley came and guest tutored in level 5 and ever since he showed us I haven't looked back. since then, I have tried to keep in practice with this skill because its something that I want to use after university so I'm taking this time to refine the skill.
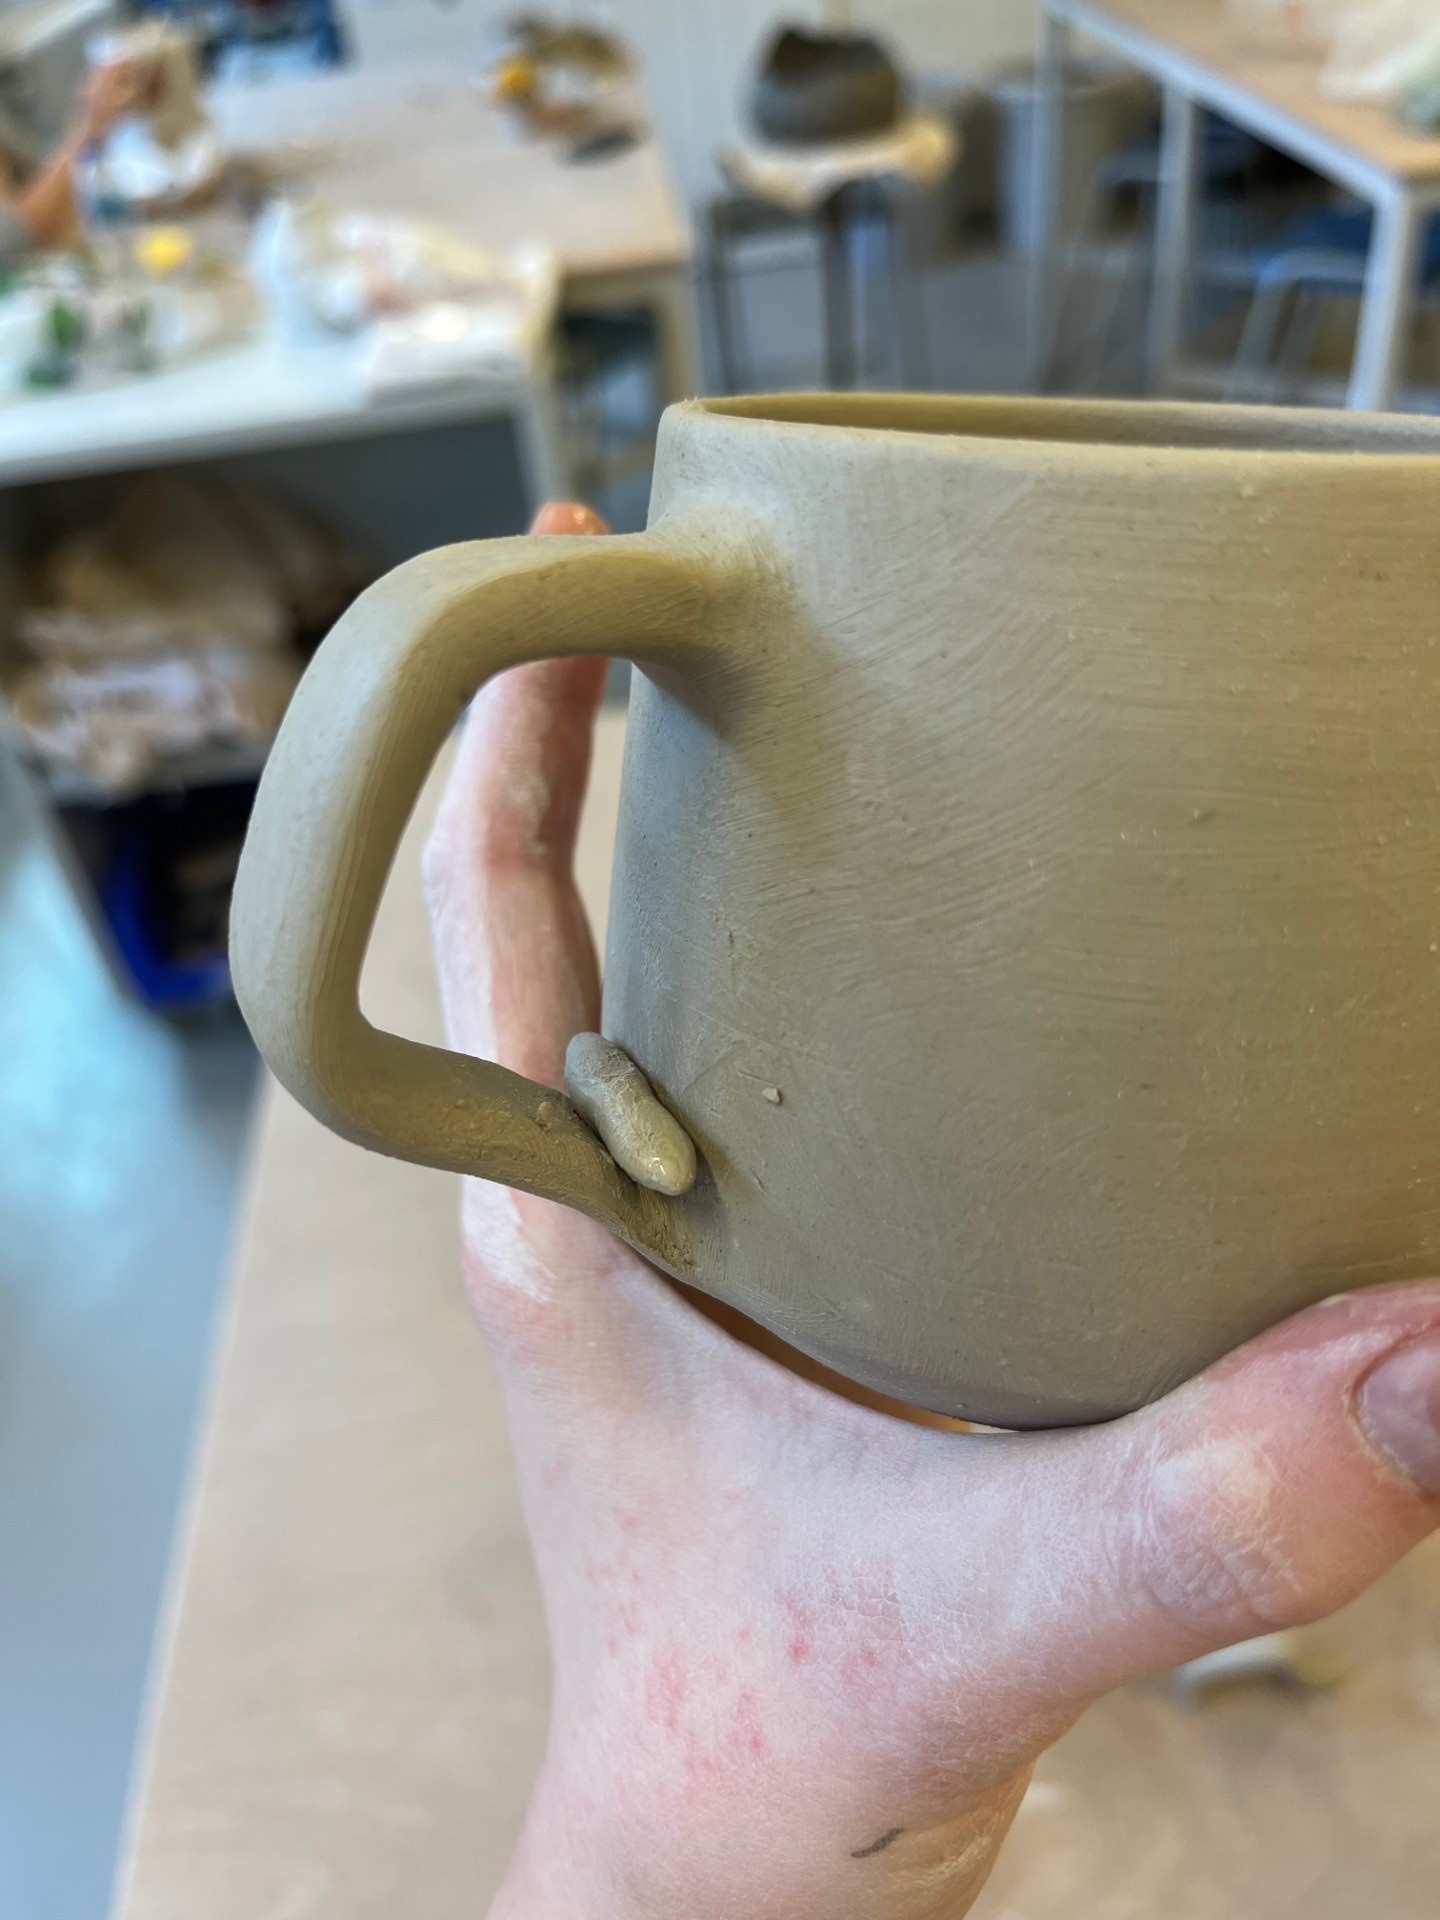
Once I had turned the two pieces, this meant that the handles had a bit of time to turn leather so it was now time to attach them. I have made mugs before so I am very familiar with the process, but I wanted to try a new method when attaching the handles. the majority of the process is the same but at the point where the handle meets the mug, I have added a small noodle of clay. This process allowed a more secure fixing but also created a more smooth and refined finish; i will 100% be taking this method on within my practice as it creates
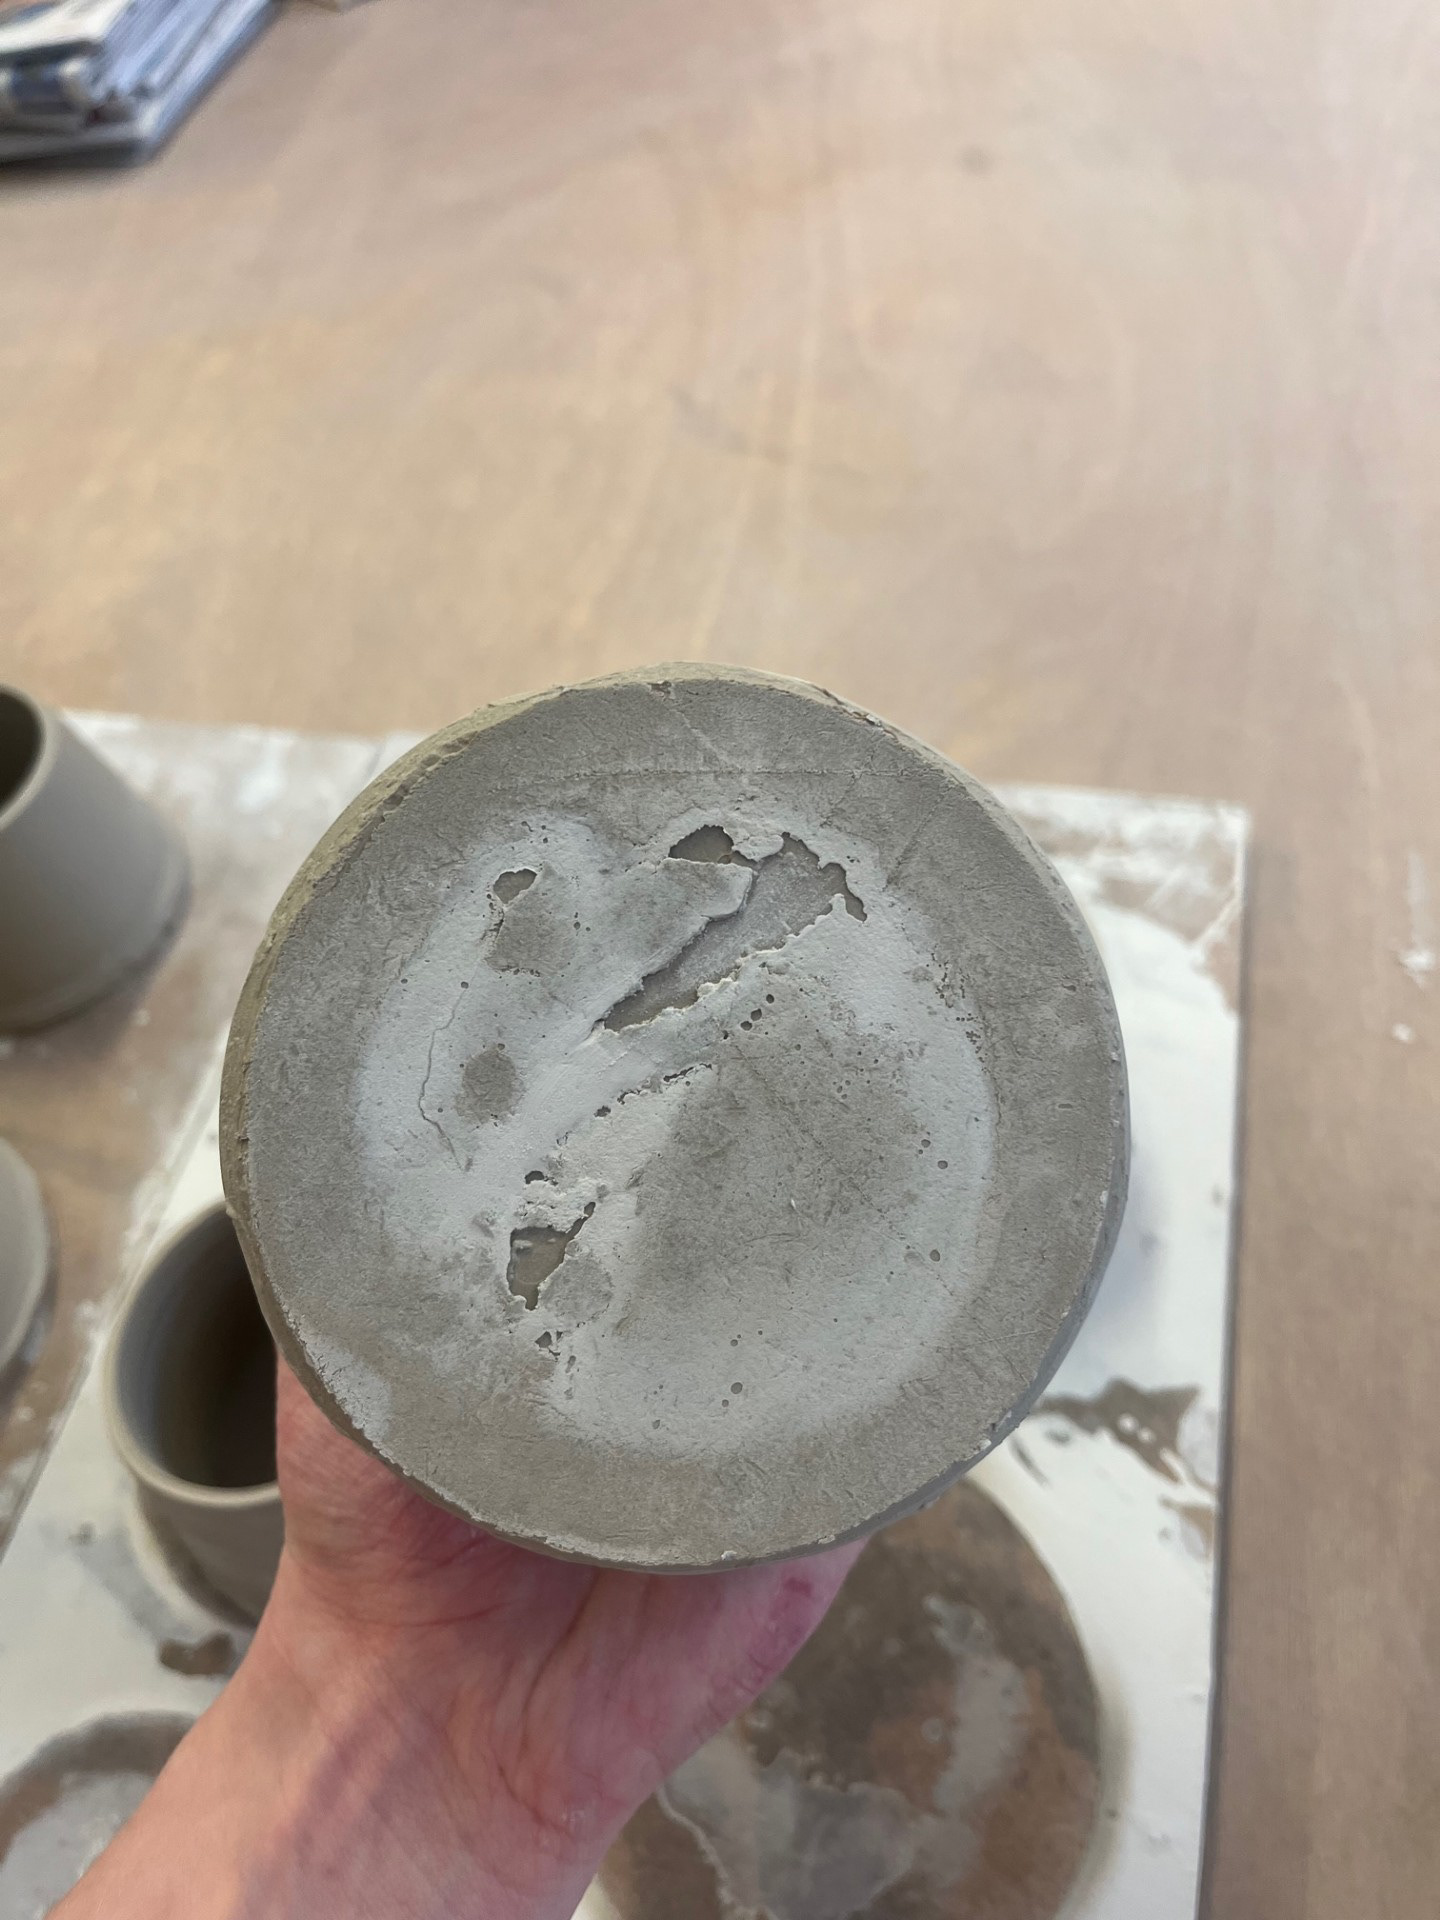
At the end of the session, this caught my eye in the studio. As I have been here for a long time, this is something that I see every day but have never realised its actual importance in breaking down the process. Pulling up the walls is something that I have been struggling with recently and I'm finding it quite hard to grasp what it is I'm actually meant to be doing. I think that this really helped me because no matter how many videos I could watch on the subject, none of them are able to show me what's happening on the inside to the actual clay. I am a very visual learner so sometimes I need that extra breakdown of a skill and this provided a step by step guide in such a simple and understandable way.
WEEK 1: 28&29/02/25, Tuesday
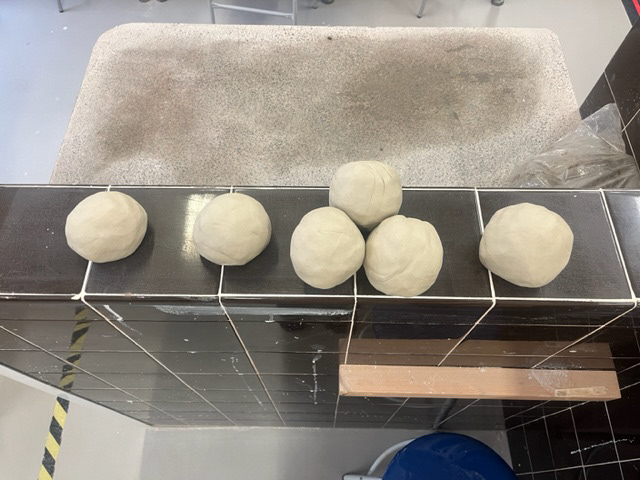
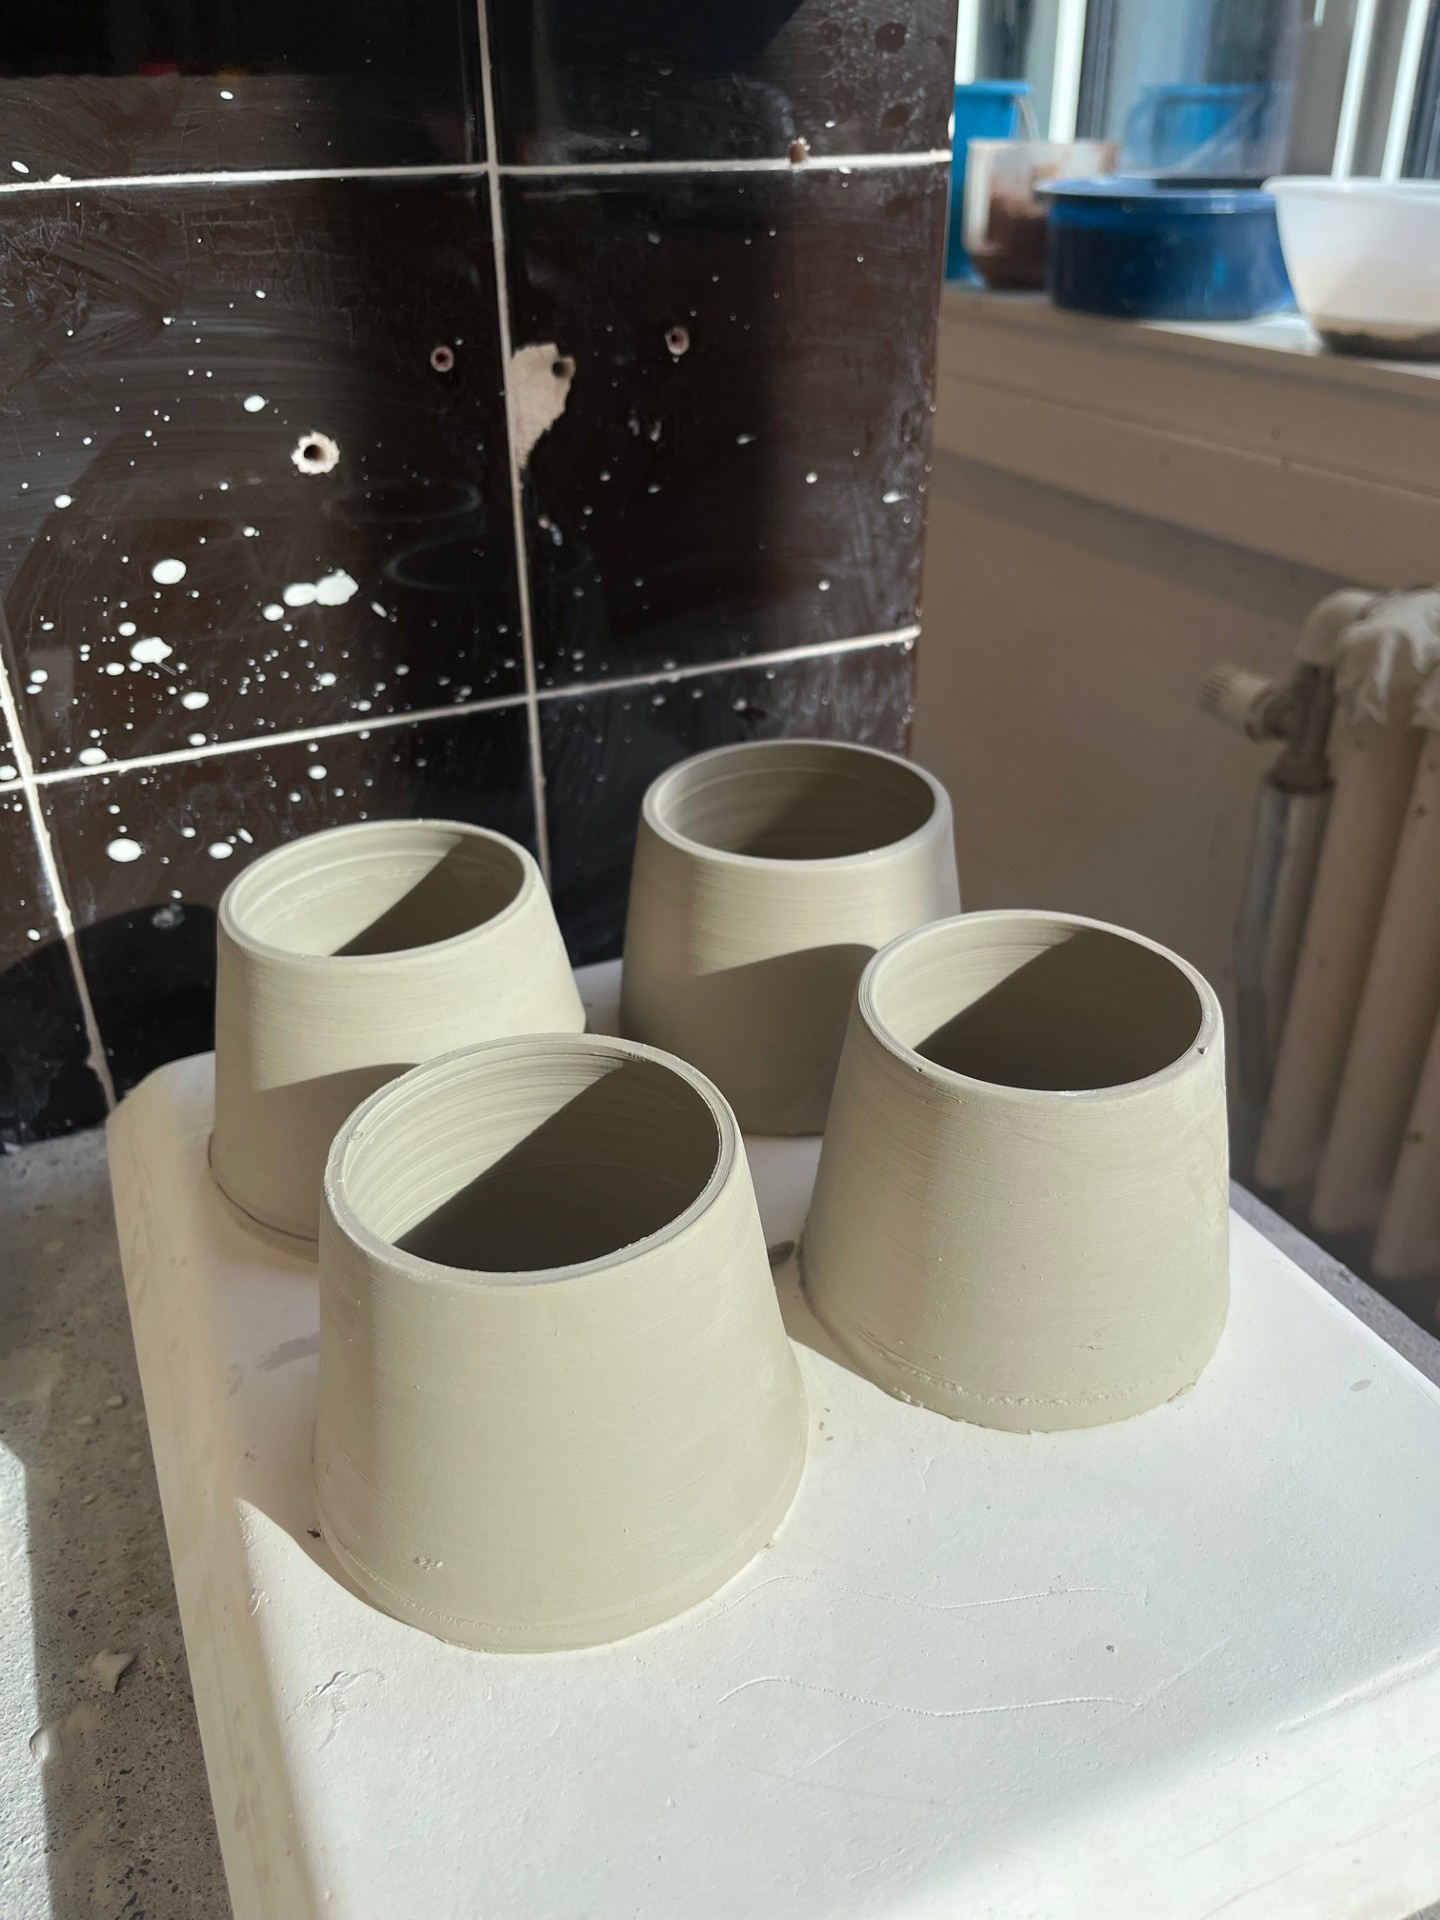
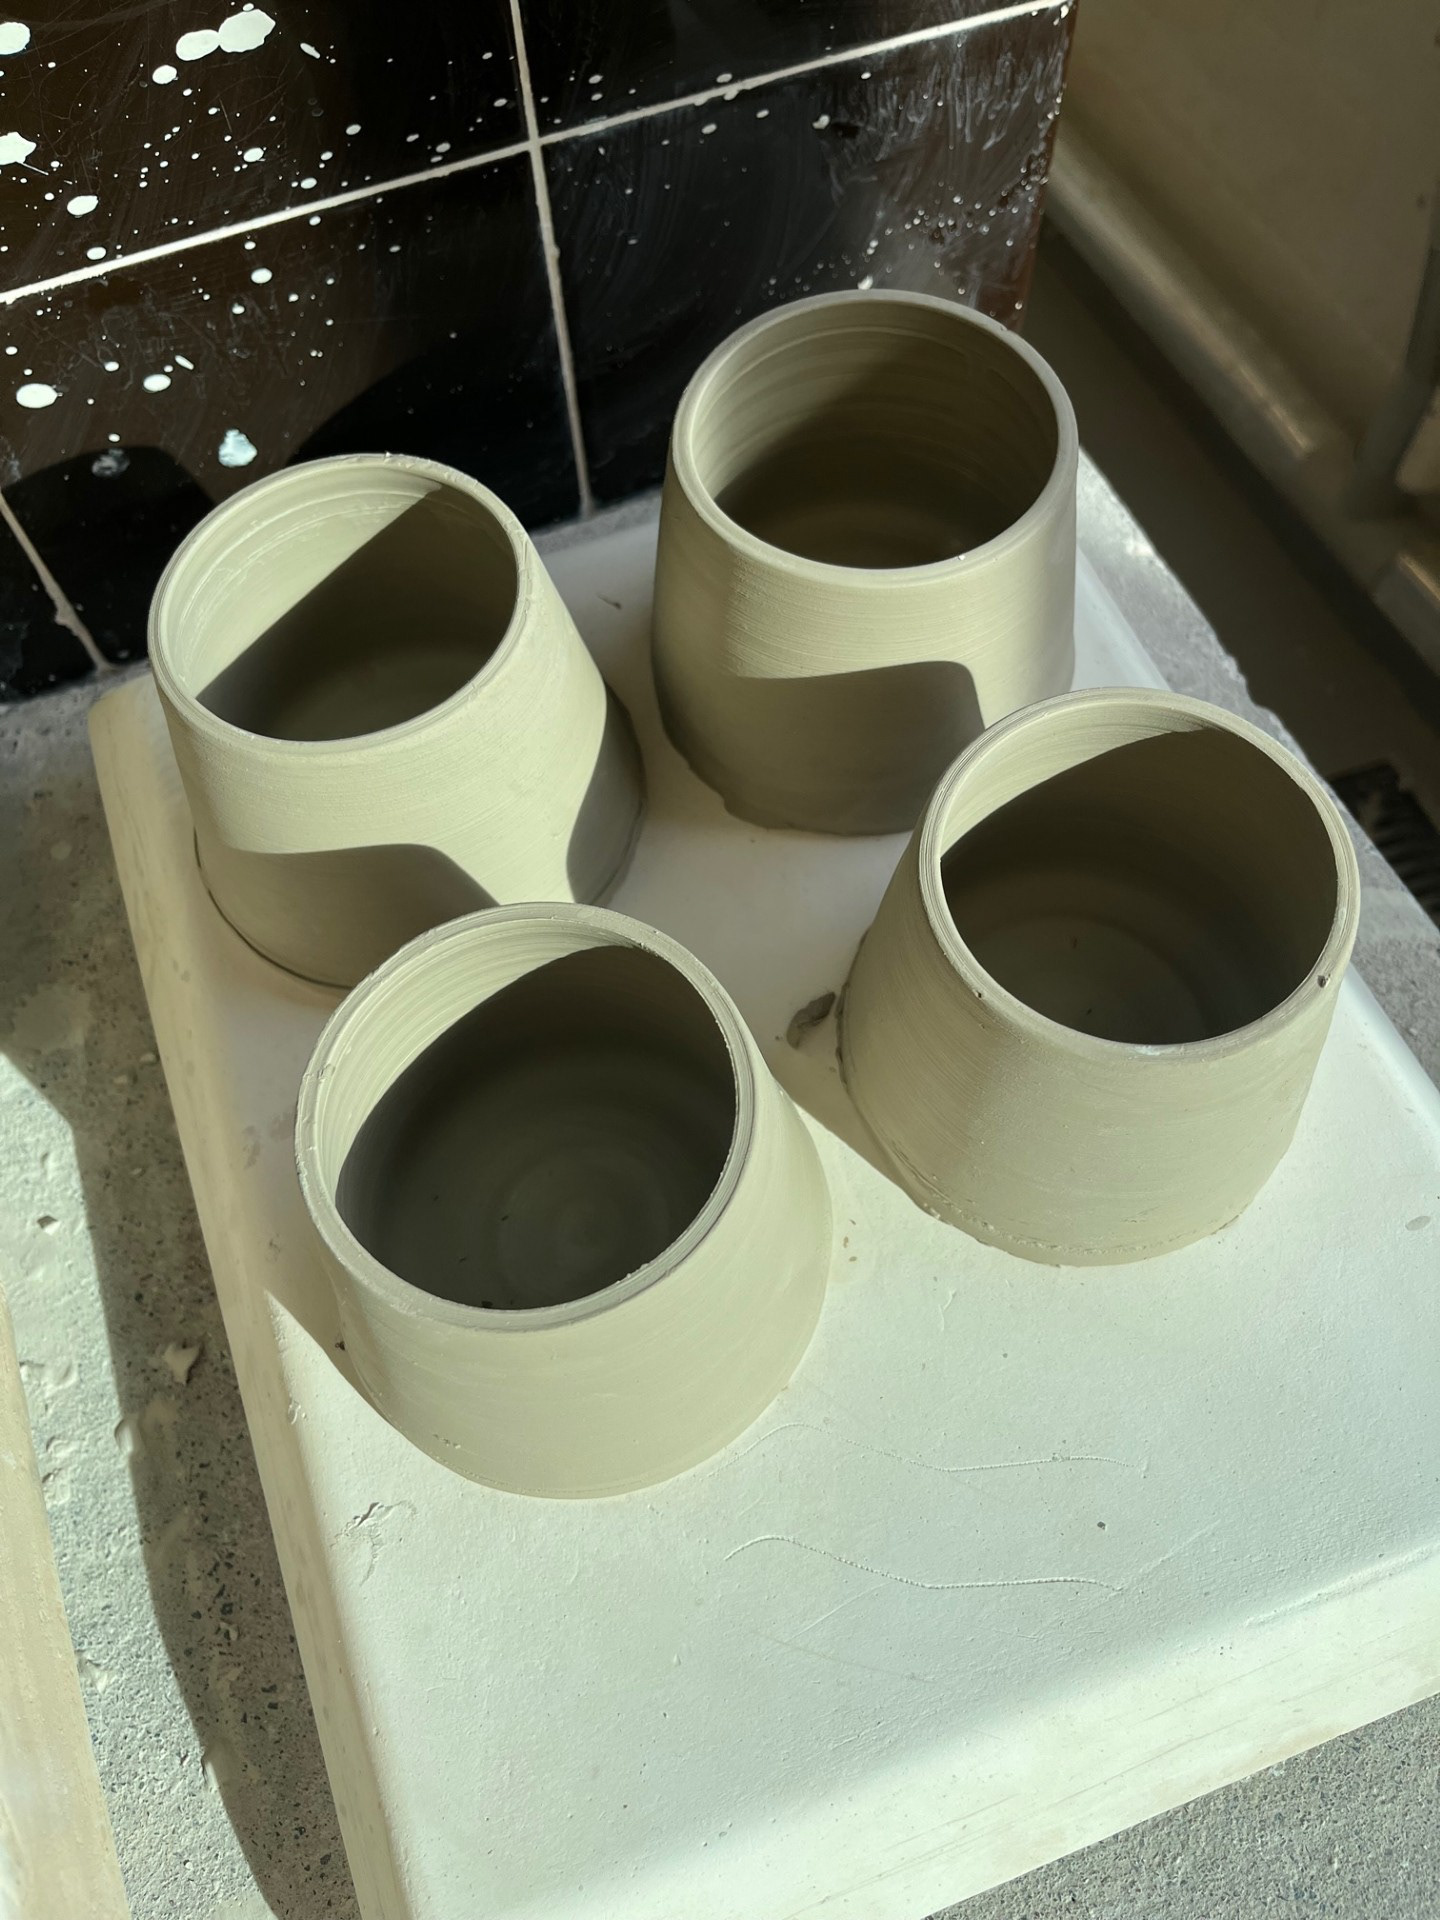
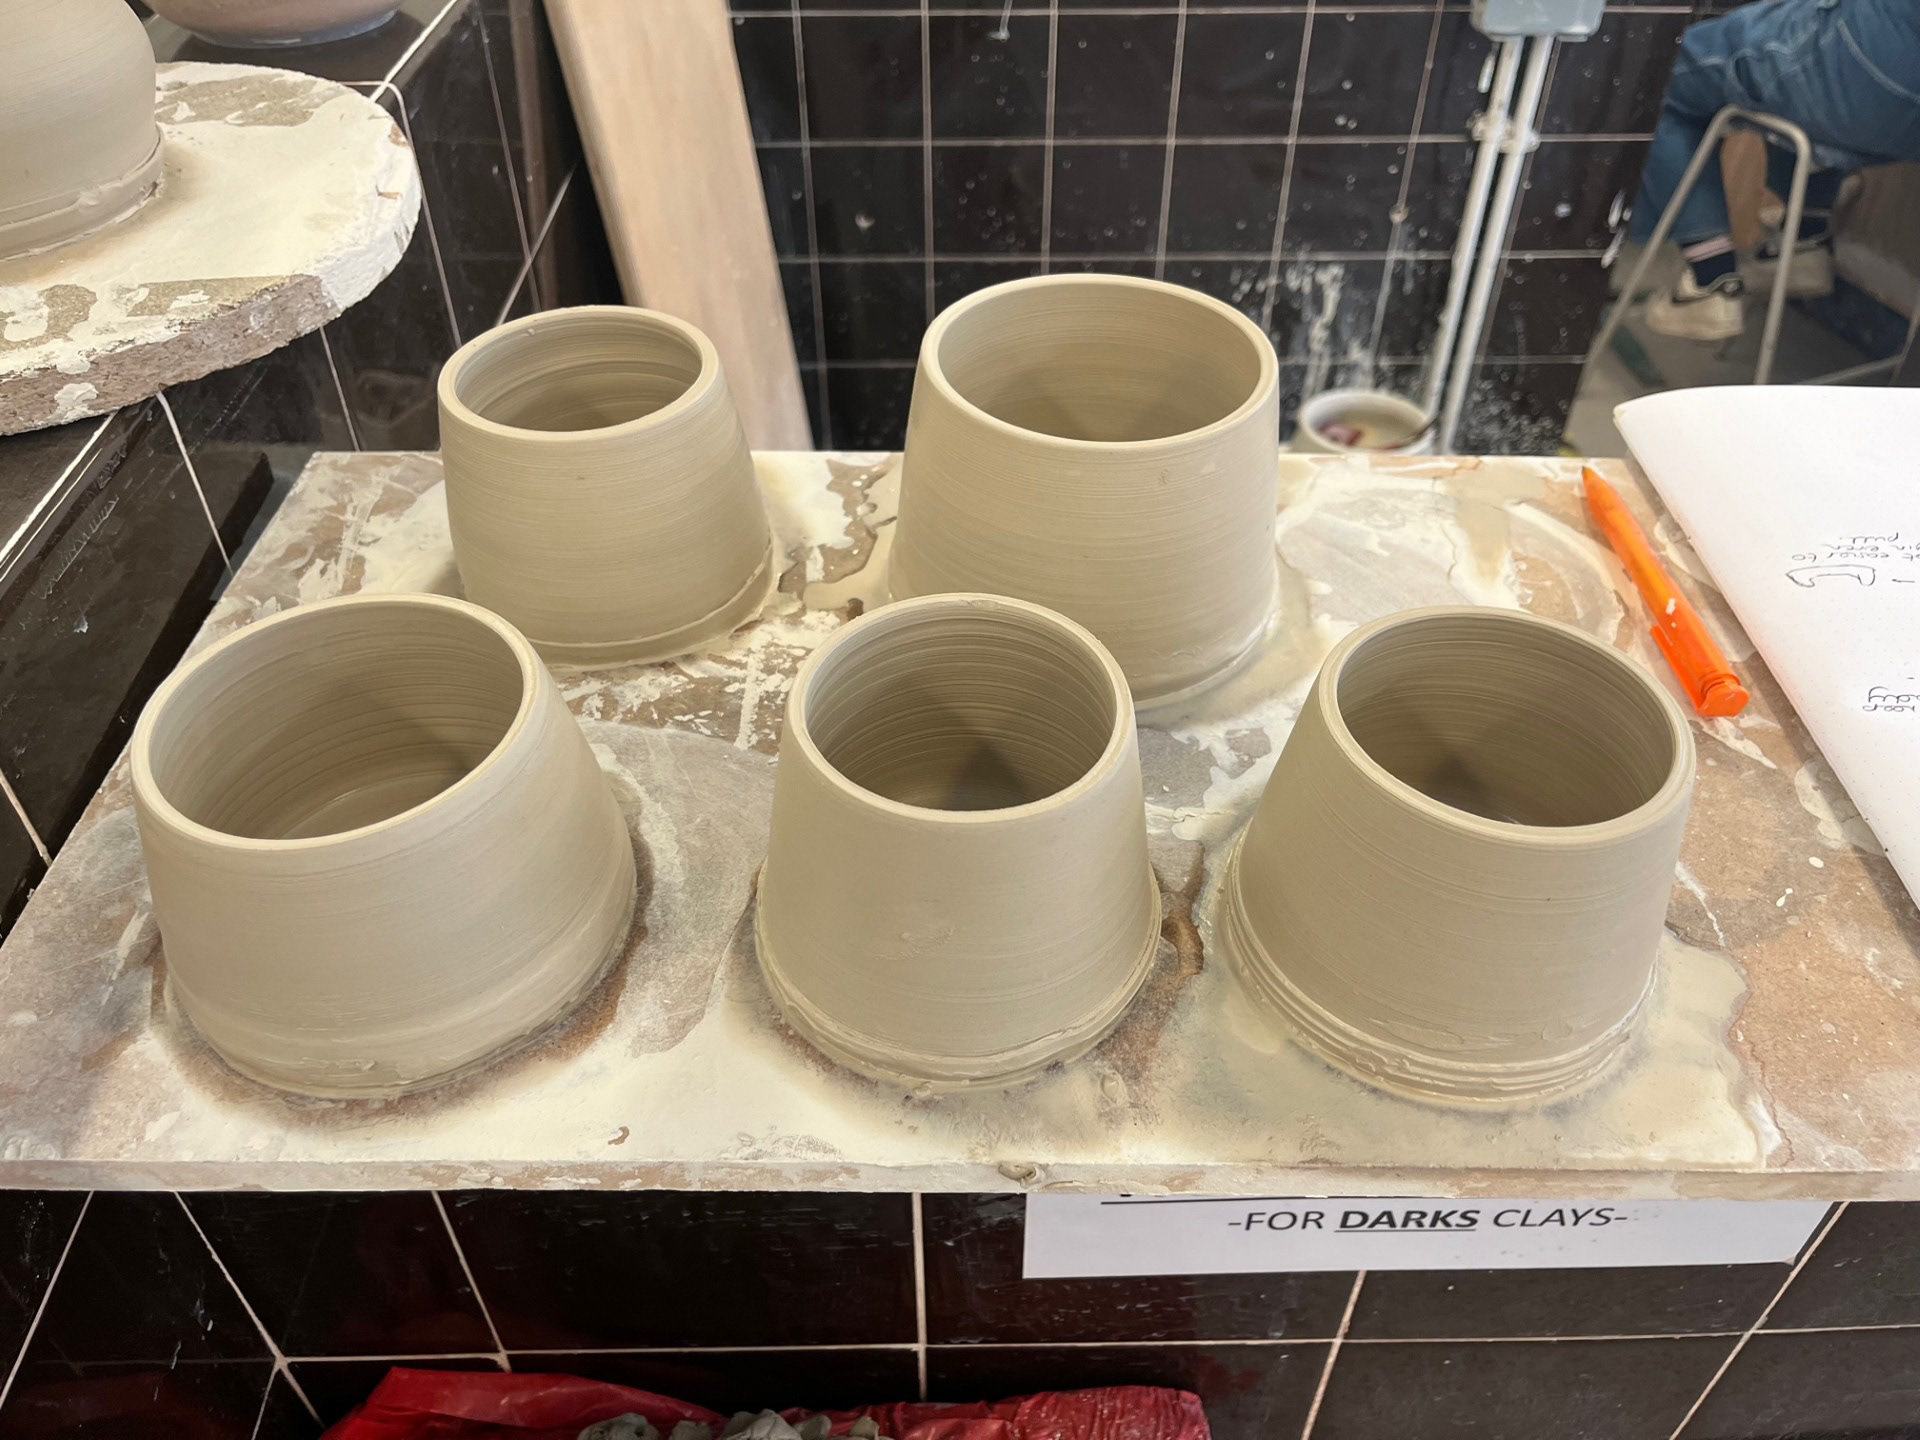
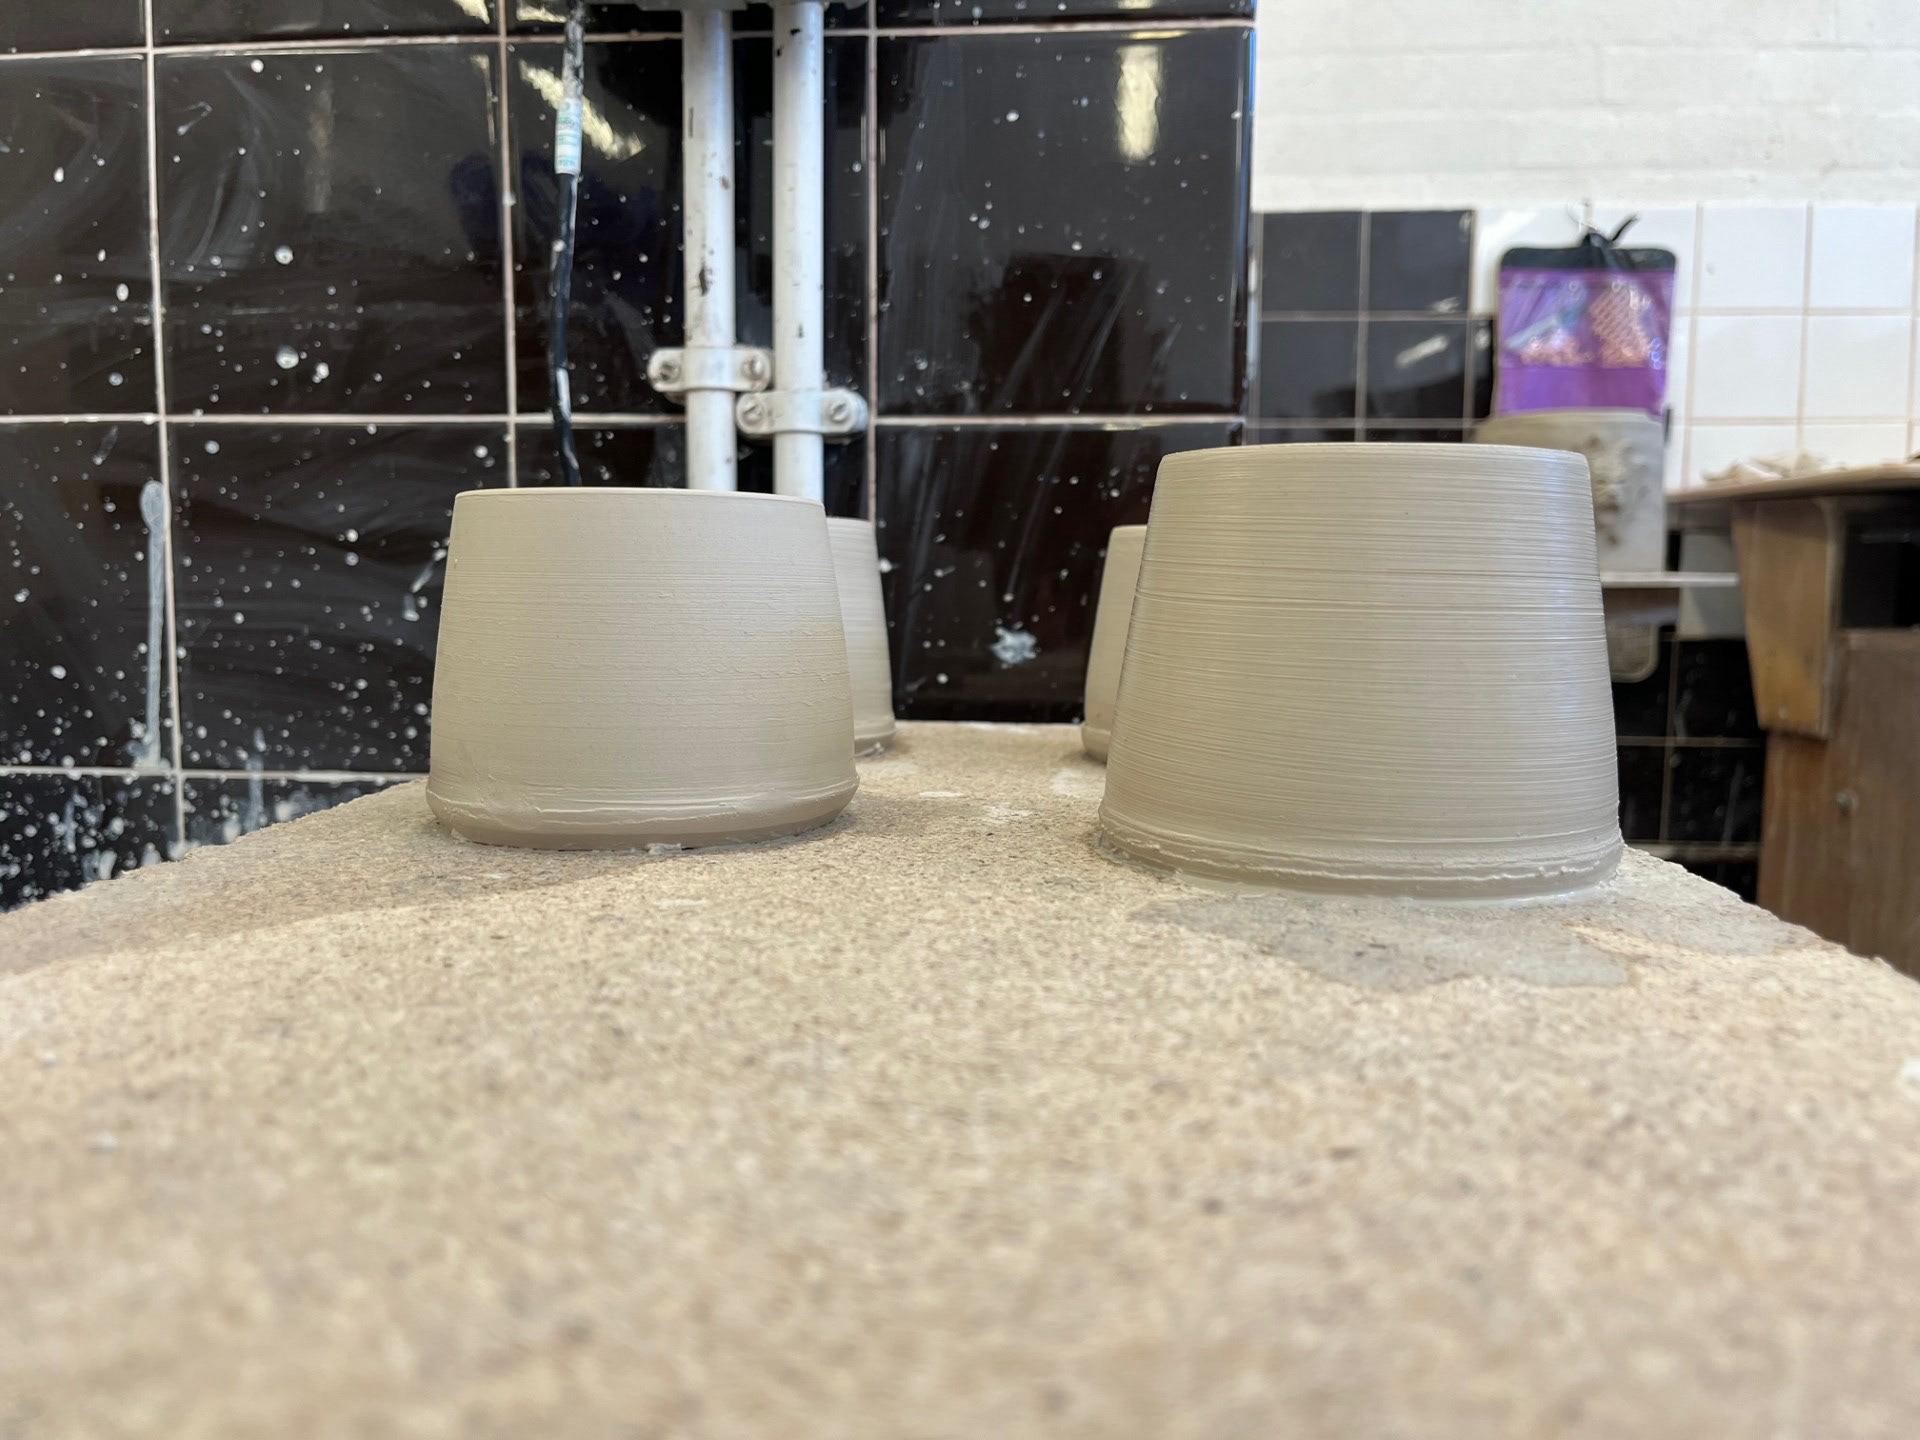
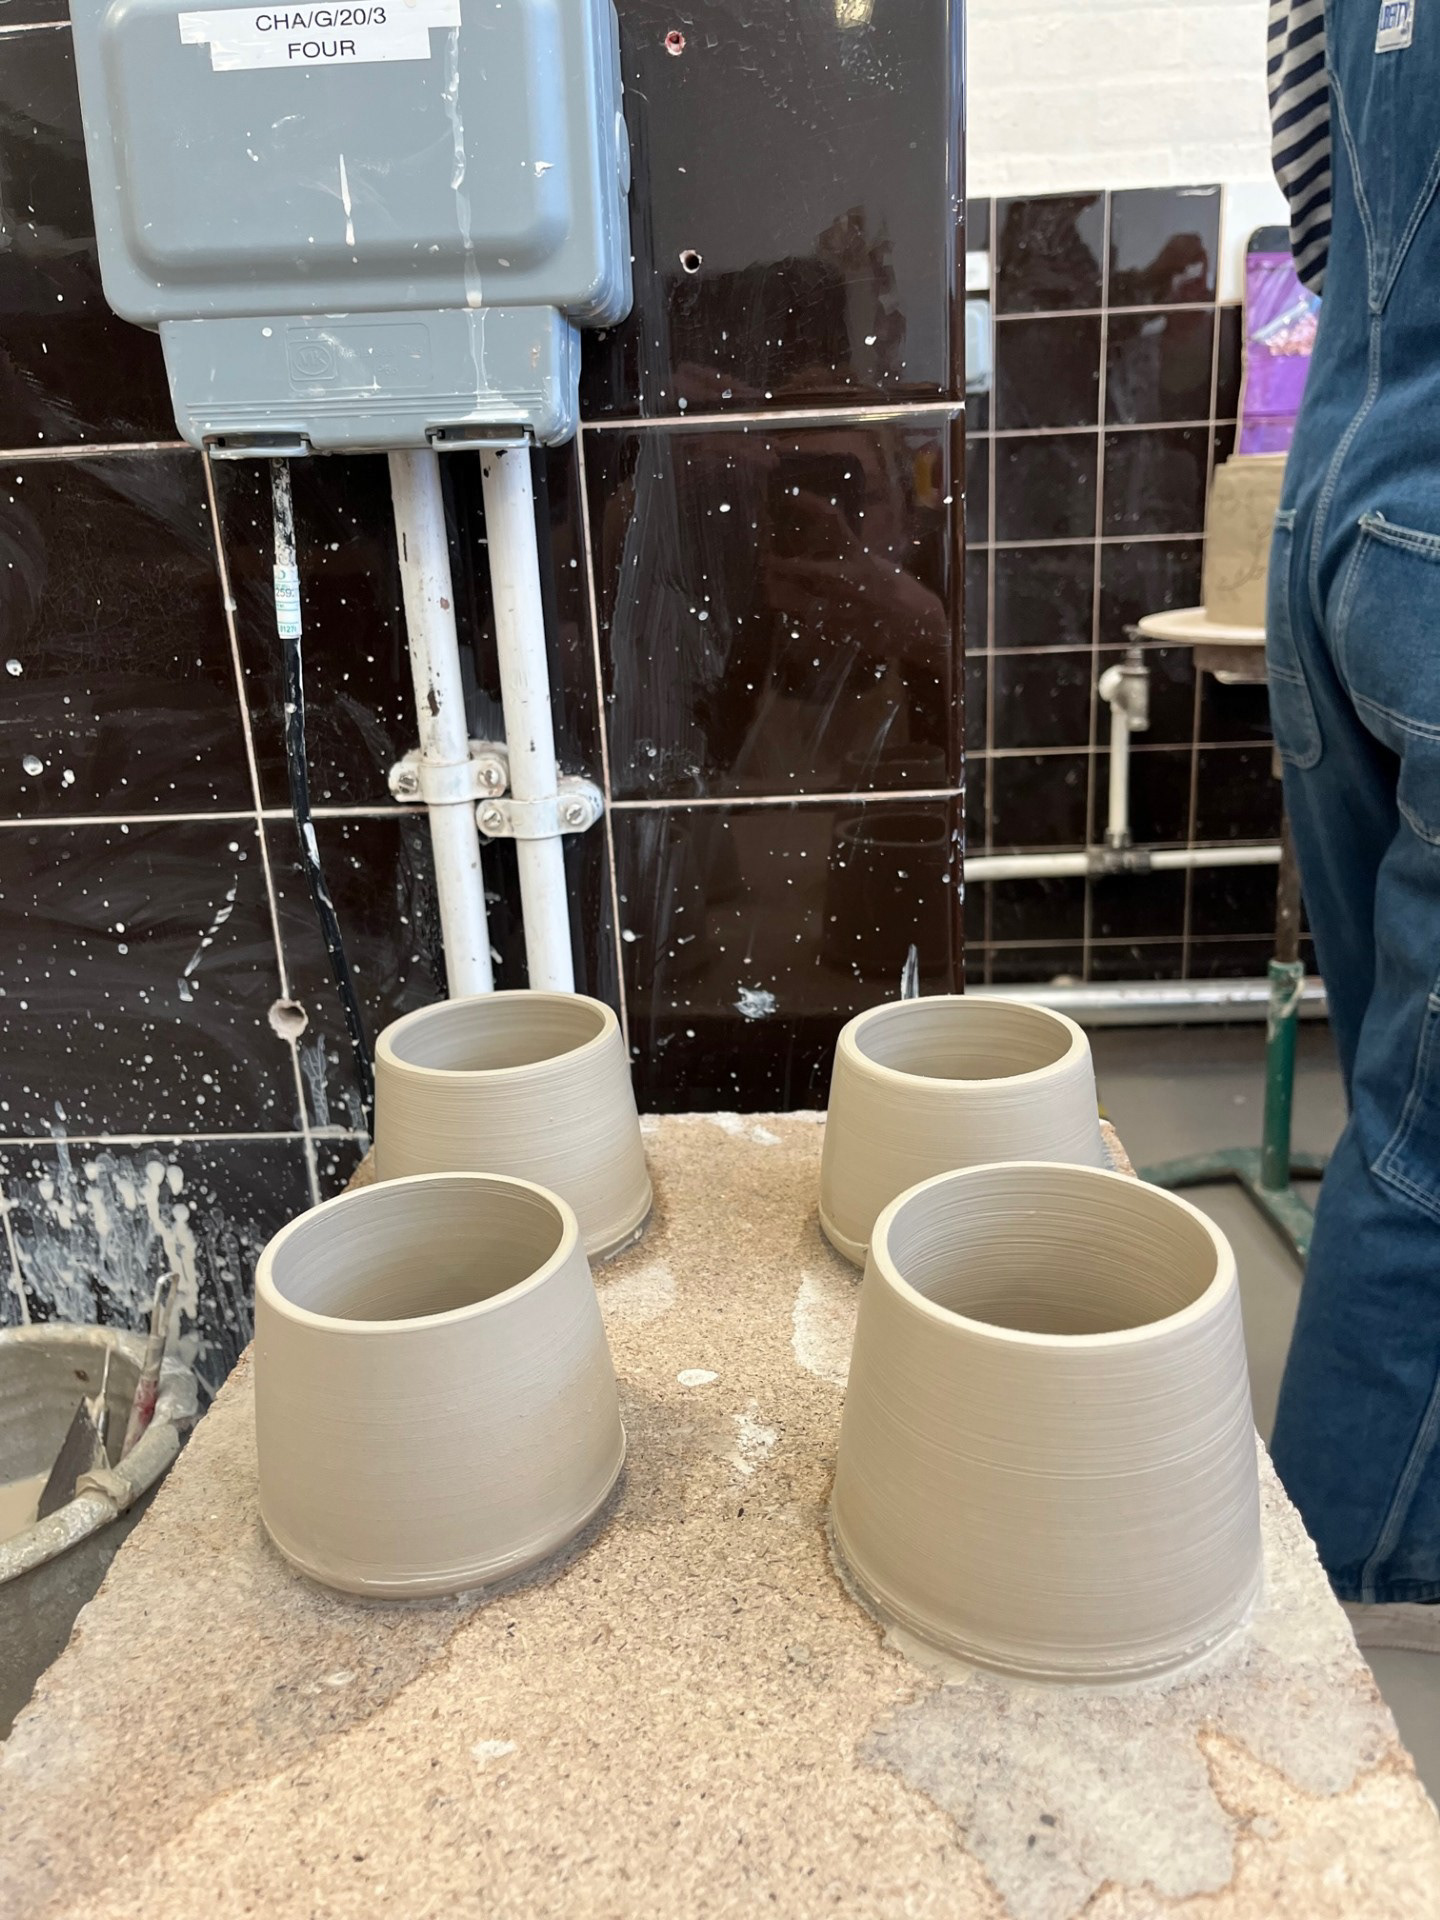
Going into this session, I have chosen to change to working with 500g clay balls. In the previous session, I realised that 1kg of clay was too much to work with if I wan to achieve consistency and refinement of my skills. Going into his session I also had a discussion with Rudi where he also suggested starting off with 500g of clay as it's a lot more achievable. One thing that I have always struggled with is making the same thing twice. I think this is partly due to my minds ability to make in information as when throwing I feel like everything happens so fast so I don't have time to take in all the information; meaning that I can both never remember to carry out the same thing in that way as well as not remember ing how to do it. Up until now I feel like it has always been a game of chance. I think that I want to really try and slow down the process in this session so that I can give myself the best oppourunity to recall the tactile process; and therefore aid the repeatability of my skill.
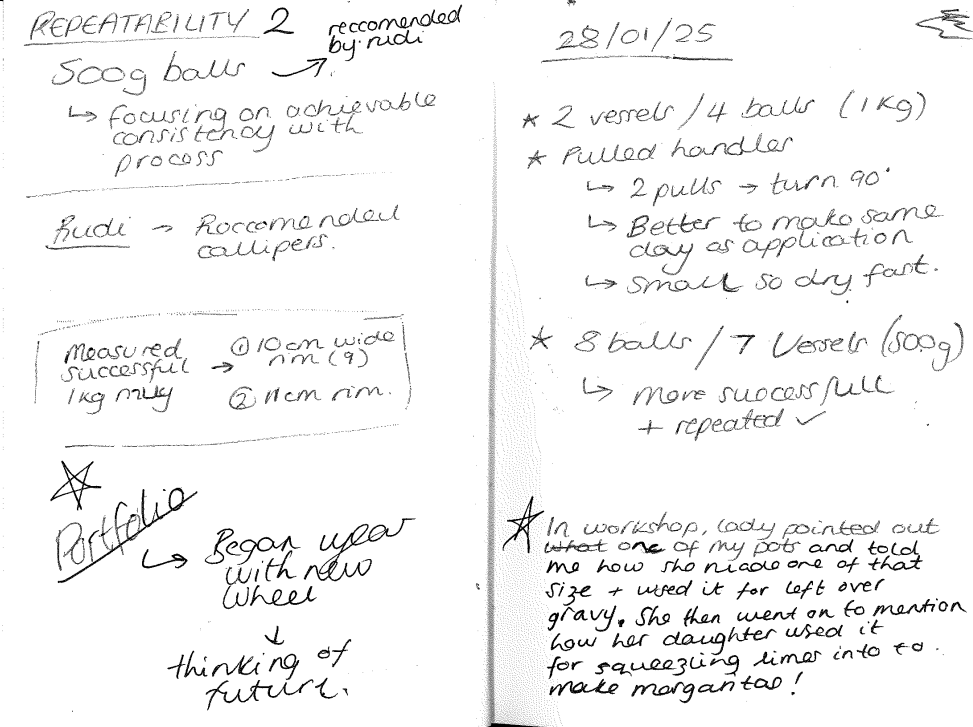
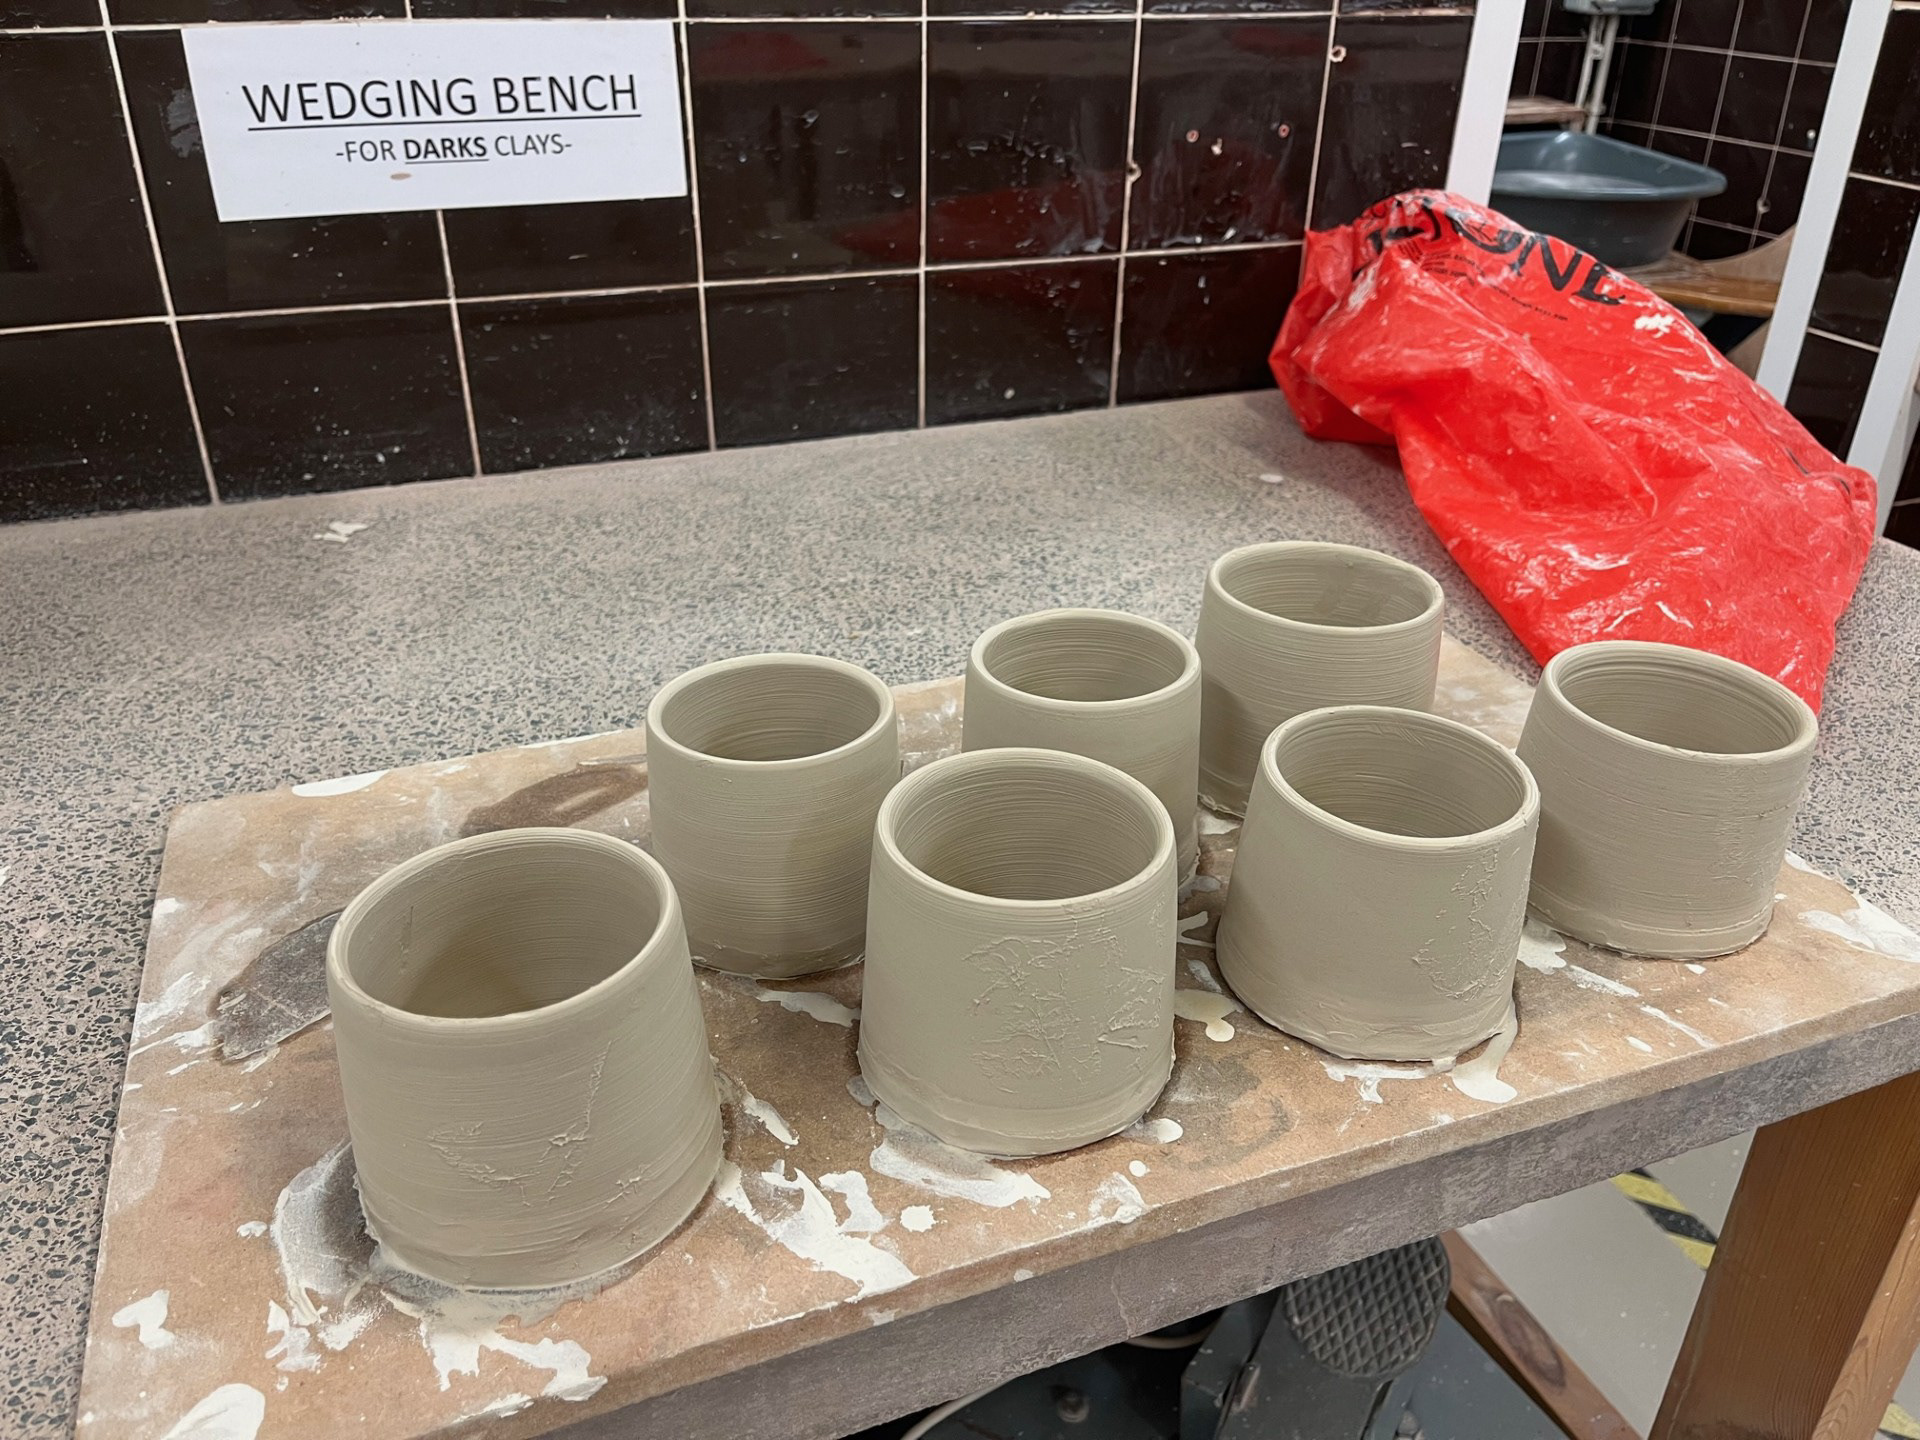
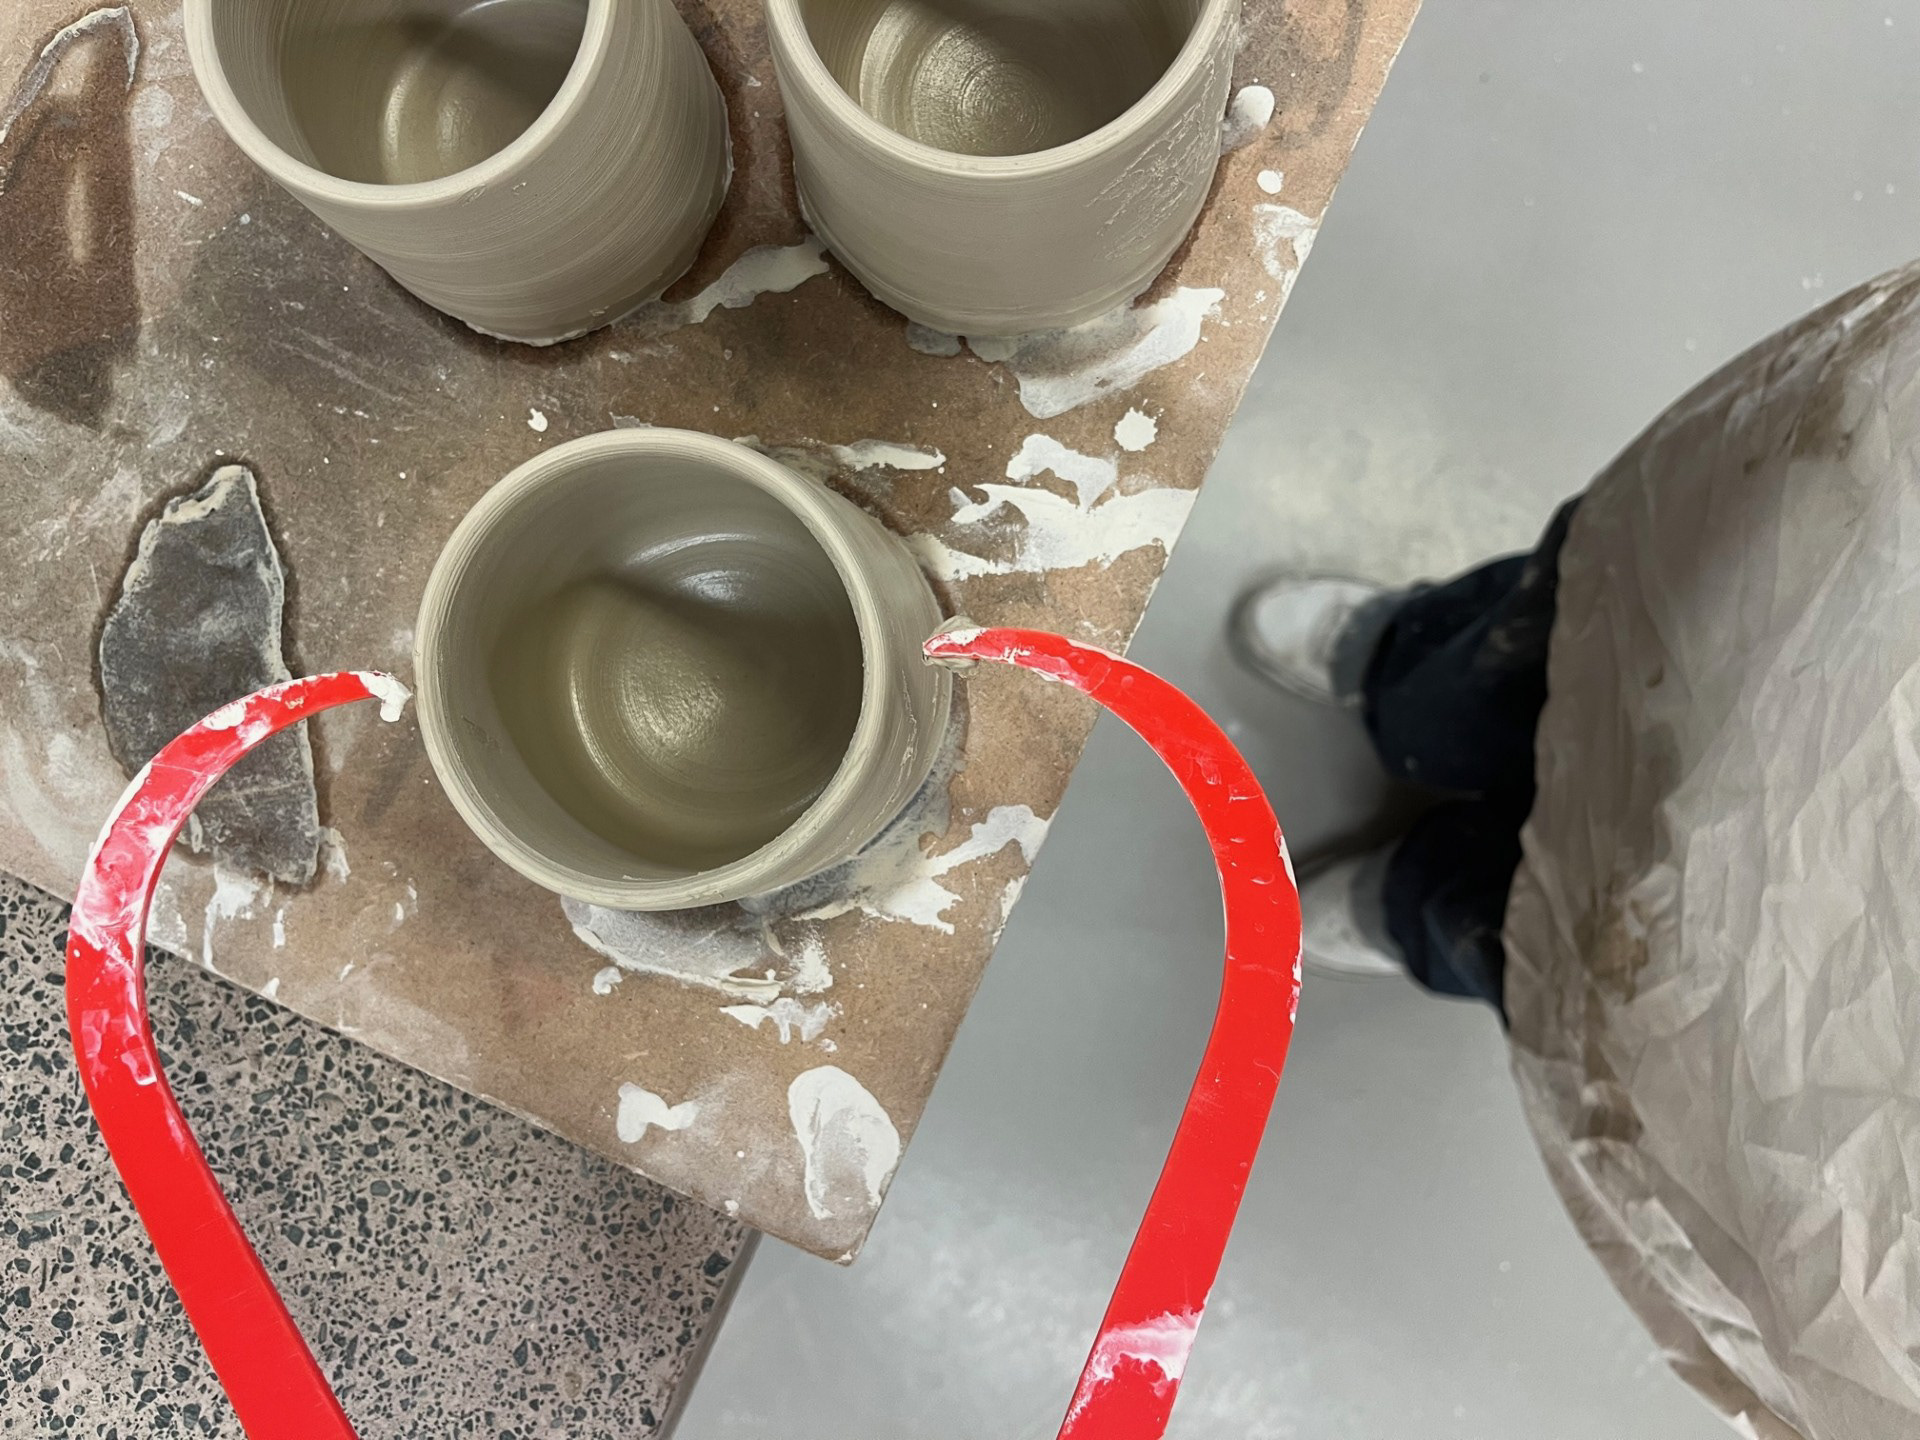
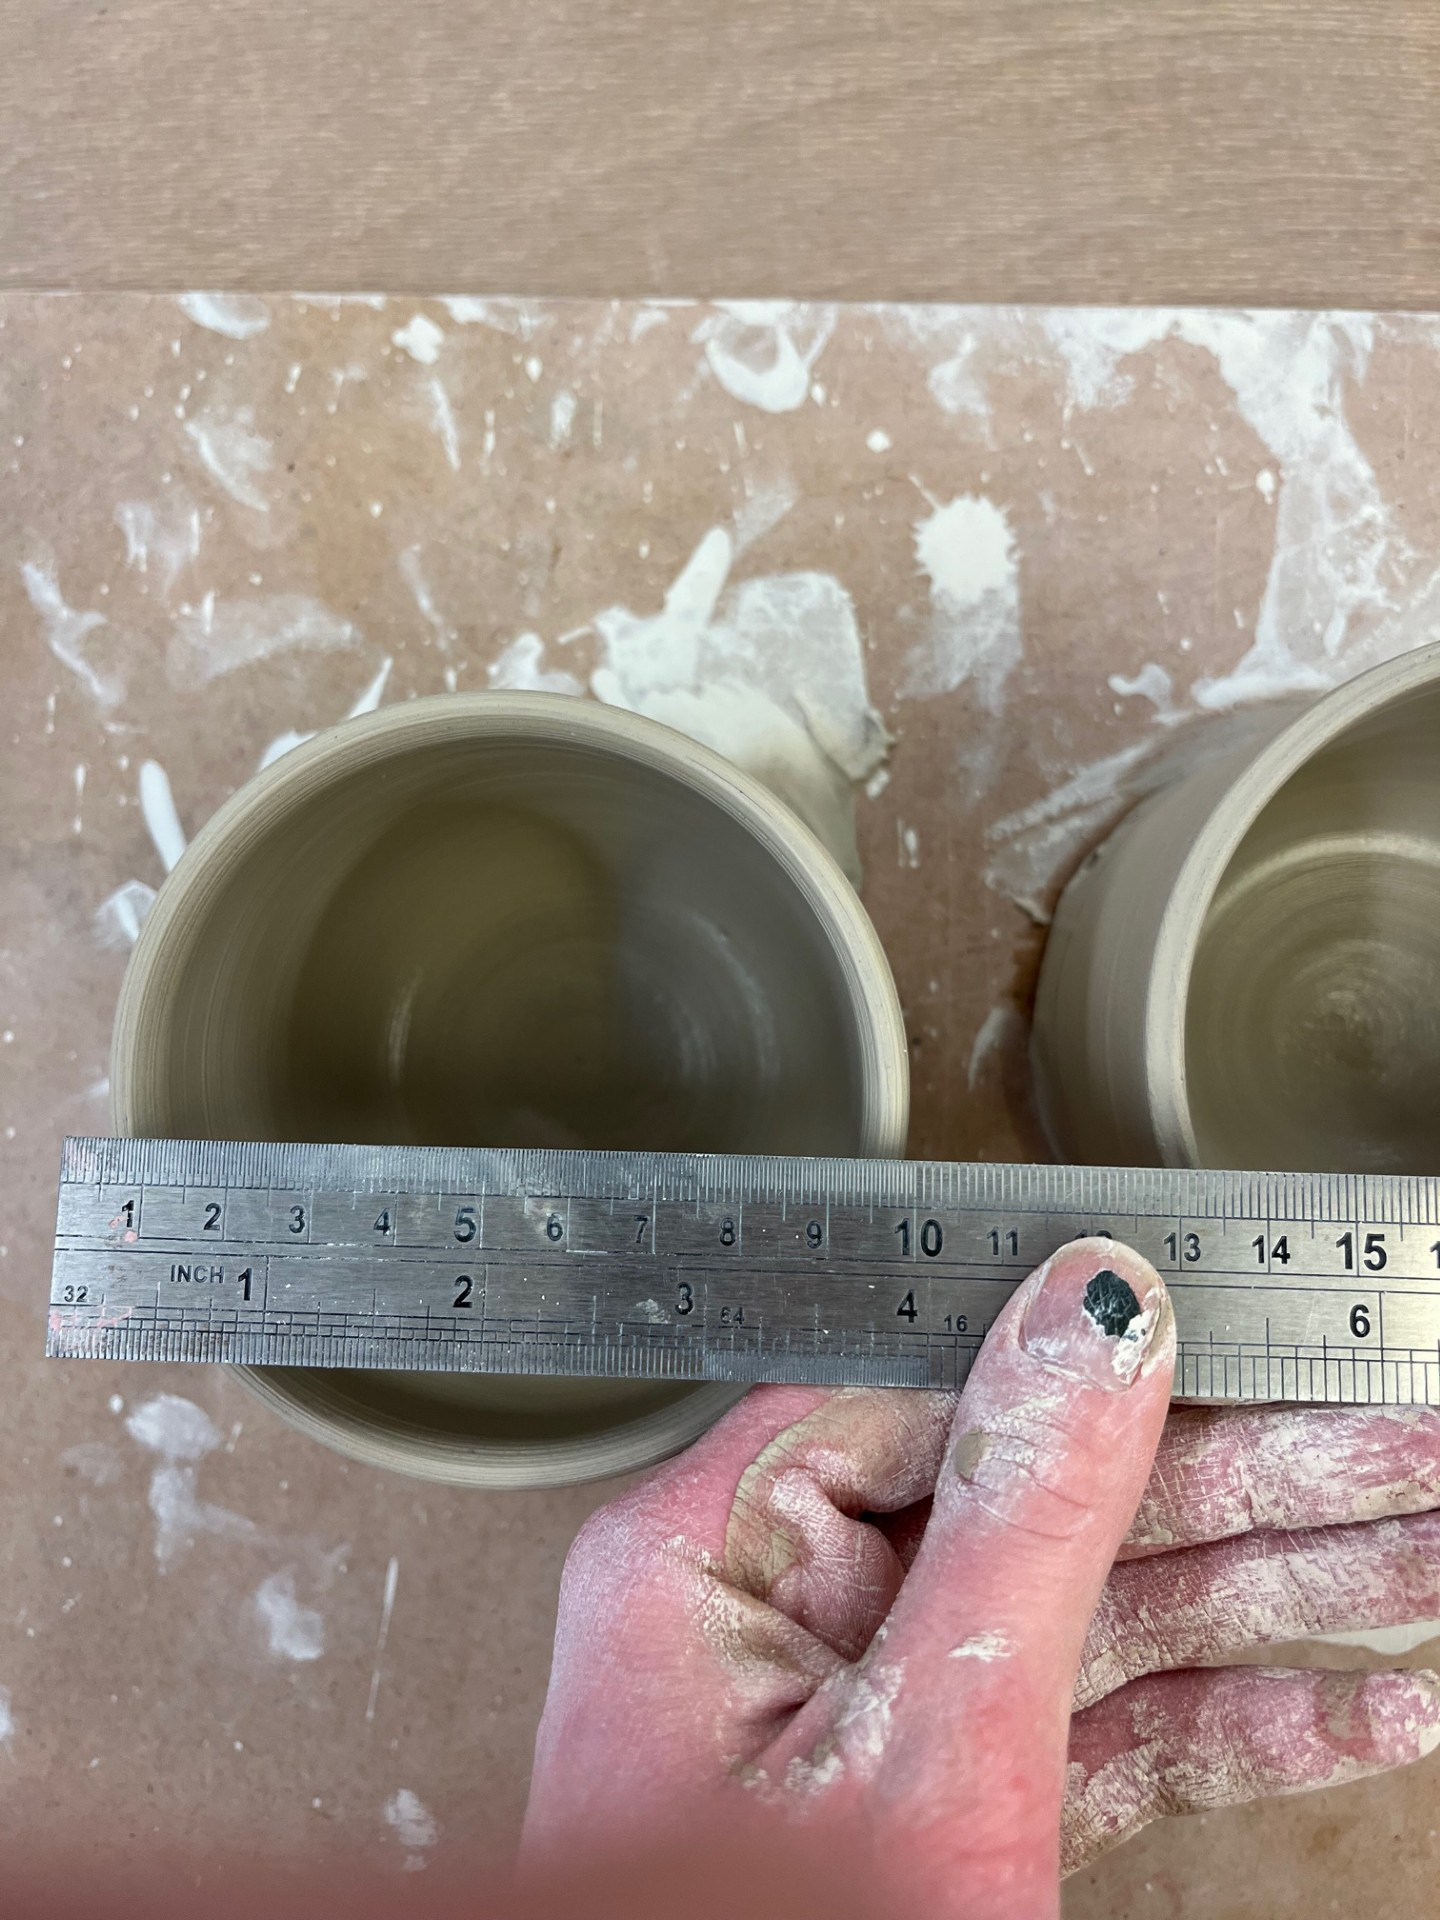
I think that this overall was such an influential session for me because I have never been able to produce such a repeated set of vessels. Although these pots aren't exactly the same in relation to their height and width but overall this is a good step in the right direction. once thing I did notice was that they are quite thick however I feel like the weight and thickness can be improved naturally through my skill refinement. One thing that helped in this session was using callipers, which was recommended by Rudi, because they allowed me to create the same style of vessels that were all the same perimeters. Within my progression, one of my aims would be to develop the ability of creating the same forms with the same dimensions by eye. I think this is one of my aims because I like the idea of being able to rely on the depth of my skills alone to create a refined body of work.
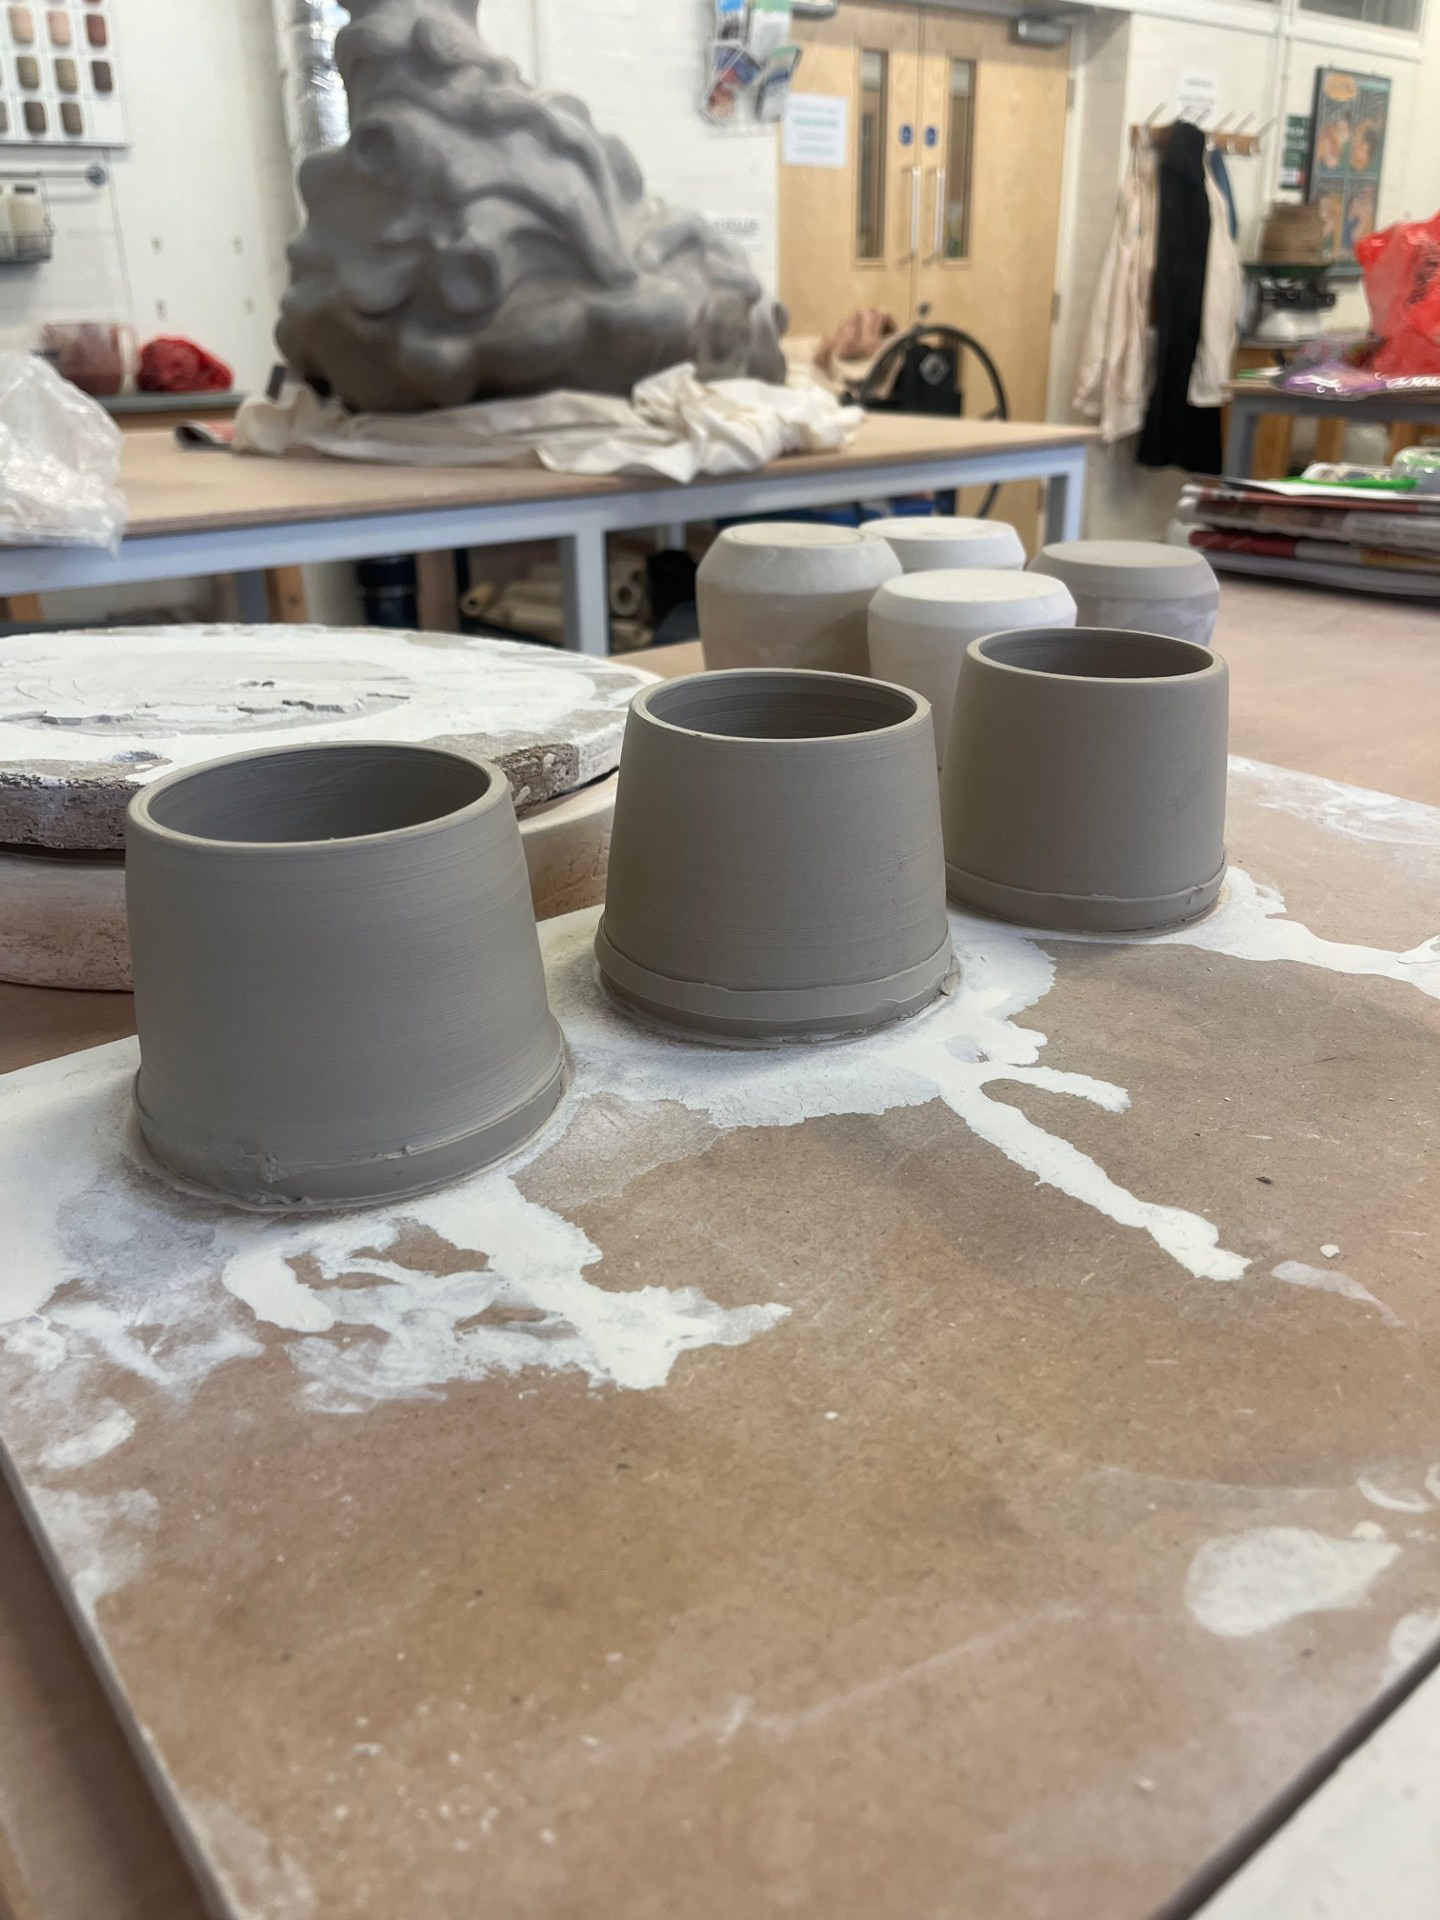
Full results from week of making:
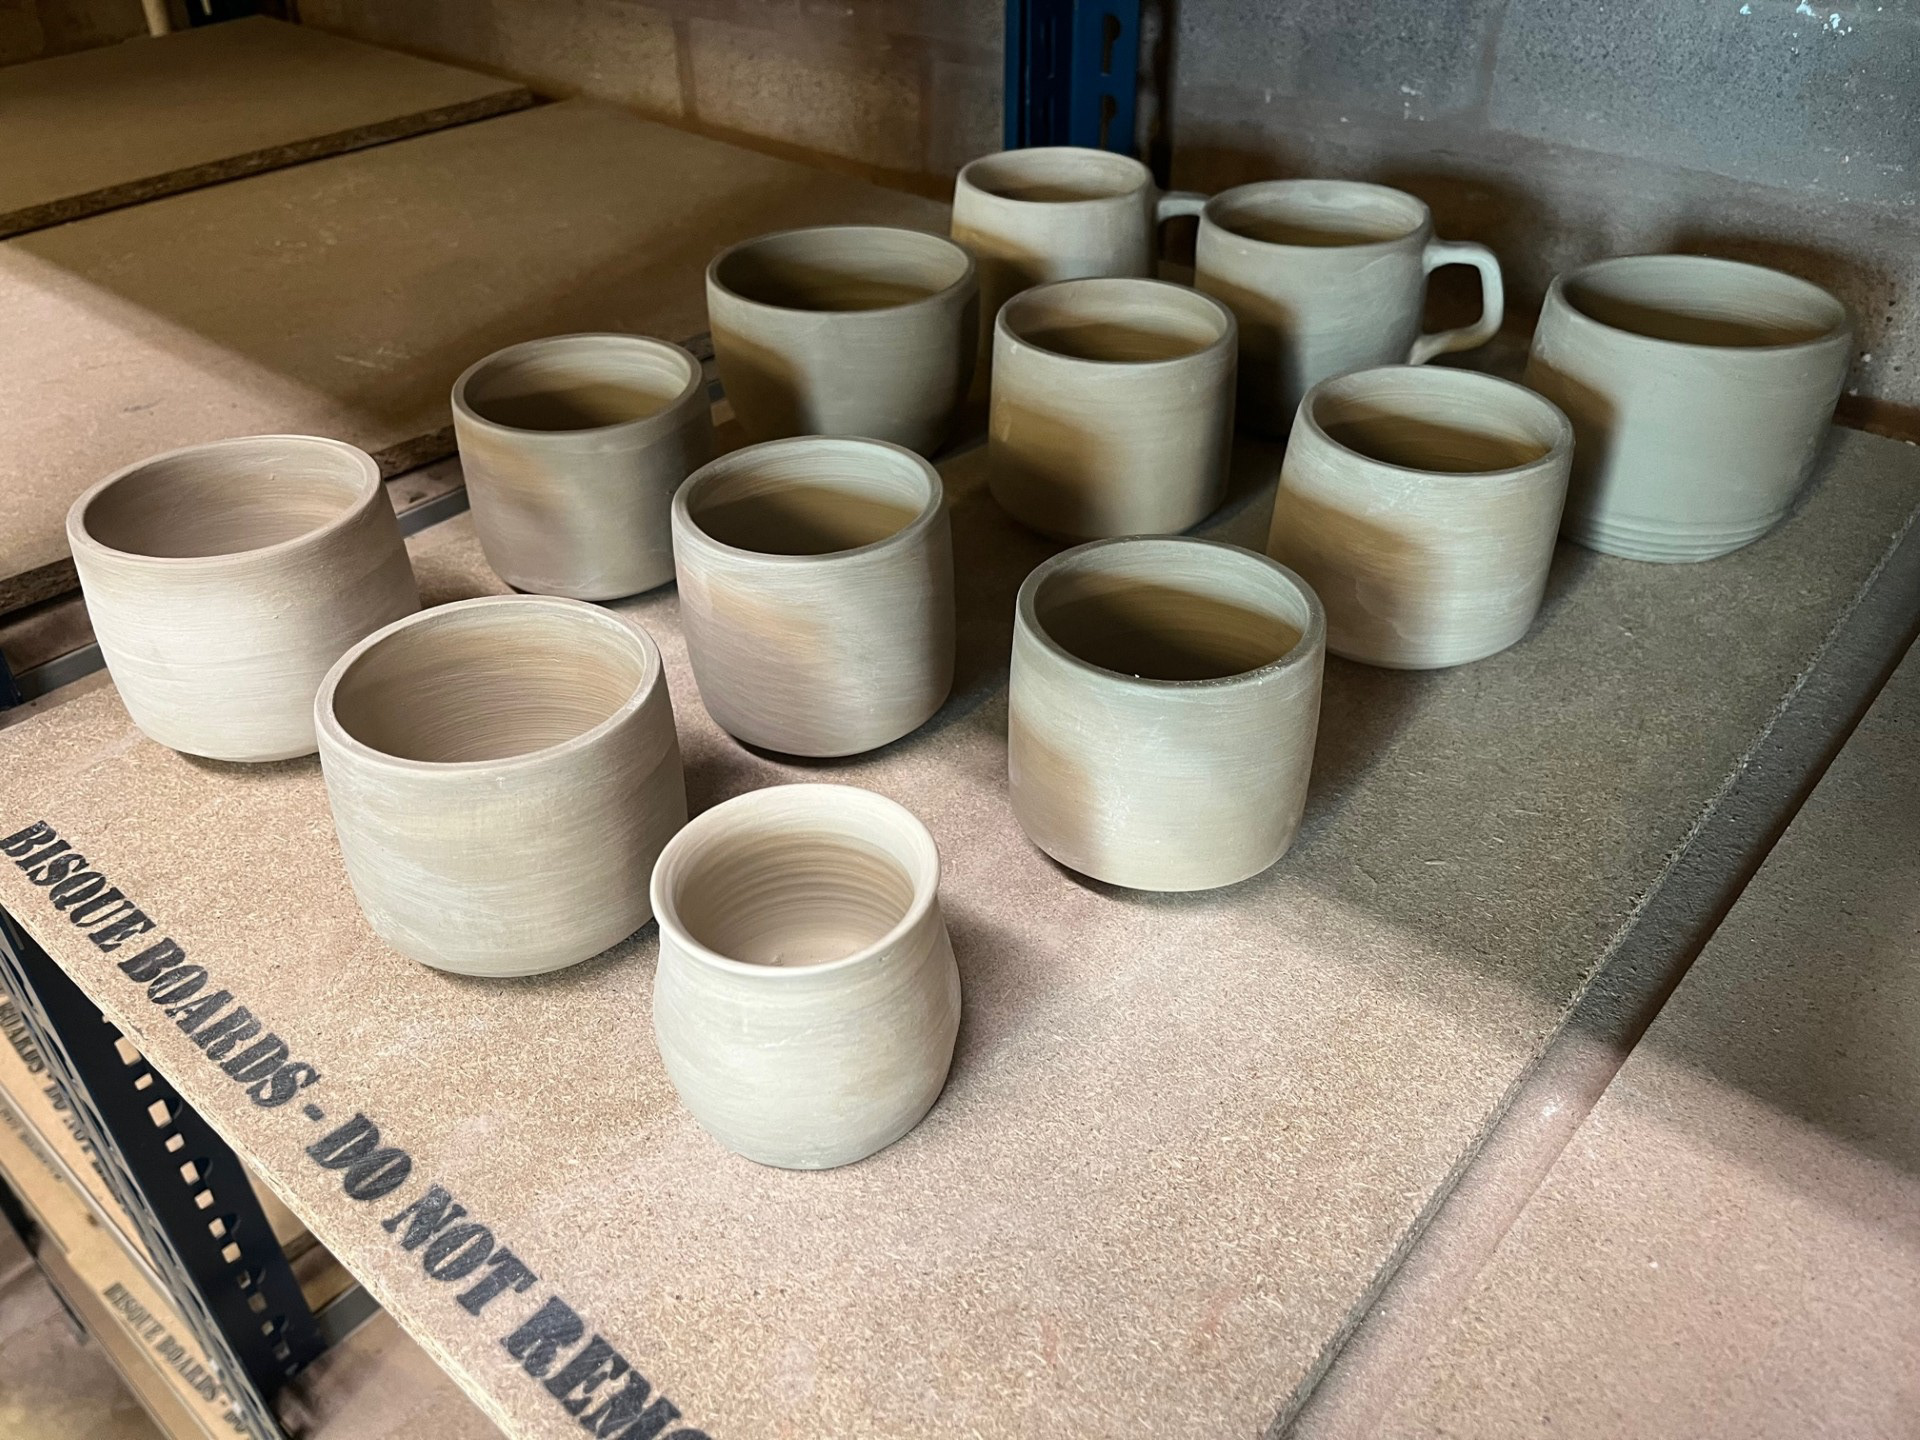
When I was in the workshop, a lady commented on the small cup you can see at the very front of the image. This small cup was more of an unintentional outcome that I decided to keep from a previous session. What she said about it really made me smile as she mentioned how it is the perfect size for leftover gravy as she has a similar one at home. She also added that her children often come round and they would on occasion have margaritas and she said that it would be the perfect size for squeezing lime juice. Hearing stories like this warms my heart because for the majority of last term ideal focused on not giving my vessels specific functions and this is a perfect example of why. I love that everyone sees functional objects differently when you take away the specific function. sit makes every vessel unintentionally unique. I like the idea of making utilitarian objects, that are so function oriented but objects without a specific label of a function; quite a nice relationship.
Reflection on Week 1:
This week was a significant step in my development, as for the first time, began creating a repeated set of vessels. Although they weren’t identical in height and width, it felt like real progress. I quickly realised that using 1kg of clay was far too much for achieving repeatability at my current skill level—the pieces were very heavy with thick walls, which highlighted the need for further refinement. That said, one of the positives was the evenness of the wall thickness, which was a key goal for me. Working with straight-walled pots proved especially helpful, as it encouraged me to focus more on subtle details like finger placement and the tactile experience of working with the clay. I also found that using callipers, as recommended by Rudi, really helped maintain consistent perimeters across the forms. Looking ahead, I plan to use around 500g of clay to make the process more manageable and allow for better control. One of my long-term aims is to reach a point where I can make matching forms by eye, relying on the depth of my skills to create a refined and cohesive body of work.
WEEK 2: 06/02/25, Thursday
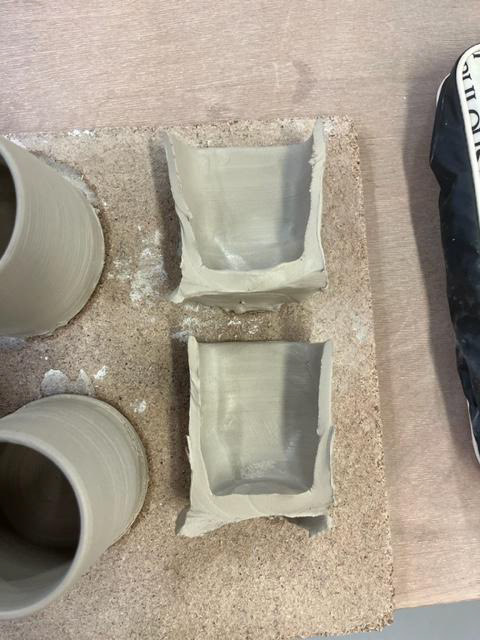
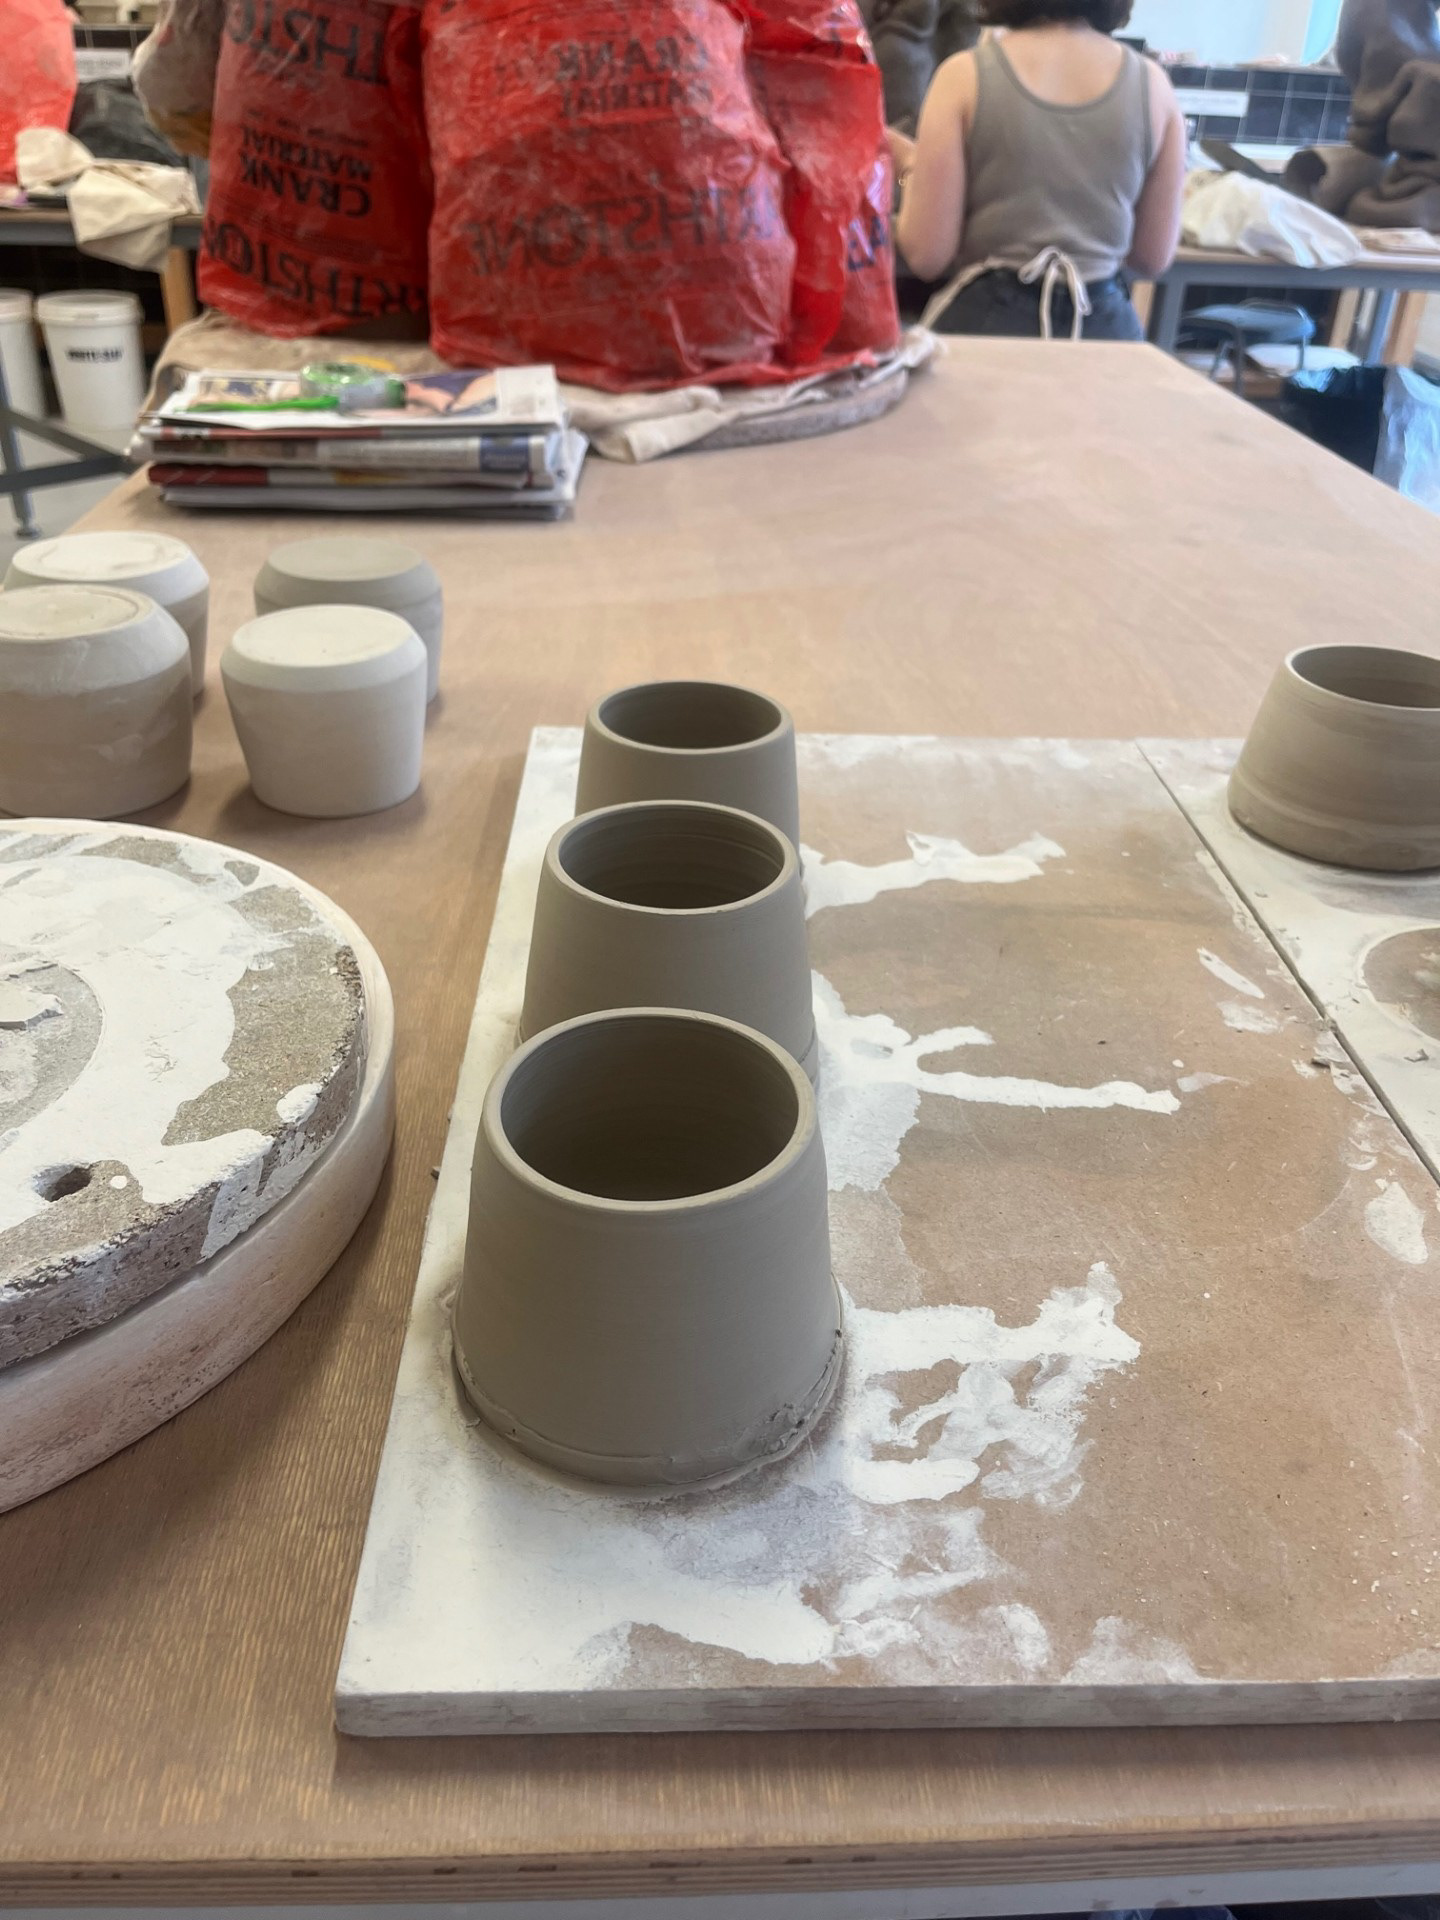
From this first week, I think that I am going to be carrying forward this repeatability aspect as I feel like thins in itself is not only a good skill to develop, but its a good way to refine technique as well as ability. I decided to try and go up by 100 grams, from the previous 500g, Also, my aim of this project is to increase my scale as well as quality of my making and I believe I can possibly achieve that by building up slowly. I am choosing to go in with same form as reference as it is the best for me to focus on building up the walls evenly - its simple and achievable. I also like doing this because it improves the quality of my work for this project whilst also giving me lots of pots that i could potentially see myself selling in the future; almost like building up stock.
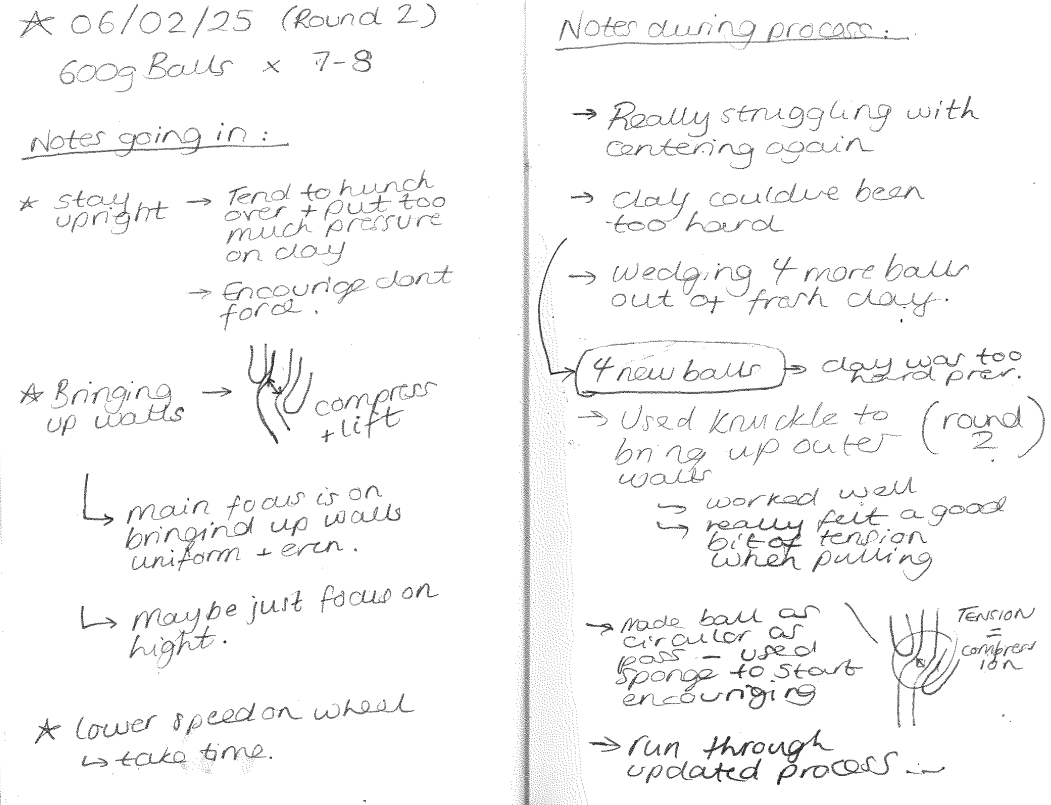
During this session I really tried to play around with my finger and hand placement when pulling up the walls. I have really wanted to put focus on this area recently as I believe that its an area that I'm not as good in. I also believe that this part can be the make or break of a good pot as it can greatly effect structural integrity as well as overall product quality. I found that using my knuckle as well as a sponge on the outer wall works quite well for me as it gave me a lot more consistent results. This is definitely something that I will be continuing to implement within my making. I decided to only keep 2 vessels out of this session so see below for images.
For this session, I decided to try and not keep any of the pieces that I made because in my tutorial it was suggested that I should try it. previously I would always keep the things that I have made out of fear that I would never be able to do it again. After this tutorial session I realised that if I don't let go of the fear there's a part of me that will always doubt myself. In this session I dedicated an evening to just simply throwing, recycling and repeating. Overall, I actually found this session very beneficial. I realised that for the past couple of years I have always put so much pressure on myself to always leave the studio having made something I'm proud of. However this session allowed me to see the pride in true personal development as well as the focus on process not outcome.
Reflection on Week 2:
This week I tried to move up in how much clay I used I realised that I need to stick with the 500g balls. Changing up the grams was getting me very inconsistent results and led me to take nothing forward from the sessions. I have realised that to build skill I need to keep everything as consistent as possible. Previously, I never recognised my patters but I would put so much pressure on myself to continuously improve. For example, as soon as I had achieved something I would instantly move onto the next thing; my mind is focused on improvement and not refinement. Having such a deep connection to my craft is really helping me uncover new things about myself and open new doors to help me grow and develop as a person. I am glad that I have recognised my own thought patterns so early on in my development so that I can put new thought processes in to place. Going forward I recognise that practically I need to achieve maximum ability with a certain amount of clay and form before moving to anything greater.

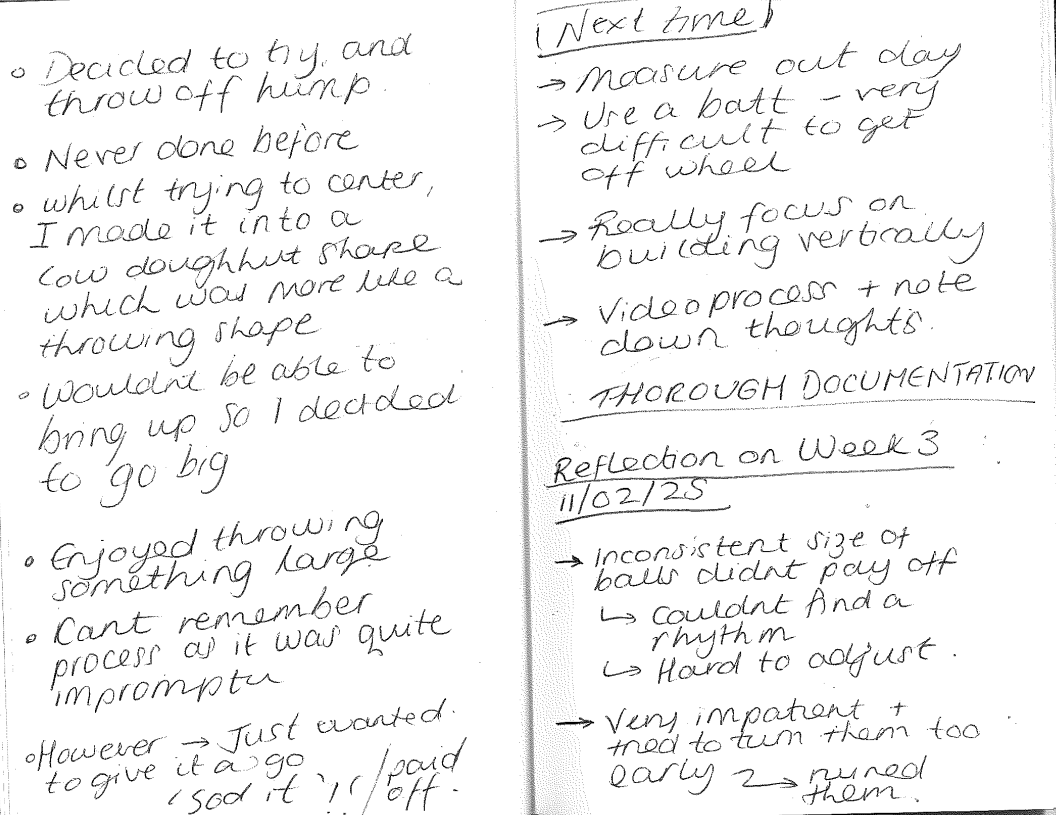
WEEK 3: 11/02/25, Tuesday @£$*&

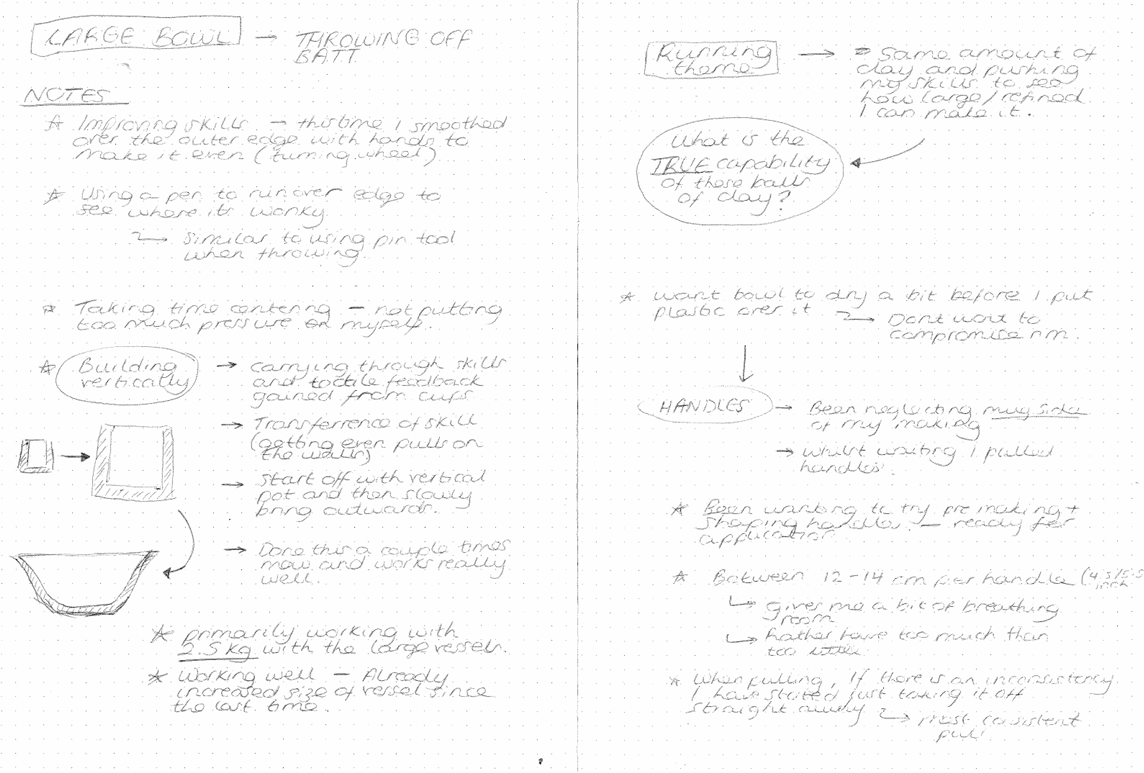
This week I will be carrying forward the repeatability and consistency element of my making as that's going to be the same for the next few weeks. My main practical focus is on the consistency of the walls because ei heave released that that is where I have been going wrong the whole time. I realised that I pinch instead of encourage and that was creating uneven walls and unstable pots. during this session I chose to do multiple balls of clay and my aim was to increase the height instead of the width so that I can try and improve the consistency of my pulls.
Reflection:
This week I tried to move up in how much clay I used I realised that I need to stick with the 500g balls. Changing up the grams was getting me very inconsistent results and led me to take nothing forward from the sessions. I found it really different adjusting to the different weights of clay. if I was a bit further on with regards to my skill development, I think that this would be a good test of transference of skill; however, I'm not at that stage yet so think that I should stay. I have realised that to build skill I need to keep everything as consistent as possible. Previously, I never recognised my patters but I would put so much pressure on myself to continuously improve. For example, as soon as I had achieved something I would instantly move onto the next thing; my mind is focused on improvement and not refinement. Having such a deep connection to my craft is really helping me uncover new things about myself and open new doors to help me grow and develop as a person. I am glad that I have recognised my own thought patterns so early on in my development so that I can put new thought processes in to place. Going forward I recognise that practically I need to achieve maximum ability with a certain amount of clay and form before moving to anything greater.
Throwing off the Hump:
Later on in this sessions, after already trying throwing and it not going to plan, I wanted to try a new avenue. Instagram inspired me and since I was struggling centring each piece - if I am trying to get high volumes and repeated forms this might be a good avenue to take. With the remainder of the clay that I had, I decided to just go for it and give it a go.
Video that inspired me - for reference
Full discussion of process and thought process:
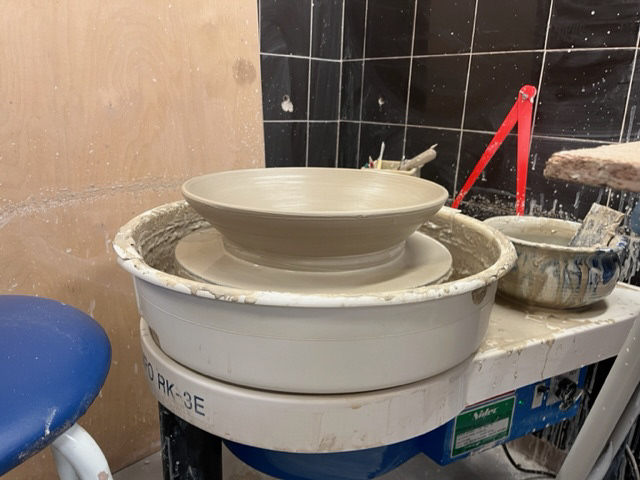
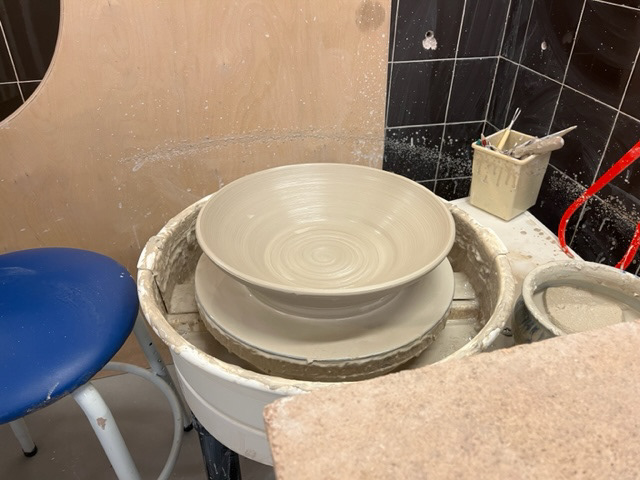
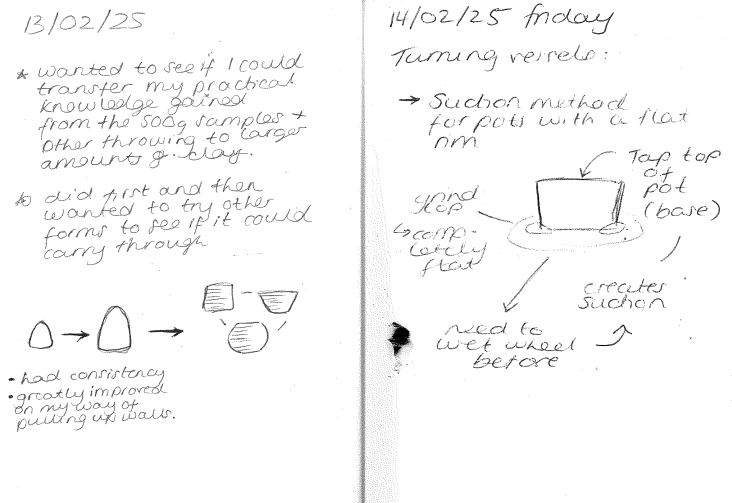
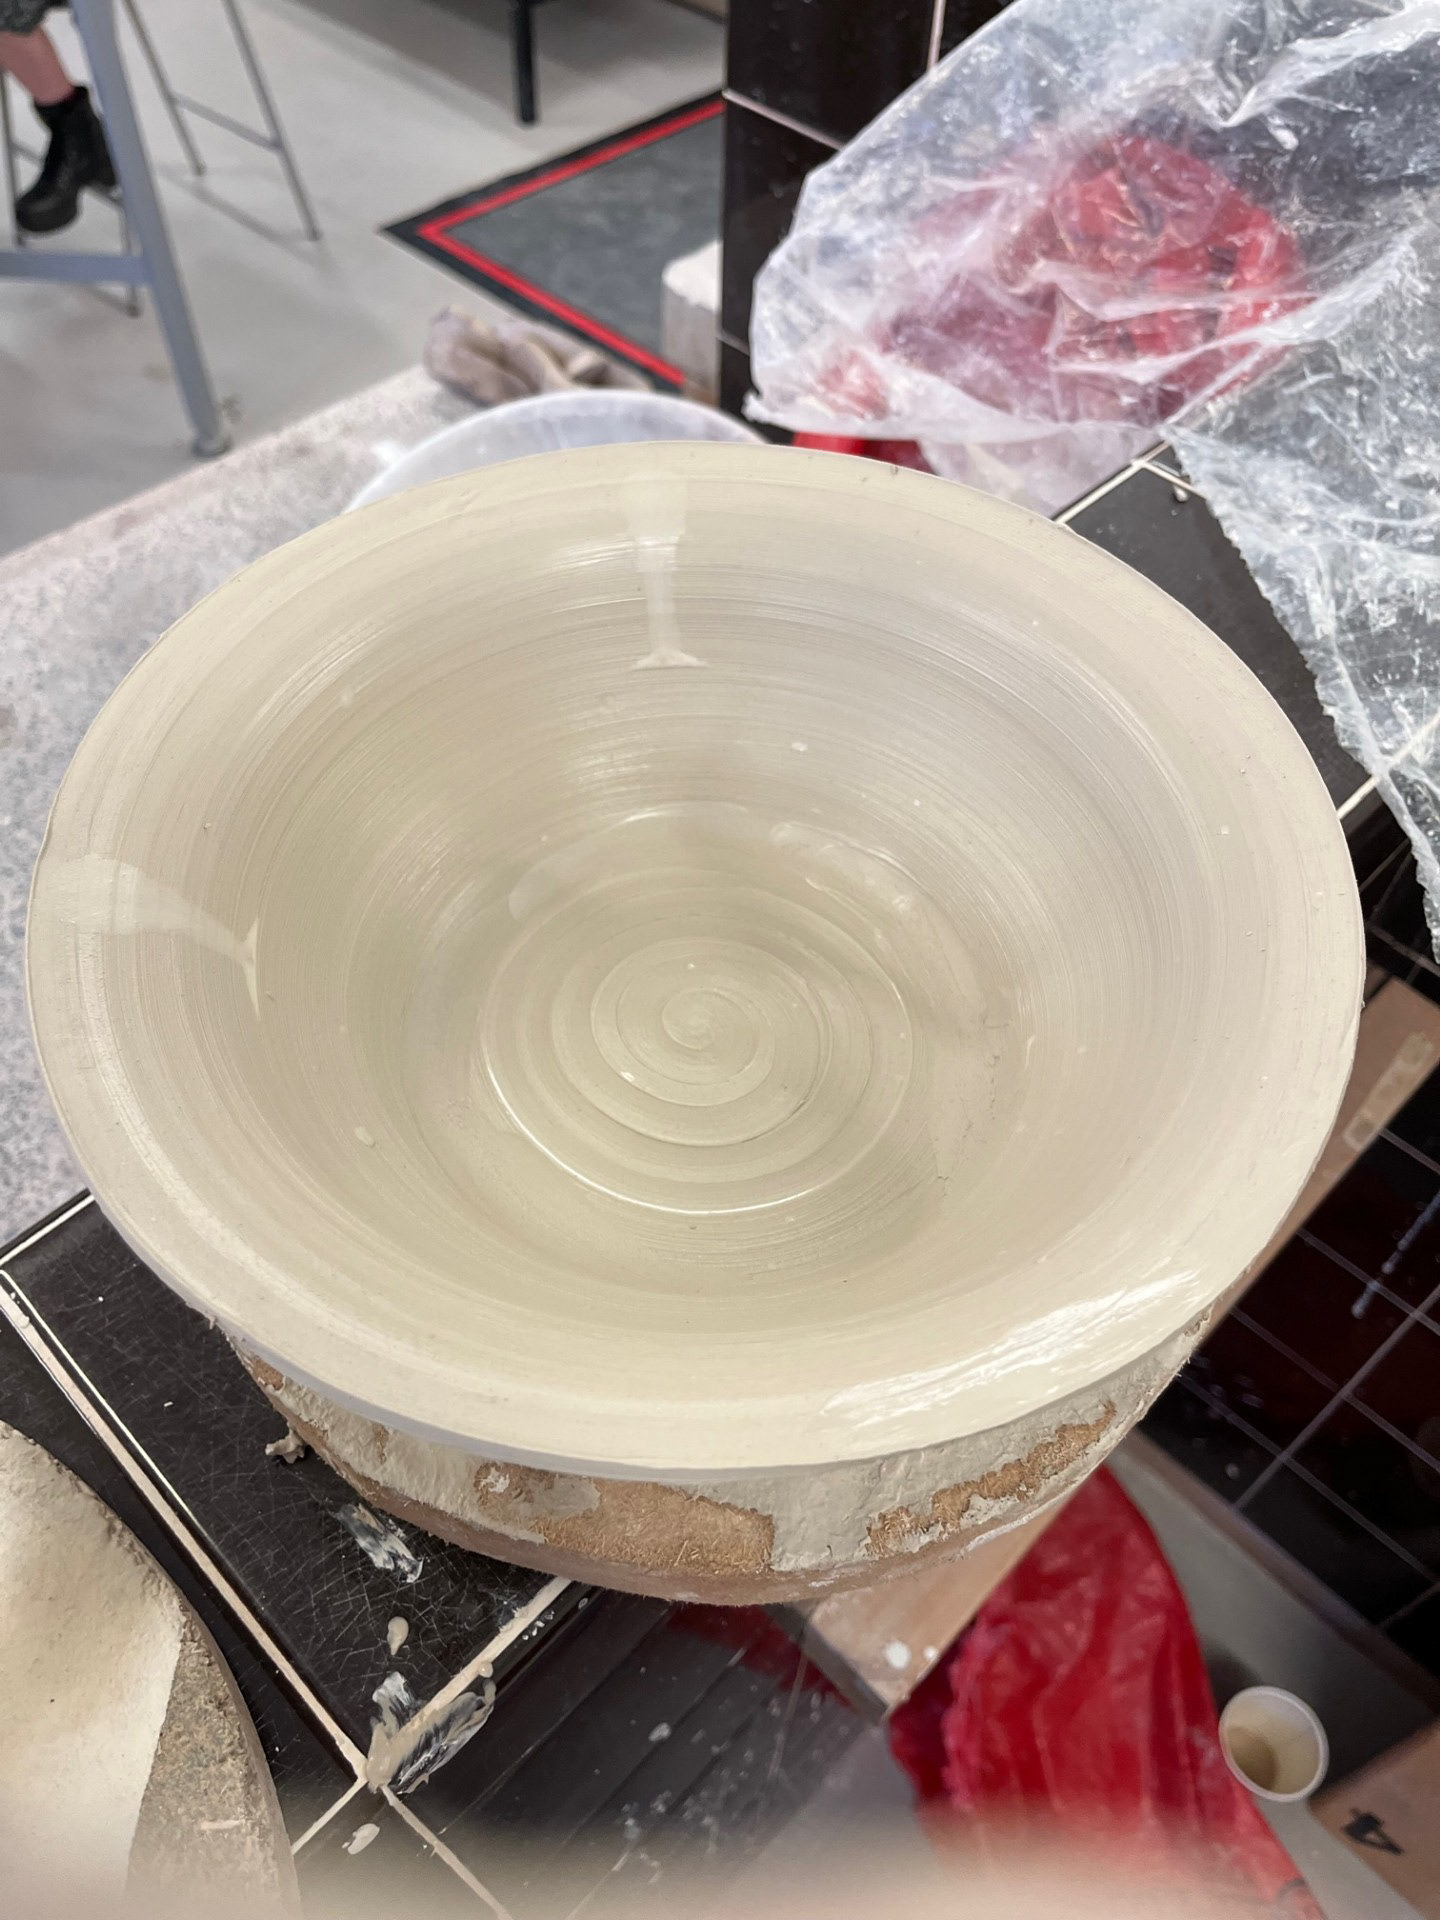
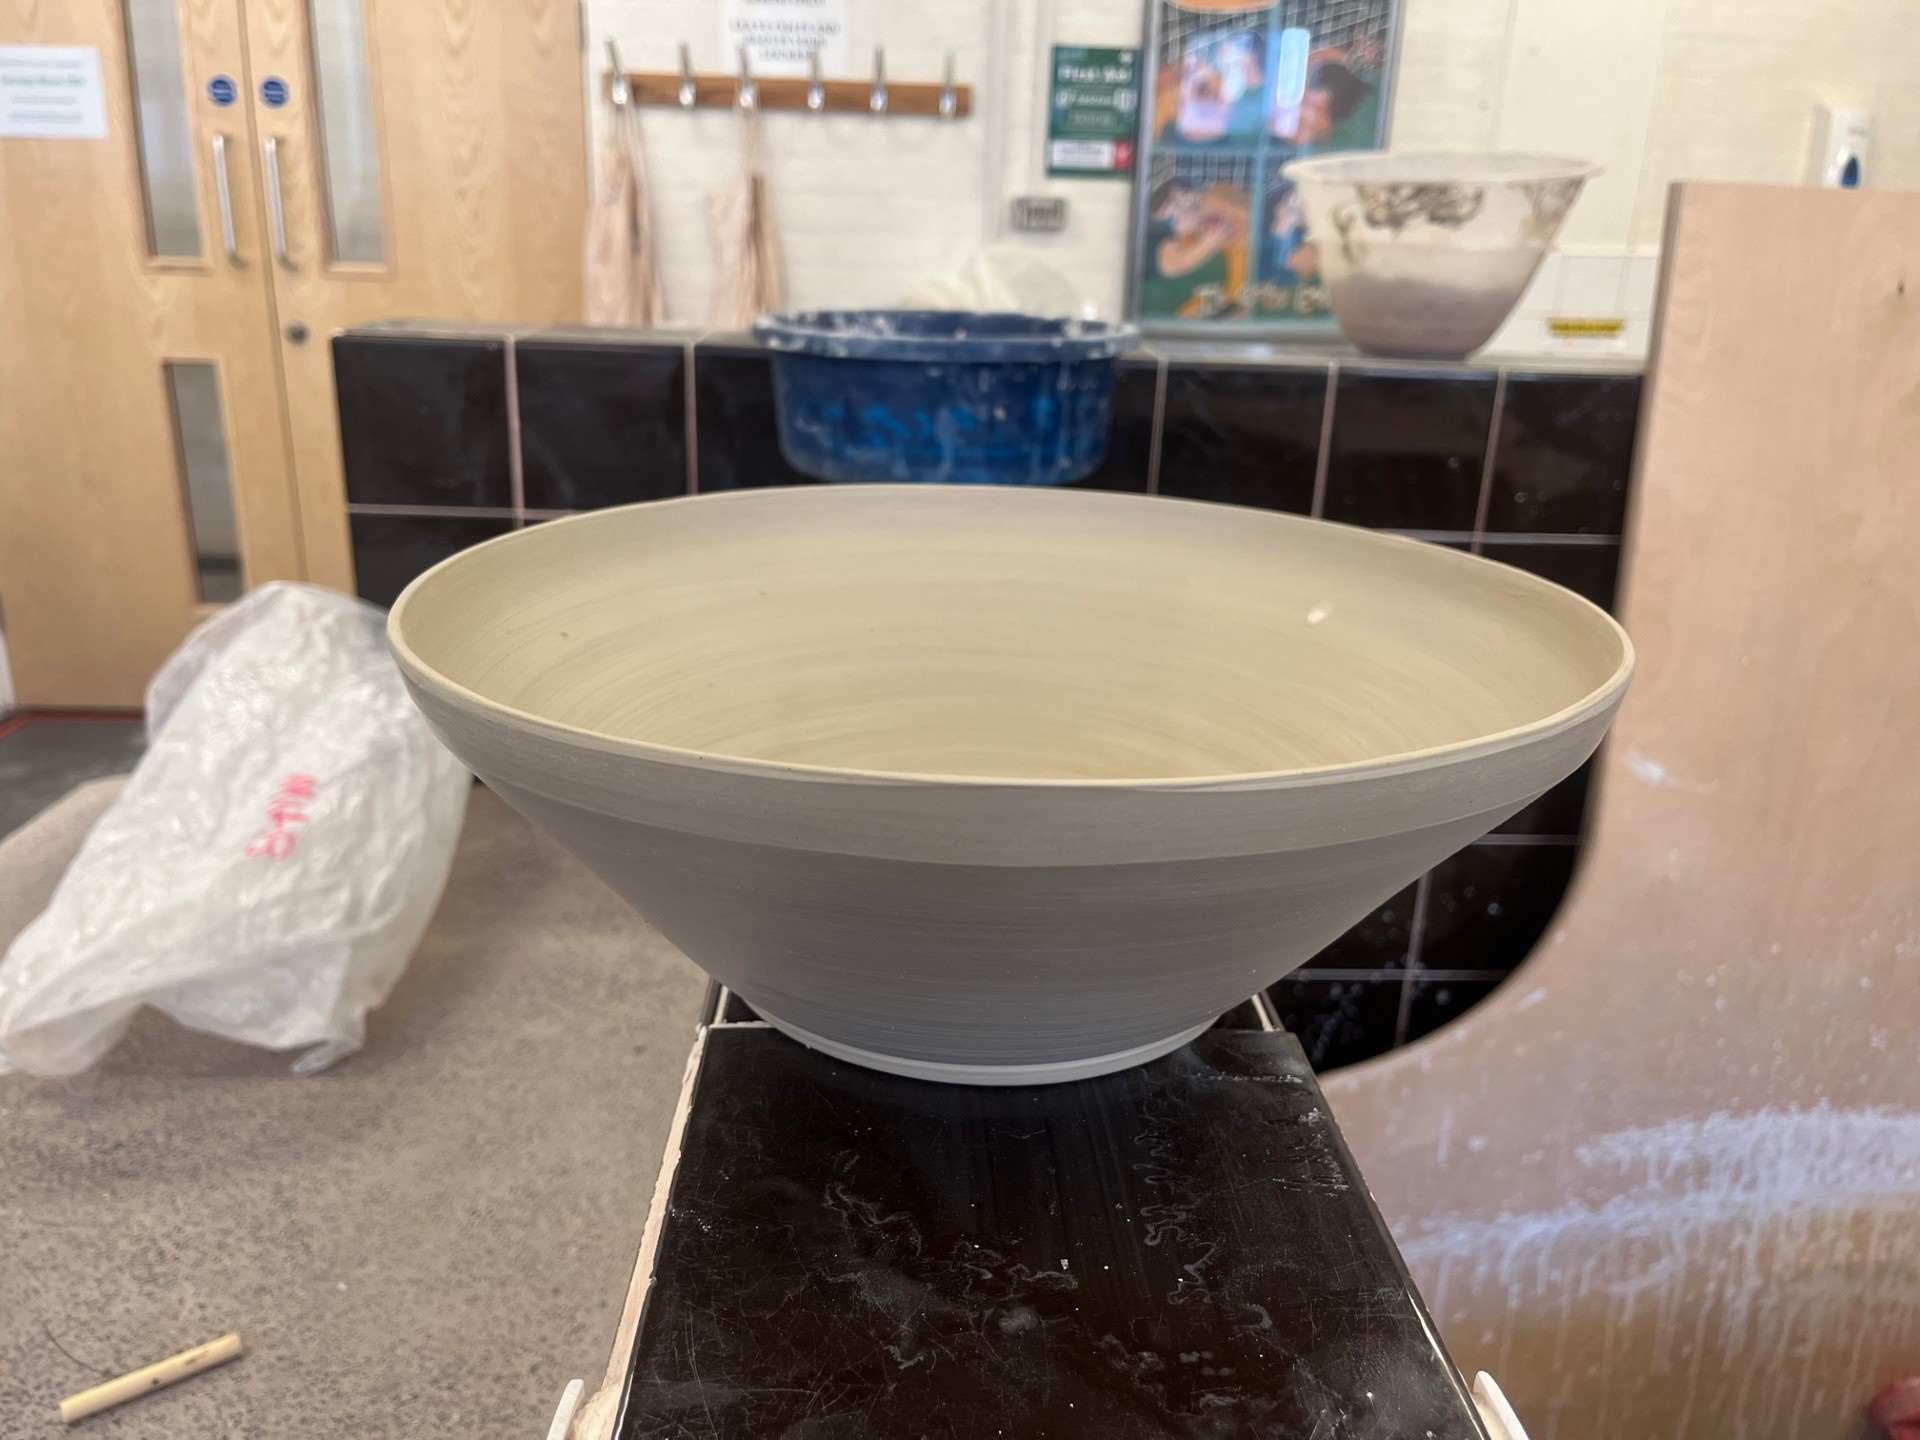
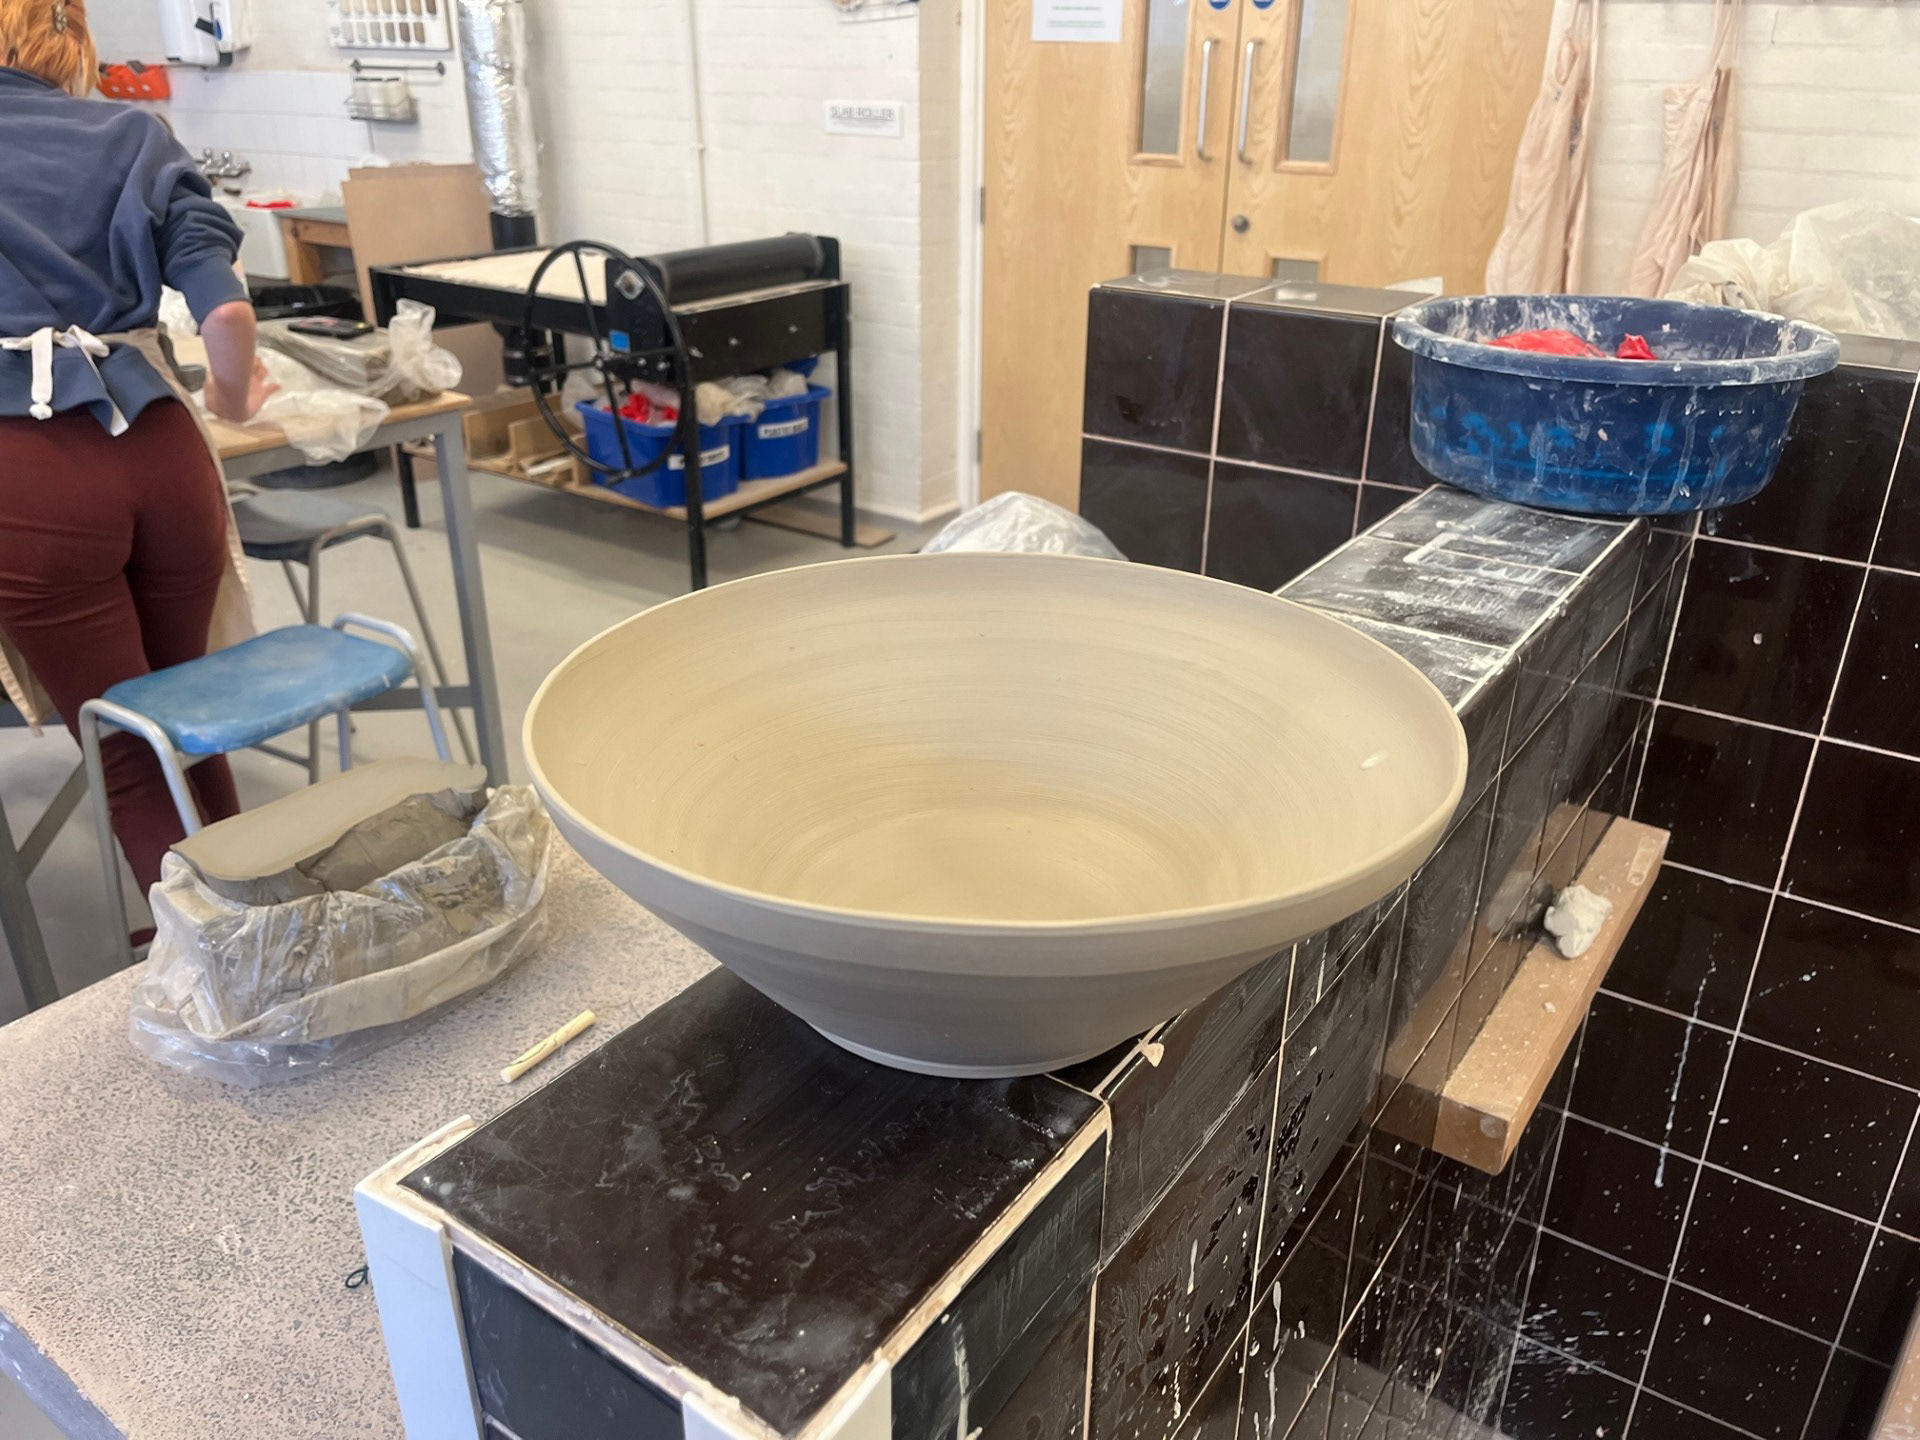
In my eyes, the only way to know if you can do something is to try it which is why I wanted to give it a try in these weeks of experimentation. the outcome itself came about through me centring it like a bowl through force of habit. Throwing off the hump requires the clay to be quite tall but I cantered it like a doughnut which meant that it would be hard to bring back up again as well as the fact that it may cause a large air bubble. I also decided to start throwing this because the clay had been cantered perfectly which shocked me so I didn't want to pass up this opportunity to throw this large.
Completing this bowl has made me come to the realisation that the work that I have been putting in to refine my throwing has paid off because I was able to carry those skills onto a larger vessel. Bearing in mind I would've never been able to produce something on this large of a scale previously. Prior to this point, I hadn't really considered what my final resolution was going to look like. At this point in the project, all I want is refinement and repeatability because those are the aspects that I didn't work on when I first began ceramics so I never had that base level of skill. Although repeatability is a skill that I need to build, scale is a skill that I want to build. As said in my initial making, I love the idea of making vessels for people to share things with and I feel like the bigger the vessel the more people it could bring together. As this was a very unexpected avenue, I am exited to take proper steps next time to complete this task, such as using a batt and weighing out clay.
Continuation on throwing larger vessels:
From the session on Tuesday, I chose to continue trying to throw large again. Going into this session, I was keeping in mind all of the points that io had identified that would make the process easier. One area that I was missing in this session that I had previously identified was the need for videoing the process. I am still trying to figure out a method for this as I prefer to watch things while I throw at the moment so this will need some more thought for future. I started off my attaching a batt as when I spoke to Rudi the last time, he recommended if I'm trying to throw larger vessels, this would be needed to get it off the wheel without compromising it. I used the rest of the clay that was in my bag as it was roughly the right amount so I split that into two and wedged it. Unfortunately, this process didn't go to plan as I was really struggling to centre the piece and then the batt fell off the wheel due to the immense pressure.
See below for further workshop notes for this day:
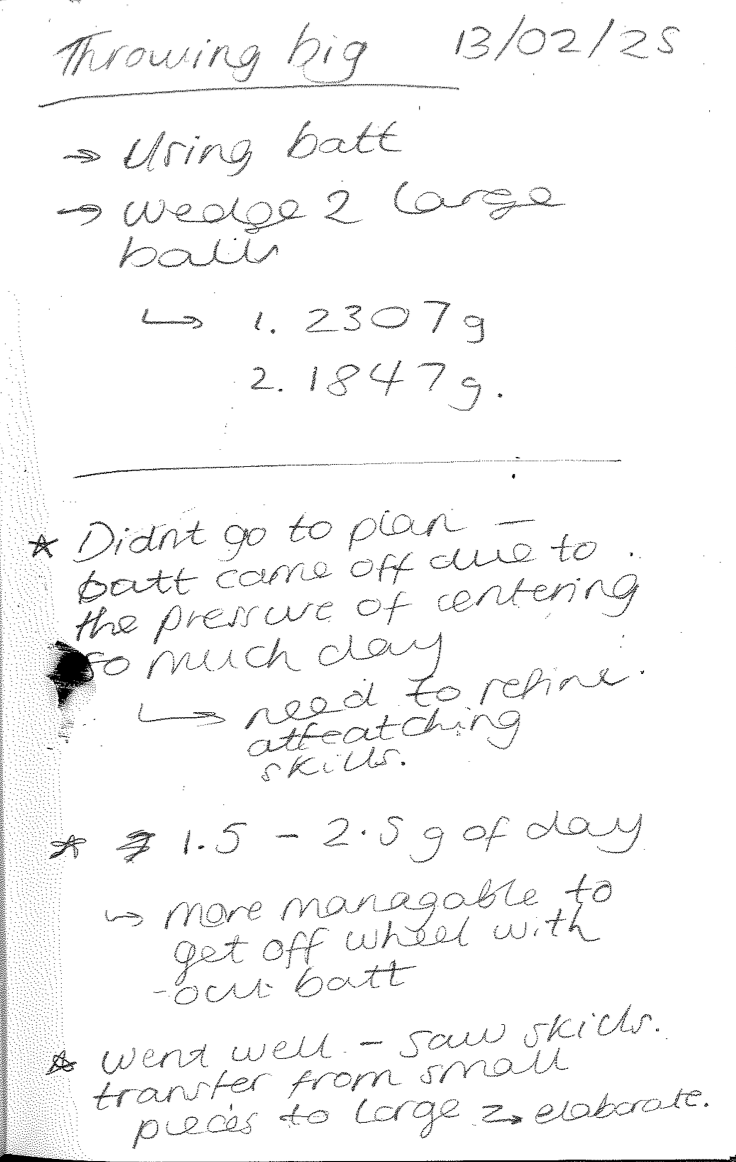
After this process was unsuccessful, I didn't want to just give up but I realised that my ability to attach a batt needed to be much improved before attempting such a large vessel. I ended up having a rethink and decided on splitting the clay into 3 rough balls of between 1.5 and 2.5 kg. I chose to shift my focus onto whether I would be able to transfer the skills that I had developed while throwing the smaller pieces onto the larger vessels.
Reflection on Week 3:
I’ve realised that investing in a camera tripod would be a valuable addition to my practice, as it would allow me to film my sessions and better track both my processes and progress. Having a stable camera setup would make it easy to press record and capture an entire session from start to finish, enabling full-scale documentation without interrupting my workflow. This visual record would complement the detailed notes I’m already taking, which have been incredibly useful in helping me understand exactly what I did during each session—whether it was planned or more instinctive. Combining both written and visual documentation would give me a much more comprehensive view of my development.
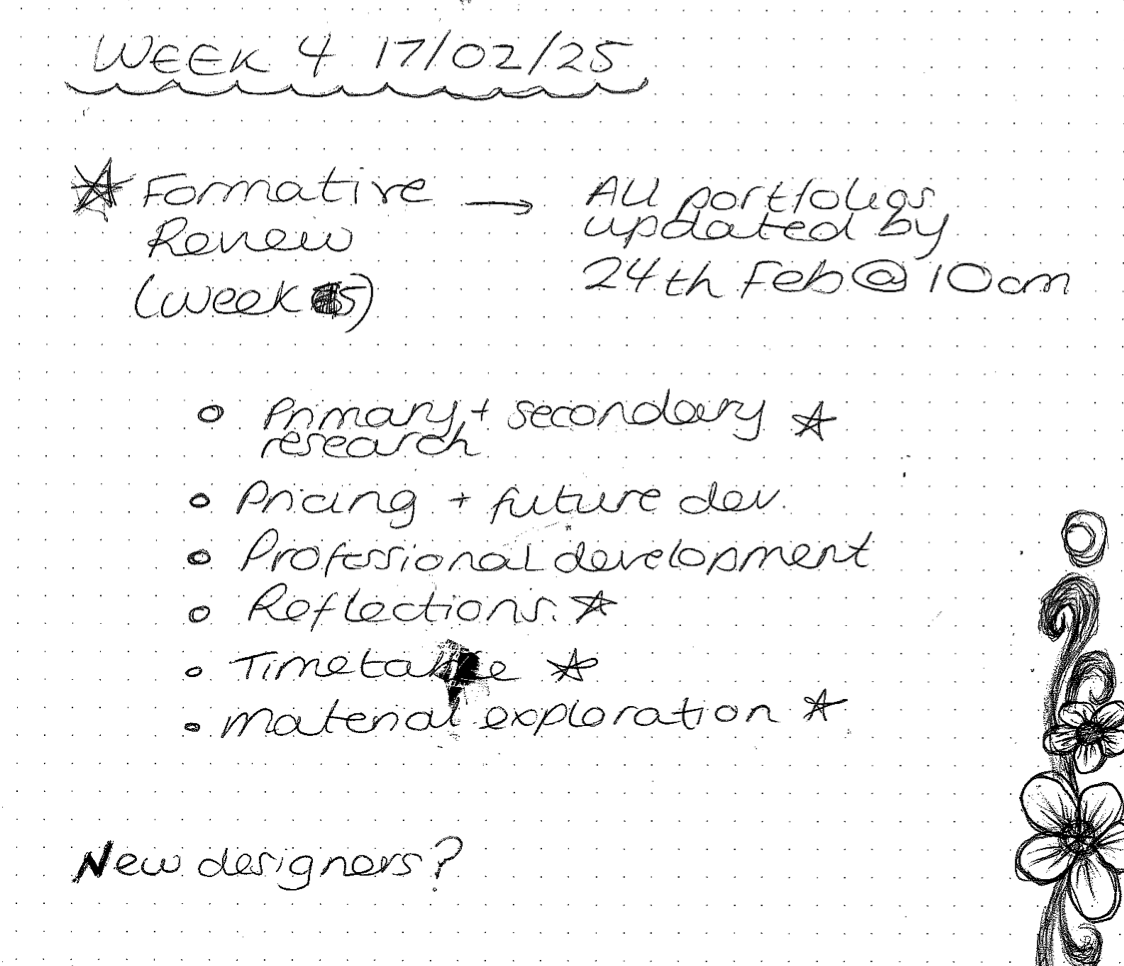
WEEK 4: 17/02/25, Monday
This week, I want my main focus to be on the glazing with relation to the exploration and documentation. So far I haven't done much to figure out possible combinations I could use for my final resolution. I am primarily going to be testing on bowls and cup forms as I have identified these as potential forms at this point in time. I will still be working on the refinement of my throwing but it is a process that I will be continuing to be working on for most of the process so it may not need as much documentation in these stages.
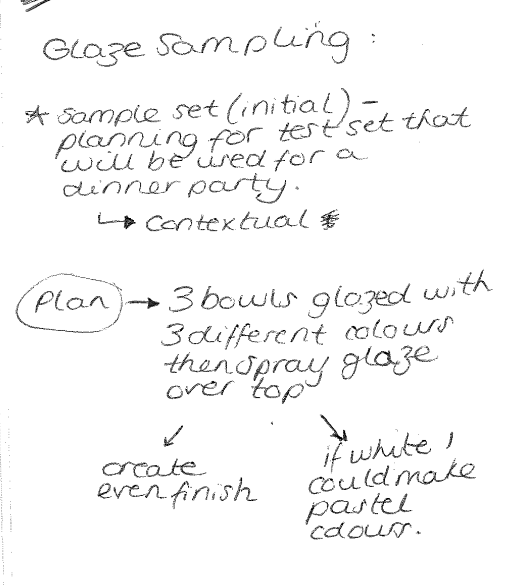
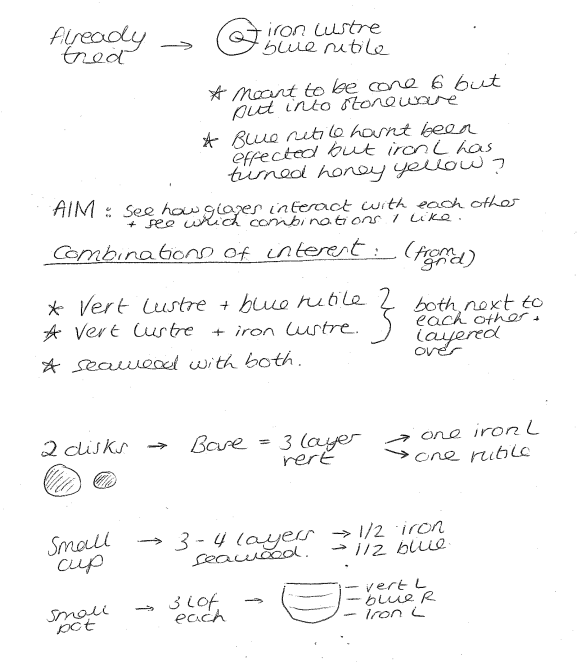
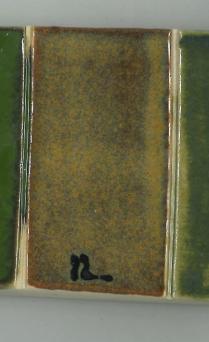
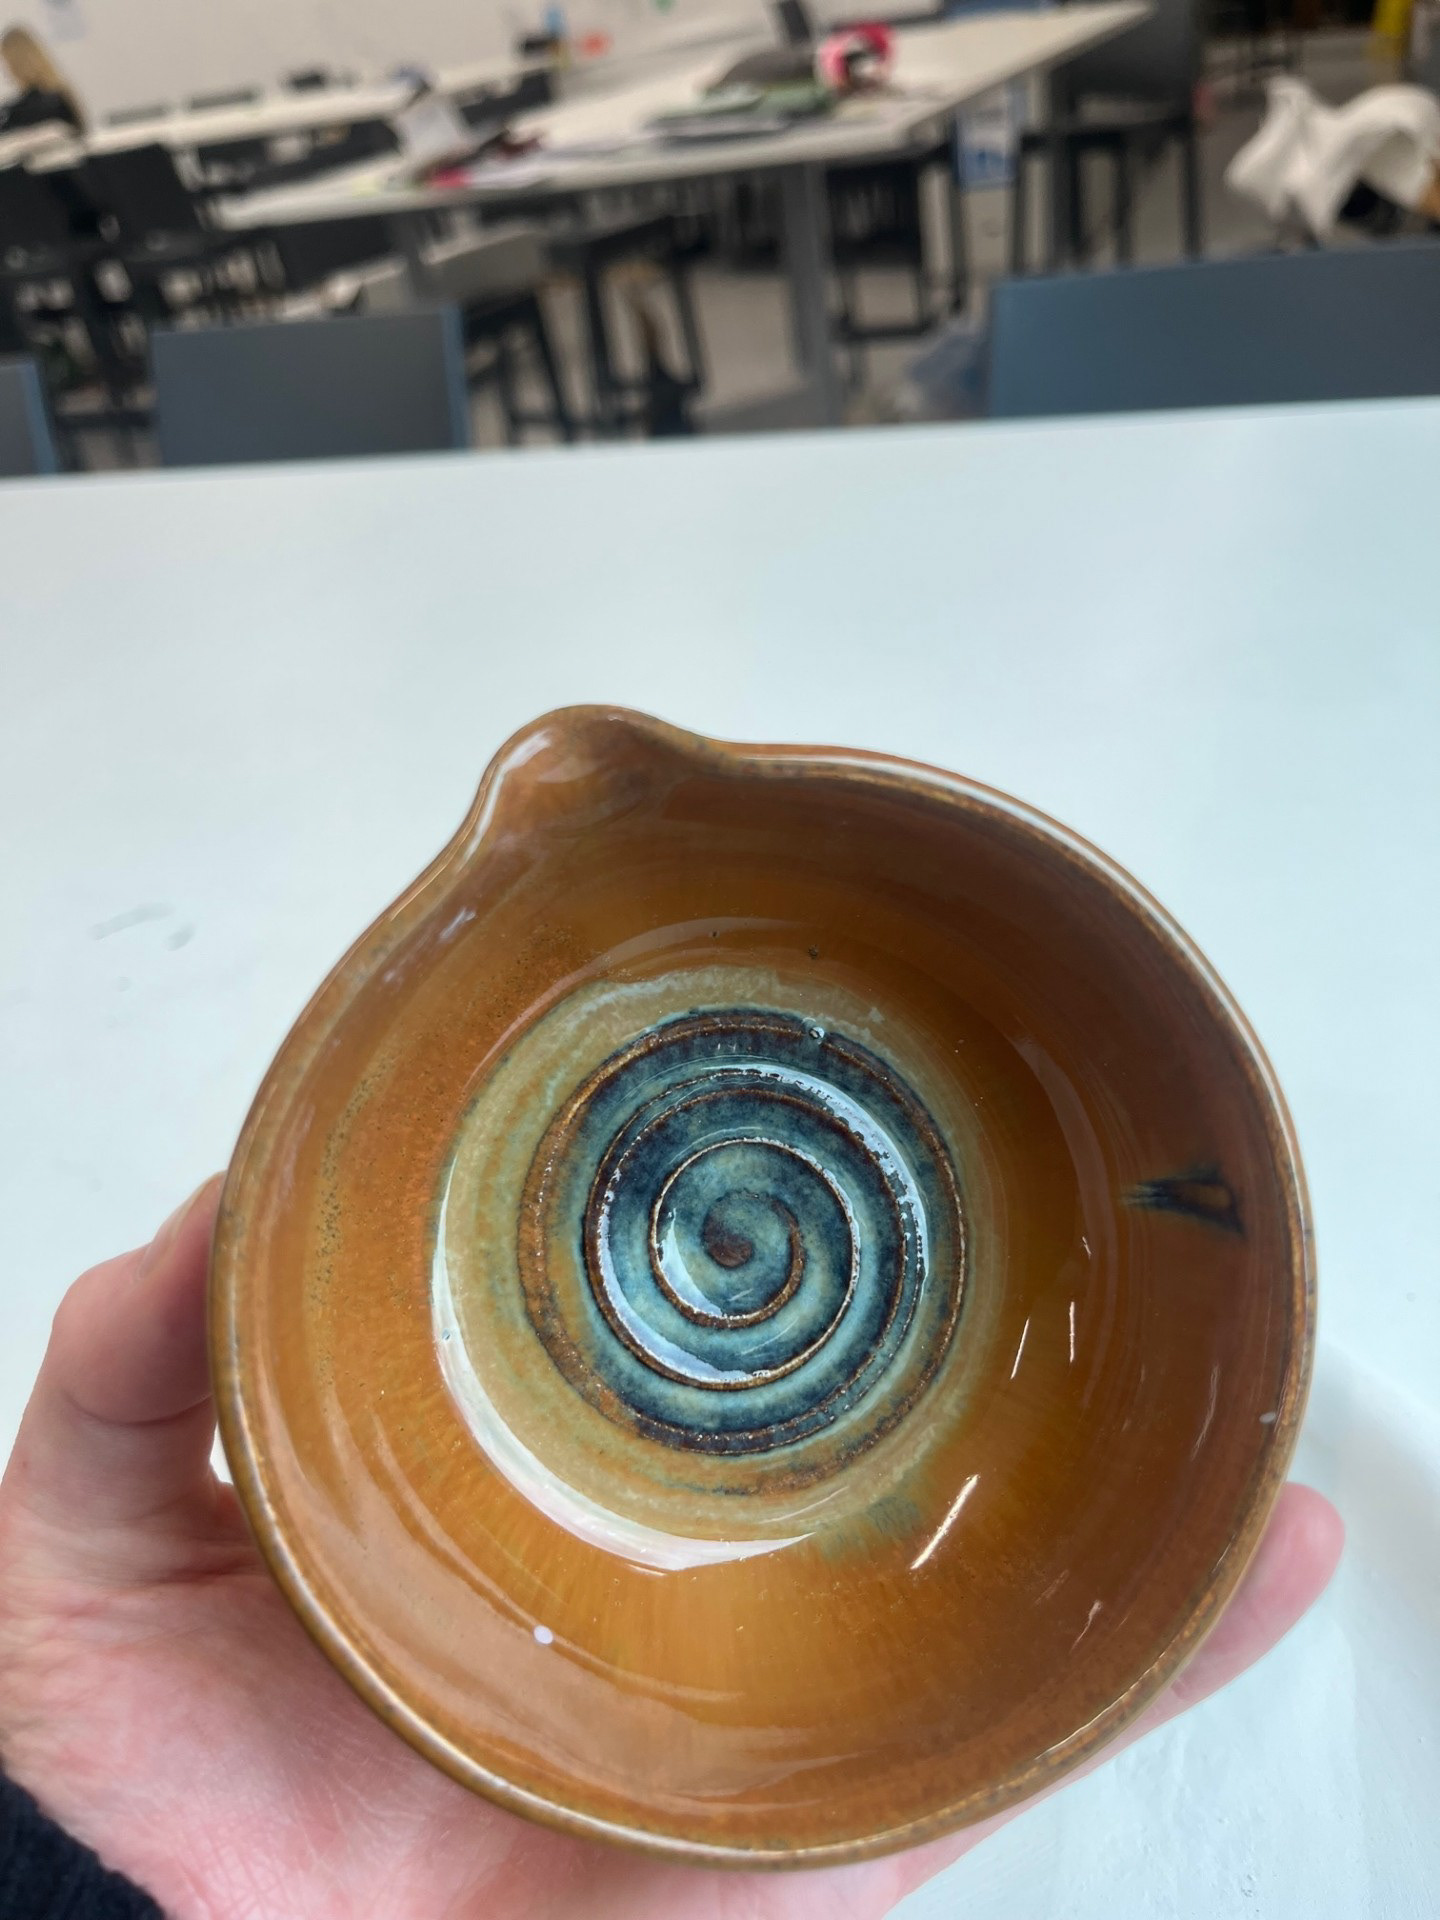
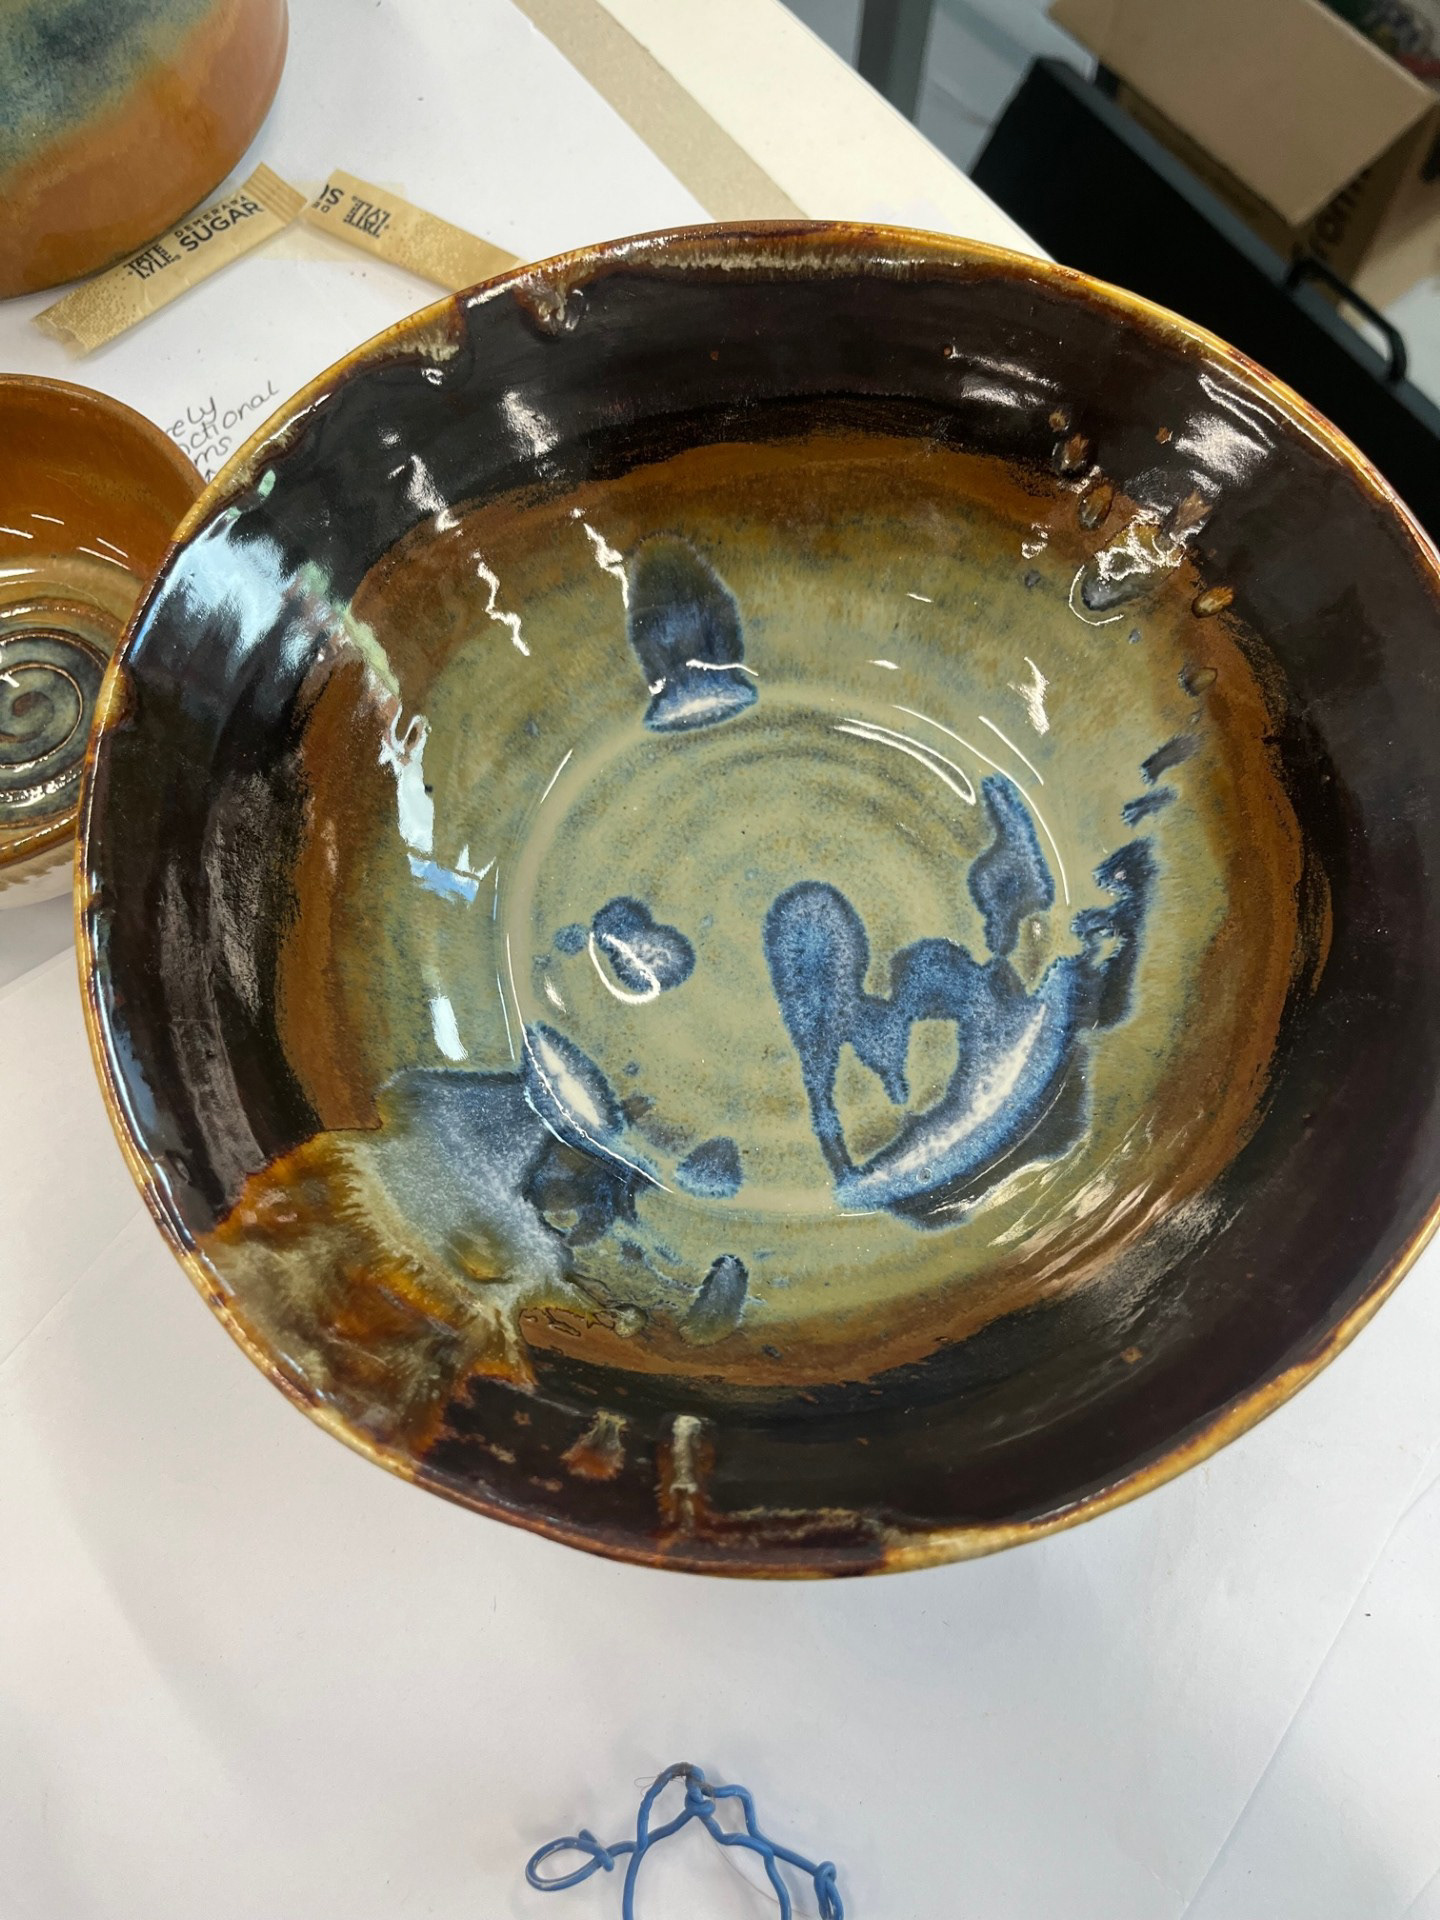
Glazing is truly a passion of mine—I love the process and the creative possibilities it offers. I was really eager to dive back into it and build on the sampling I started at the end of my last project. Over the past few weeks, I’ve been steadily building up a collection of glaze tests, and it's definitely time to clear them off the bisque shelf and reflect on what I’ve learned. Although I don’t have many photos of the actual process, I’ve mainly been working with Vert Lustre, Iron Lustre, and Blue Rutile. I didn’t approach this round of glazing with a strict plan; instead, I focused on experimentation and trying something new, allowing instinct and curiosity to guide the application. This exploratory approach has been refreshing and rewarding, and I’m excited to see how these tests can inform the next stage of my making.
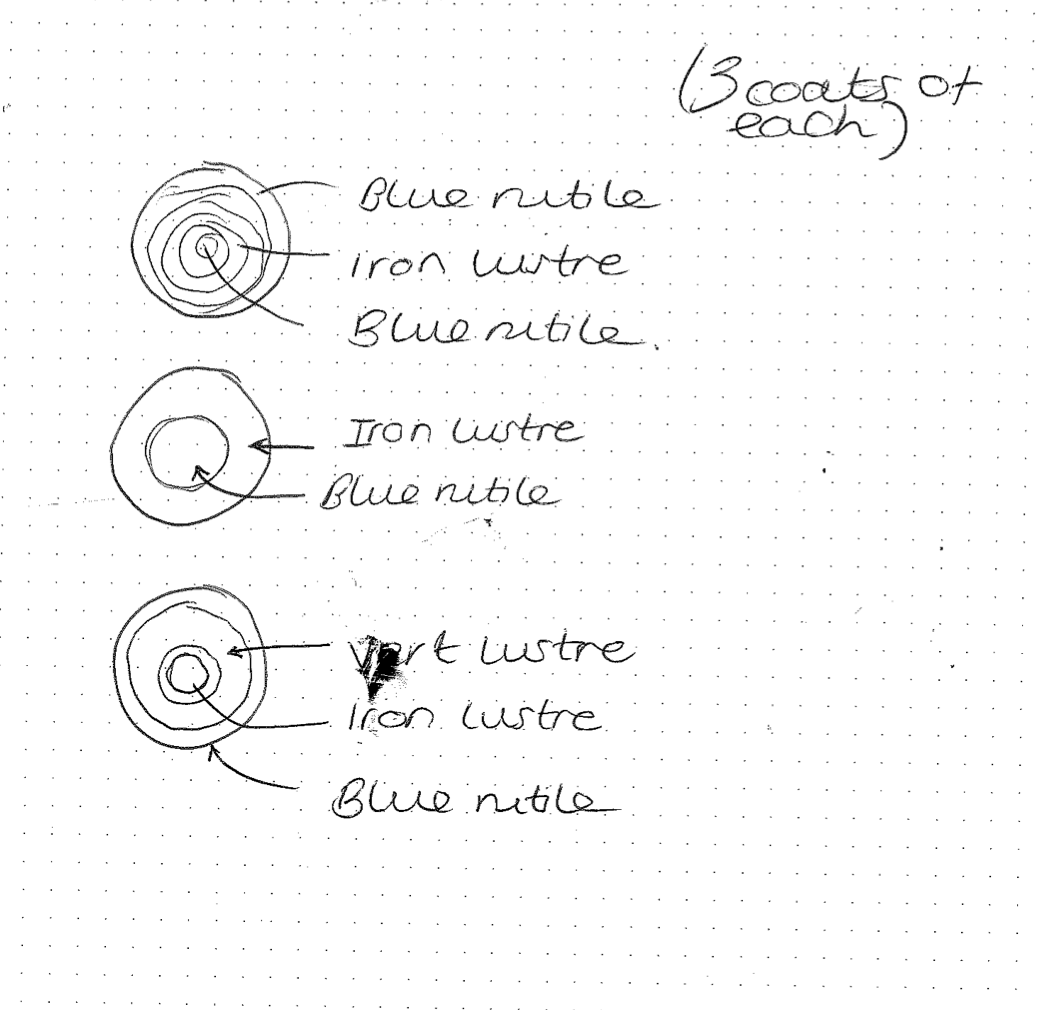

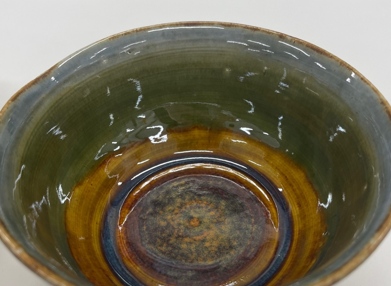
Iron Lustre & Blue Rutile
Iron Lustre & Blue Rutile
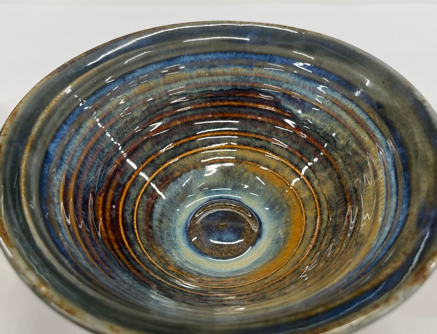
Vert Lustre, Iron Lustre & Blue Rutile

Reflection:
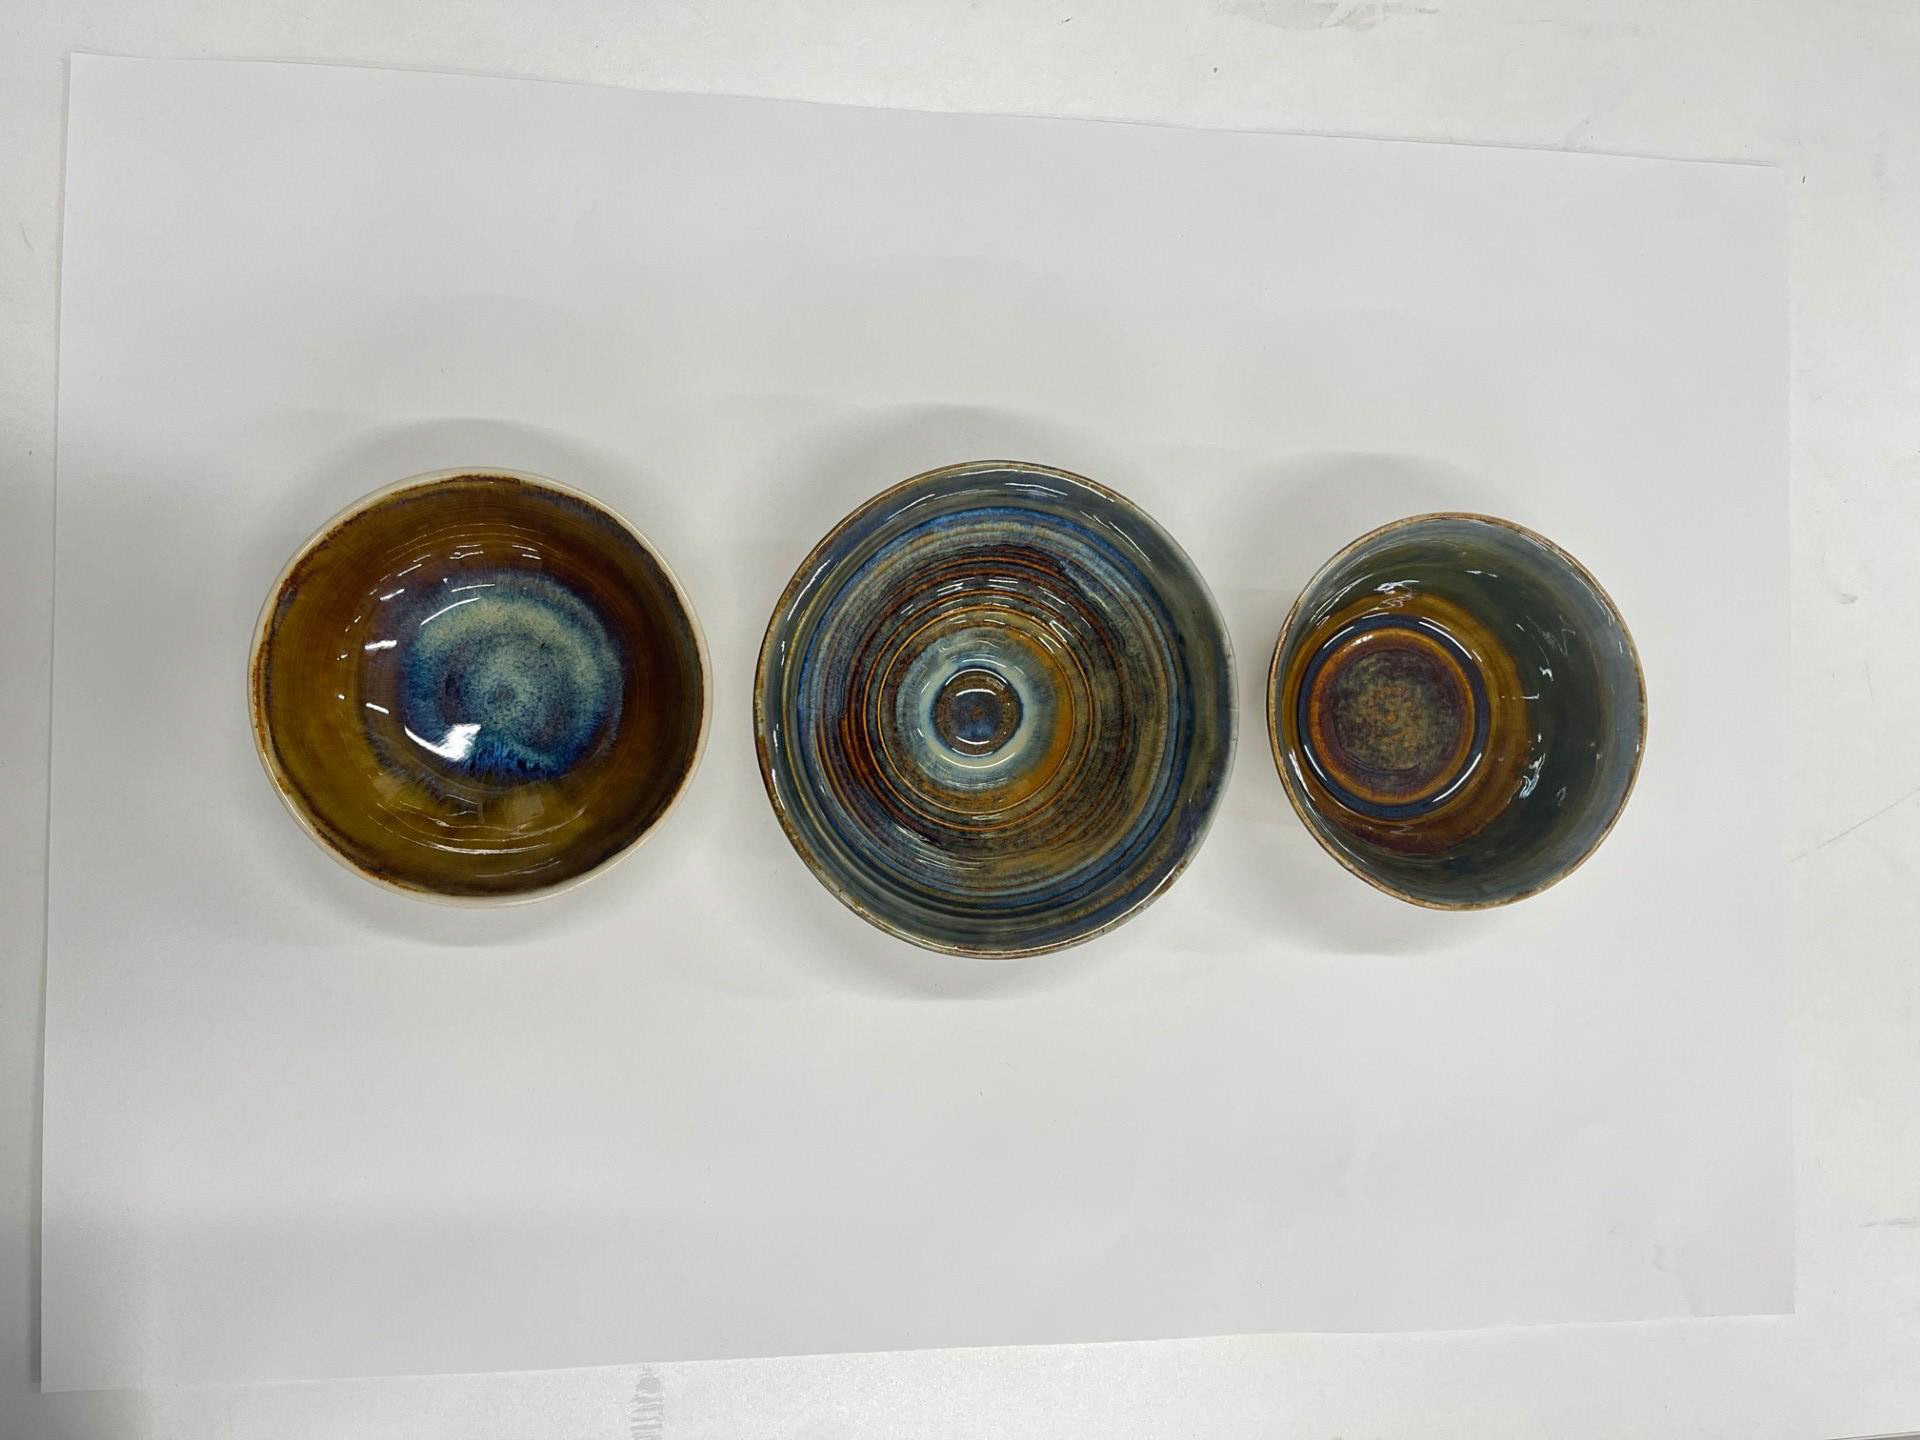
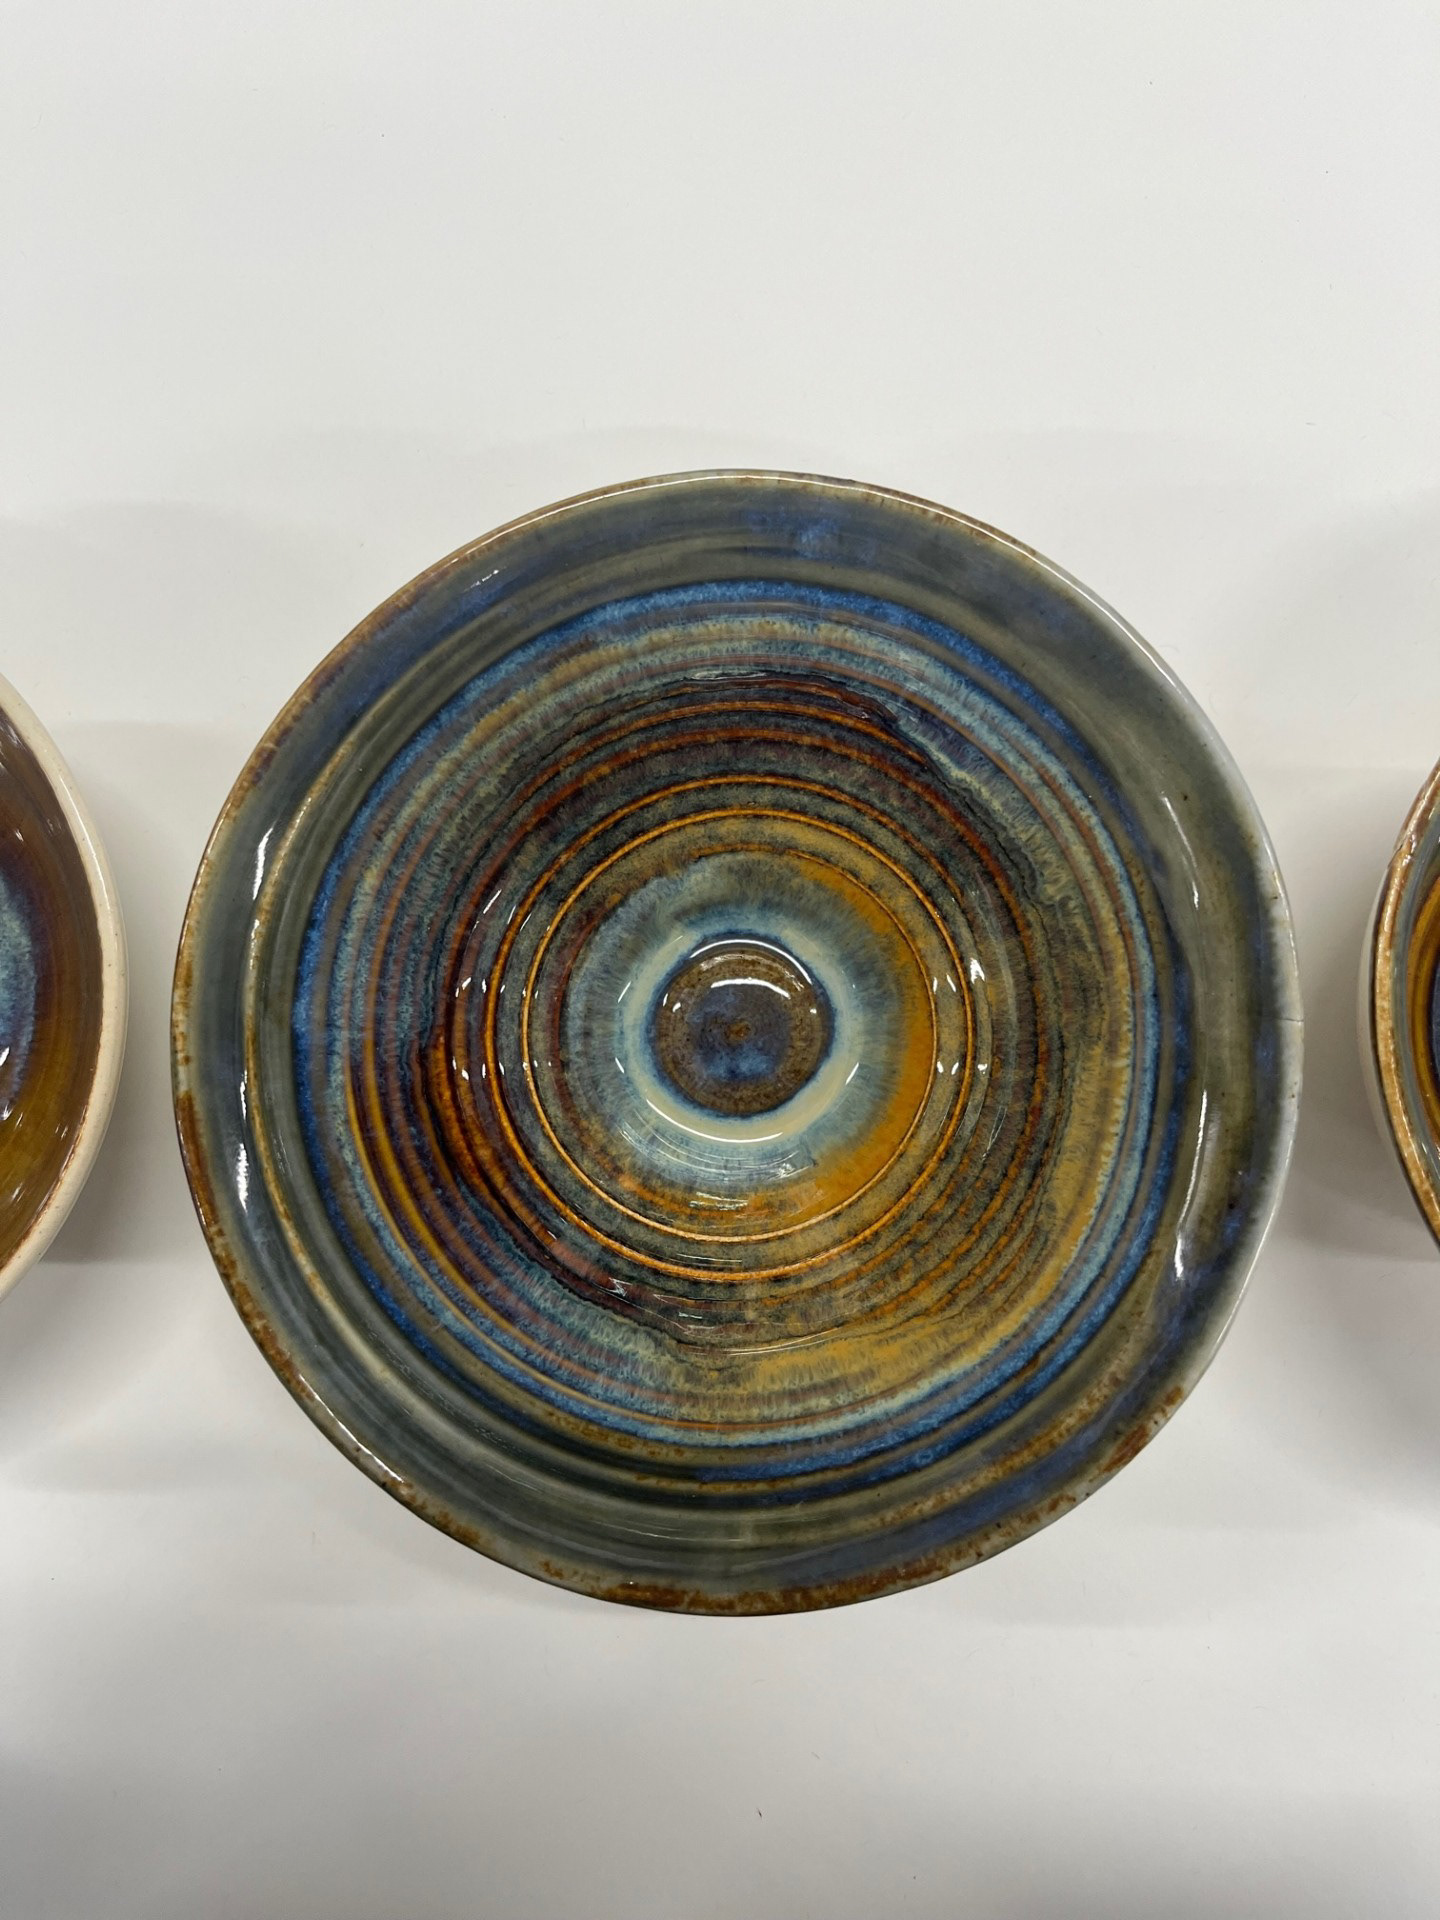
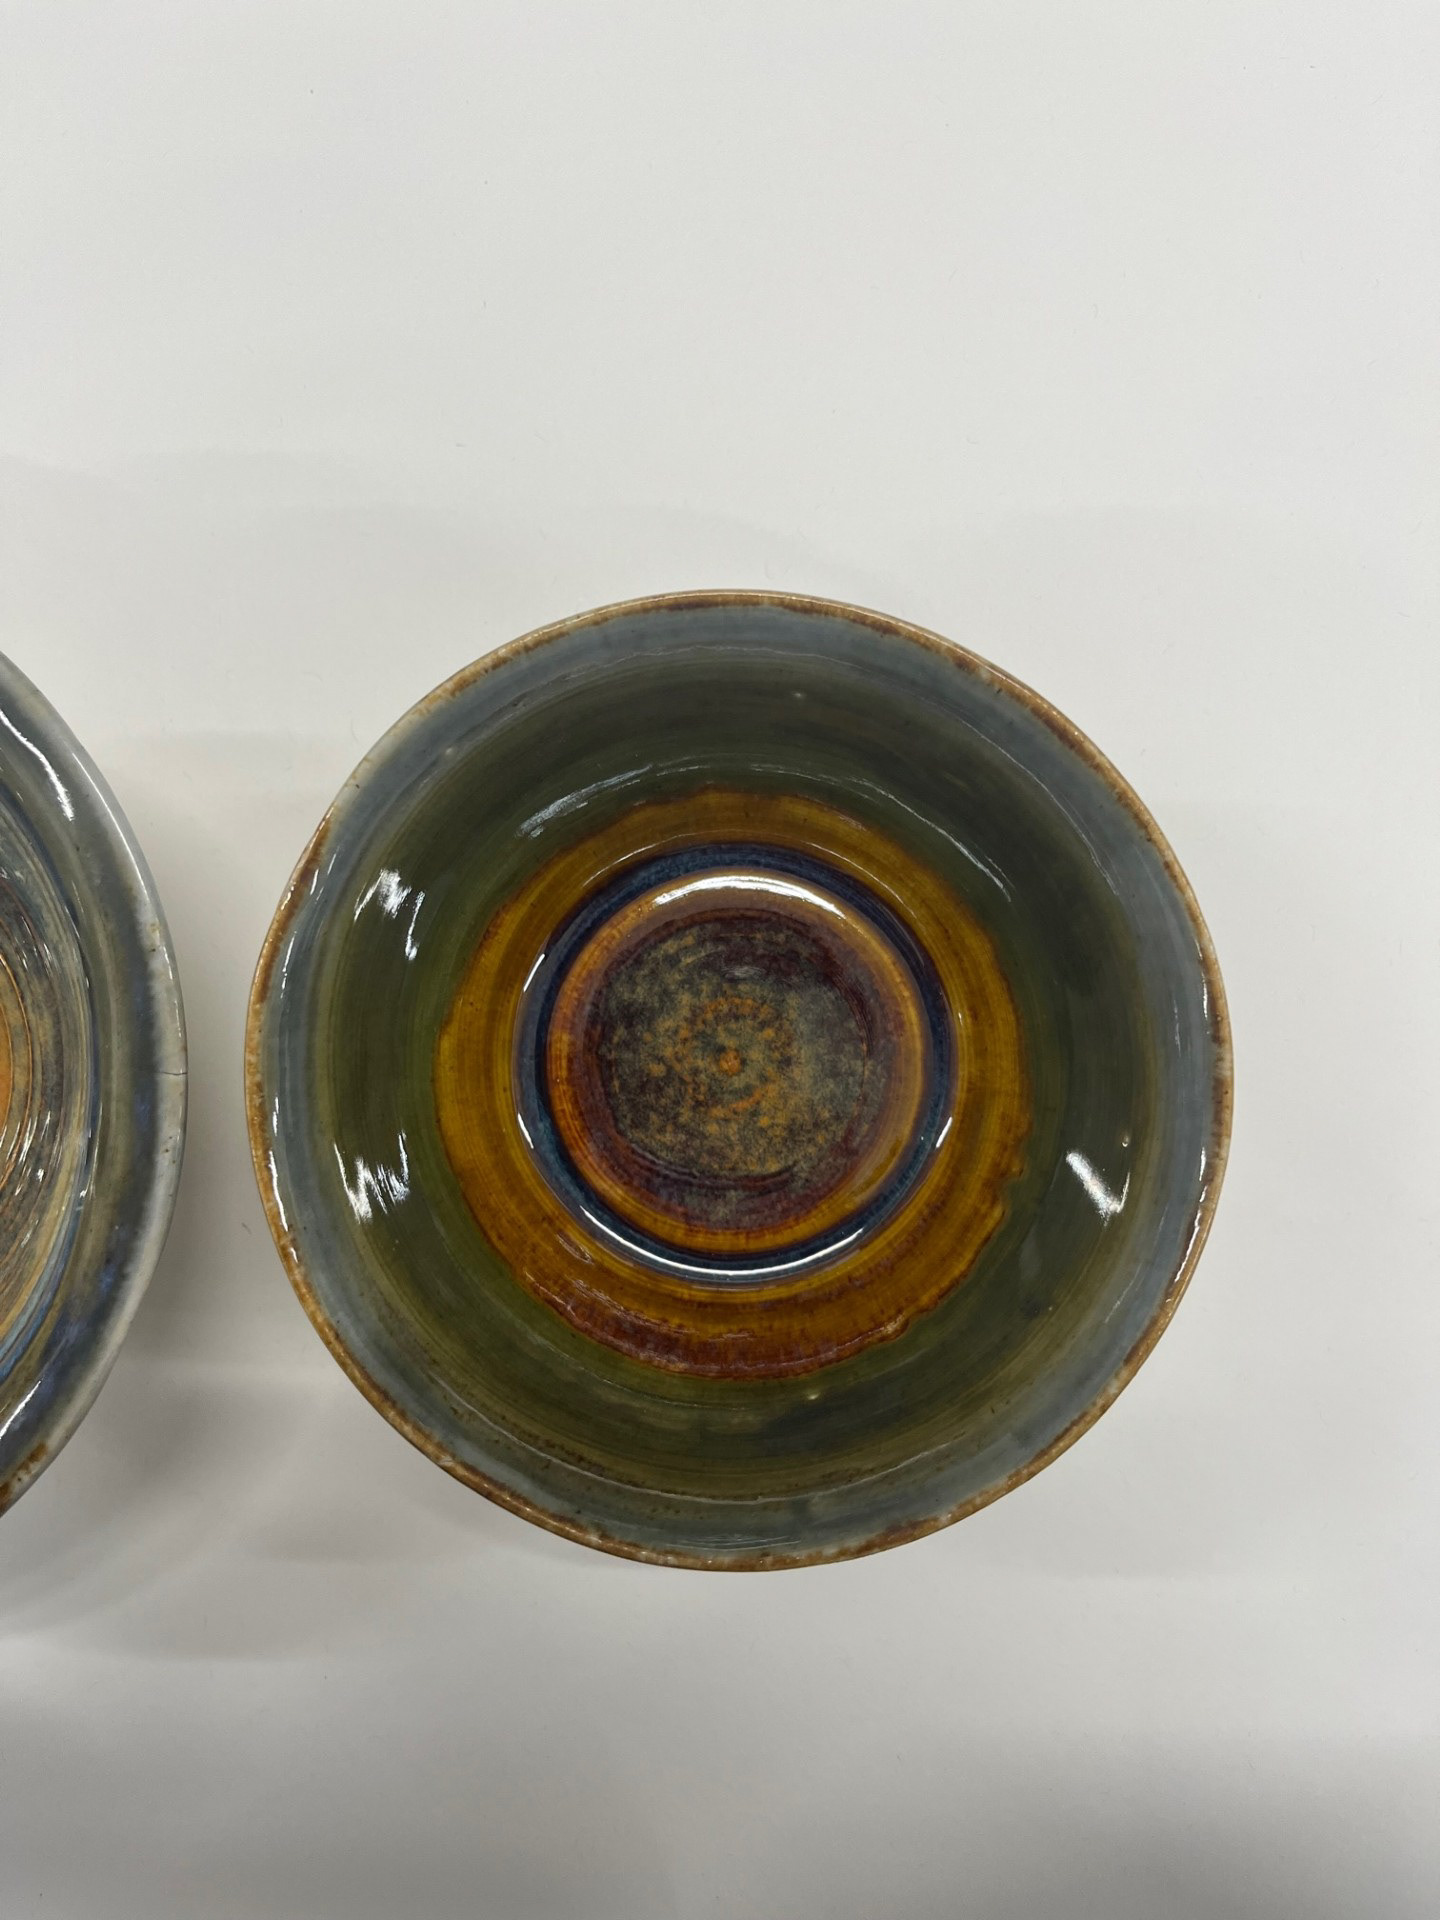
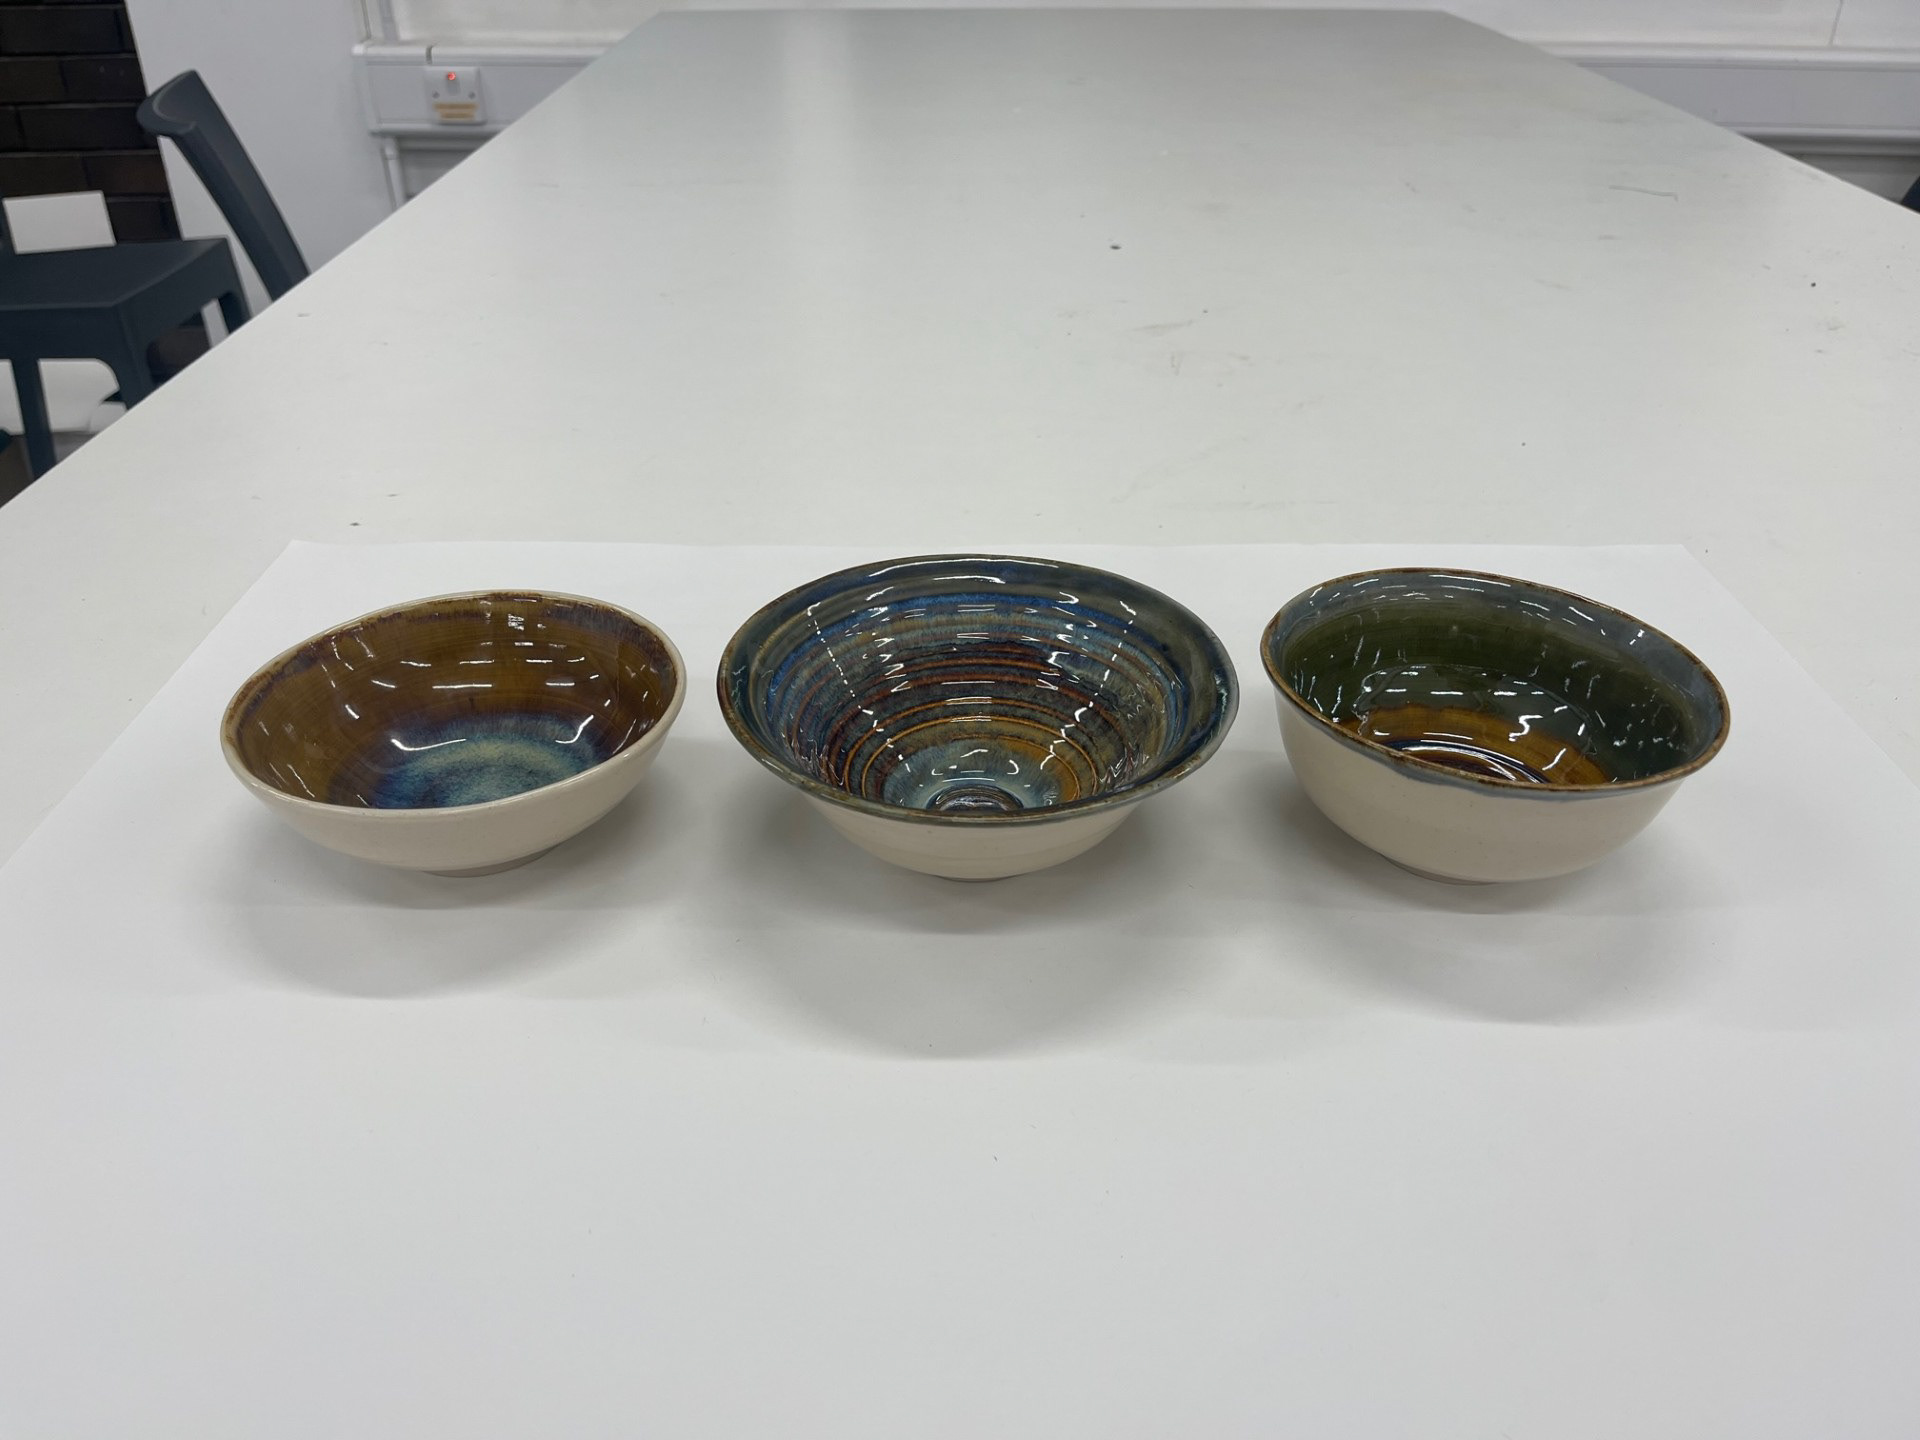
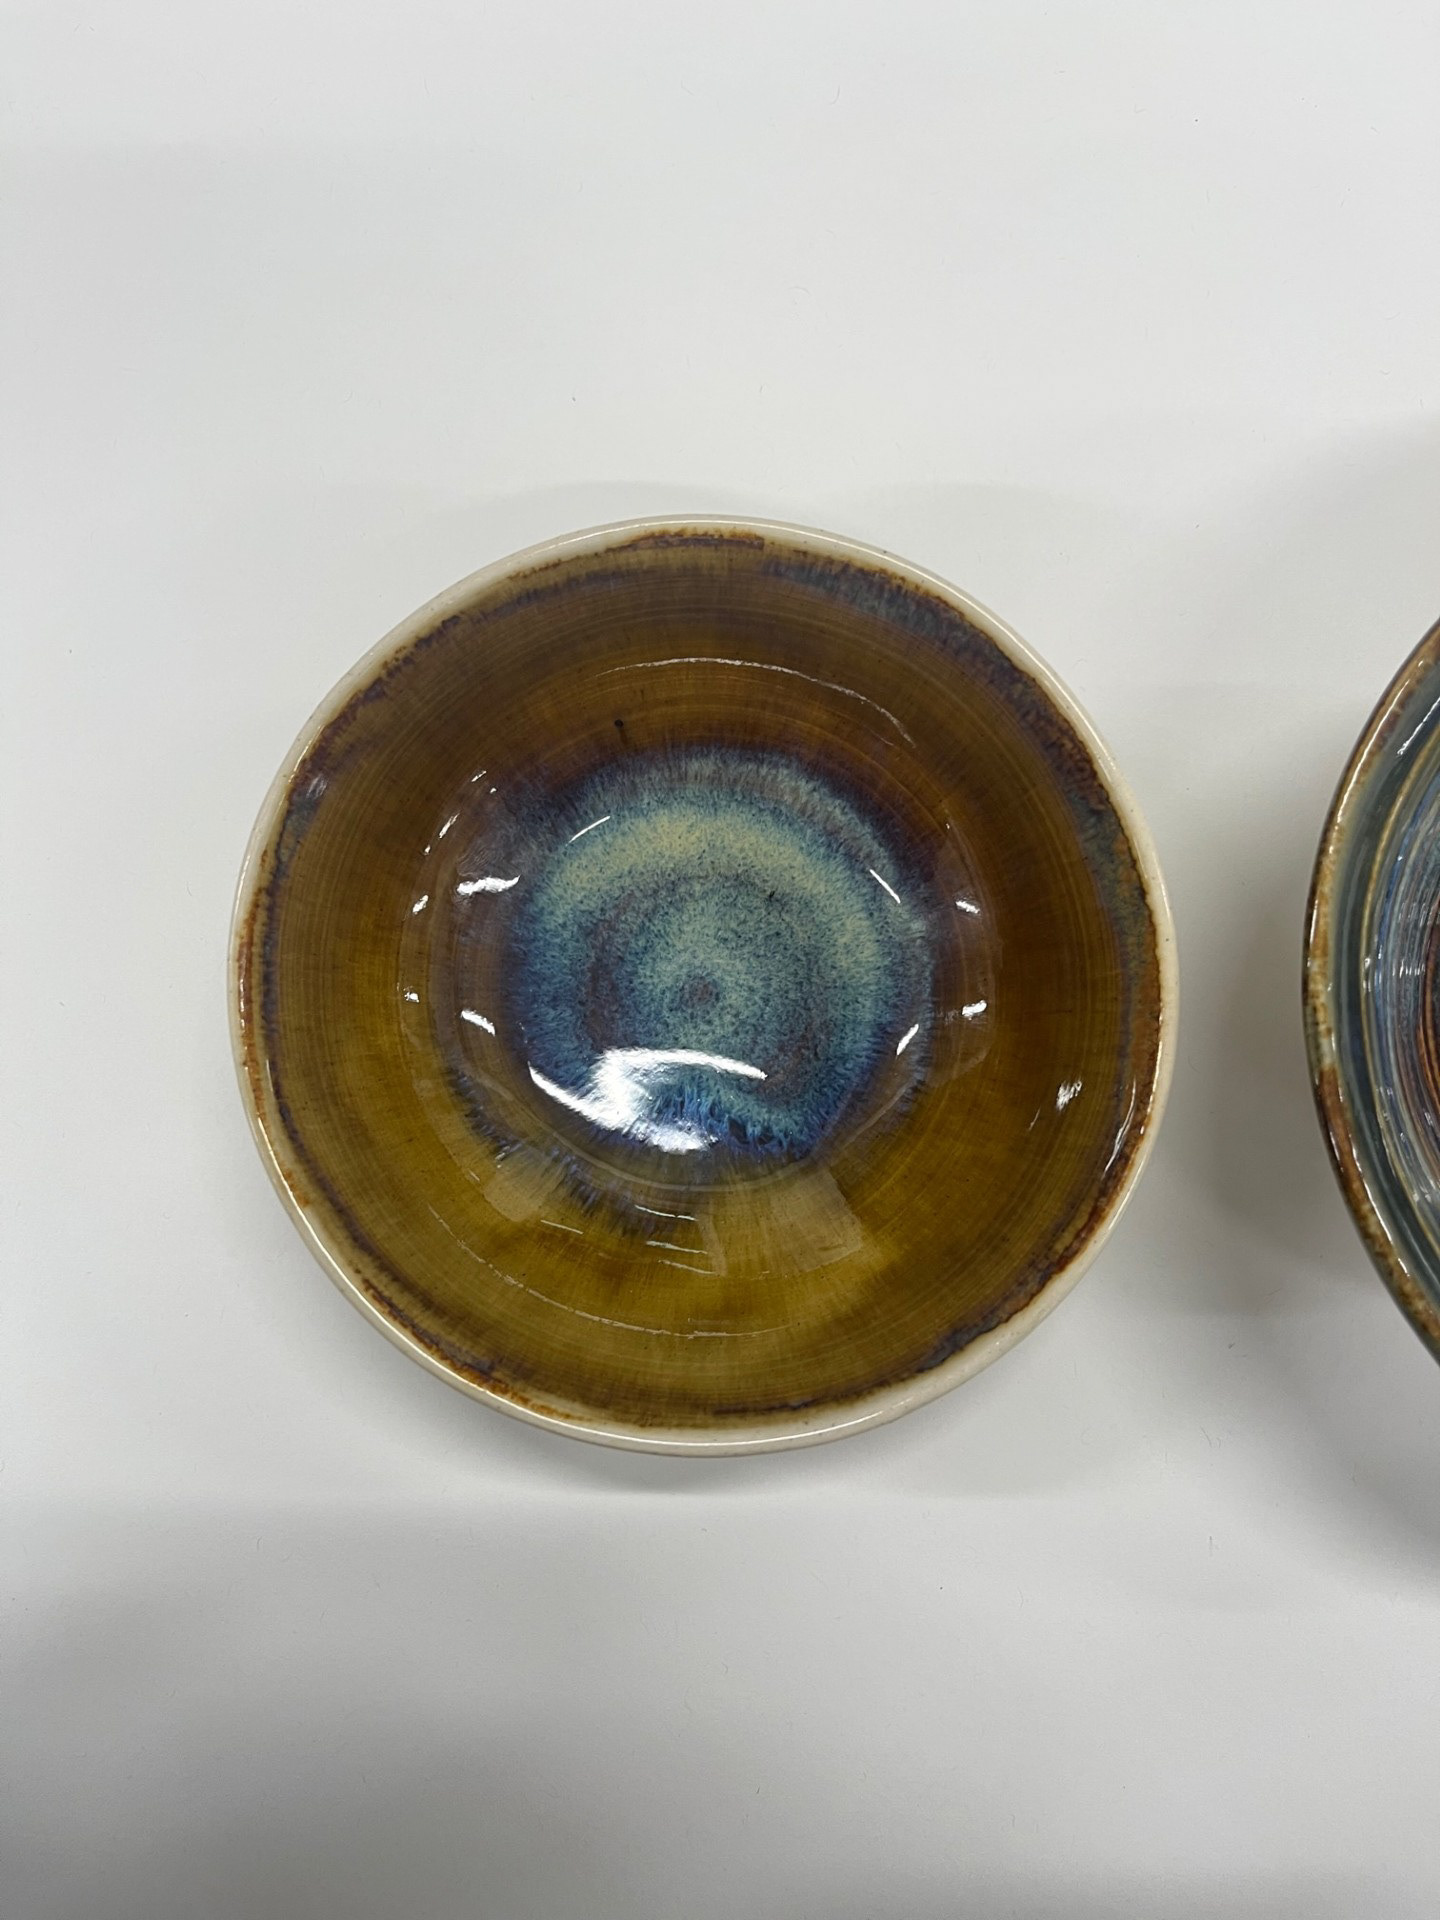
I'm really glad I have gotten round to the glaze testing this week because it will make up 50 percent of my practical elements with the other half being form and refinement. I think that from starting ceramics, I soon realised glaze would be one of my main forms of artistic expression because it is something I have always loved. The main aim of this testing was to just try out a few different combinations of the glazes that I bought in the previous semester. I wanted to see what kind of effects i could create by putting different glazes next to each other and seeing how they could react. In relation to the outcomes, I am pleasantly surprised with how vibrant the glazes came out and I think that the Iron Lustre and blue Rutile combinations are ones I will definitely be repeating in future testing.
Further Glaze Testing:

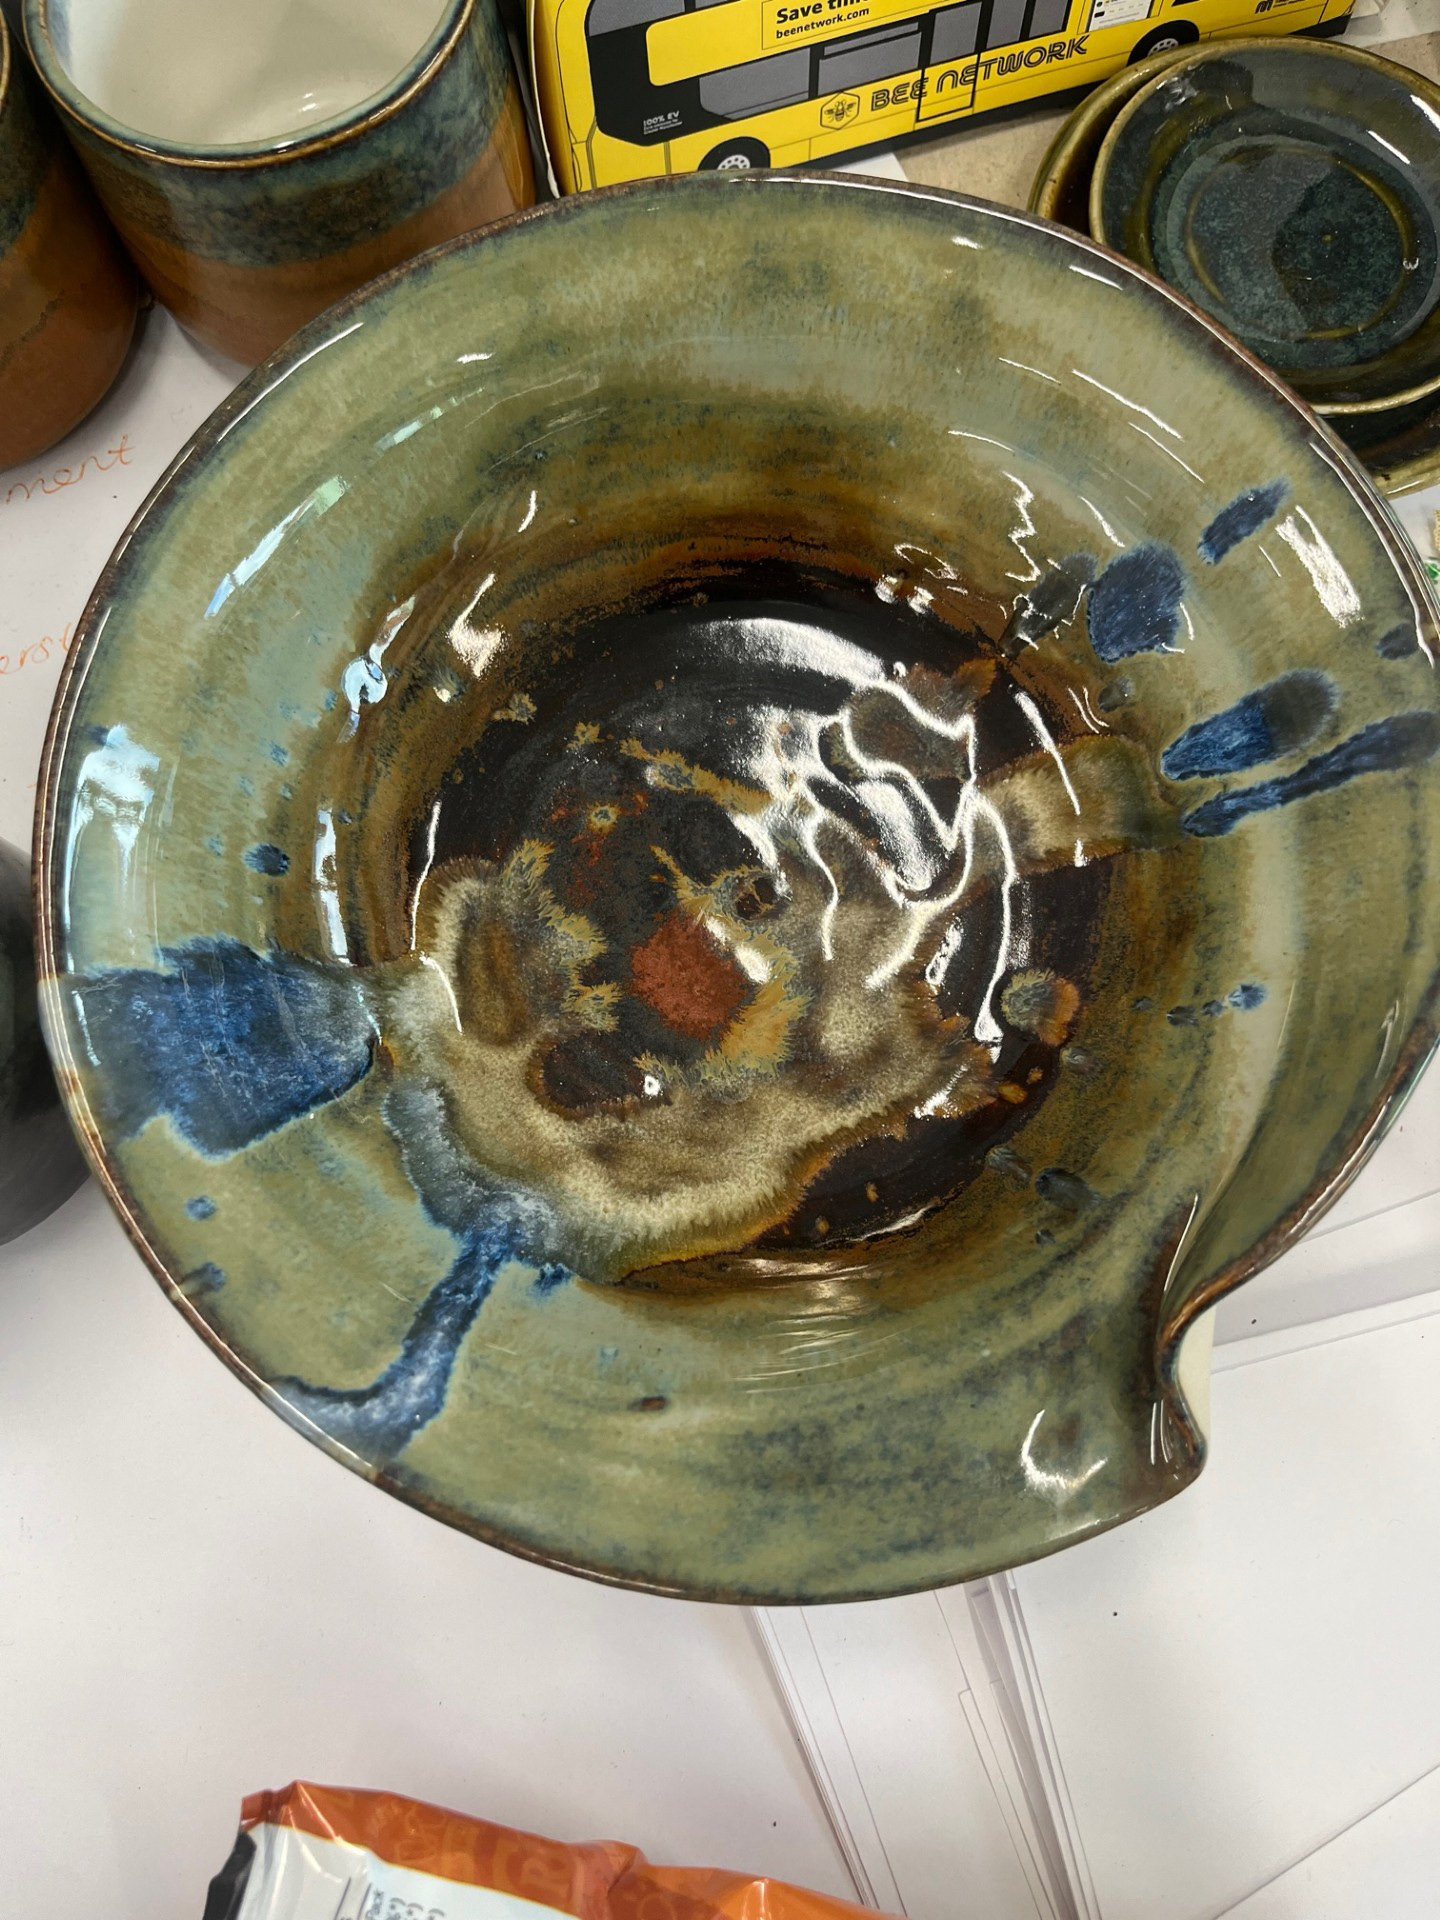
wanted to try doing a rough application to see if it would give a nice effect to the glaze. Hoping it would blur the lines a bit better once fired or give it an interesting pattern. From looking on social media, this a a technique that is widely used when applying brush on glaze so I am exited to see the outcome on this pot. I also am trying to keep a consistent amount of layers when applying the glazes to the various samples. At the moment I am sticking to 3 of each as I think it will help me compare the samples, techniques and possibly firing temperatures against each other so that I can develop a bit of consistency.
Outcome of Disks:
Vert Lustre & Iron Lustre

Vert Lustre & Blue Rutile
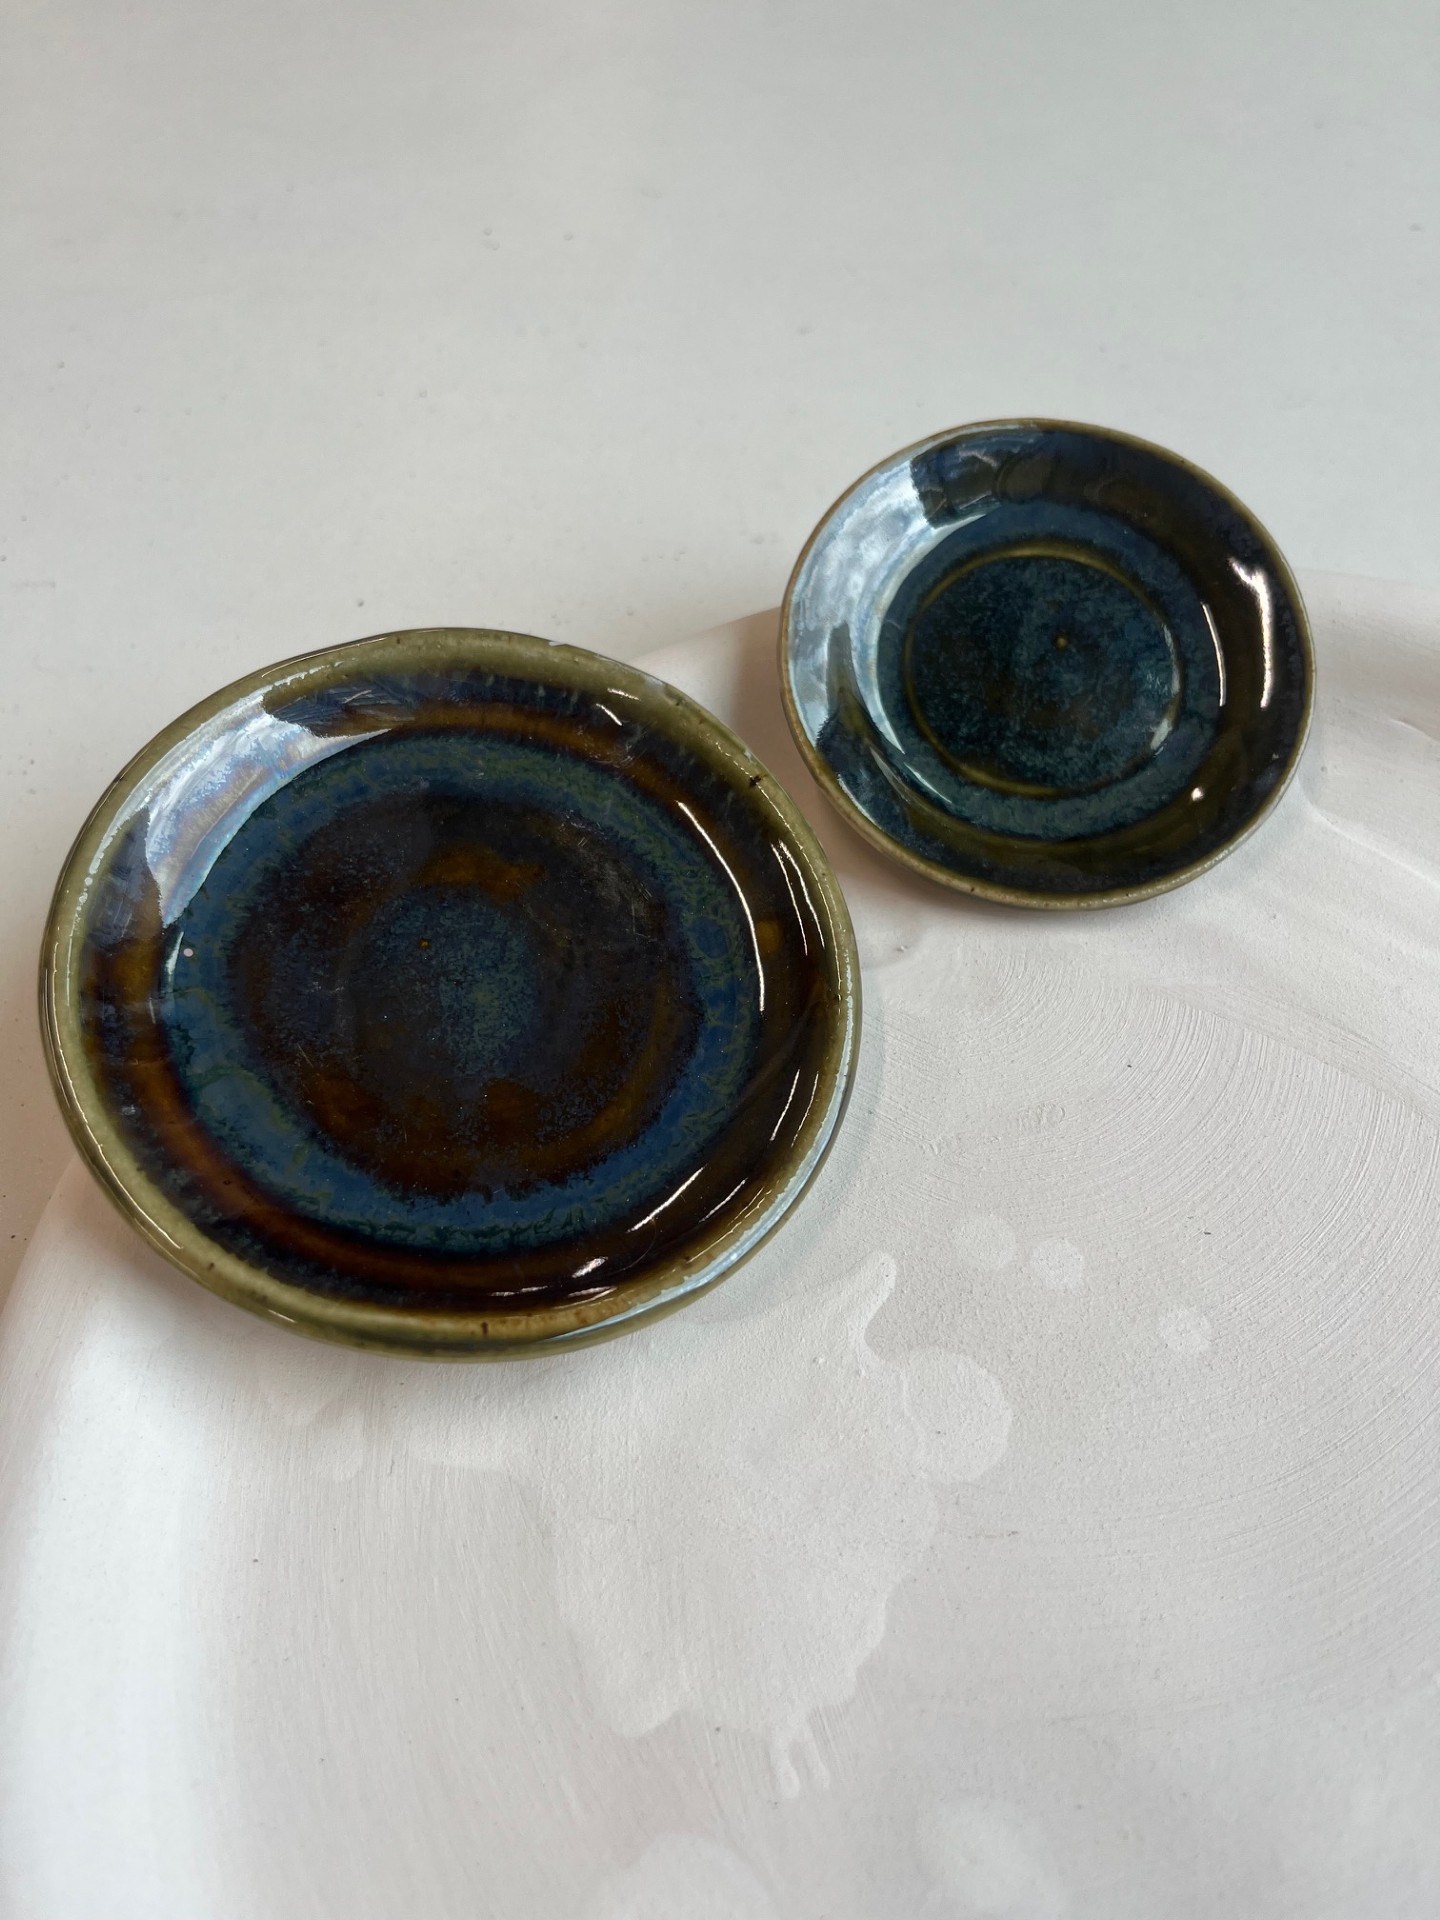
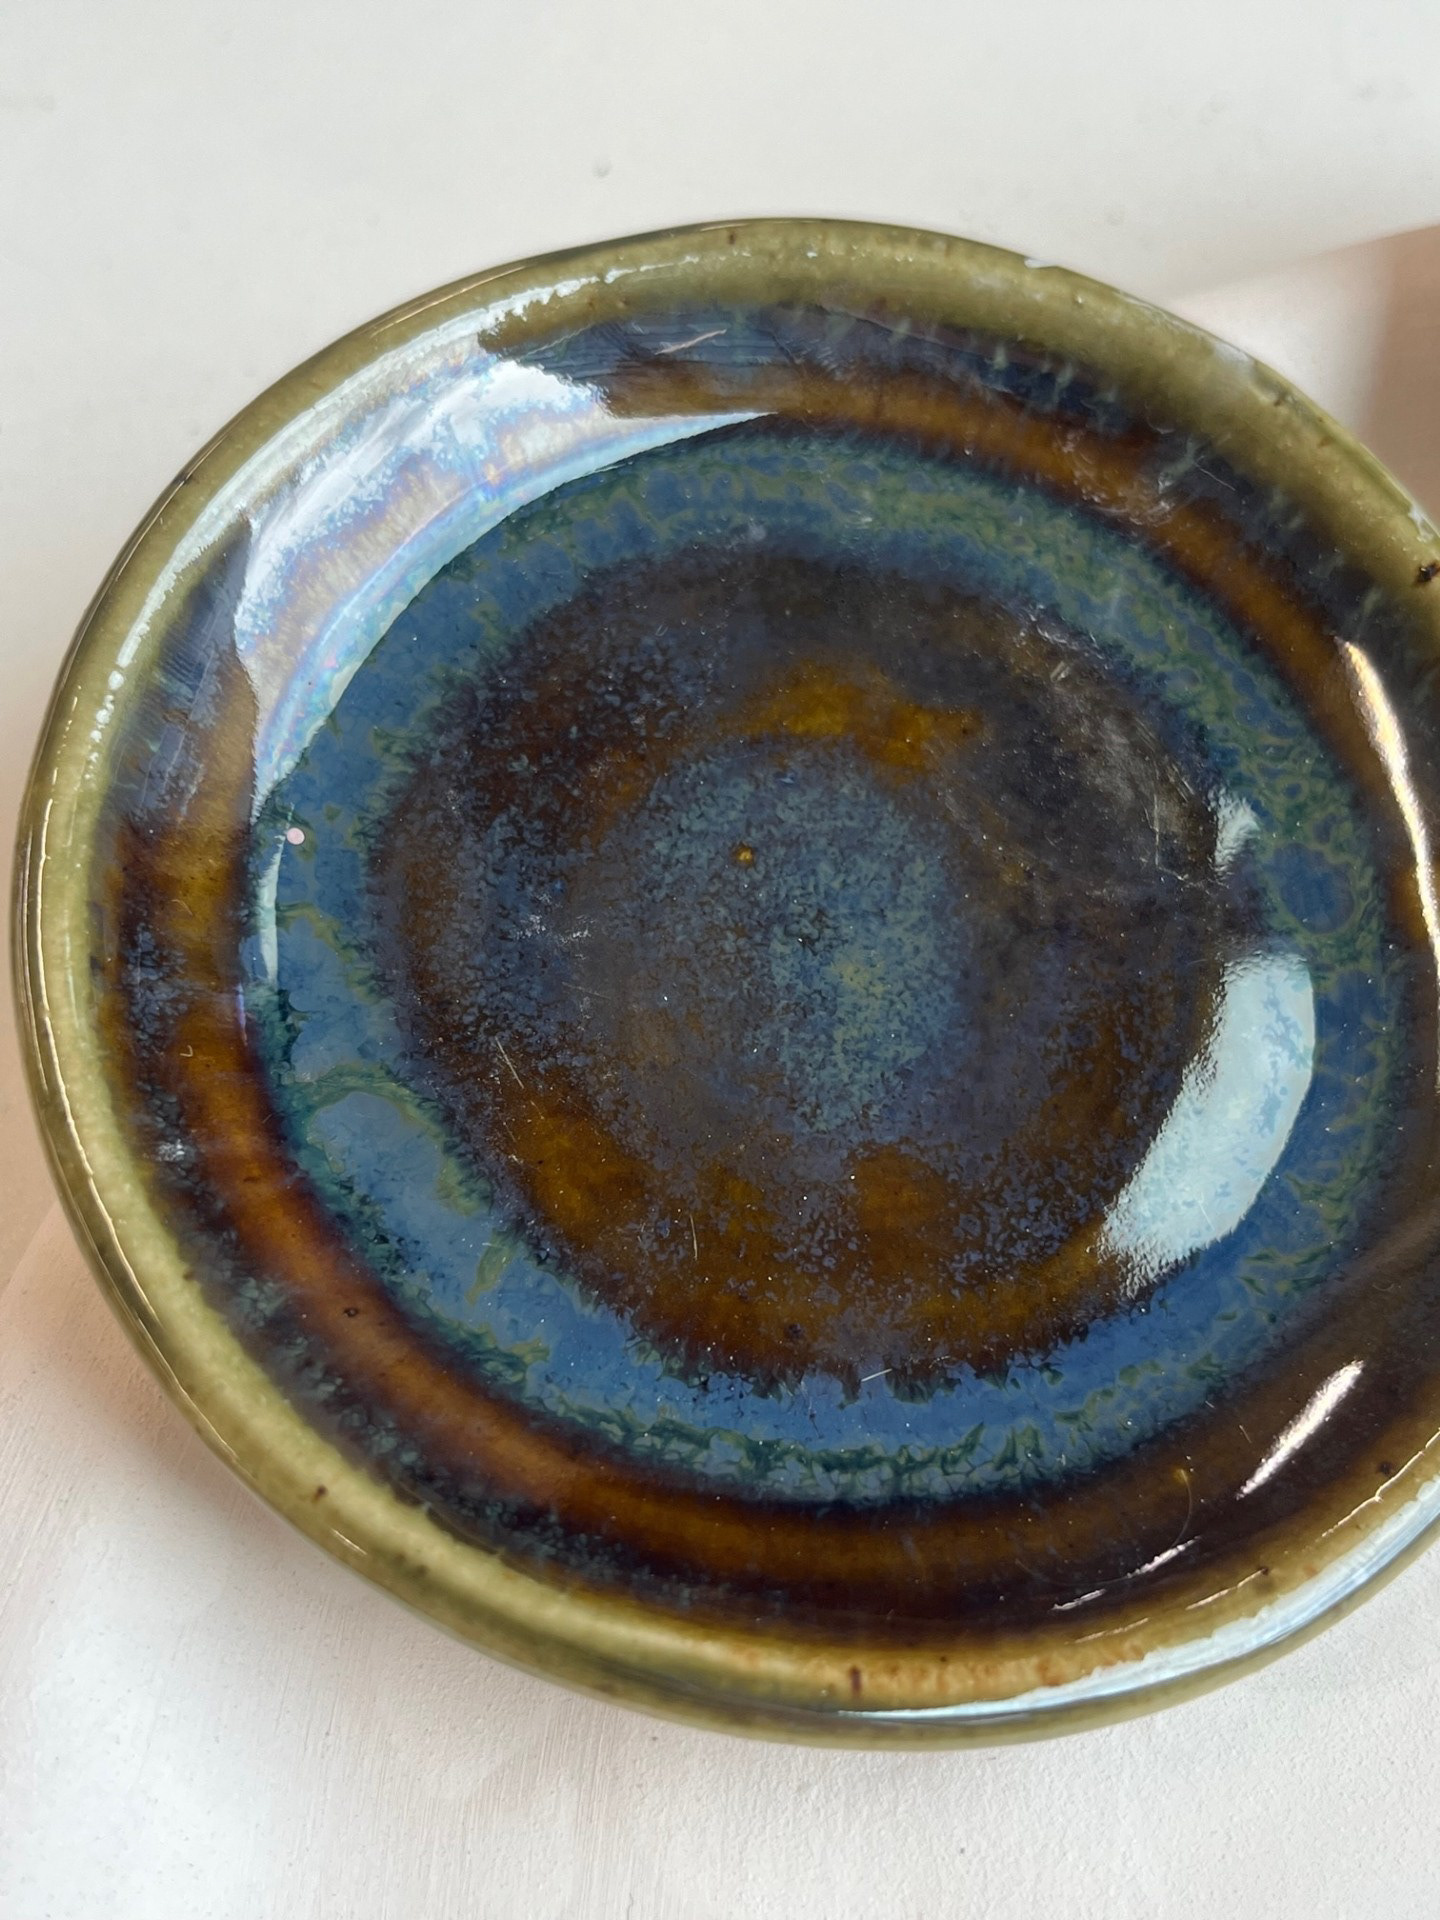
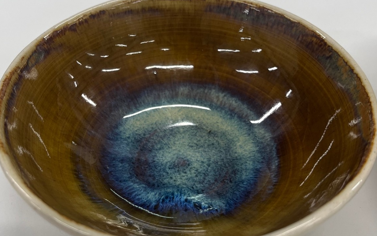
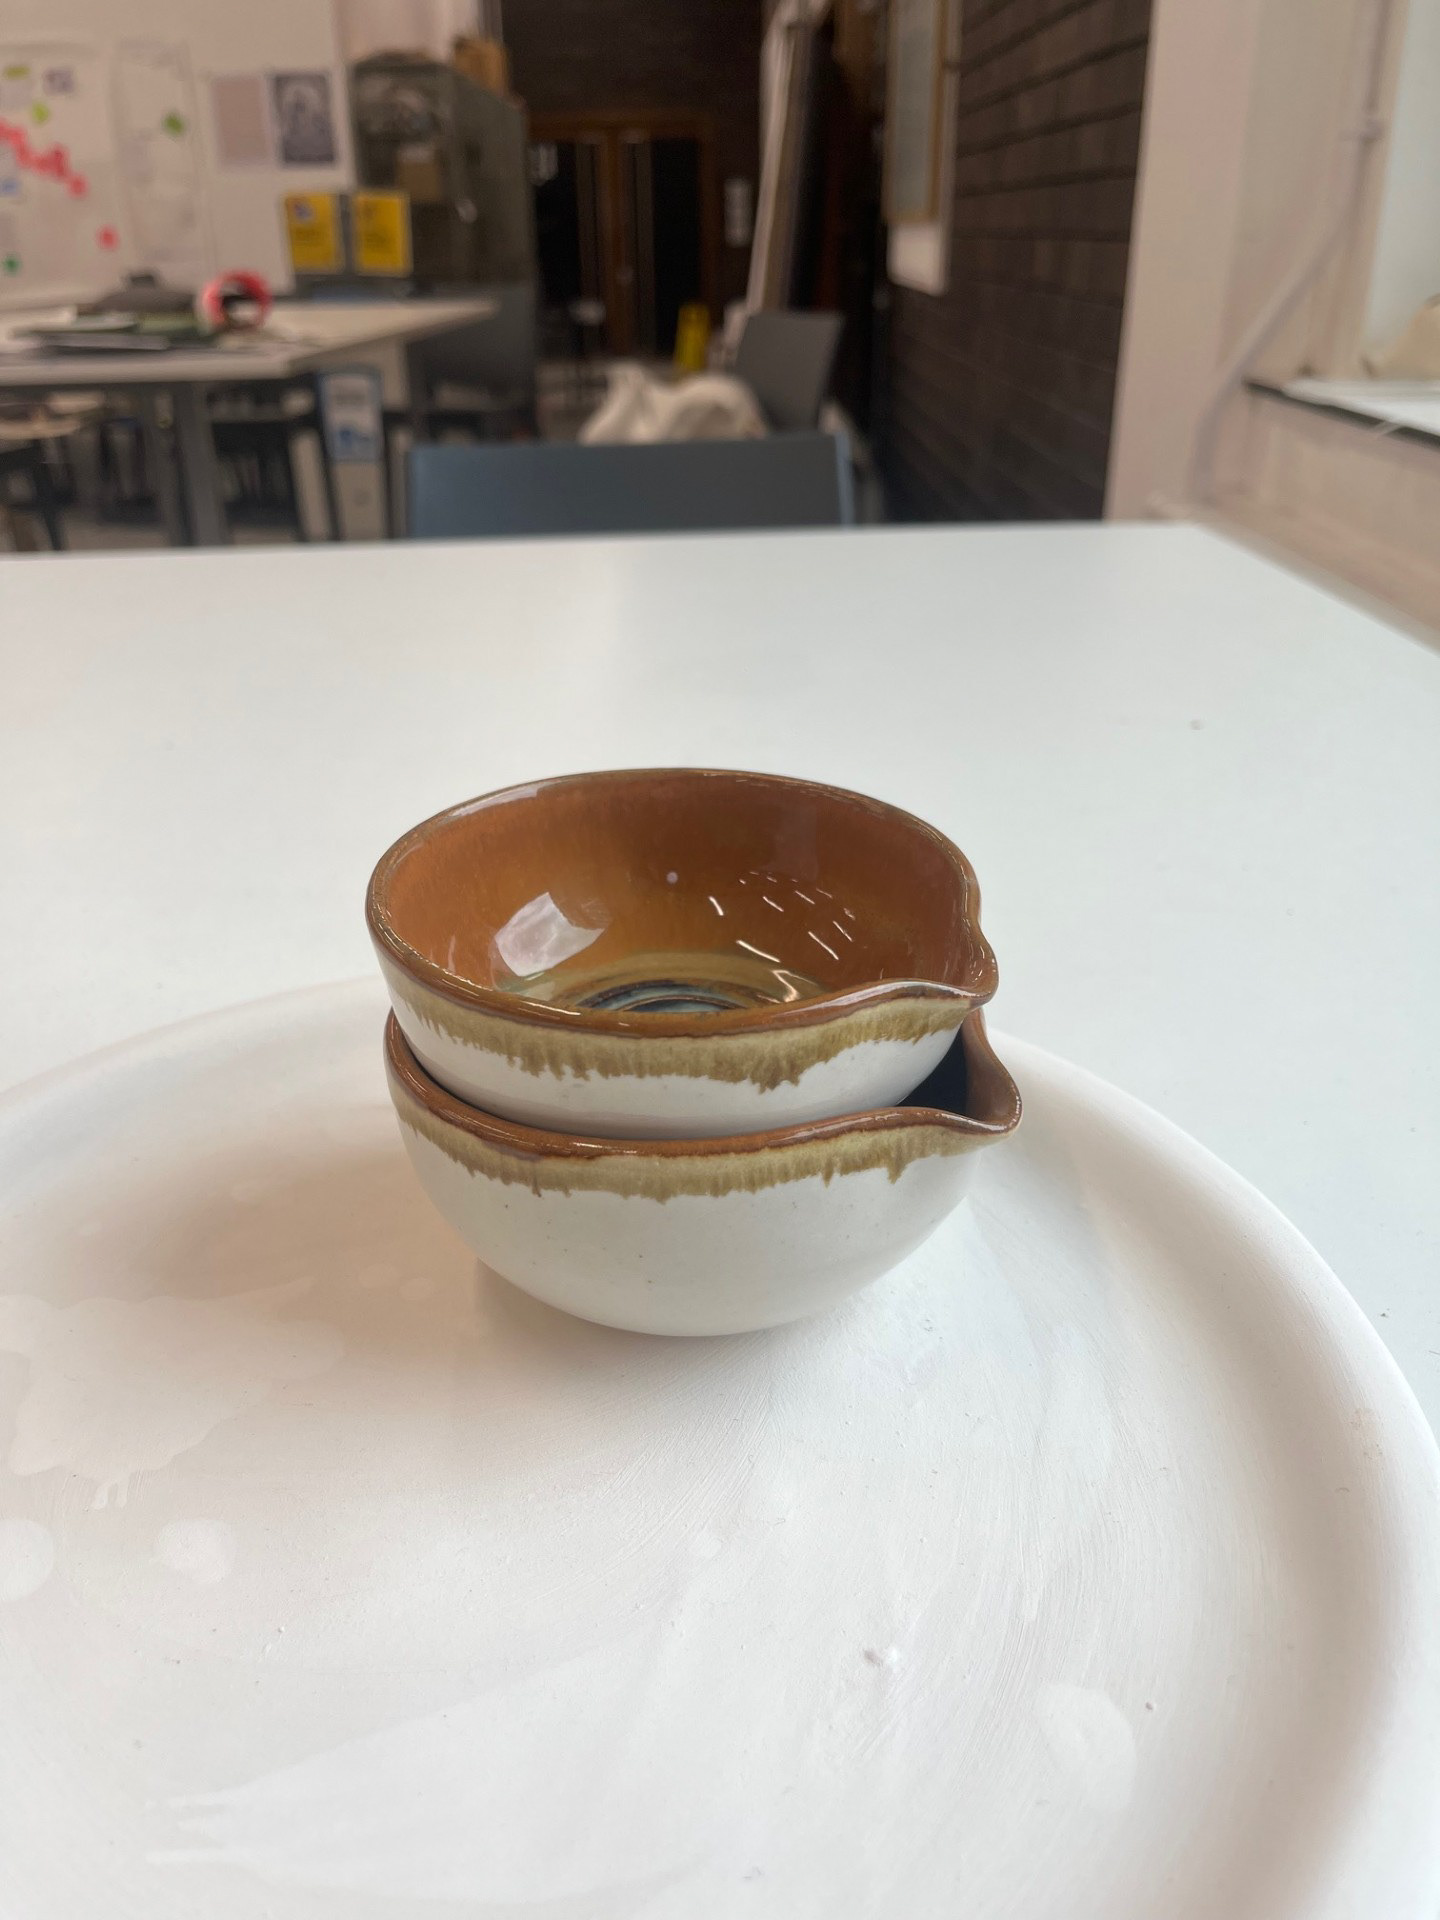
For these samples, I wanted to try vert lustre with the 2 glazes that I use the most, iron lustre and blue rutile. I chose to do this because the tiles where these two combined with vert lustre on my glaze grid that I completed last term really intrigued me but I had never re tested it. Looking back now, 3 layers of vert lustre and then the others over the top probably created too many layers. I can tell this on the surface because with these glazes, the surface goes slightly metallic when too much glaze has been applied. Another thing that I have realised id that, the temperature that I have fired these at could be too high as around the rims and the edges it goes almost transparent meaning that the glaze has turned more liquid than its meant to. However, I do still really like the finish of both, i just think that i want to complete another test that has less layers as well as it being fired at a lower temperature so that I can get a more authentic test sample.
WEEK 4: Tutorial, 19/02/25

Overall, I think that this was a very helpful tutorial because I got lots of great feedback from it. I think that this is partly to do with the fact that I have been doing a lot of practical work along with ideation that helped fuel the discussion. Practically, I have been doing lots of work on refining my practice so that all elements of my practice have consistency. In the last 4 weeks I have experienced a lot of improvement in the pure quality of my practice as well as the development of personal routines within the workshop. All of this stemming from the ground work that I did researching and therefore drawing inspiration from Mingei and the art of folk craft. This tutorial allowed me to verbalise the notion that the more in tune with my practical and creative brain that I am, the more confidence I feel in my own practice. Knowing everything I do inside and out, having that constant introspection, is what has enabled me to understand myself and my practice to a great degree; therefore providing me with new found confidence. Another things that has enabled this development is my note taking. I am currently making the effort to try and document my work as meticulously as possible as sometimes my actions and thoughts can get lost within my practice. This in the past has made me feel like my projects lacked depth; however now that I am noting down even the smallest thoughts and ideas, I feel like I am finally keeping track of everything, almost acting like a bookmark in a book. I am finally not losing my place.
Further breakdown from tutorial:
I have decided to do a couple of different breakdowns of my feedback from the tutorial because I think that it helps me to process the information a bit better. It really allows me to figure out a strategy to implement the next steps that I'm going to take; and in my eyes, the more I break it down, the easier it will me for me to understand.
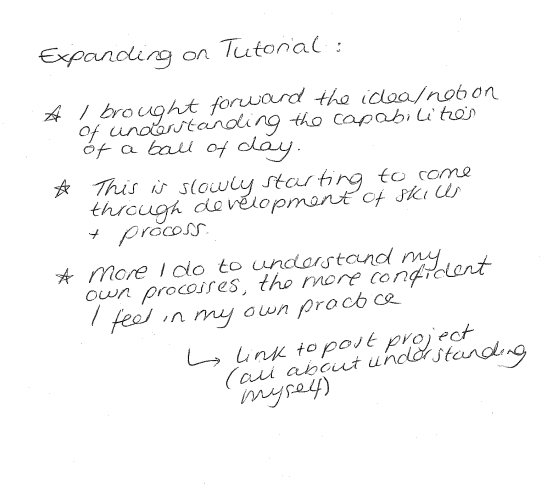
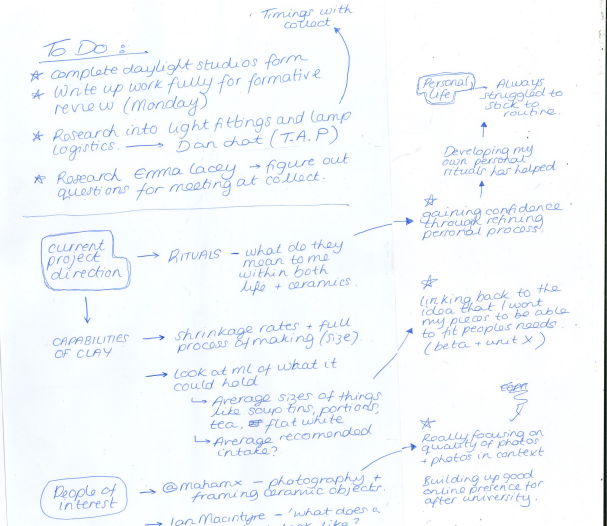
From the tutorial I was given a couple of areas to research, one of which being a designer called Maham Anjum. Previously, I had the idea to host an evening where people use my vessels to share food and conversate over but I soon realised that all I really needed/ wanted from this was photos in context. Maham Anjum provides amazing inspiration for this and I am very exited to begin some research on her in the research portion of my portfolio. Another thing that I brought to the table was my interest in understanding the capabilities of clay. In my quest for deeper understanding, I felt the desire to understand the capabilities of a ball of clay. For example, if I had a 1kg ball of clay, what could I make with that? This is something that will be my main focus within the coming week and I am exited to start experimenting further.
Making Ritual:
During the tutorial, I expressed my interest in touching on the routine/ ritual that I have slowly developed through this period of growth. As discussed before, I have experienced an increase in confidence through understanding what 'my process' really means, so I really think that highlighting this within my project is something that would mean a lot. I think that this has a lot of links to the ethos behind my project as I want whatever objects I make to be utilitarian yet beautiful so that they can enhance everyday routines and rituals of those who own them.
See below for my current ritual:
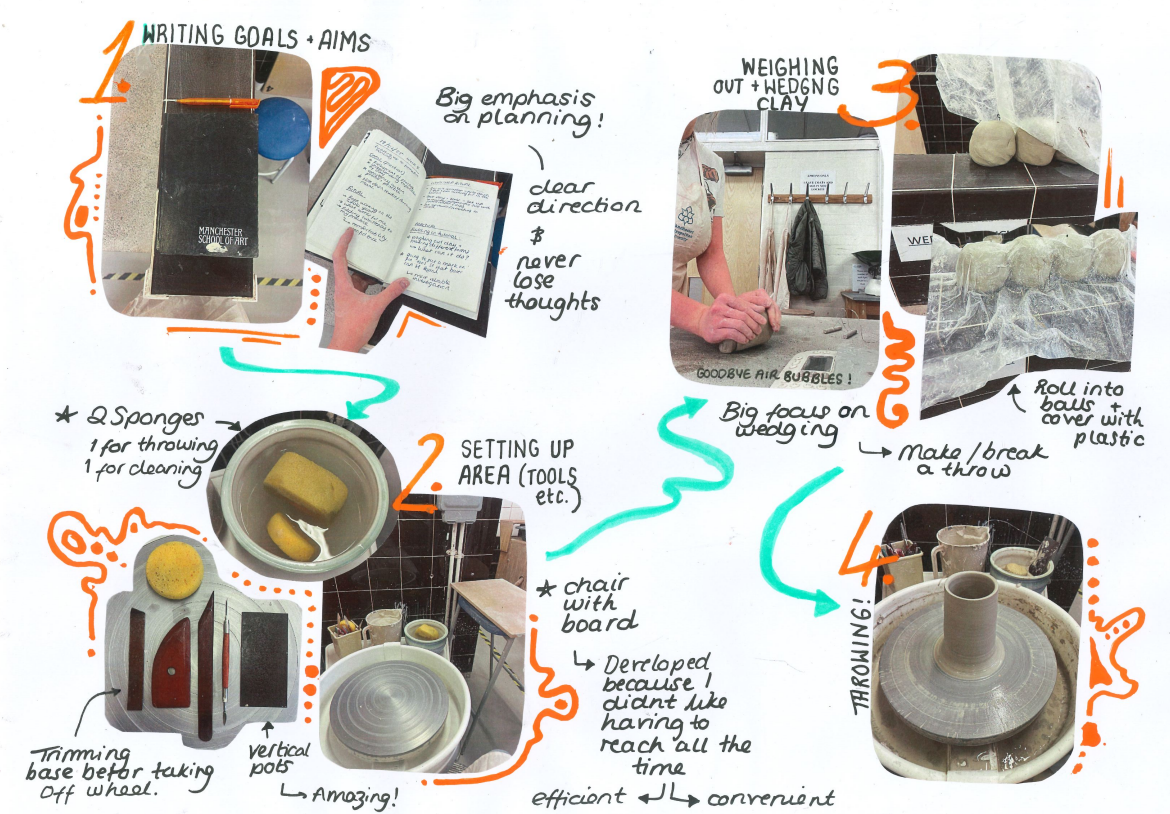
See below for further expansion of process:
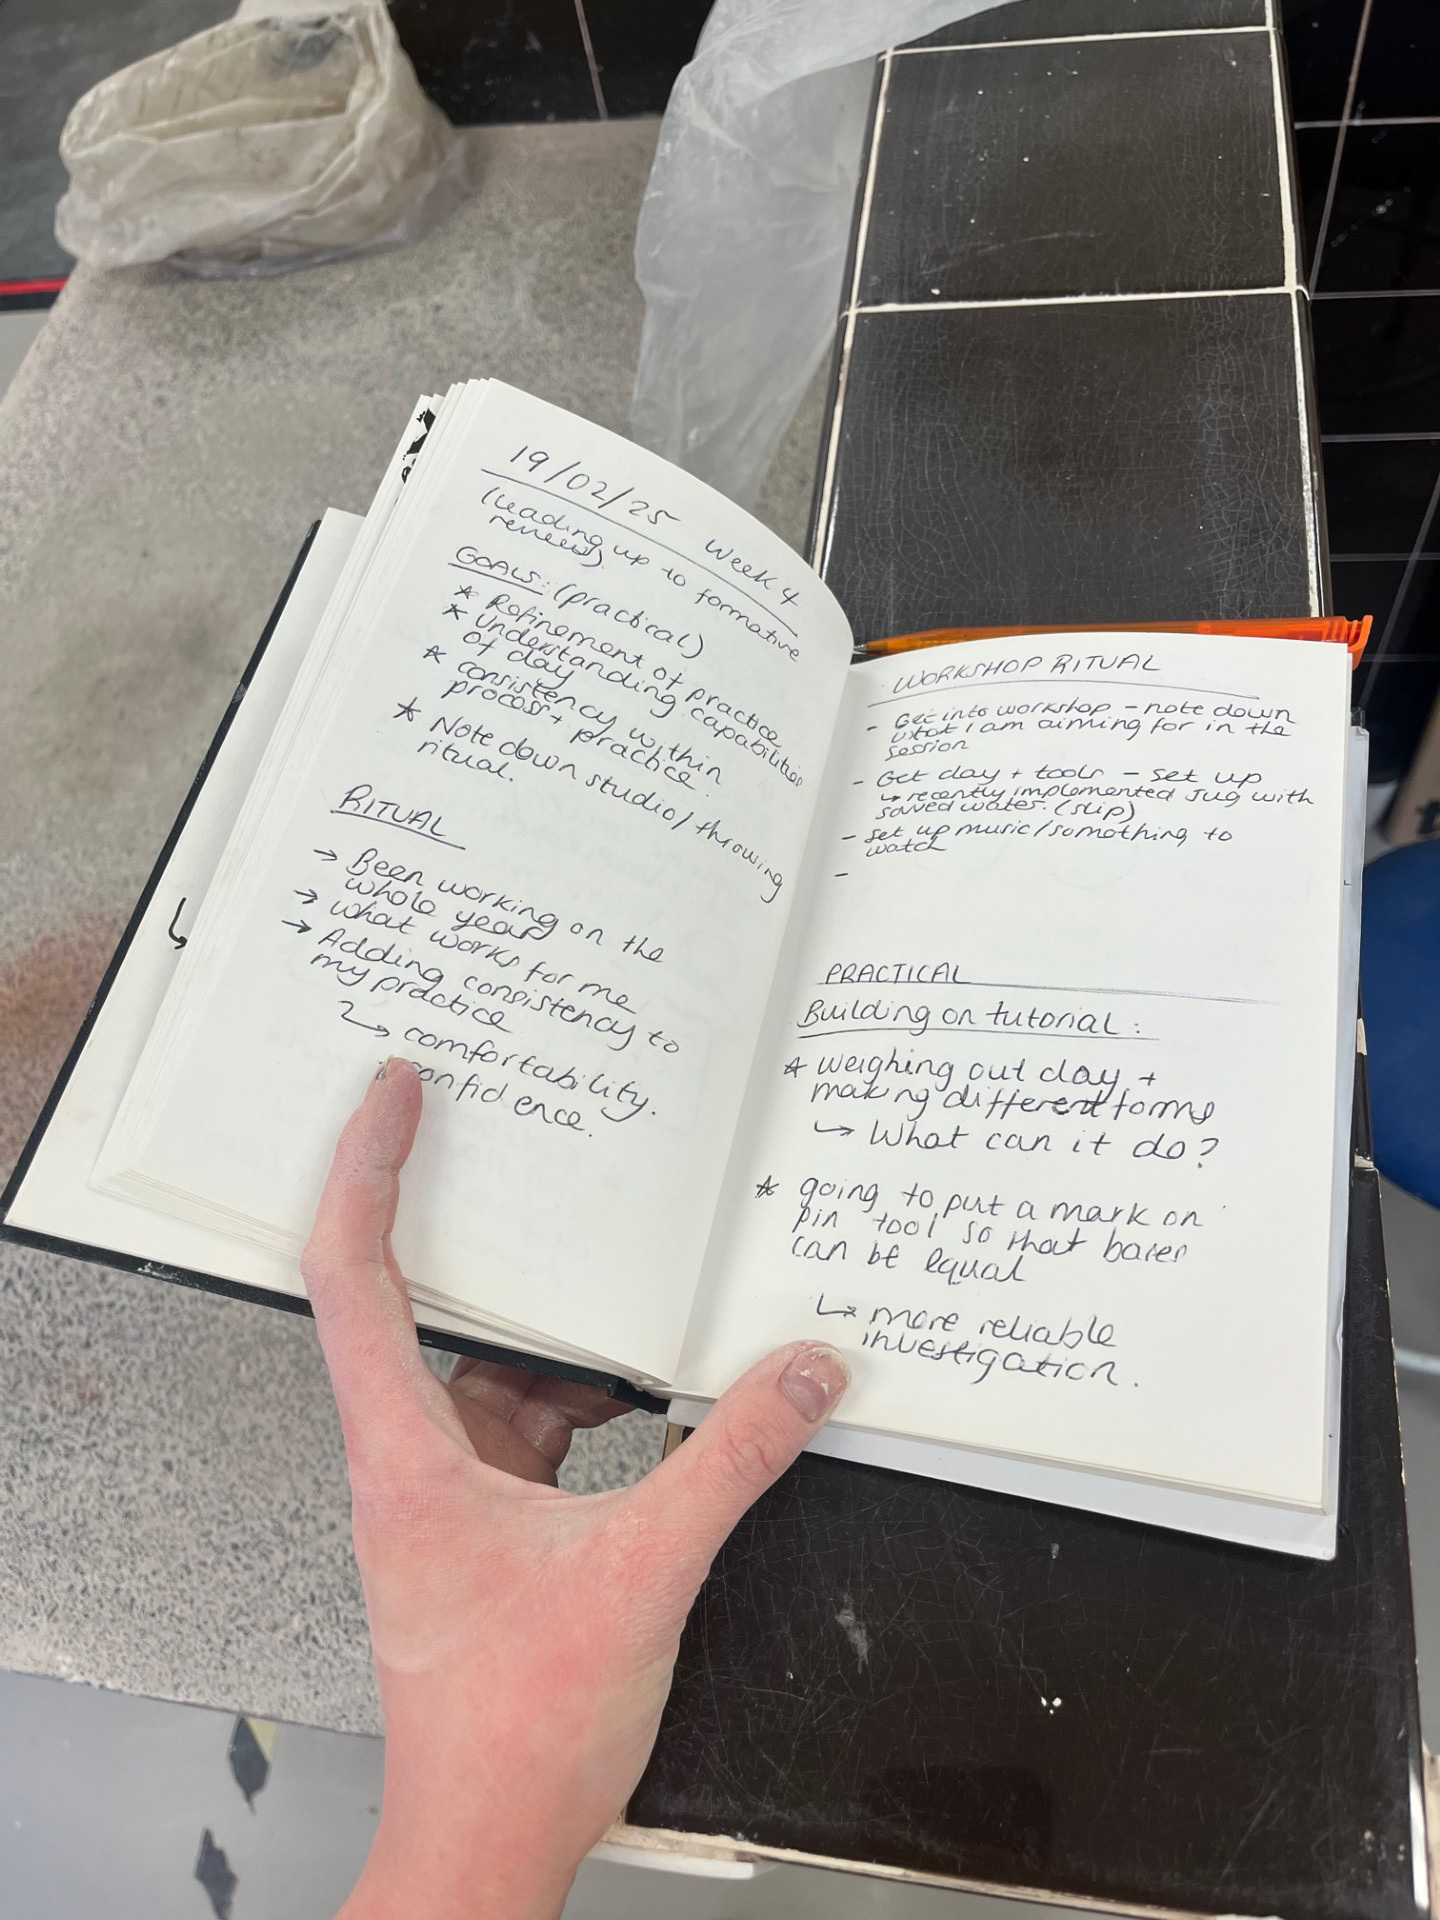
1. Outlining goals & aims
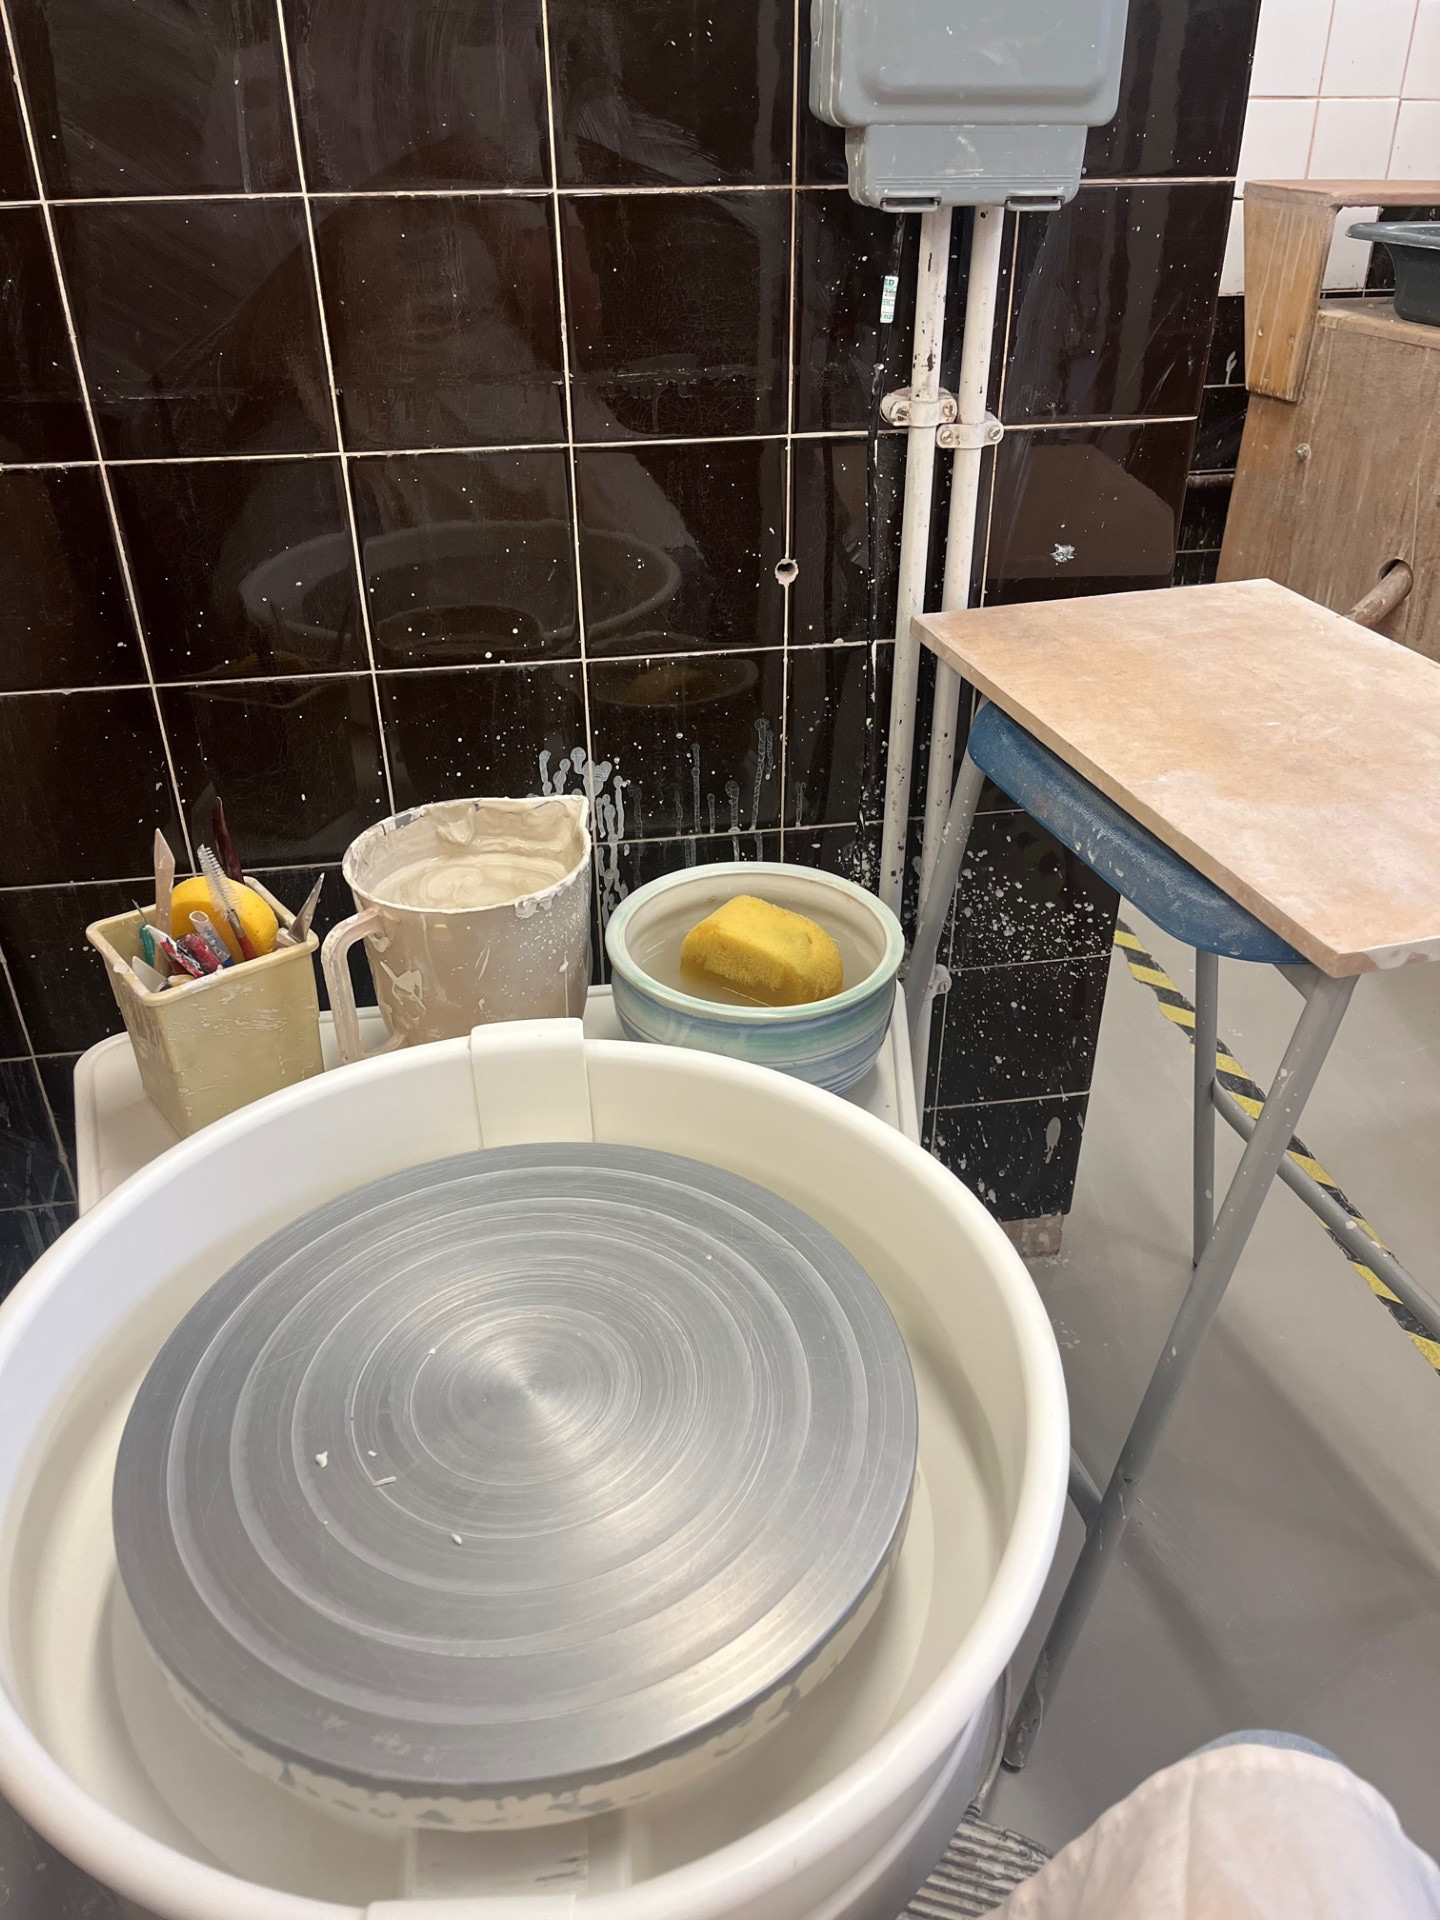
2. Set up wheel
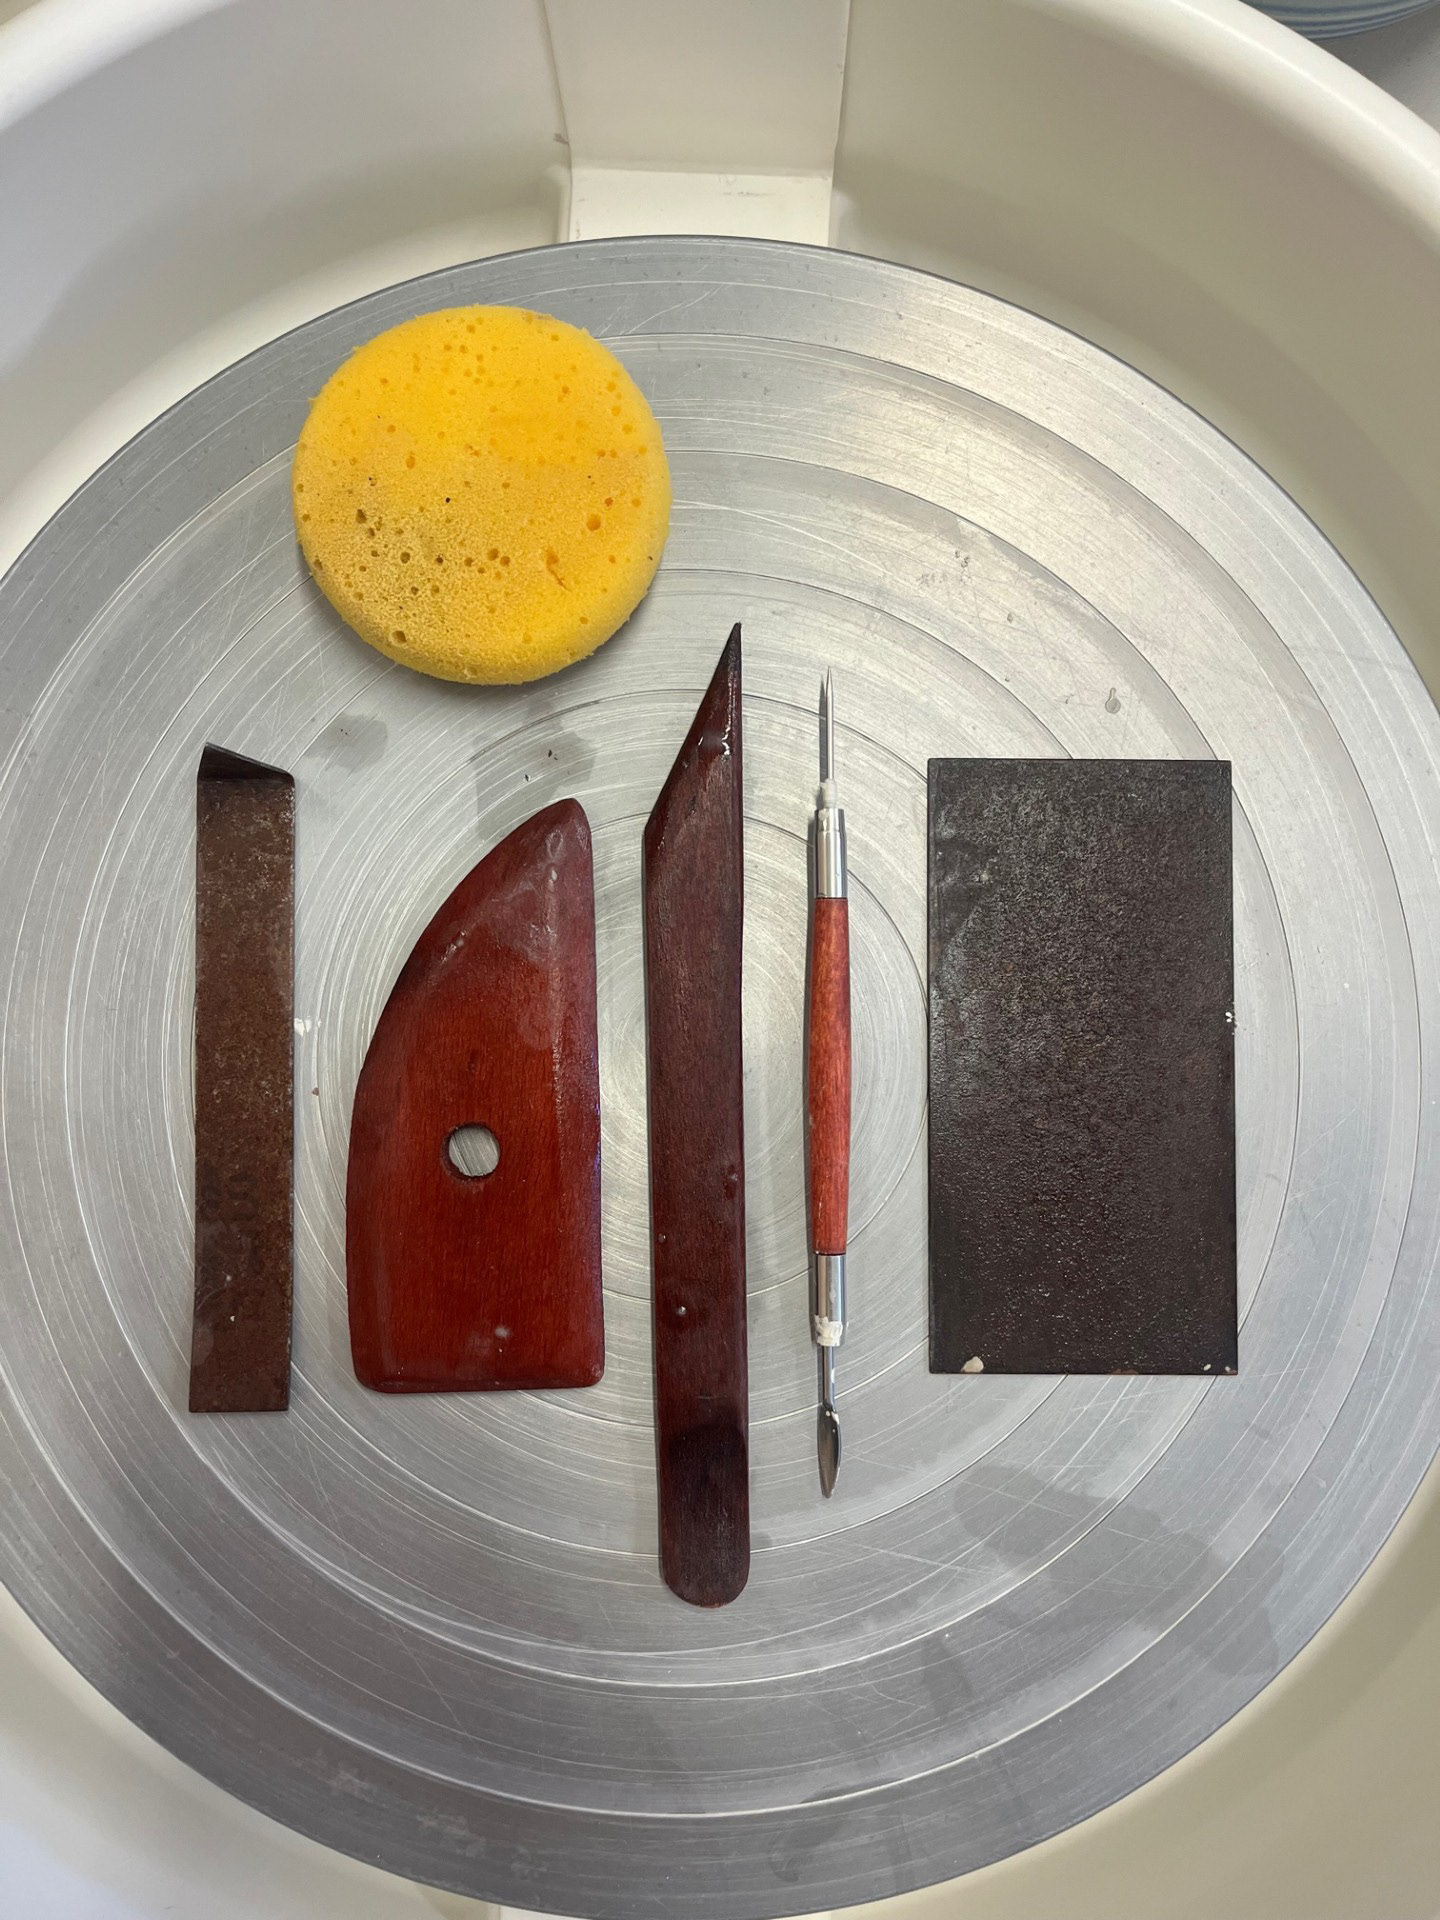
The Main tools I use
1. I start off by outlining the goals and aims of the session as well as notes from previous sessions - I have found that doing this has really helped me as it stops me from getting lost within my progression.
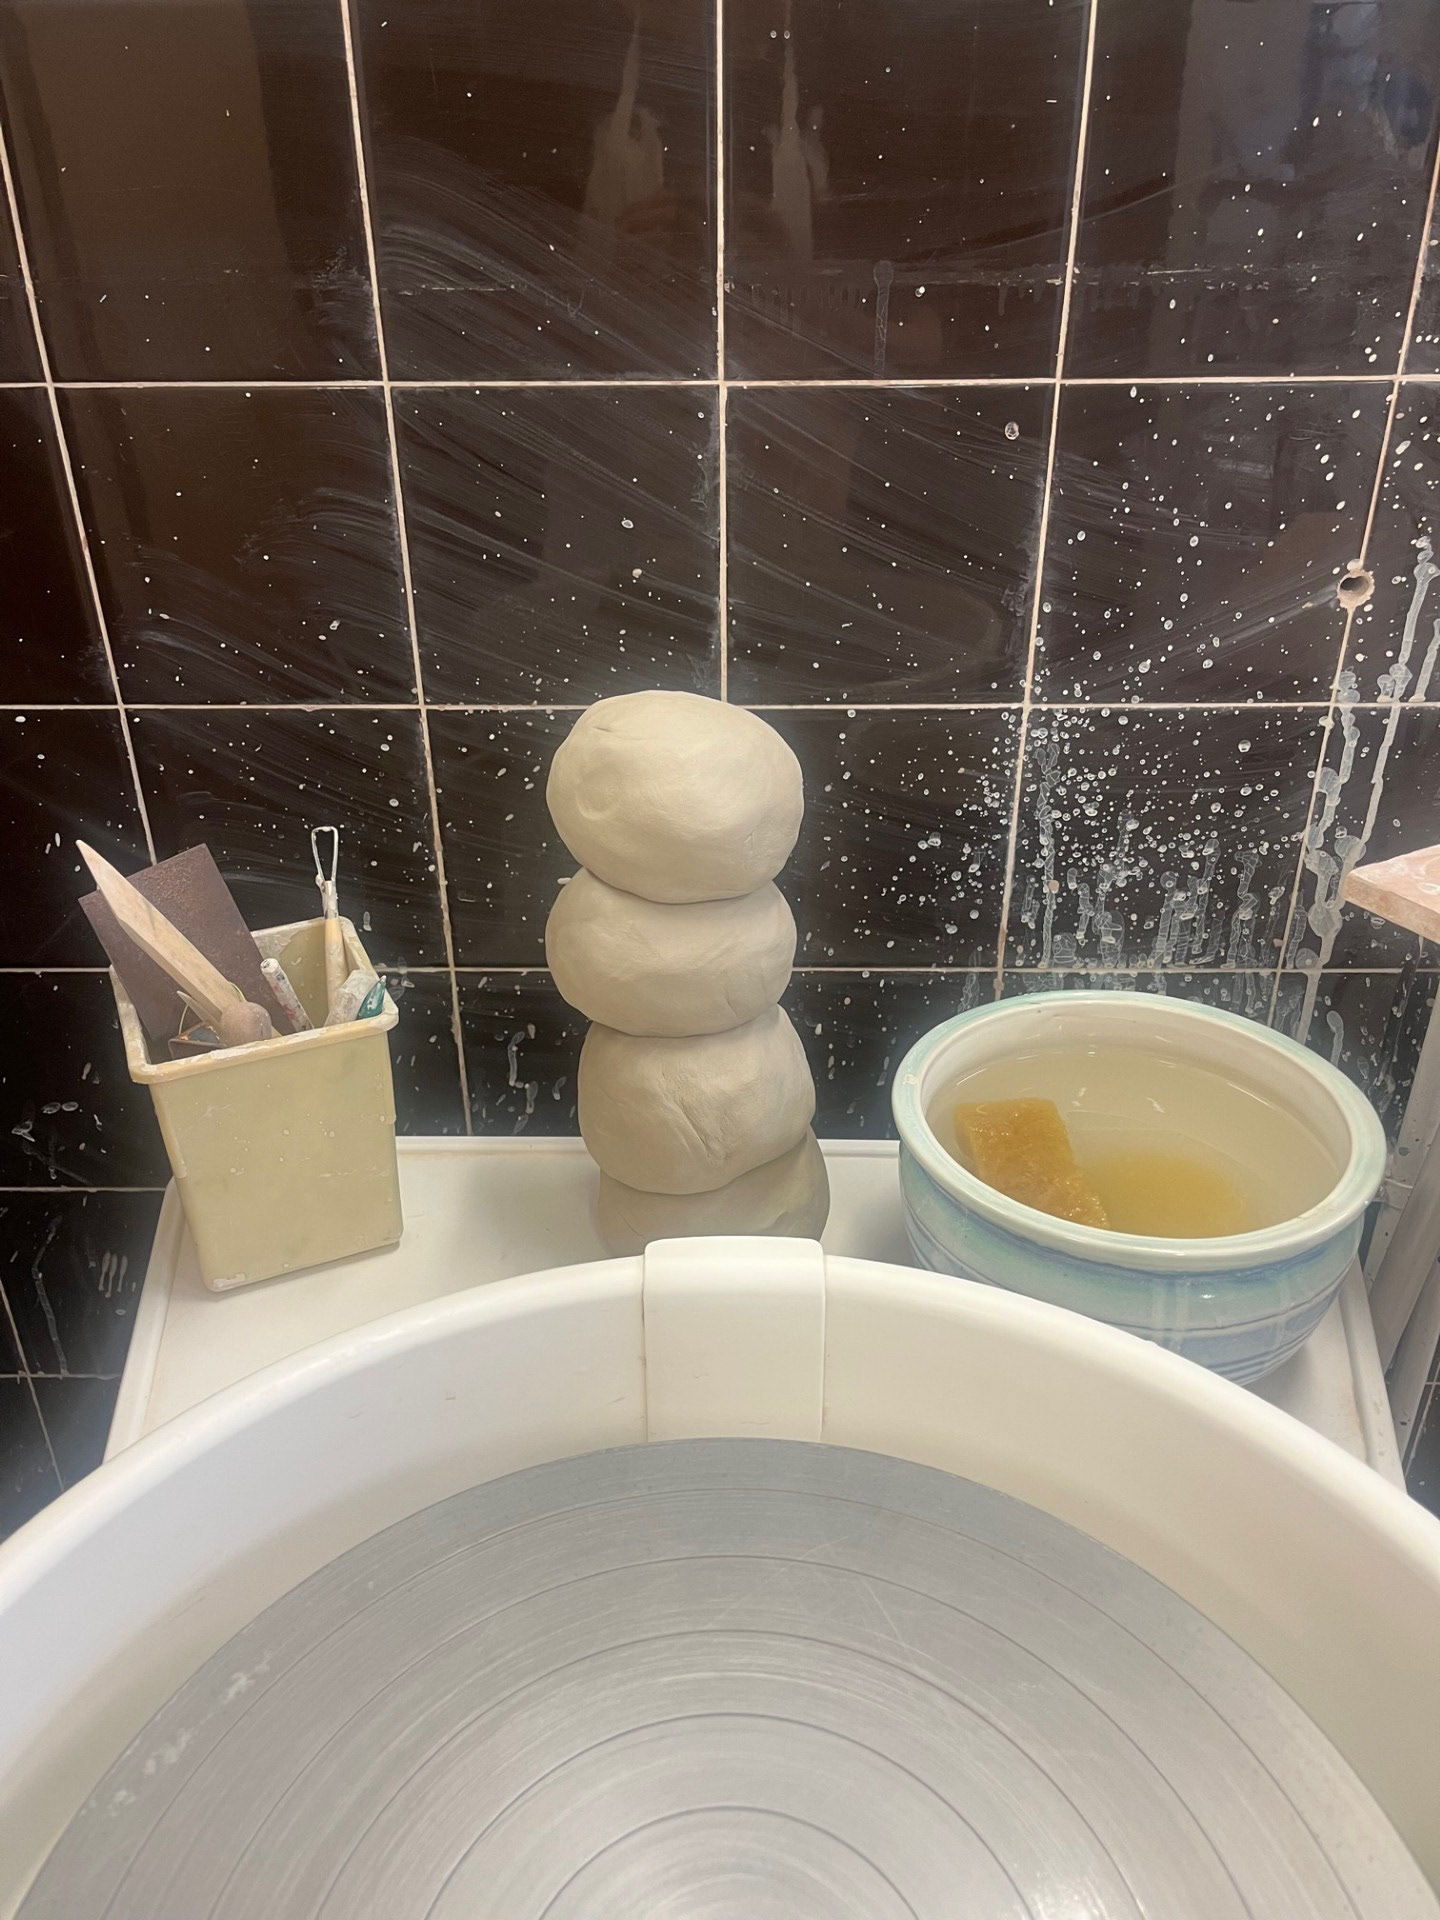
2. The next step is setting up the wheel - I get my tools, fresh water, saved slip water and then a board. Previously, I never used to have the slip water but I realised that I much prefer completing the process with it because it makes it a lot smoother. With the board, I choose to put it on a chair because its a lot harder to lift the pieces anywhere else without compromising them. This is why I use the chair because it means that the board is a lot closer.
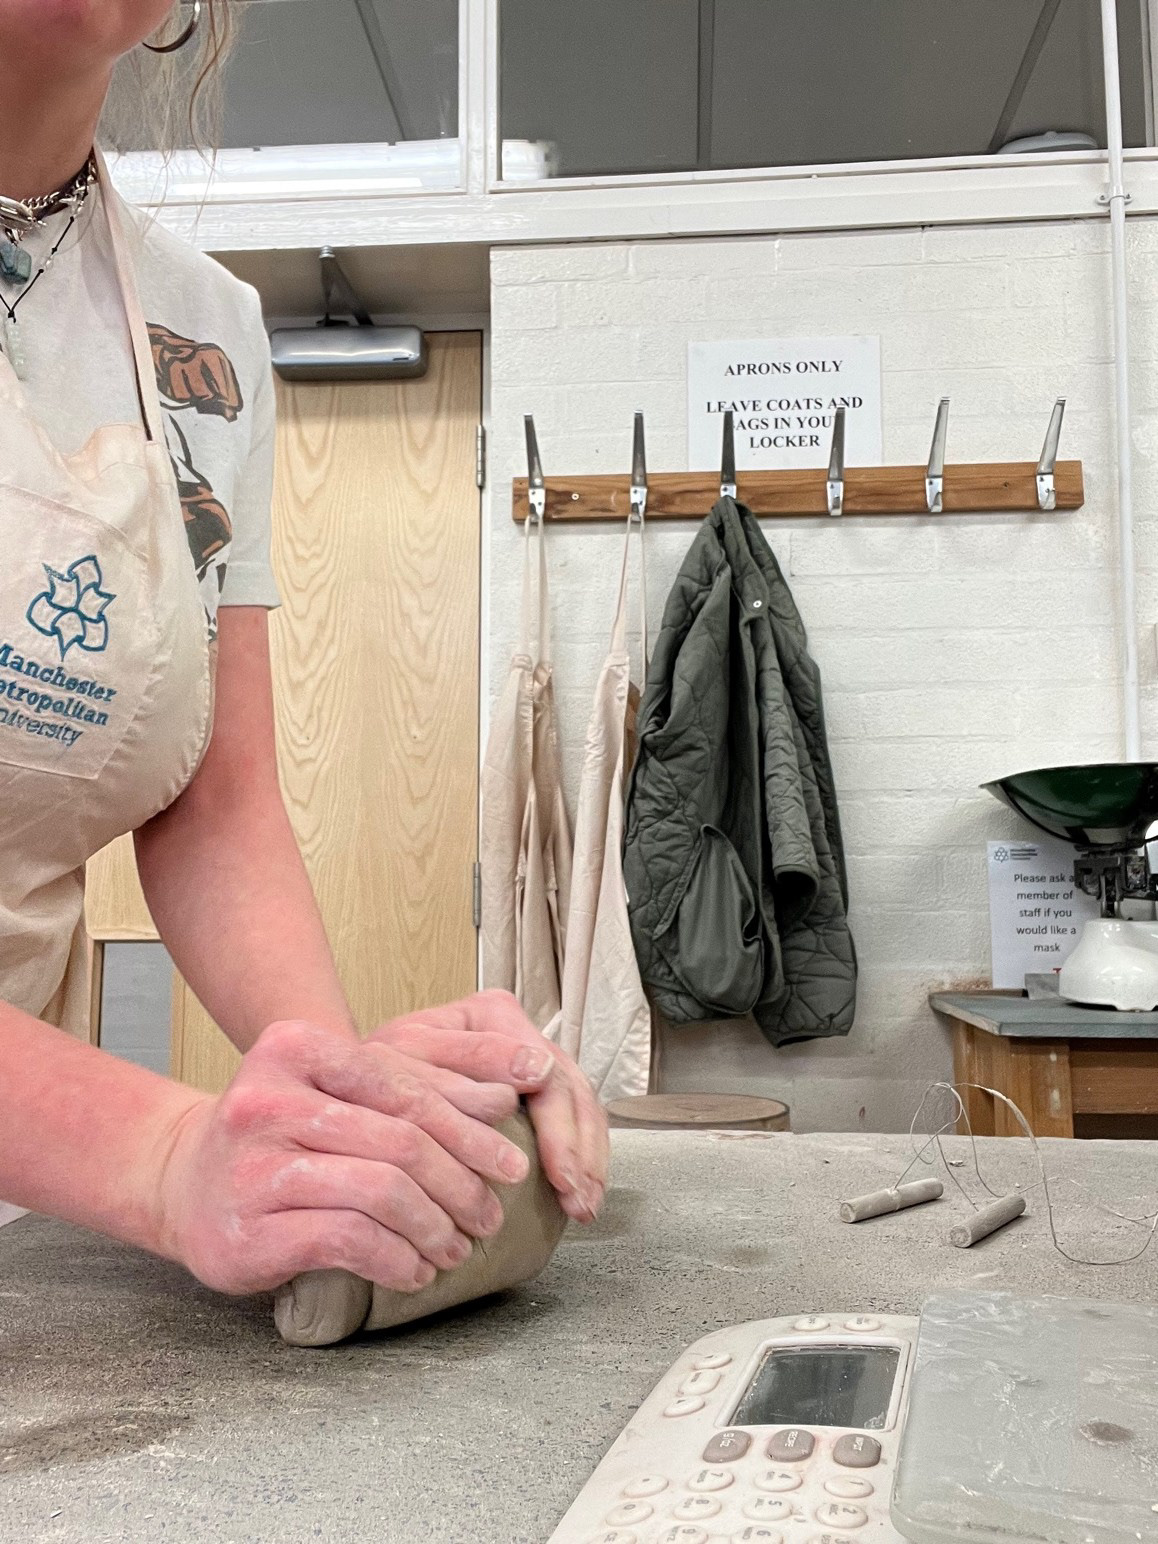
3. Weigh out & wedge clay
4. Roll balls and cover with Plastic
3. Once that is done, I then weigh out and wedge my clay. I have found that I find it a lot easier to set up everything first as it allows the clay to be as fresh as possible. this means that there is less time for it to harden before beginning throwing. Another thing that I have found is that getting everything else set up first allows me to really focus on the wedging as that is a really important part of the process (gets rid of air bubbles).
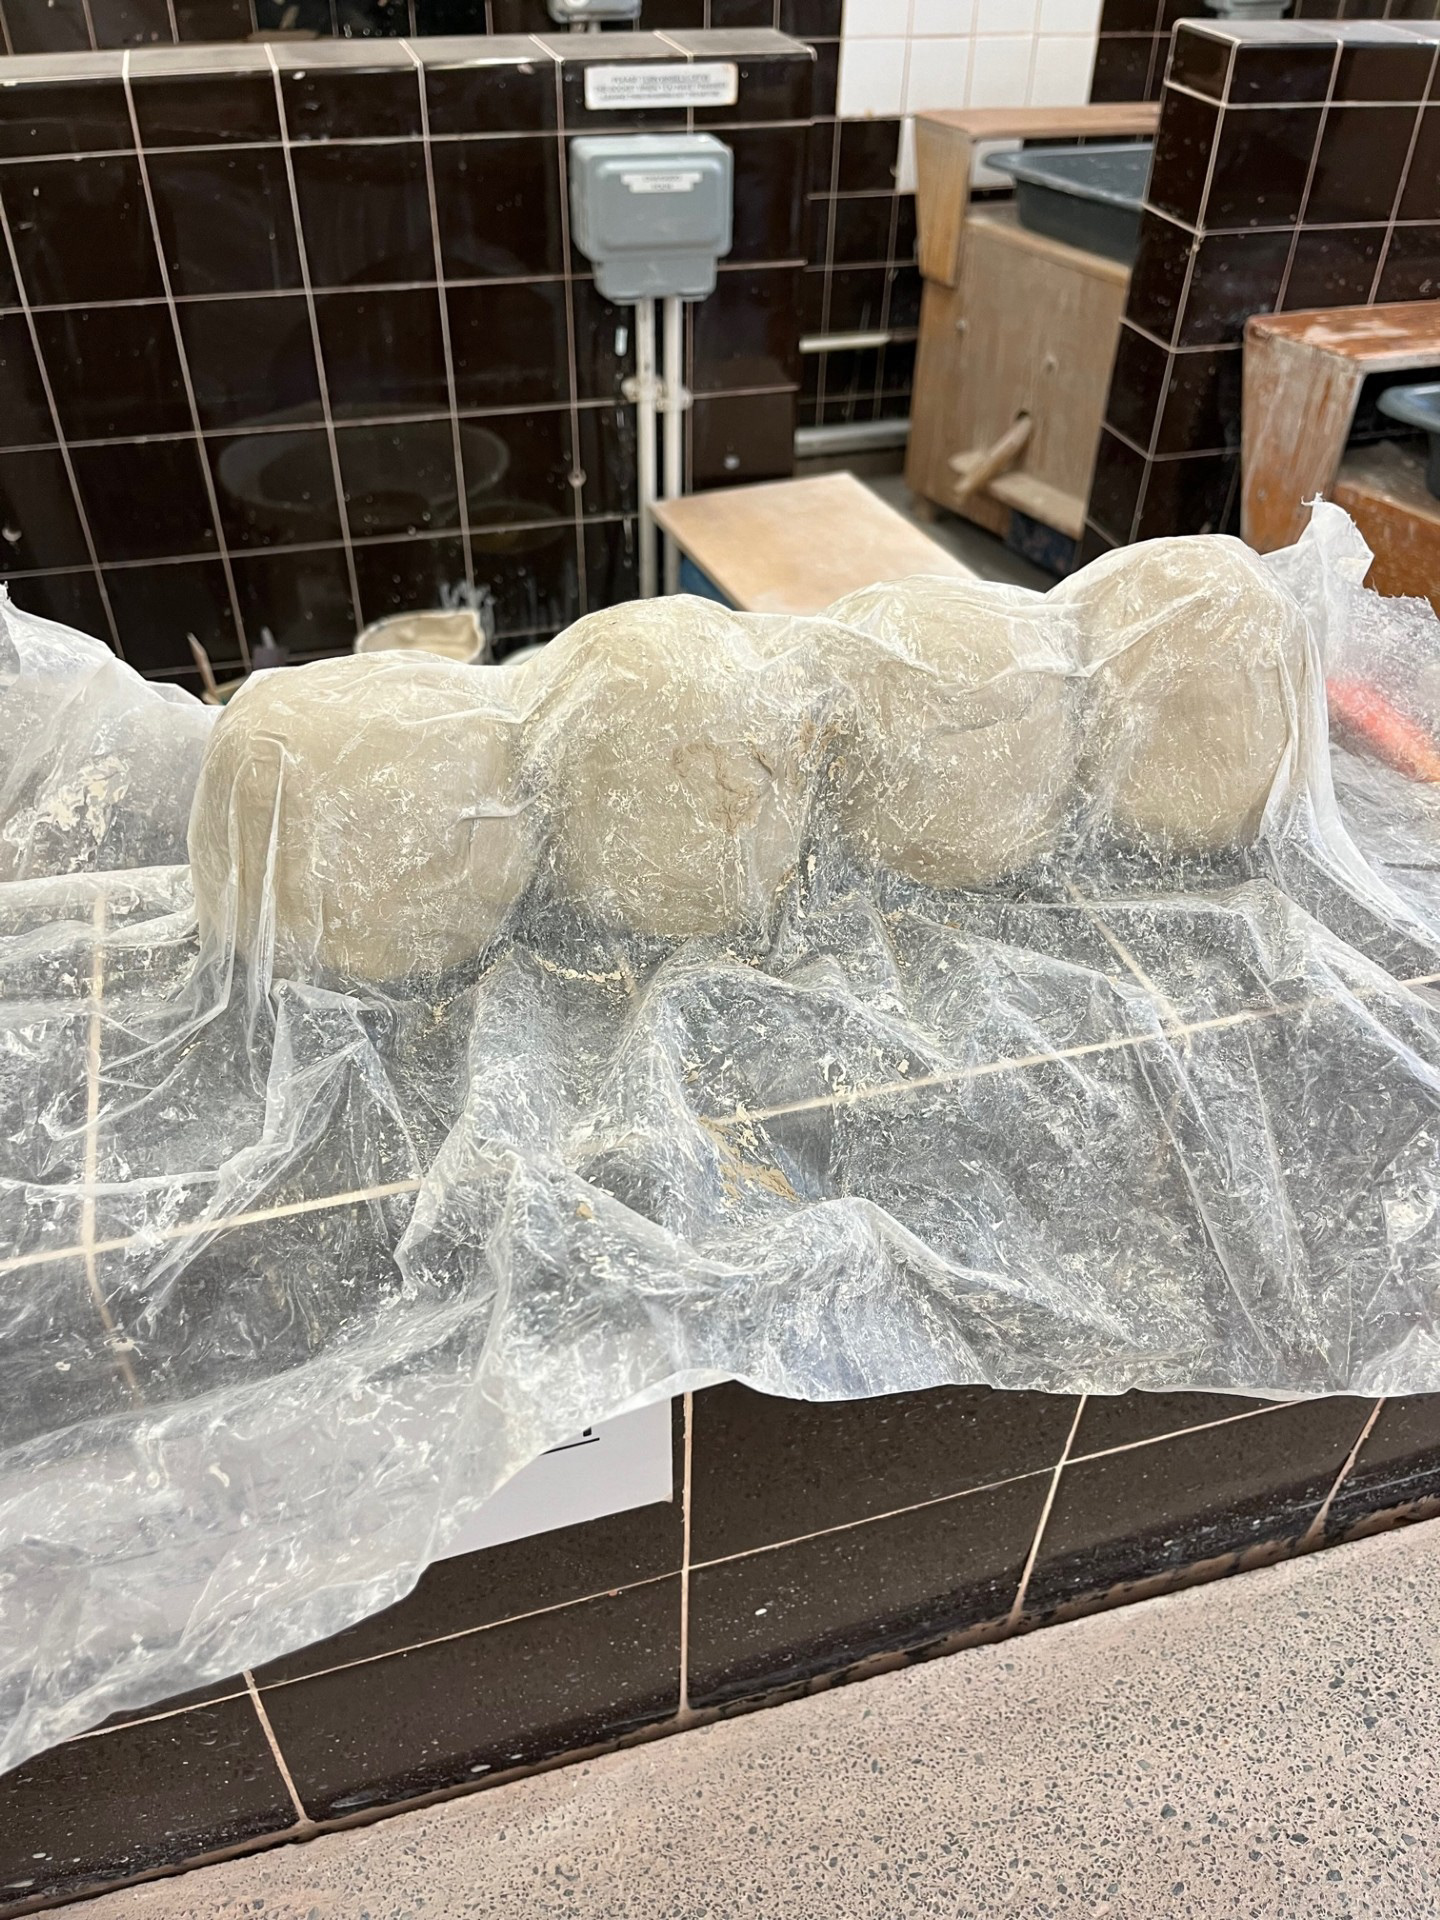
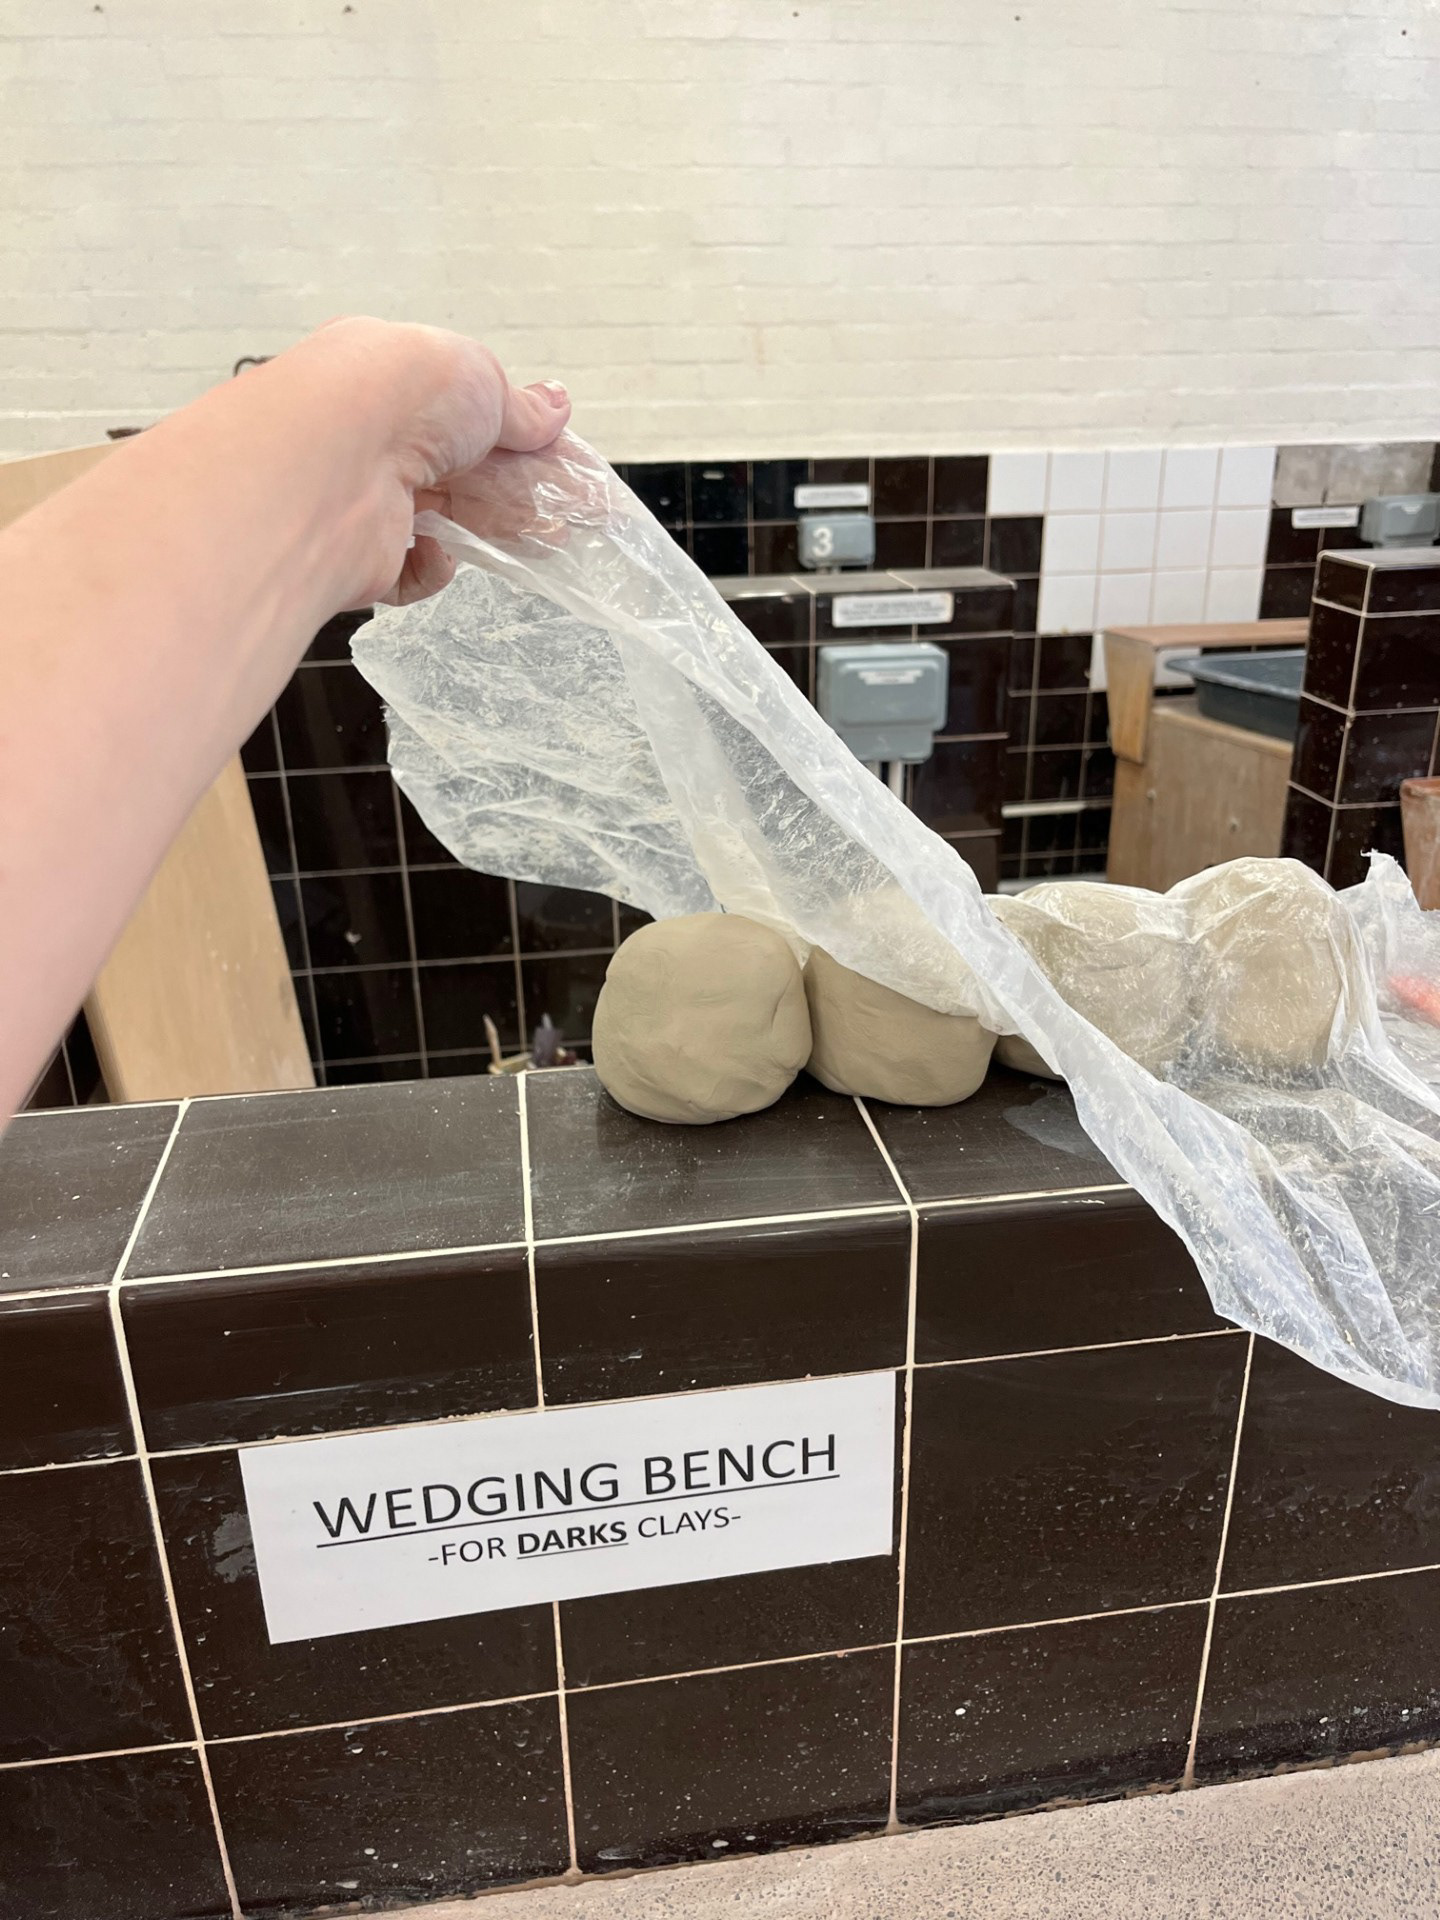
4. After weighing and wedging the clay I then place the balls on the wall behind the wheel and cover them with plastic. I started putting them on the wall because I felt that it made the balls a lot more accessible and it also gave me more room to actually throw. I also have recently started putting plastic over the balls so that they wouldn't dry out because I realised that the longer they are left out the harder they will become - therefore the harder it is to centre.
WEEK 4: Glaze Sampling, 18/02/24
This is the sample that I wanted to expand on for this set of testing. I was really intrigued by the outcome of this sample as it was nothing like I expected. The yellow finish almost looks like a honey glaze which is completely different to what the glaze is meant to come out like as it is meant to be a blue-ish glaze with yellow undertones. Once it came out I had some idea as to why this happened because I decided to put this into the normal stoneware kiln firing when this typically needs cone 6. I have previously put another glaze, blue rutile, through the stoneware kiln and it wasn't effected that much which is why I wanted to do more tests to determine whether this would be a more consistent result.
Image on bottle compared to 2 previous tests I have done:

Image on Bottle
Initial sample I did (2 coats)
More recent sample - glaze grid
I have chosen these small cups from my previous repeatability testing to do this with as i wanted to retry this glaze combination but on a vertical surface. I wanted to see how the glazes would interact in contrast to the bowl because there is a potential that the outcome could be very different. For example, for the bowl above, I think that the centre is so bright because the majority of the colourful pigment has sunk to the bottom of the dish due to the shape. I have also chose some other dishes that are of a similar shape to the bowl to add another element of comparison so that I can tell things like, whether the shape can dictate the effect of the glaze and if I have applied it the same both times.
For the design, I chose to place the Iron lustre on the bottom and then a strip of blue rutile on the top. Before painting on my glazes, I first poured white zirconium on the inside and wiped the edges so that I would be able to focus solely on the painting as well as creating a much smoother finish. I chose to spray the outer of the small dishes because its something that I did on the previous set of glaze samples and I really liked the outcome. In this, I also wanted to try something new and try out waxing the bases of these pots. I wanted to do this because I usually tape the base of my pots but for these there was no foot ring so that would have been difficult. In terms of application, its not the smoothest finish but hopefully it will serve its purpose; I also will have time to work on my application technique if I decided to carry this on later in the project.
Outcome of Samples:


Reflection:
I am really happy with outcome because to me they look extremely refined, especially when compared to my past works. I am really happy that I did them all as the same glaze because I am exited at the fact that they all look like a cohesive family of objects. This was a good way to just get quite a few of my samples glazed at once because I always have so so many lying around. This is because I love the making side and typically don't like to get rid of things because if its of a good enough standard, I would like to have things that I could sell one day.
With regards to the colour, I am extremely surprised by the outcome. This deep mustard/orange is a colour that I never would've imagined to come out of this glaze, I simply didn't think it was possible. This could be to do with the amount of layers that I applied as I wanted to get as much of a reaction as possible so I may have applied an extra layer or two. The blue rutile was one that I was quite surprised about too as usually that is usually quite a vibrant glaze however in this sample it is quite dark and speckled. There are many factors that could have effected the outcome, one of which i have already mentioned, but another could be placement within the kiln. I helped Rudi unload the kiln for these so I was able to see exactly where they were placed, which was in the bottom at the back. I am going to keep this in mind for future tests as it could potentially be a factor to the finish of future pots.
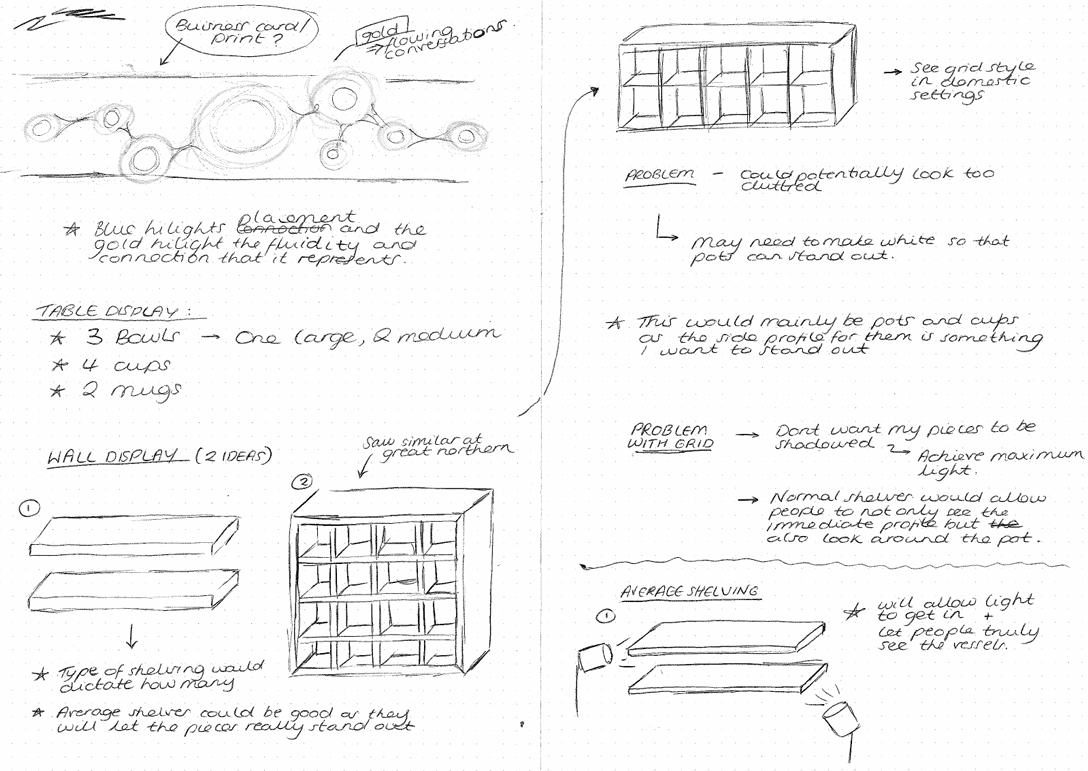
TAP Exhibition: Preparation
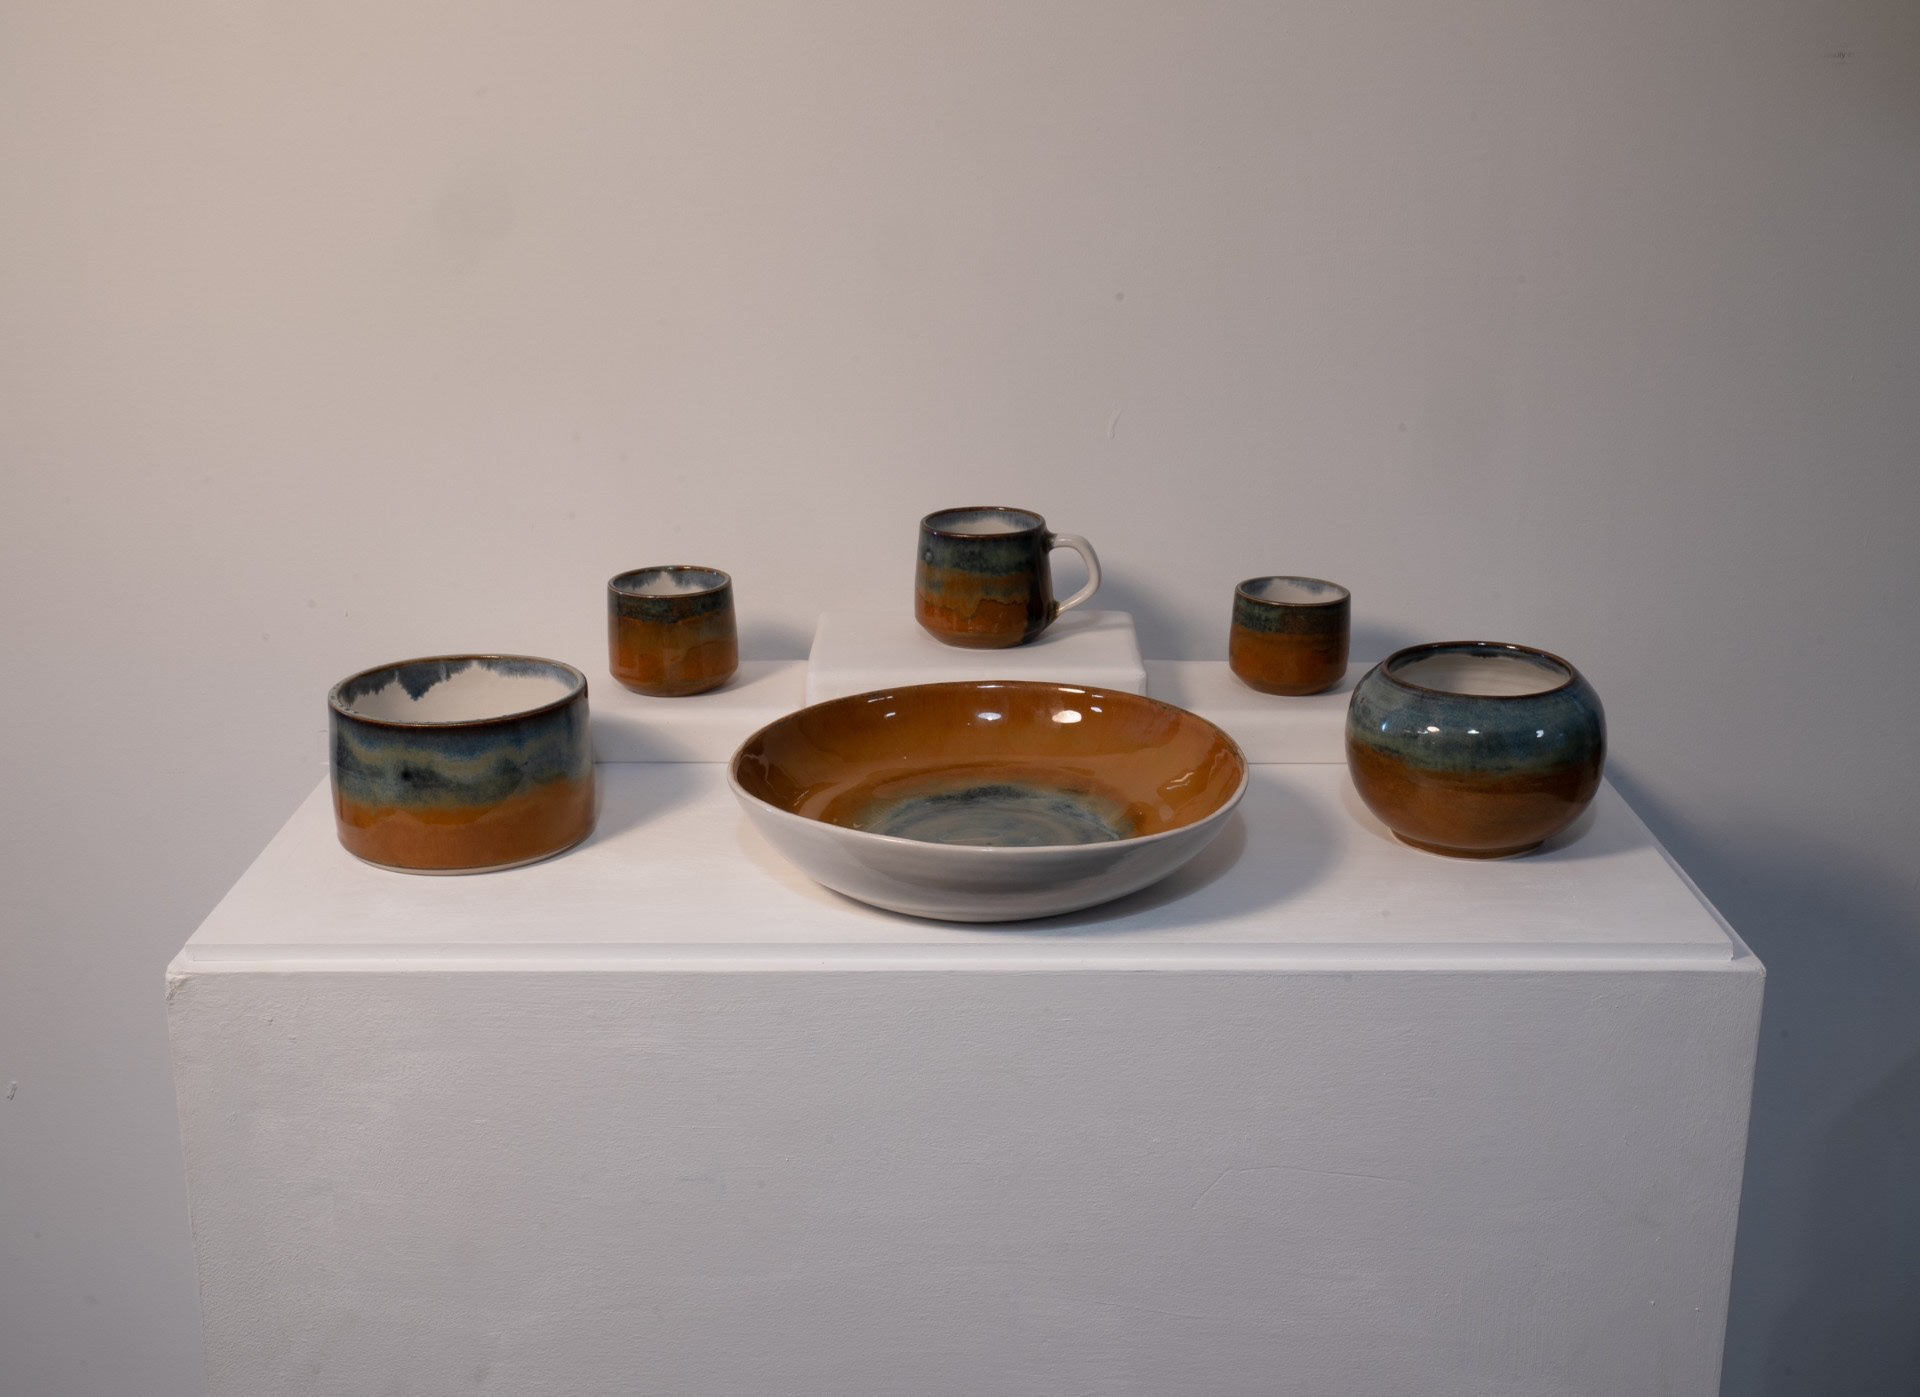
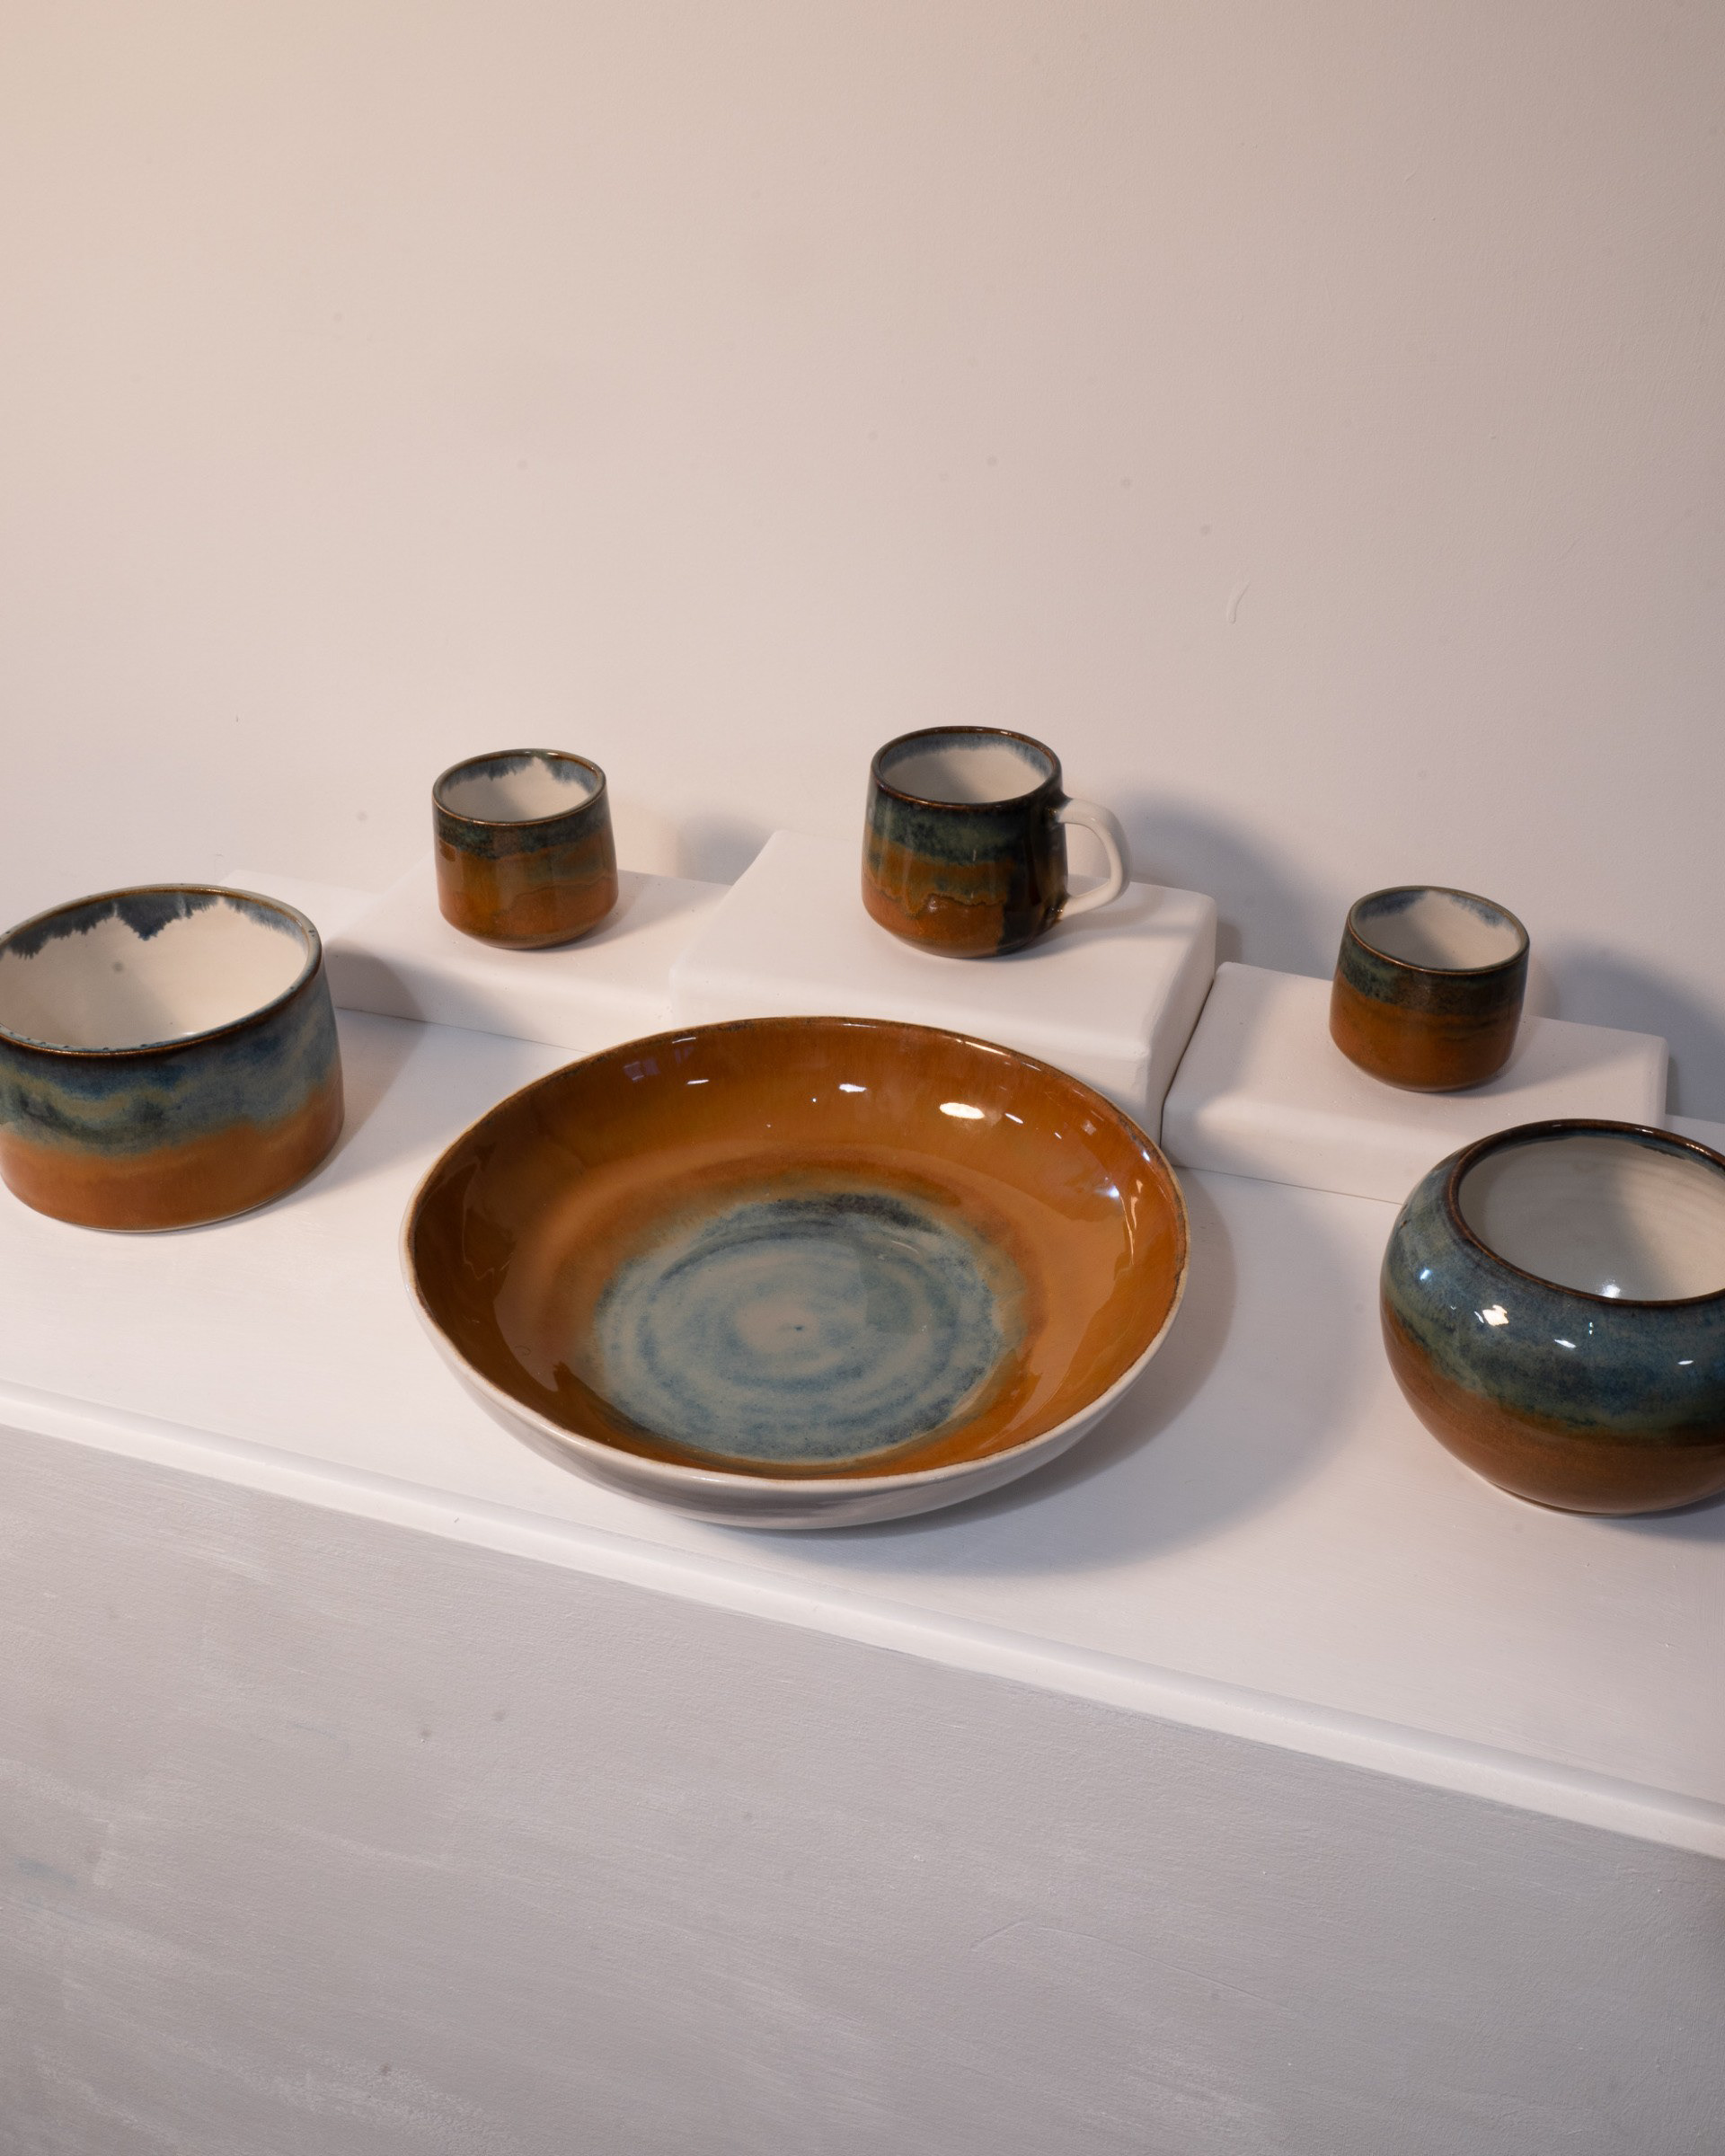
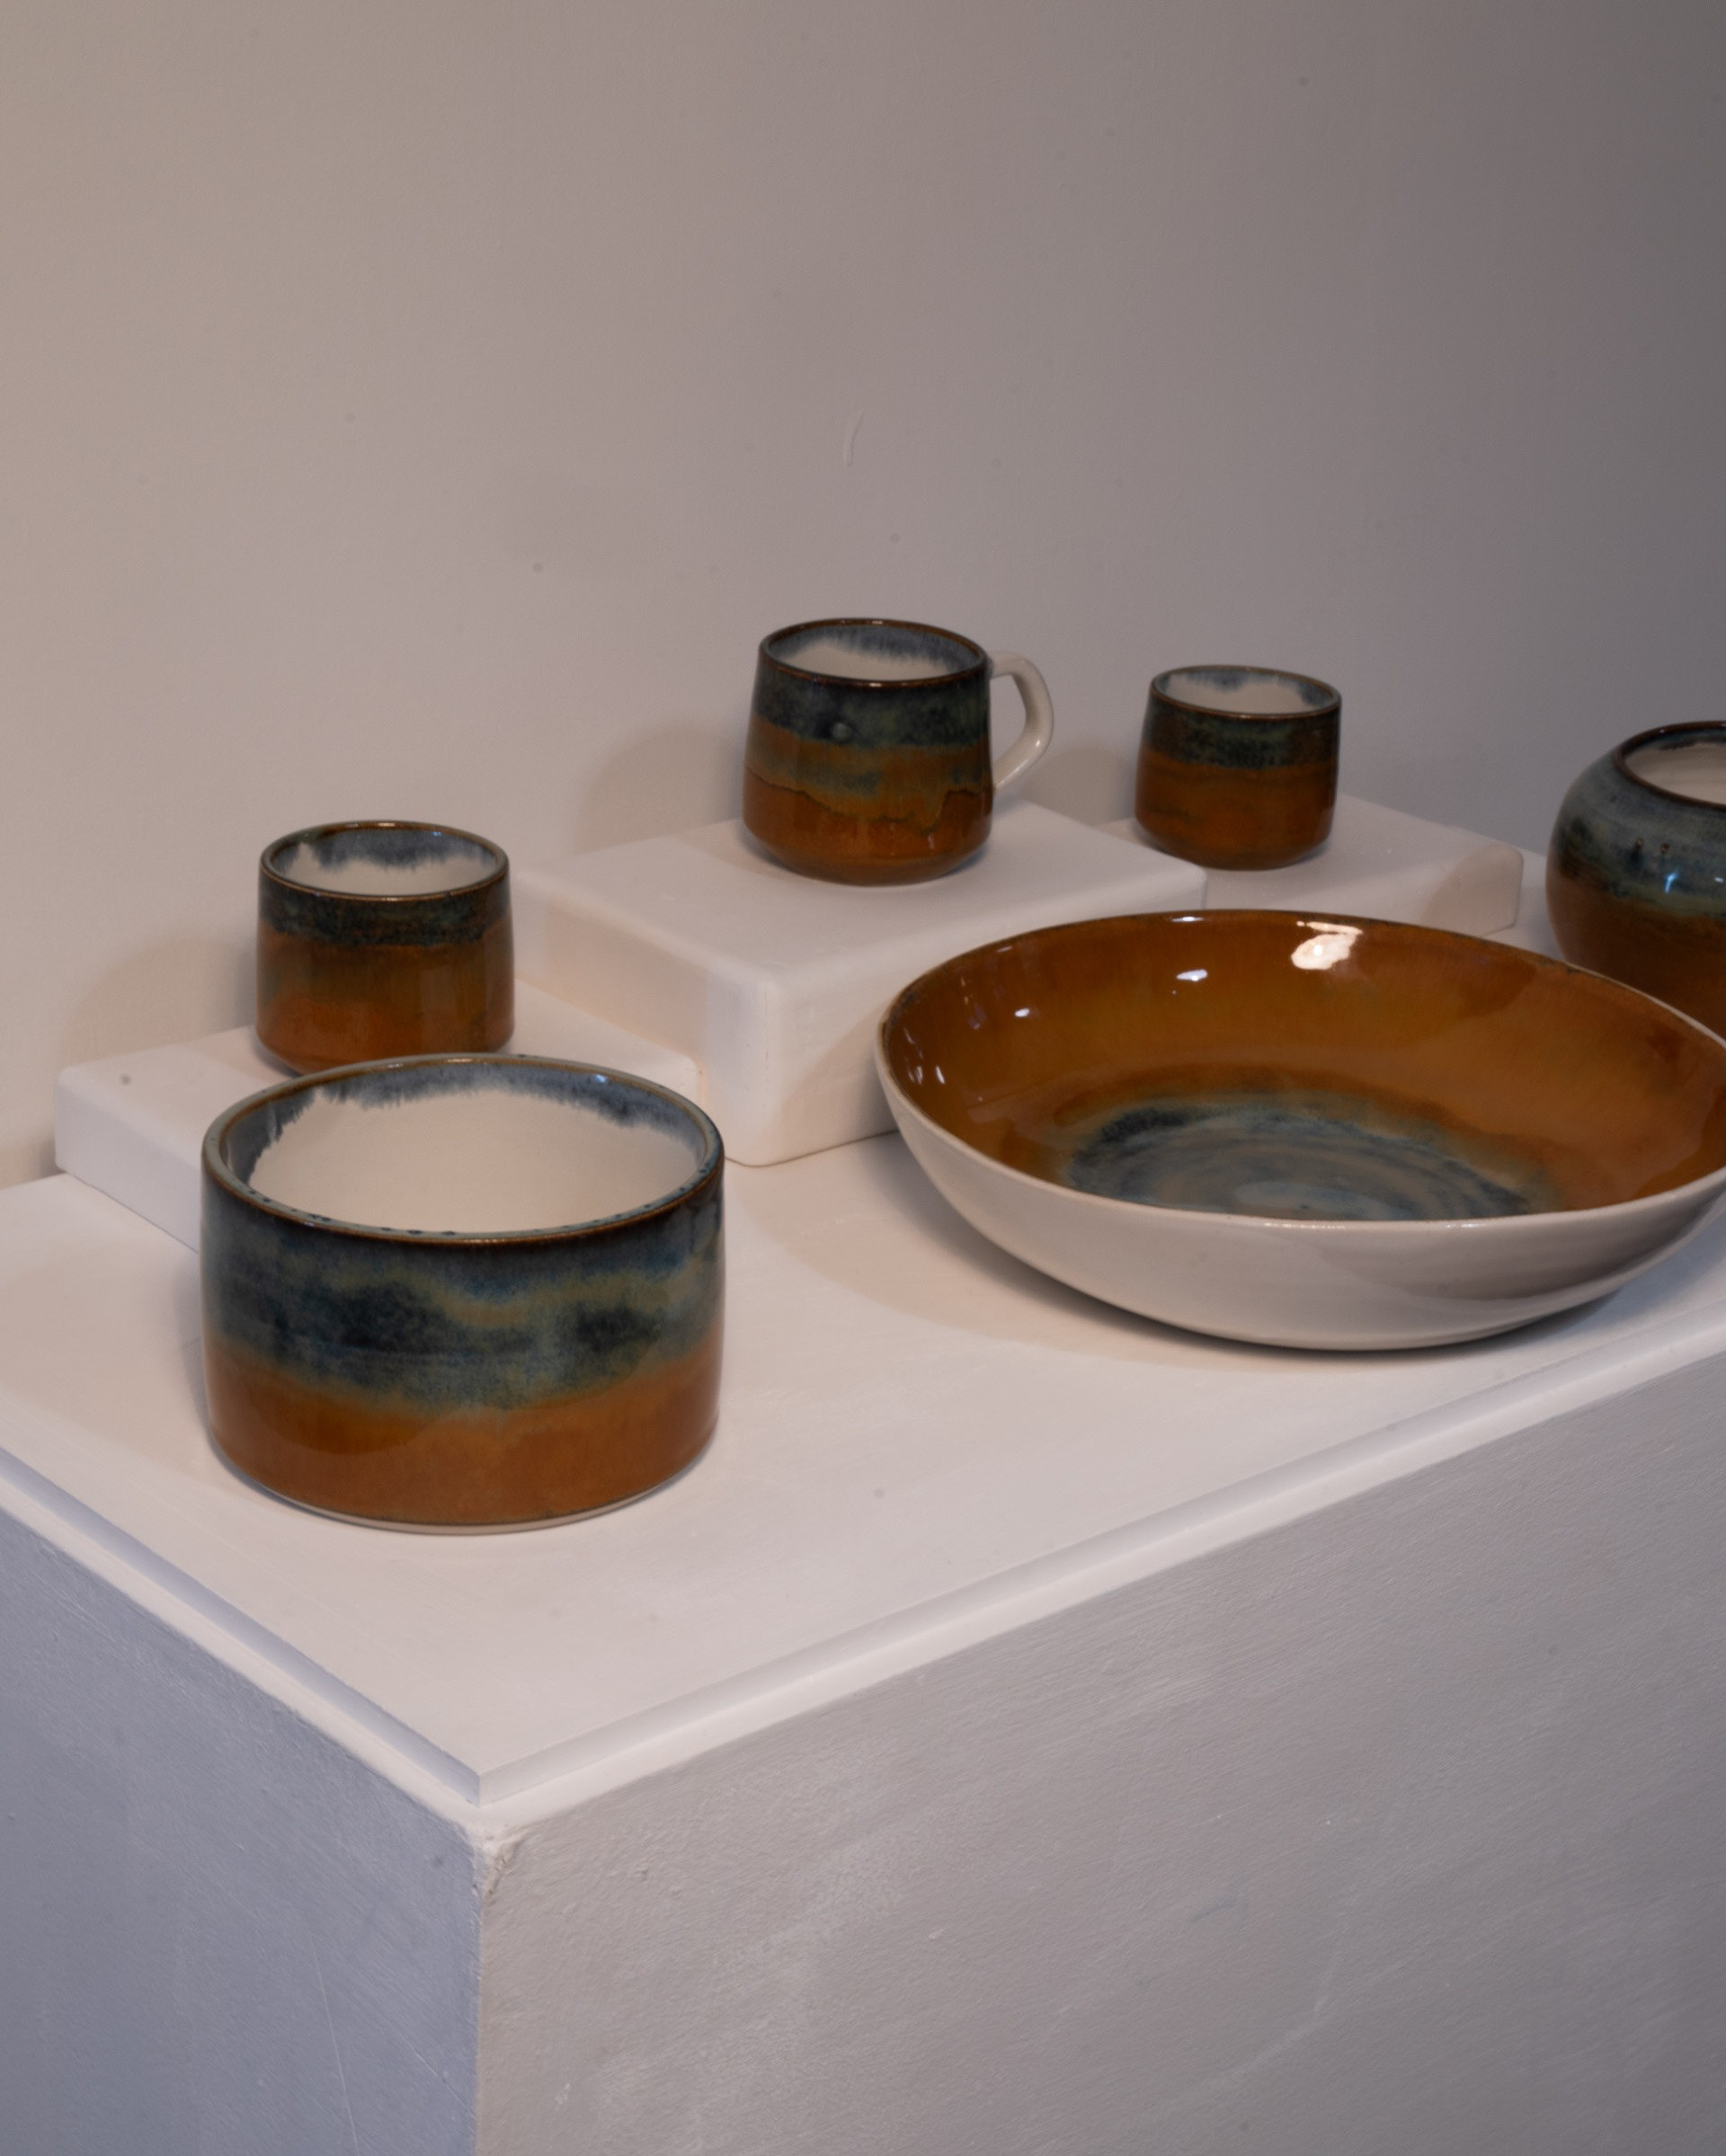
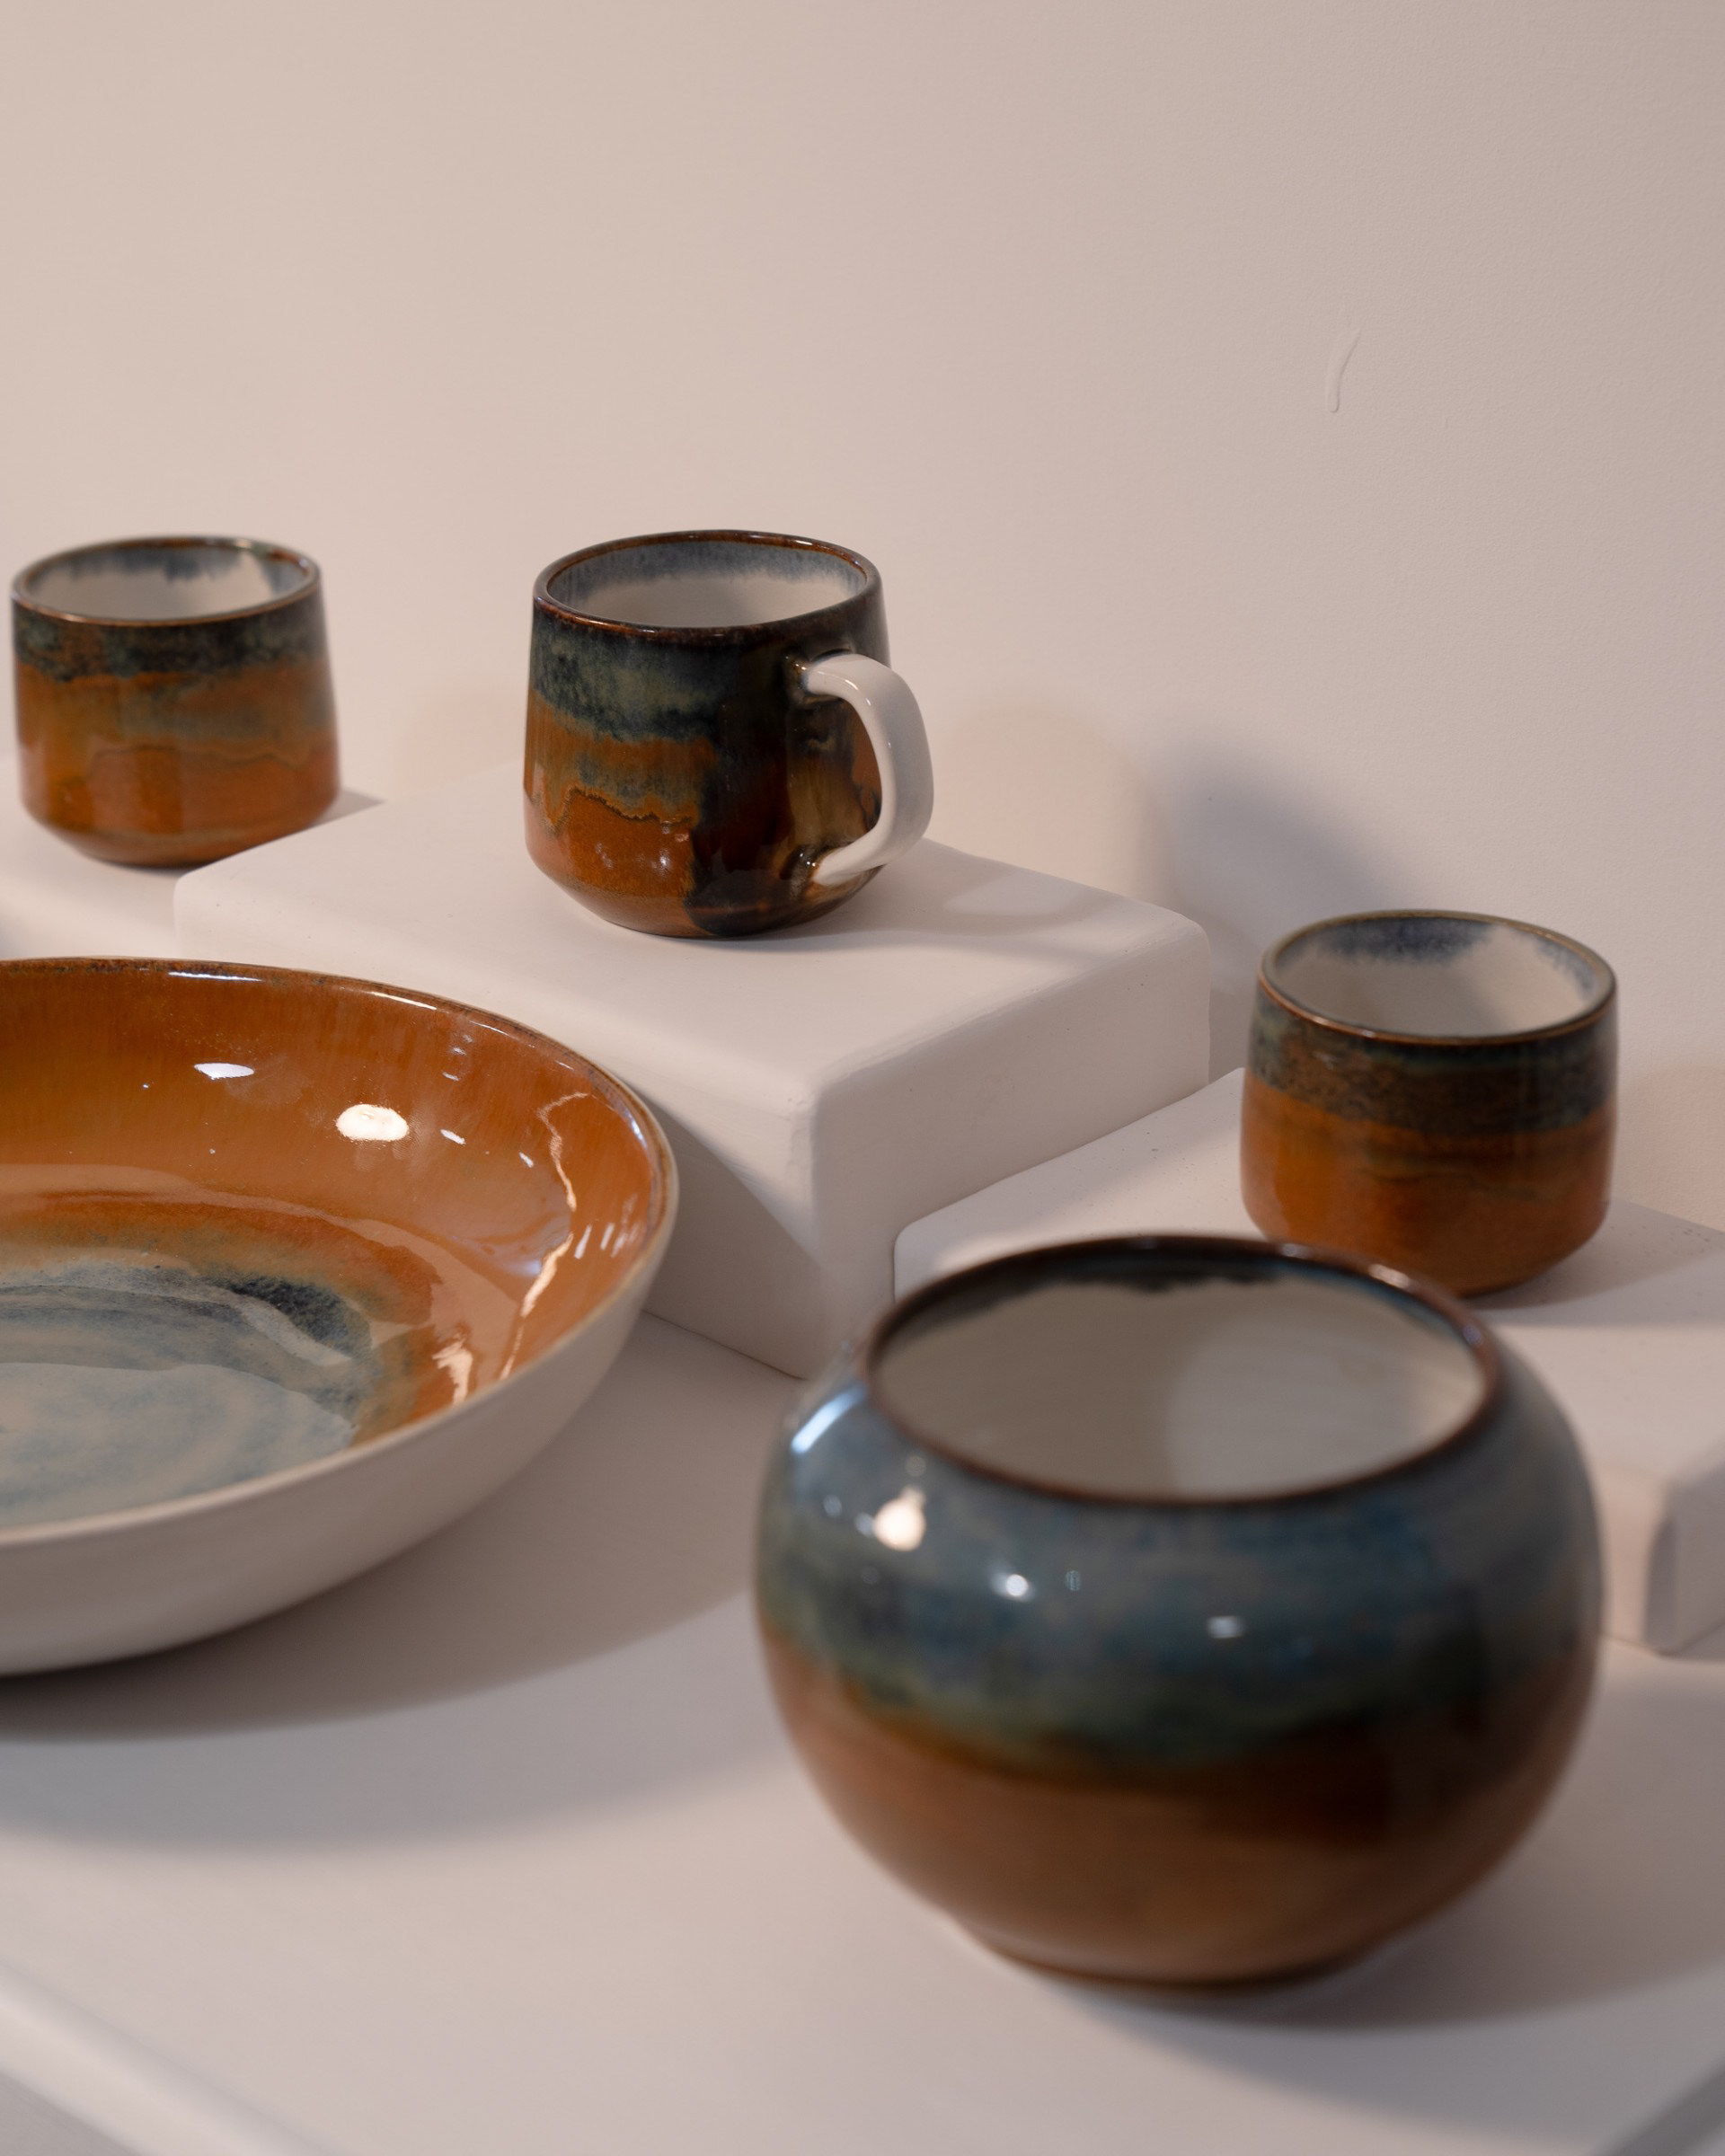
I have been accepted into a student led exhibition held in the student pub, the salutation. Although this doesn't directly relate to the project, I feel that I would be developing my skills either way so the knowledge I gain would be helpful regardless. Going into this, I am trying to continue making detailed notes as so far it has really helped me remember my thoughts as well as what I did within each session. The pieces that I have chosen were ones that I had already thrown which was ideal, because I could really see them making a lovely ensemble. I think I chose these vessels because I liked how the were all different shapes yet they still looked cohesive. Another reason was that I was quite proud of these pieces and for my first exhibition I wanted to put my best foot forward and present my current highest level work.
As I wanted to present my best work so far, I chose to include a large bowl and two medium pots. I have chosen to do this because I am also extremely proud of these vessels and I think that they will allow me to represent both elements of my skills that I hold dearly; my ability to achieve refinement as well as scale. Showing the maximums of my skill with regards to repeatability and refinement as well as scale is a concept that I am interested to explore for my final resolution as I like the idea that it can show the spectrum of my skill.
The sample seen below is the one that I will be using as a reference for my chosen exhibition as I love the outcome of the glaze. Choosing this glazing style will also mean that it is cohesive with the other cups and mug that I will be including in this exhibition.
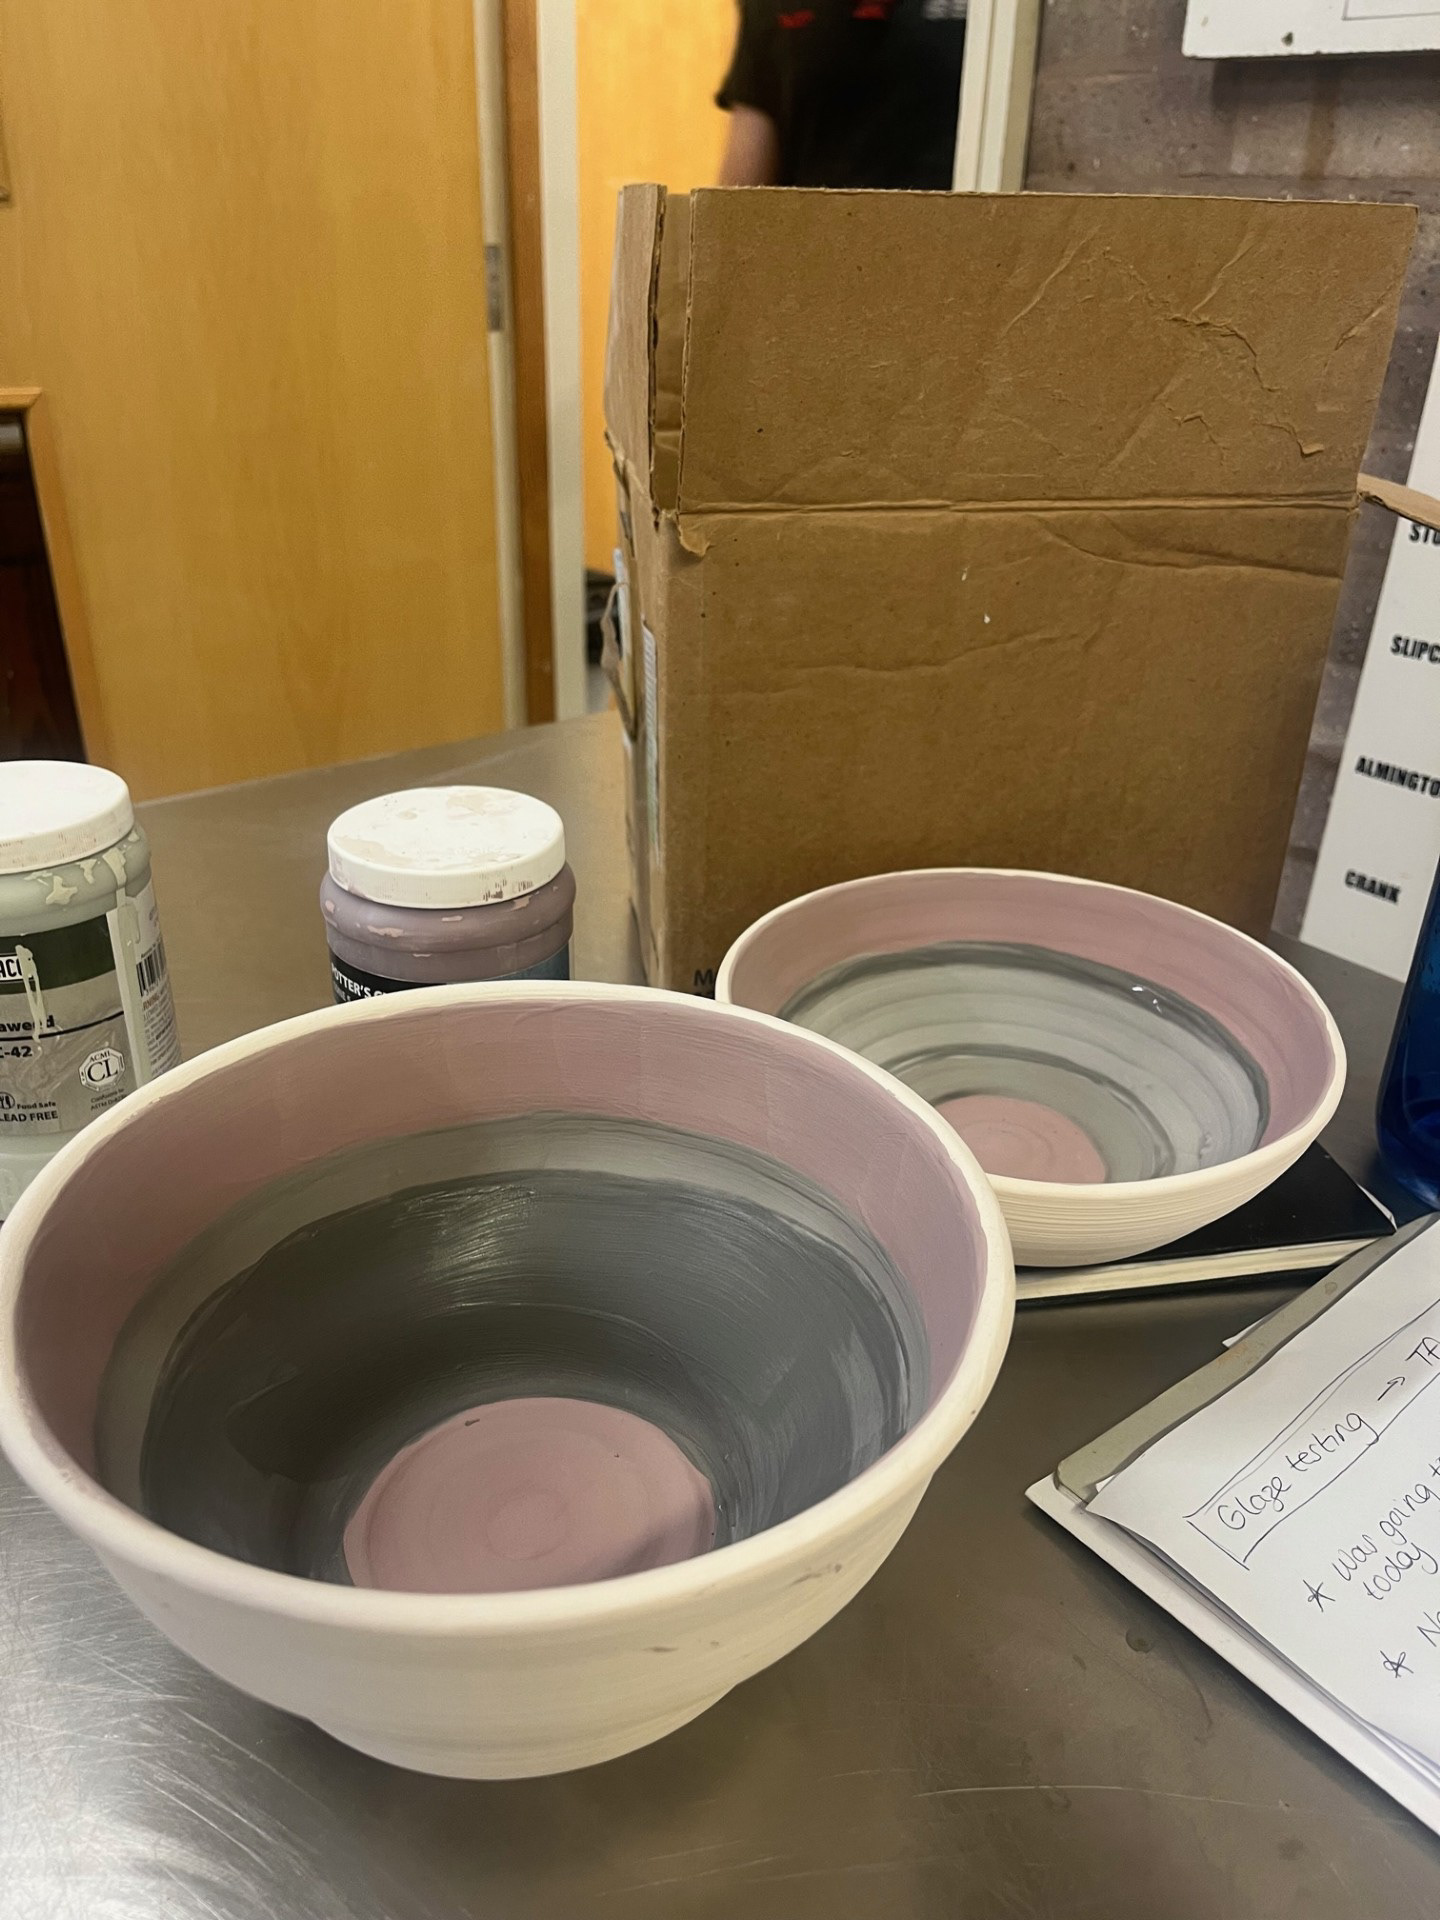
Before completing these samples, I was staring at the pieces that I wanted to use for the exhibition and I was very nervous because I have been waiting a while to glaze these pieces. Hence why I decided to use vessels that I already had to practice painting. As I hadn't painted something this big yet, I wanted to make sure that I was confident making consistent and even brushstrokes. I'm glad that I competed this as it did help me gain confidence for glazing the actual pieces. I think that using practice tests for painting is something that I am definitely going to employ in the future; especially as i am in a time currently where I am ever growing and developing.
2/3 Vessels - Poured Zirconium (shiny white) on inside
Other vessel (large bowl) - Sprayed zirconium on outside
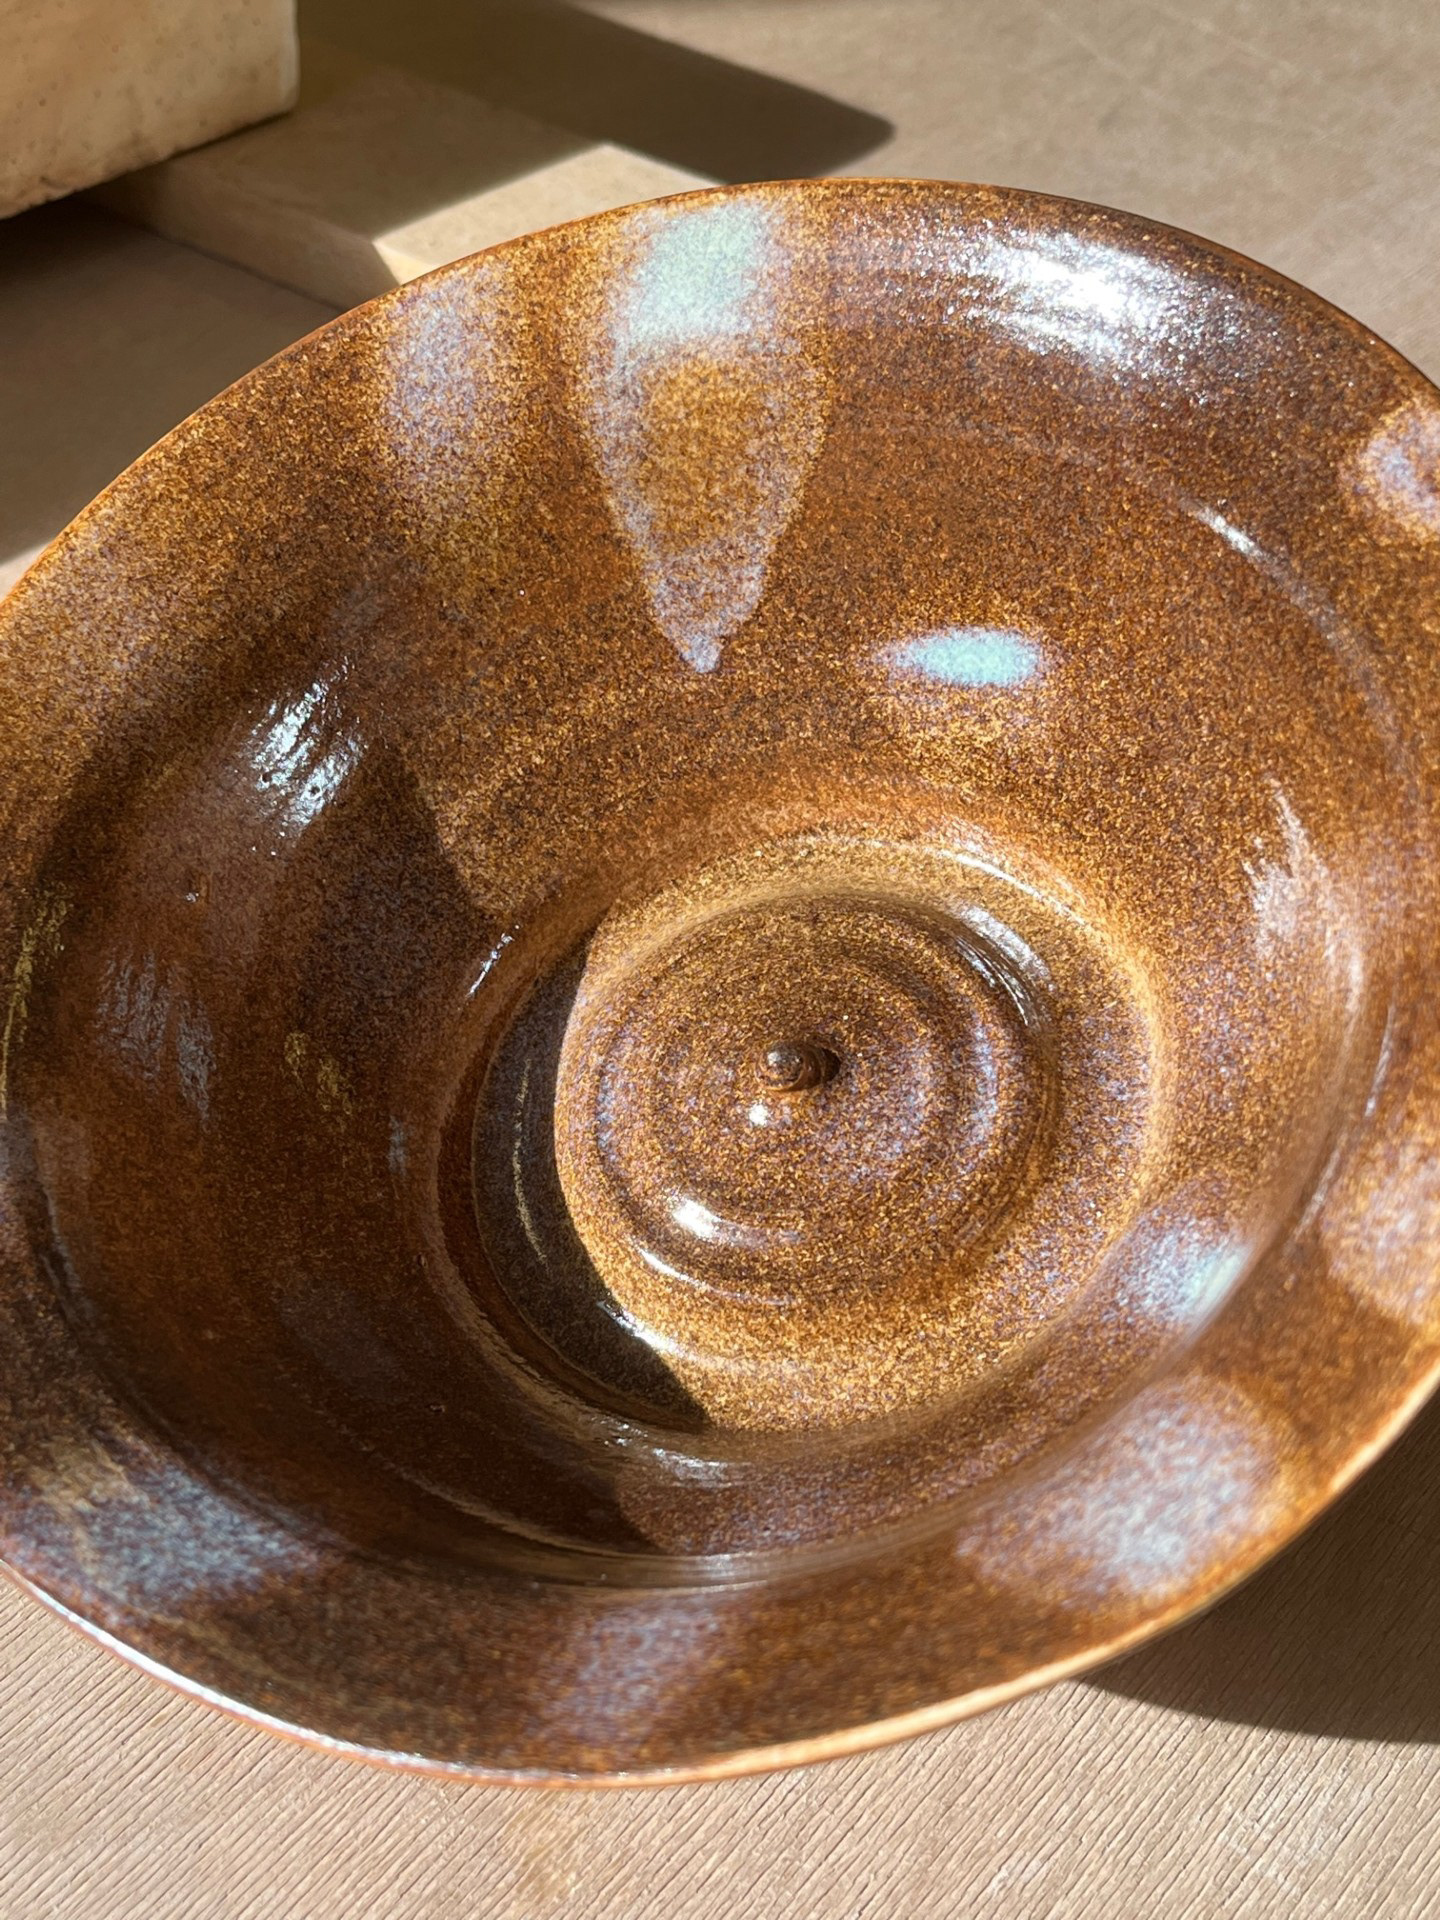
The large bowl that I have decided to include for me isn't as refined technically as I had hoped but I think that for me it serves more as a representative object. As this bowl was made by accident it means that there were a couple of gaps or thing missing from the process to make it refined, such as using a batt. The bowl itself was made with lots of clay so it means its extremely heavy which isn't ideal as I want people to be able to pass around my objects so that they can share things like food in social situations. I wanted to include this so that I would be able to visualise the full ensemble that I had been envisioning for my resolution. I will need to refine this skill so that I can make larger things but with less clay which will hopefully come along with refining my technique and practice - currently, it can sometimes turn out inconsistent when I decide to go large.
Glazing the pieces, I chose to complete the outside of the bowl by spraying the zirconium on the outside as I feel like it would create a more even surface layer. For the medium vessels I chose to pour the inside as that was best suited to both the glaze and the vessel.
Images from Exhibition:
Reflection of Experience:
The first exhibition brought a mix of positives and learning experiences that were really valuable for my development. One of the key positives was working with plaster blocks, which I smoothed down to create smaller plinths for display. This task not only supported the practical setup of the exhibition but also helped me think more deeply about the personal curation of my practice. It allowed me to visualise how I might want my work to be displayed in future settings and highlighted the aspects of my making that I want to draw attention to. The experience also gave me insight into how to execute those ideas more effectively. Another important takeaway was the opportunity to talk to people about my work. Engaging in these conversations helped me become more comfortable speaking in an exhibition setting, and it gave me a real confidence boost to hear others’ thoughts and perspectives. I found it fascinating hearing the small features people picked out that really made the piece stand out to them. Overall, it was a meaningful step toward understanding how I want to present my work and how to communicate it to an audience.
WEEK 5: 10/02/25 - Formative Review/ Tutorial Feedback
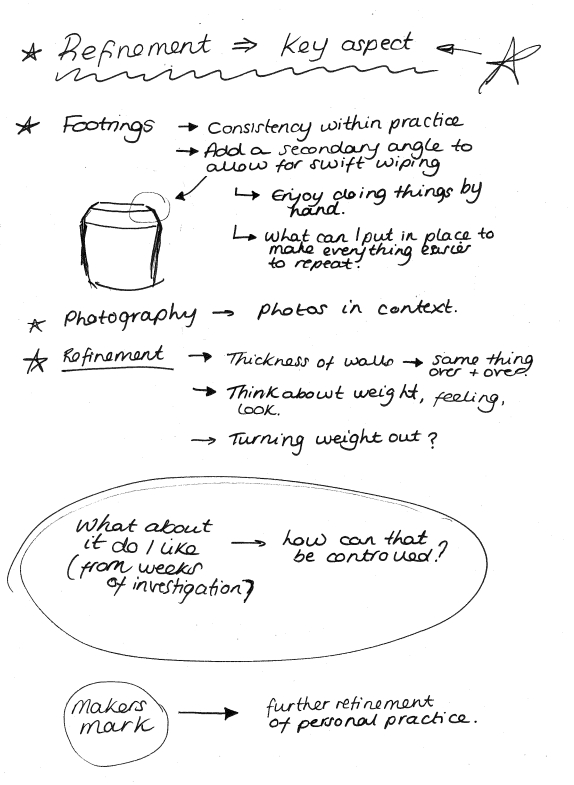
In this next week of making, i am going to be focusing on mainly the refinement of my skills. The refinement is going well so far as I am already seeing a difference but there will always be room to refine. in this tutorial we identified some refinement factors that i should be considering, which are things like weight, feeling, thickness of rim etc. Im quite glad we identified these factors because it gives me a mental checklist to work towards to help me improve.
One main takeaway from this tutorial was my that I need to think about implementing consistency, especially in the footrings. One of the things that I am missing from my practice it control; what elements do I like and how can that be controlled to make the same outcome? one example of this is the bleeding rim which is such a natural process but m trying to think how can I refine that feature to make it look controlled?
Throwing Practice:

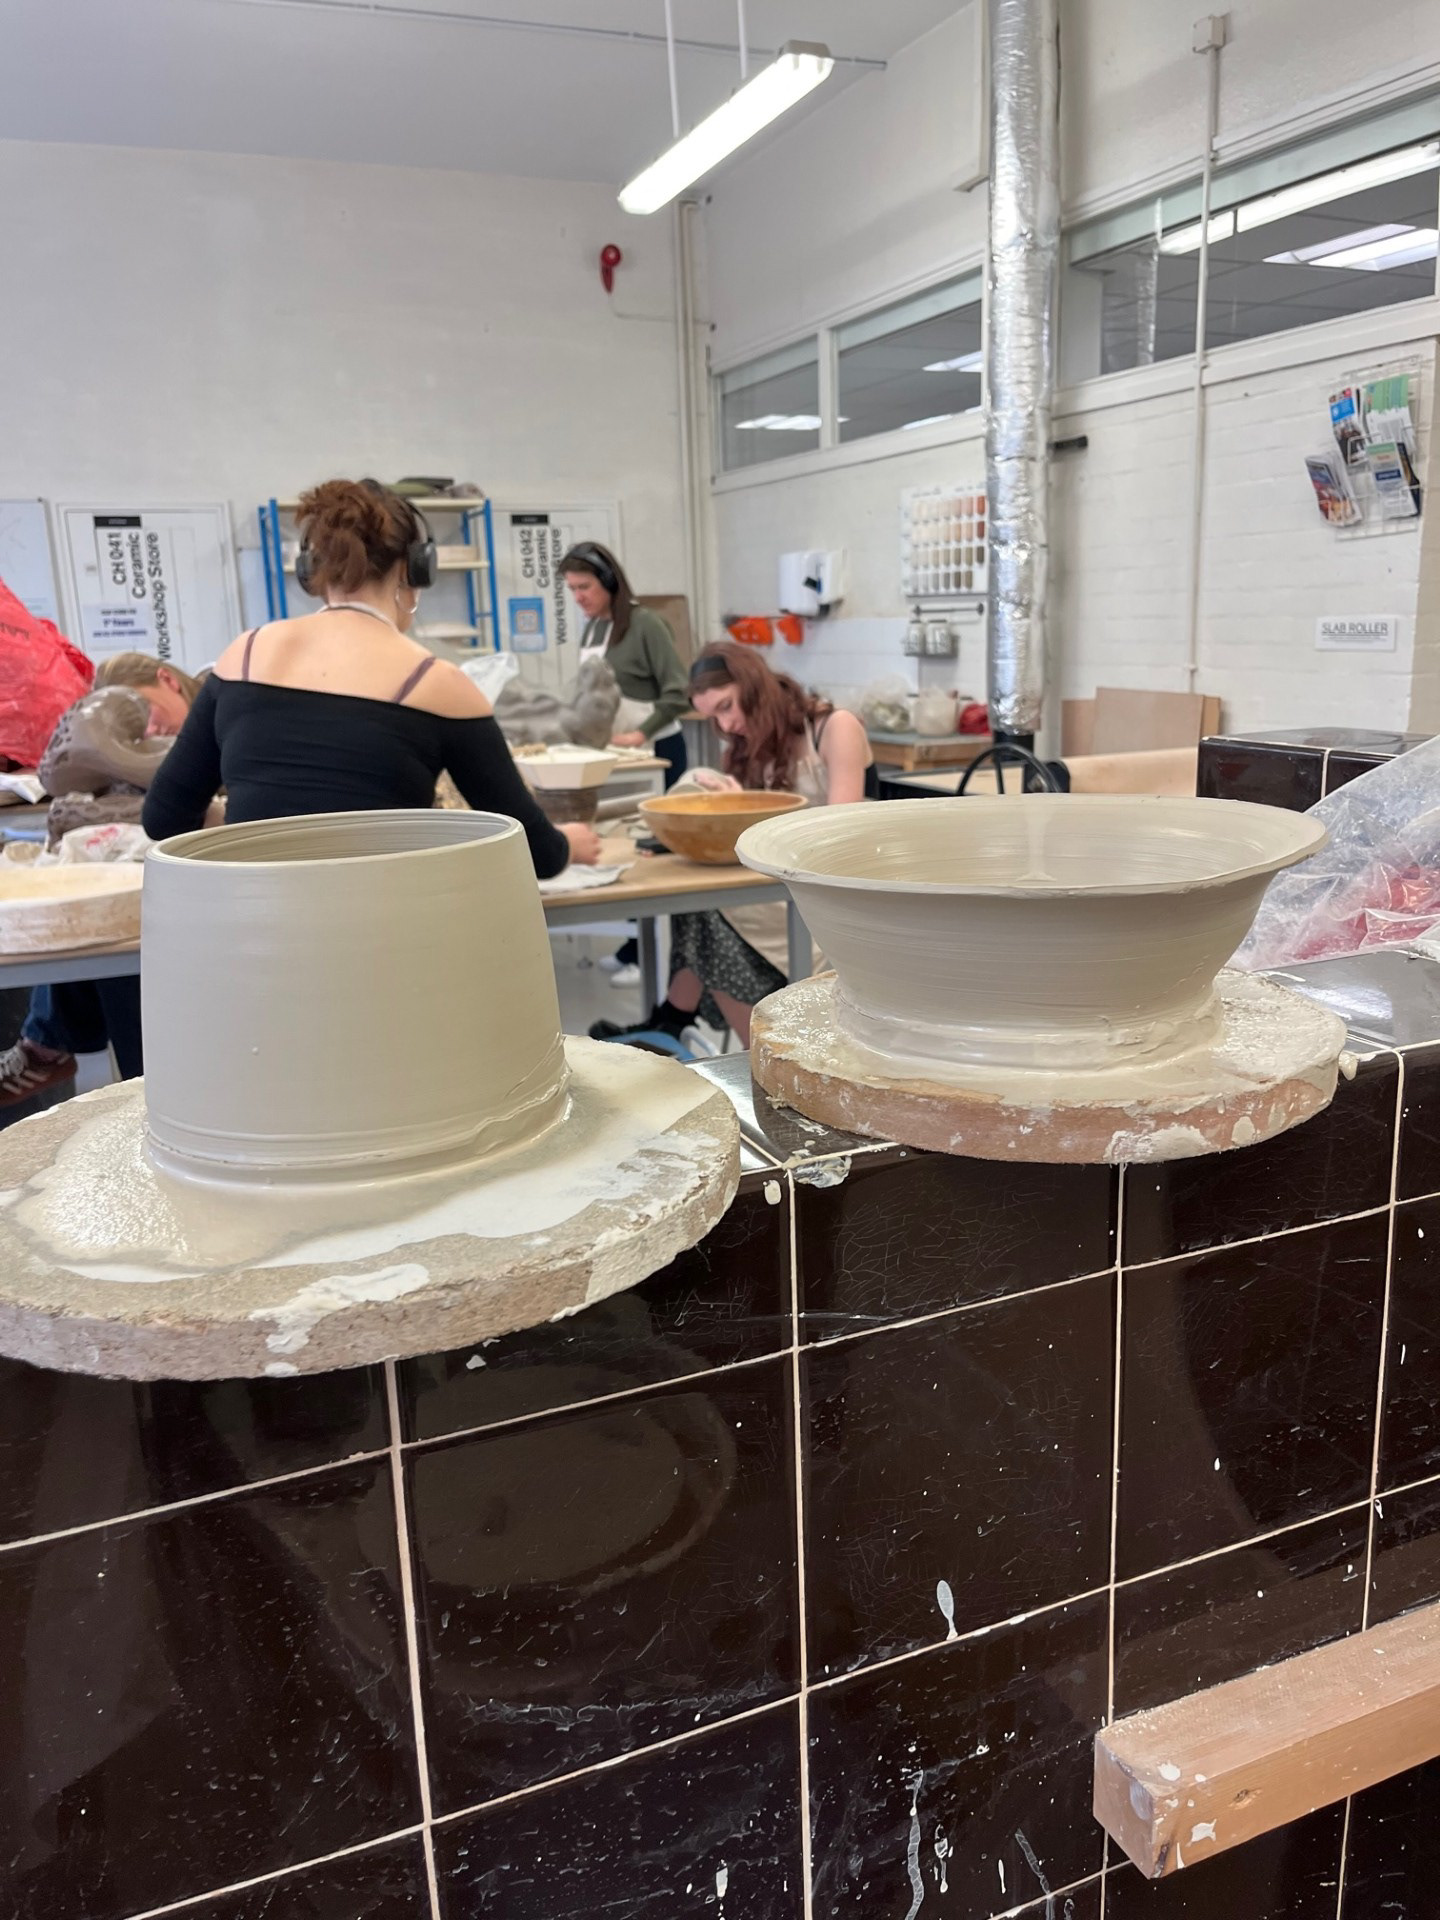
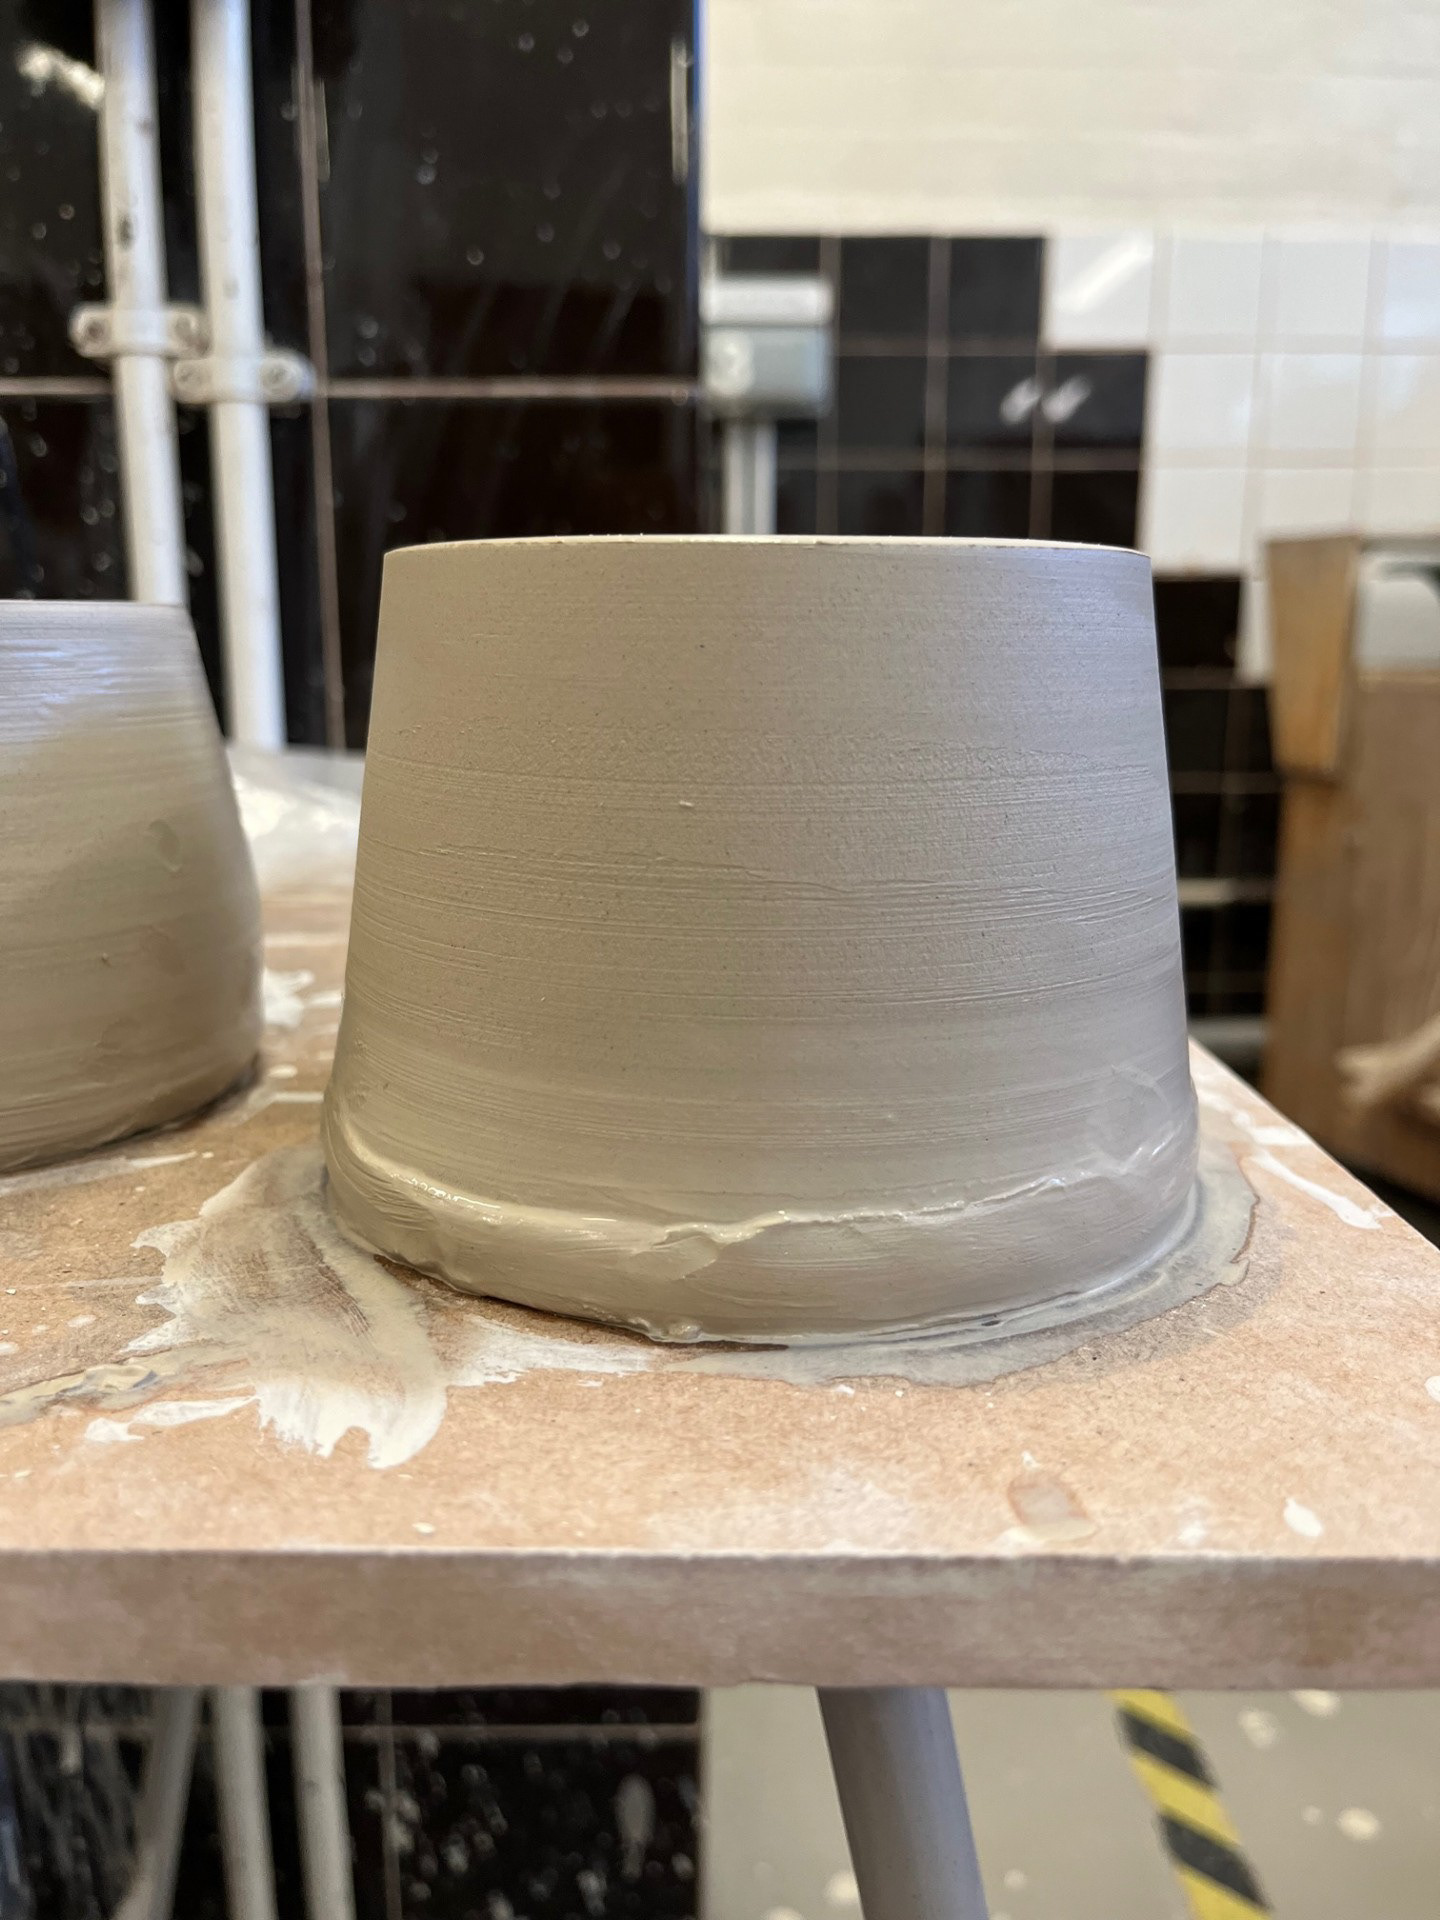
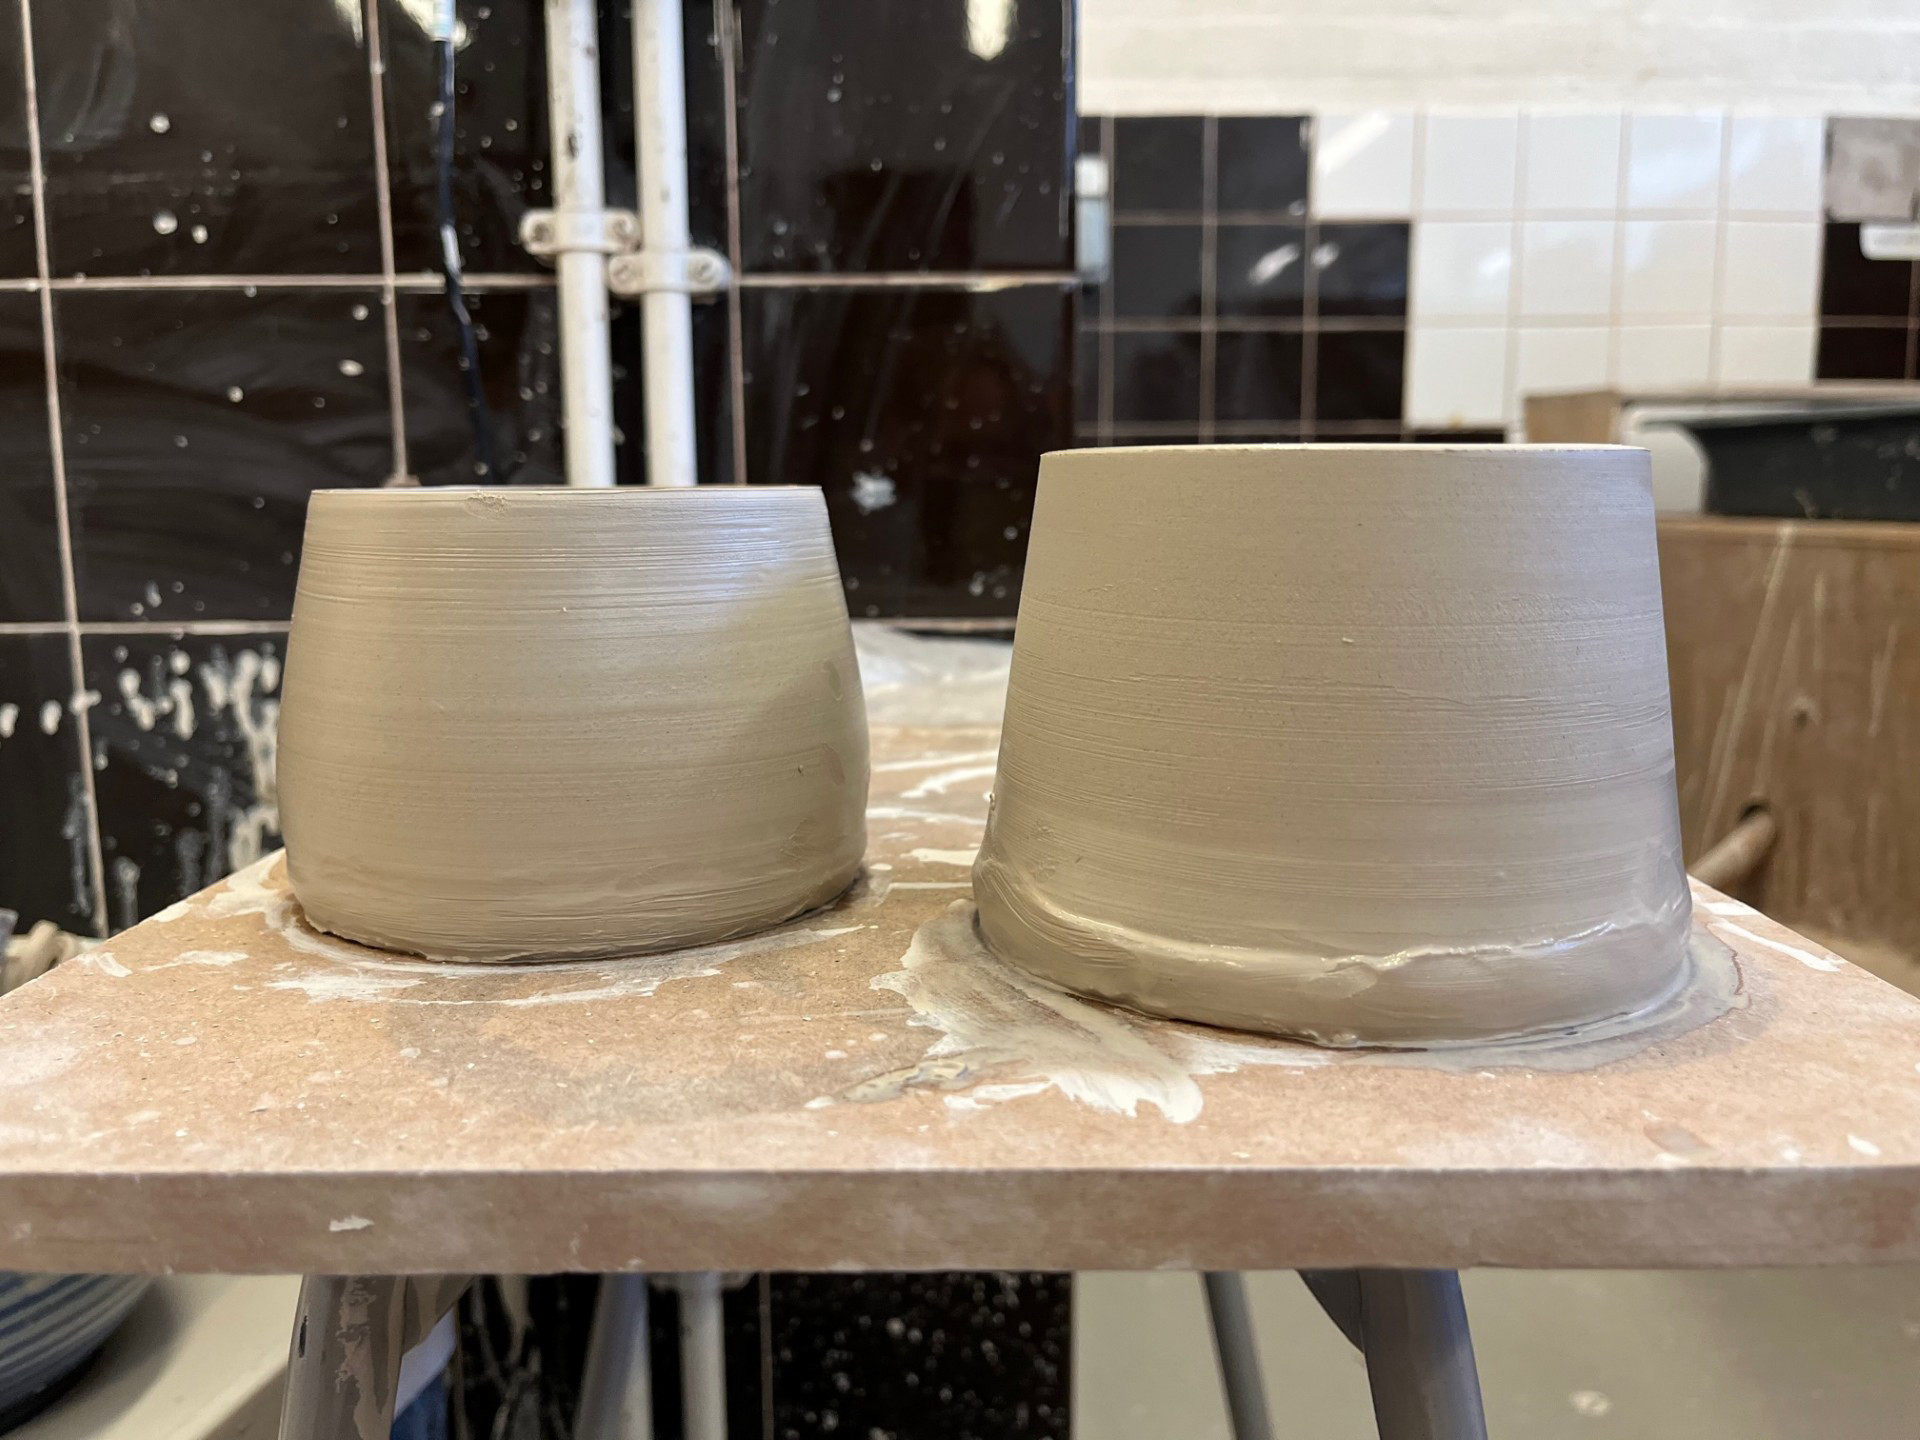
WEEK 7: 10/03/25, Monday
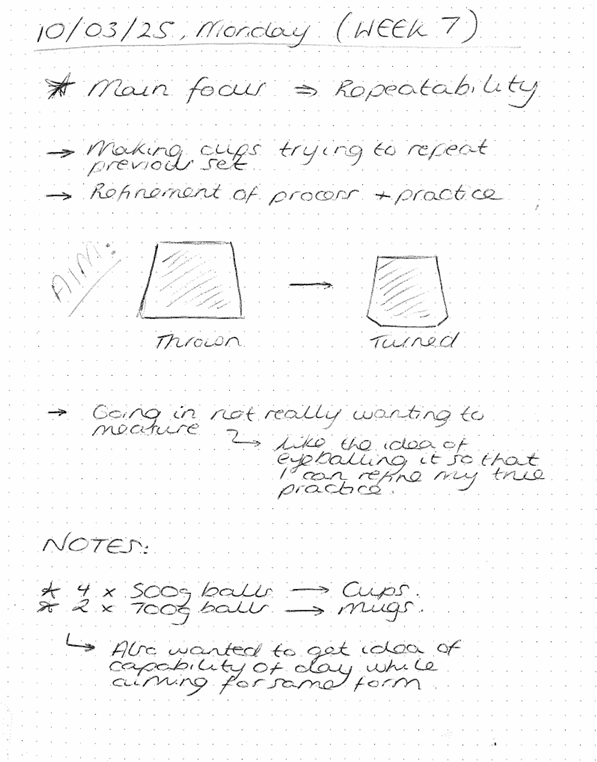

In this session, I’ve really noticed an improvement in my throwing—my pots are becoming much more consistent and refined. I’ve been especially enjoying using the metal rib tool, as it significantly enhances the finish of the pots and contributes to their overall quality. The compression it provides while pulling up the walls also strengthens the clay, making the forms sturdier. Another technique I’ve adopted is using a metal tool to scrape the base or skirt of the pot before removing it from the wheel. Since trying this method, I’ve seen great improvements; it makes lifting the pots off the wheel easier, reducing the risk of warping or damaging their shape. Additionally, trimming the skirt makes the turning process smoother, as it creates a more even and consistent base. Overall, the skills I’ve developed in this session—refining surfaces, strengthening forms, and improving efficiency—are techniques I can see myself using throughout the rest of this project and in my future practice. They not only elevate the quality of my work but also make the entire process more deliberate, precise, and rewarding.
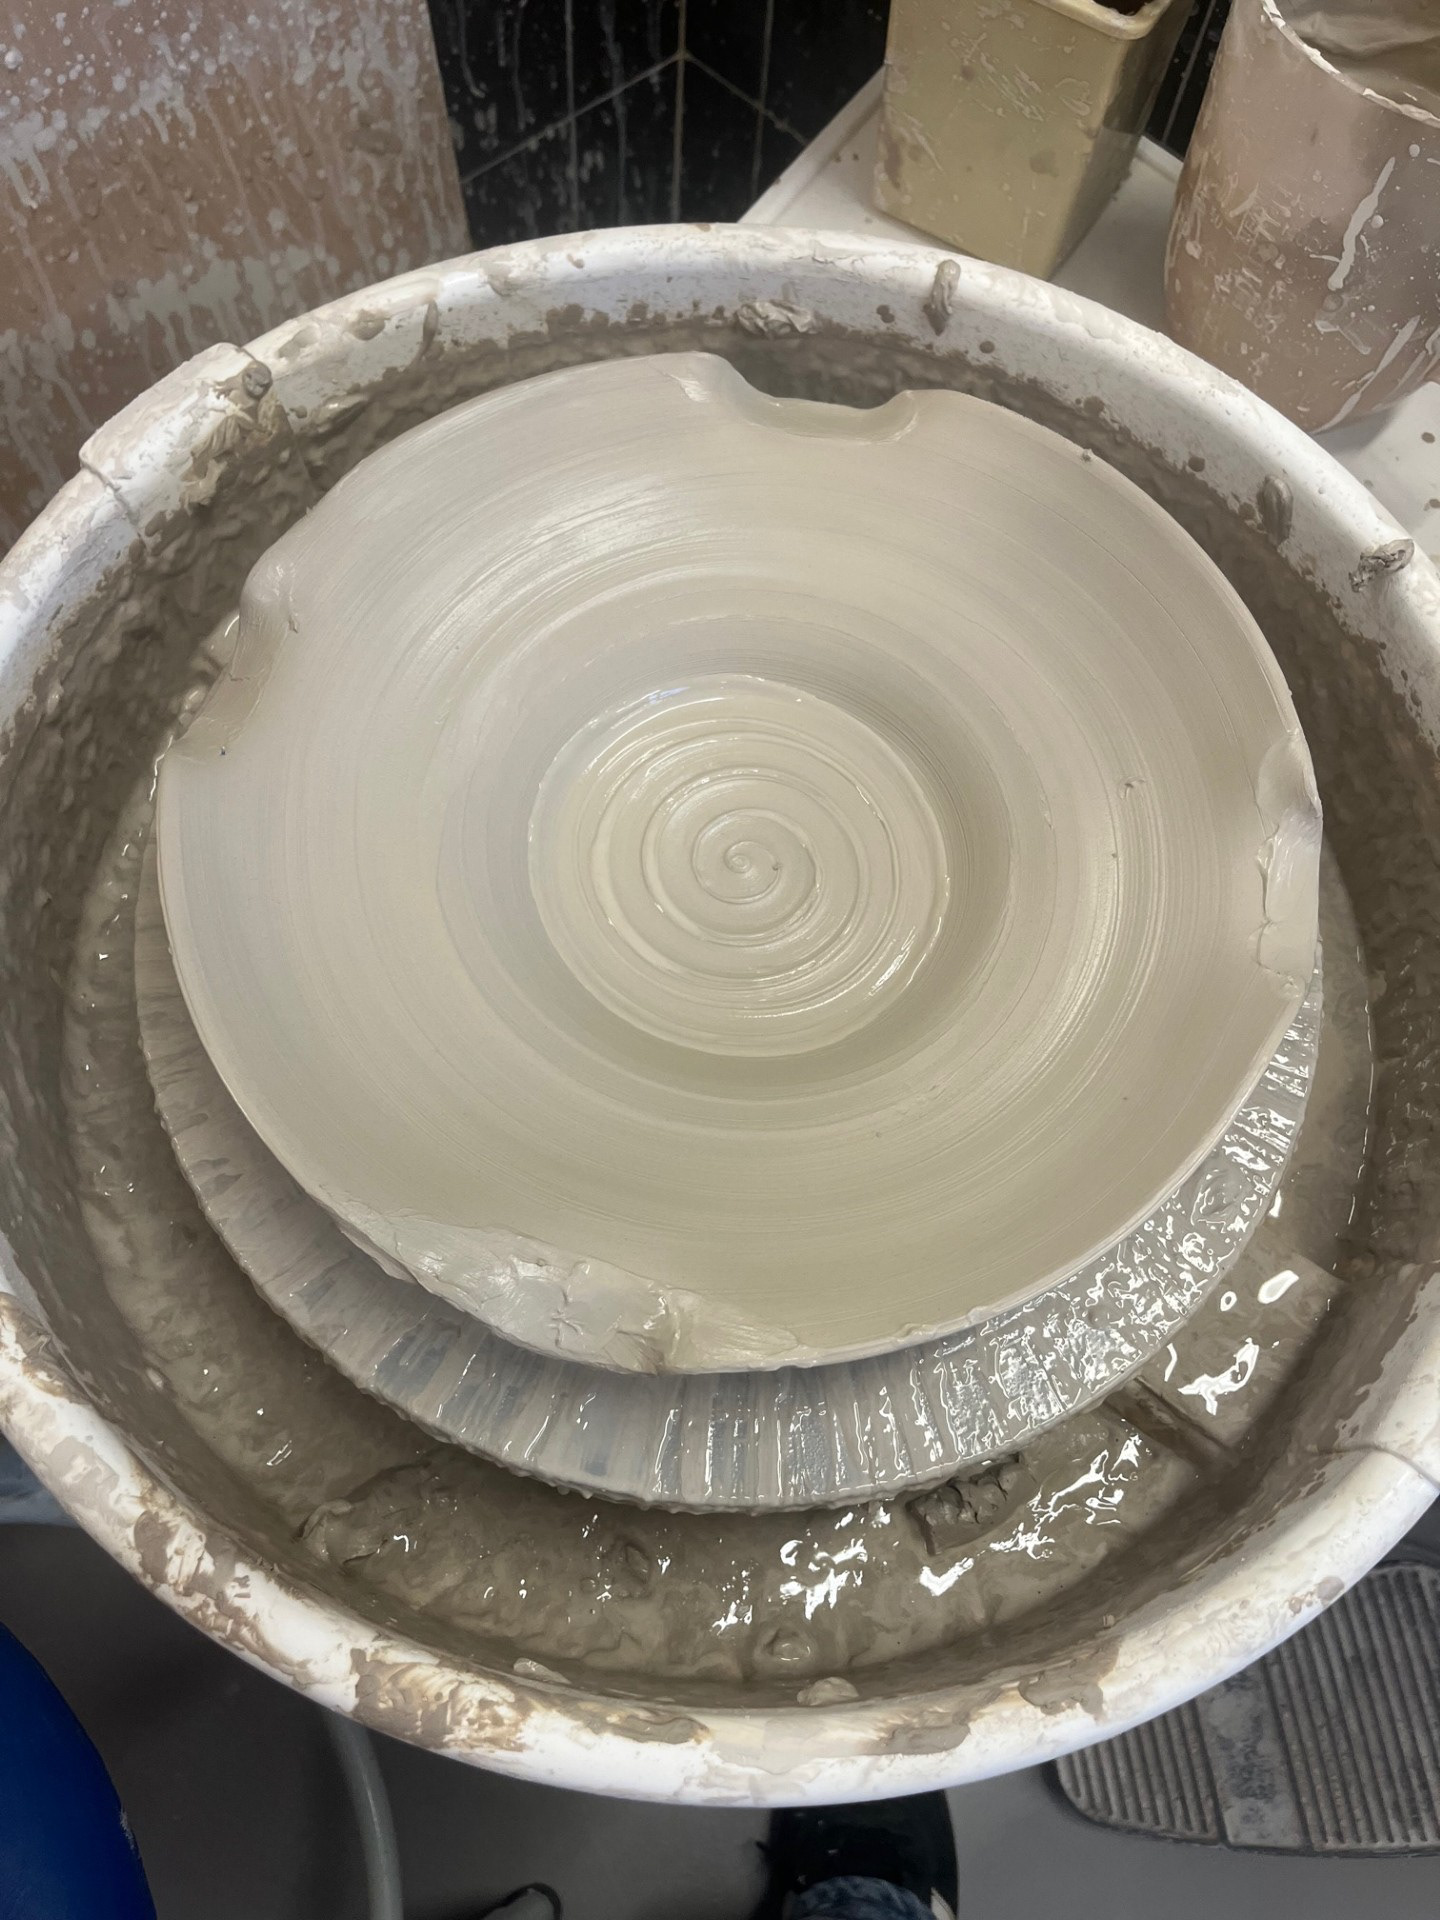
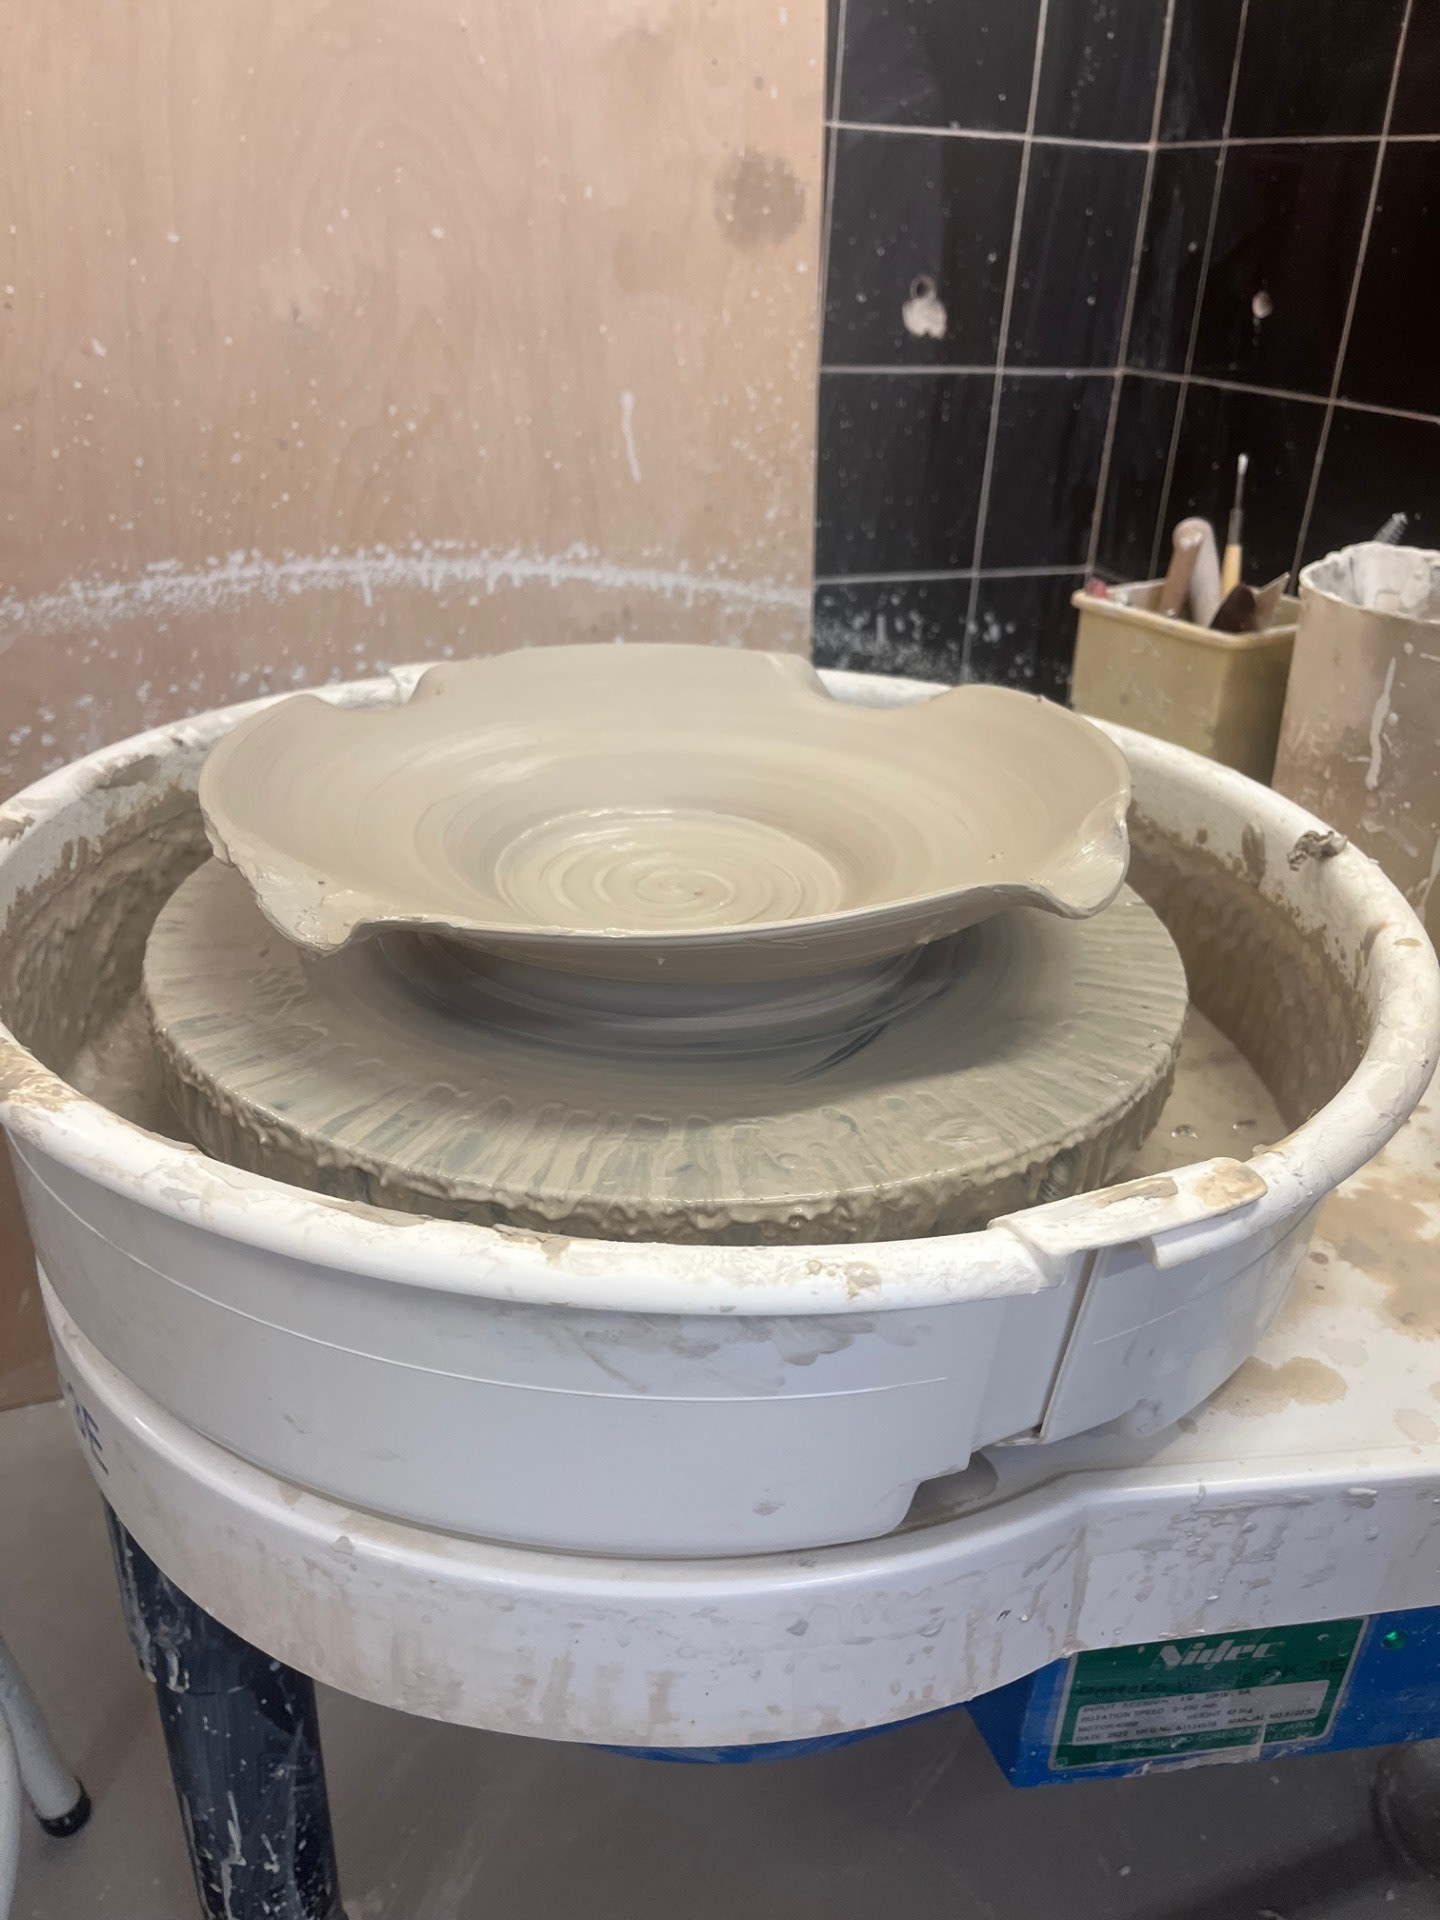
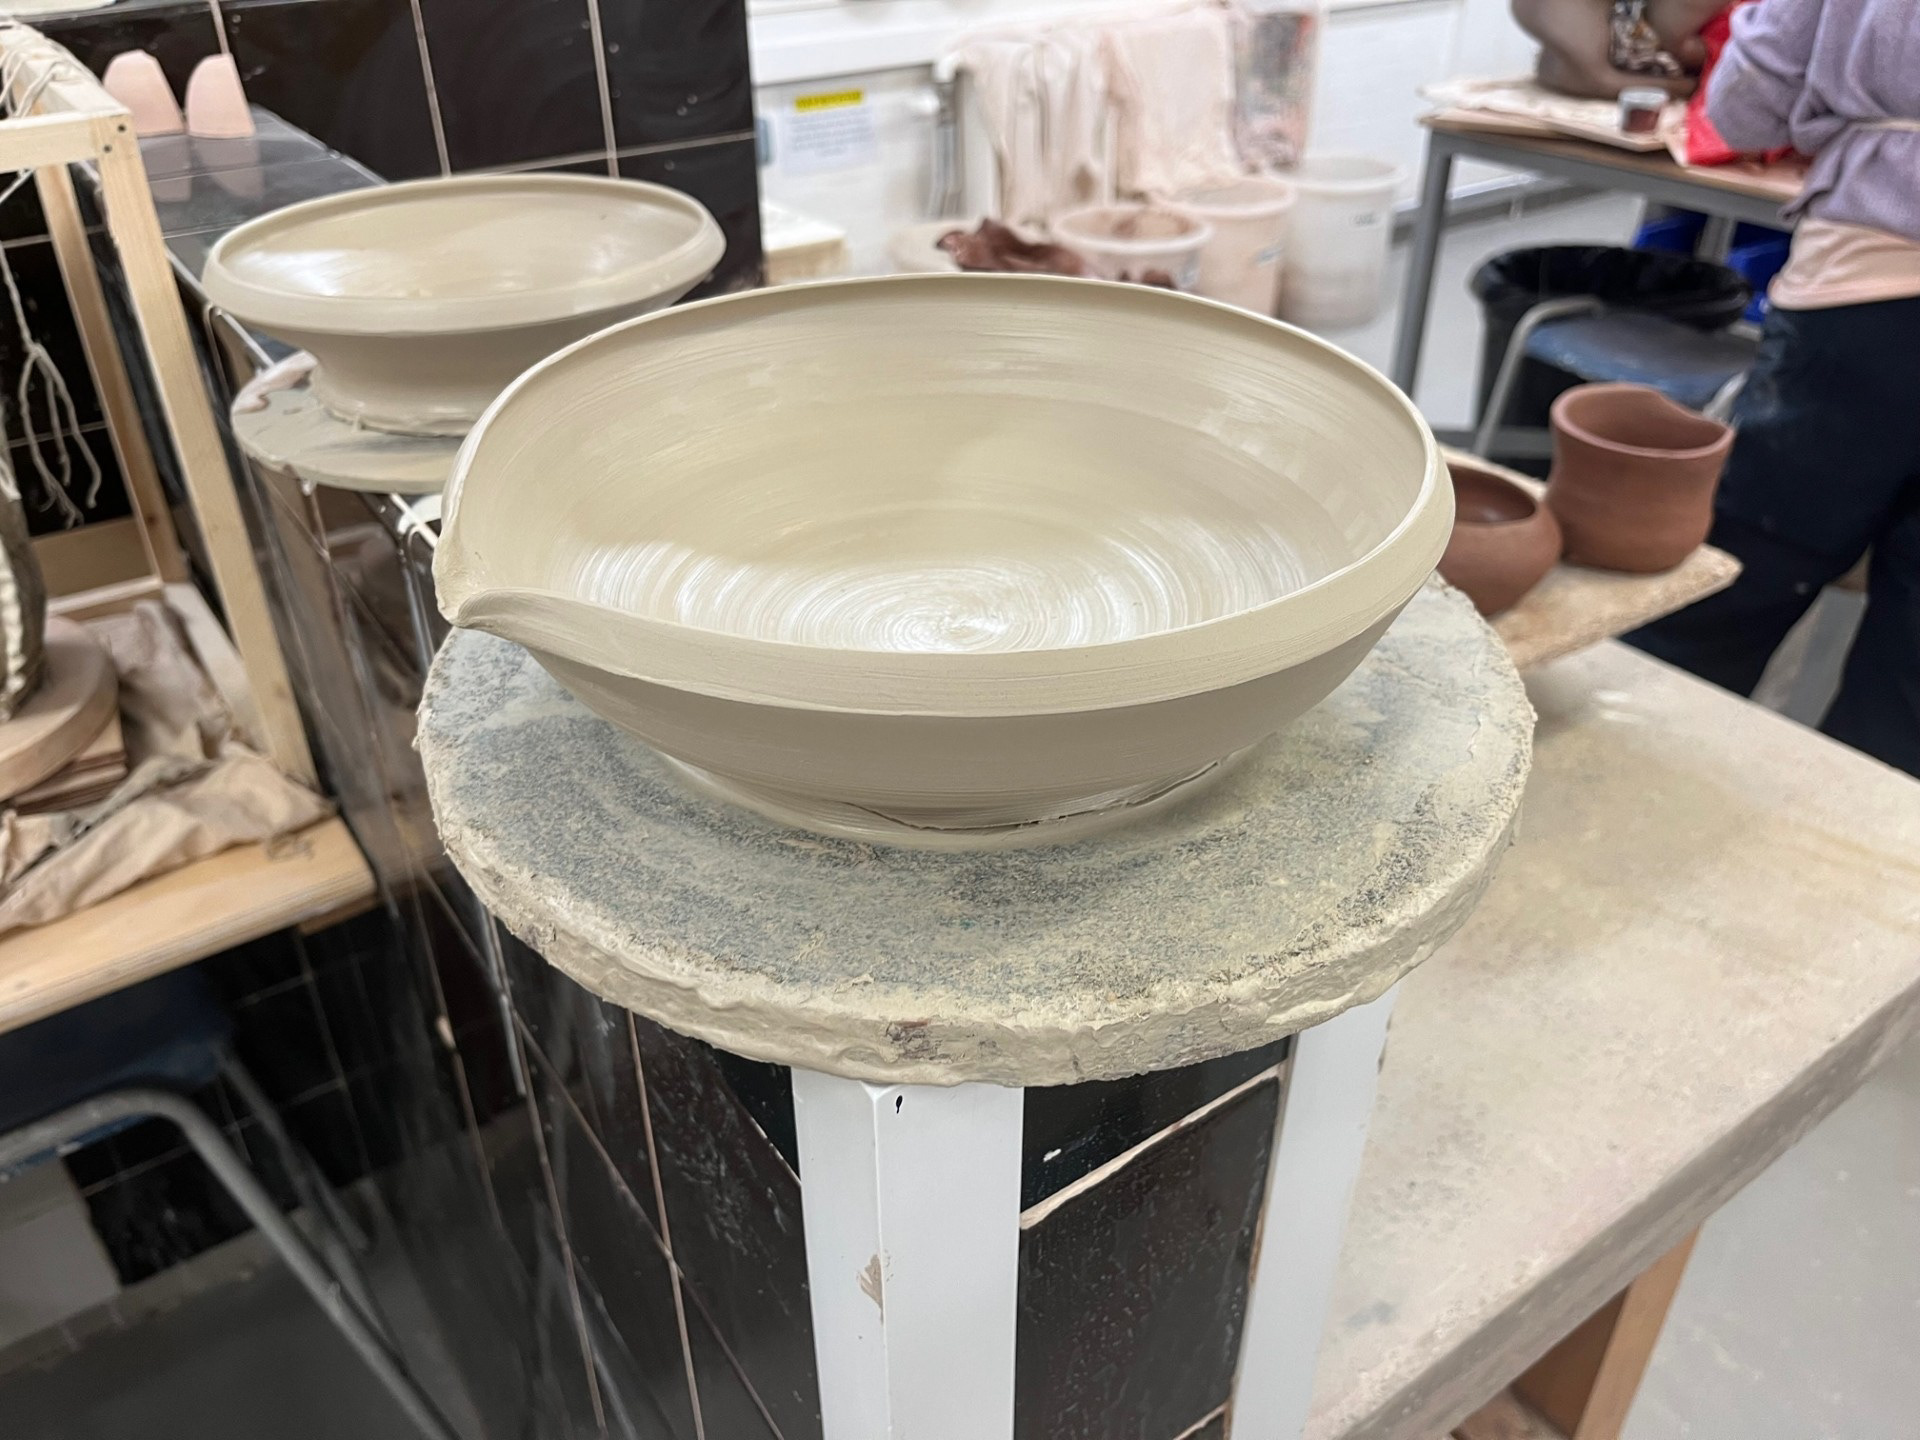
WEEK 7: 11/03/25, Morning
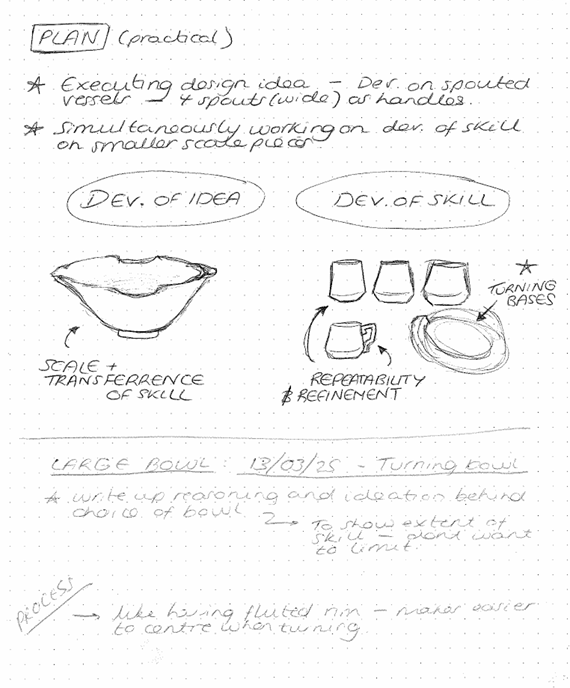
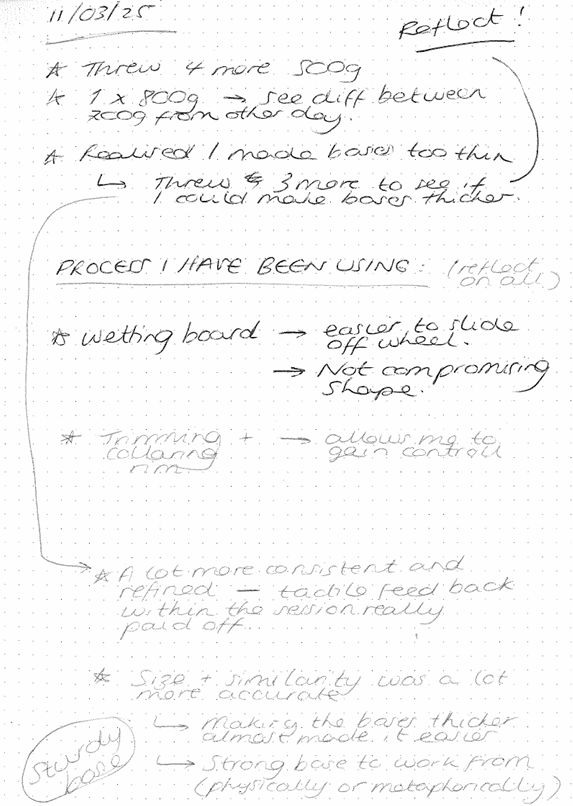
In this session, my main focus is on trying to execute a specific design idea. Over the past few weeks, I’ve been concentrating on refinement, and while that will continue to be a constant in my practice, I now want to progress to the next stage of the project. The concept I’m working on involves creating vessels that reflect two key aspects of my making: repeatability and scale. One vessel will represent the ability to reproduce consistent forms, while the other will showcase my skill in working with larger volumes of clay. I want to produce work that embodies both of these areas, as I see them as two of the most important criteria for any thrower. Repeatability is fundamental—it’s the baseline skill for any studio potter like myself—while scale reflects a more personal ambition. From the beginning of my ceramics journey, I’ve been drawn to throwing larger forms, which is likely why I didn’t focus on consistency early on; I was always driven by the challenge of handling more clay. Now, I see the value in balancing both goals, and this project is an opportunity to bring them together in a meaningful way.
See below for workshop images:
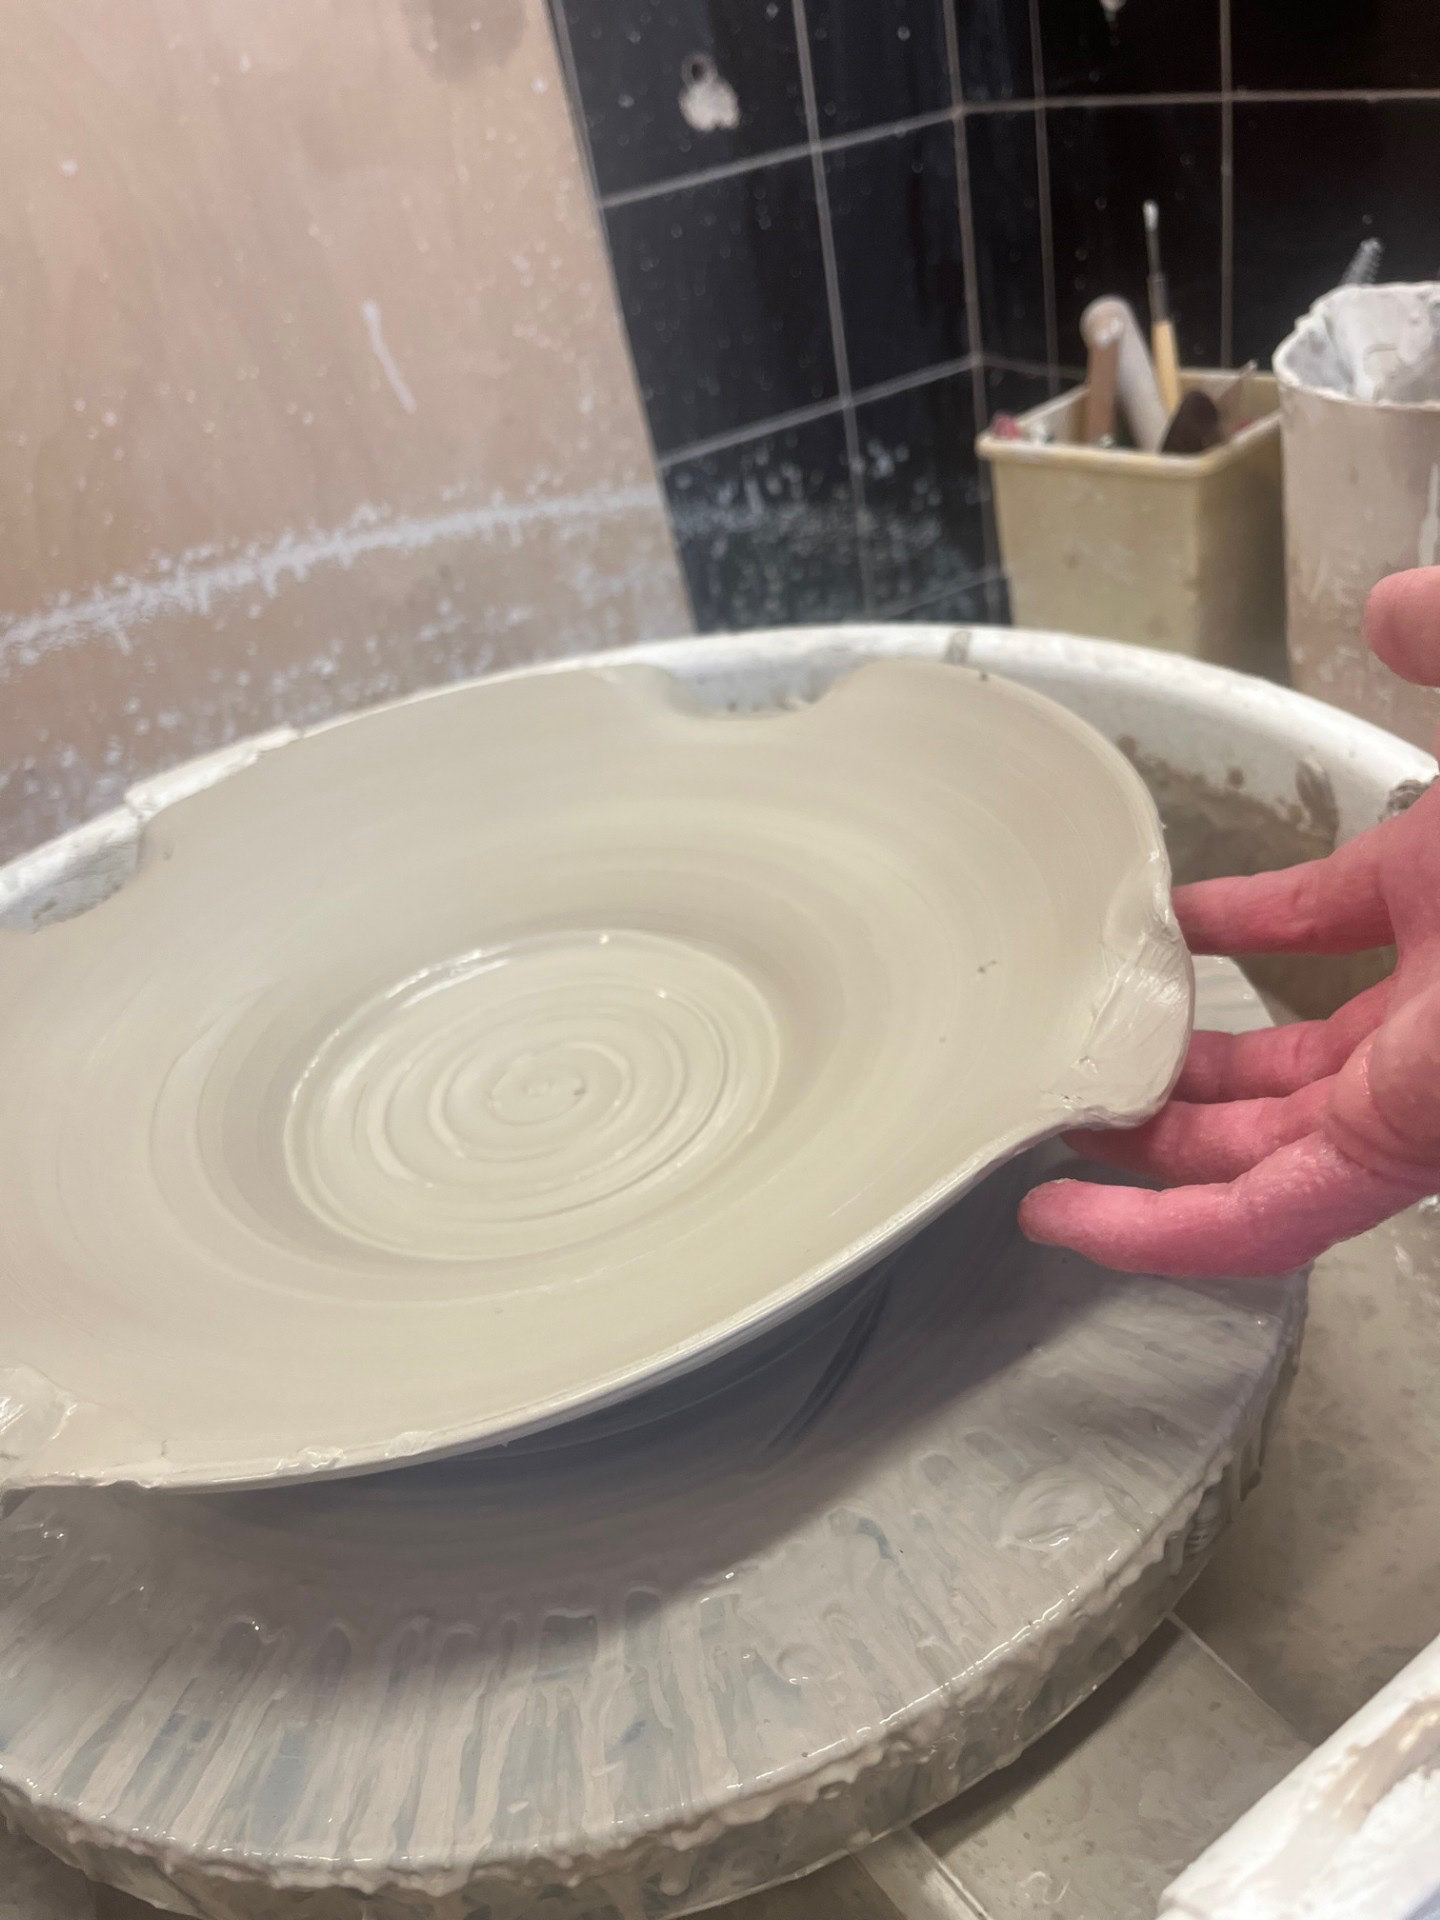
Overall, this process went well, but there were a few issues that need to be addressed. Building on the progress from the last session, I was able to maintain the quality of the pots in terms of wall consistency, throwing structure, and overall craftsmanship. However, the main challenge this time was achieving consistency in repeatability. The pots varied noticeably in size, shape, and height. I believe a key factor contributing to this inconsistency is the initial pull of the clay—specifically, that I’m starting each pot with a different base width. Since the base determines the potential height and wall thickness of the pot, any variation at this early stage throws off the final dimensions. In the next batch, I’ll focus on keeping the initial base size consistent, as this will likely improve the uniformity of the entire batch and bring me closer to achieving true repeatability.
WEEK 7: 12/03/25, Morning
Started with the four turned pieces from the previous day but quickly realized the shapes were too bottom-heavy, with wide bases compared to the rims, making them feel overly negative. The pots lacked consistency in thickness, shape, and size, which didn’t align with what I was aiming for. After throwing a second batch, I noticed the bases were extremely thin, and while I thought they might be salvageable, removing them from the wheel was difficult due to trapped air bubbles caused by the uneven base thickness. Later that afternoon, after they had dried slightly, I found that only a few had survived.
I decided to throw 3 more chanelling all of the information that i had learnt from the previous 2 batches. the main aim for this batch was to really focus on making the bases the correct thichness as well as a consistent thickness.
Over the past two days, I’ve made three batches of work, and with each one, the learning curve and improvements have been clear. The early pieces varied significantly in size, weight, and thickness, but the samples have gradually become more consistent. This process has made me realise just how crucial repetition is when refining skills—the more I practice, the more noticeable the progress becomes. Each time I throw, I find myself recalling more from the previous attempts, something I previously struggled with. In the past, I couldn’t remember what I had done before, so there was no foundation to build on. Now, I feel like I’m finally establishing strong foundations, with new skills beginning to feel like muscle memory, and I’m excited to continue developing in the next stages of my practice.
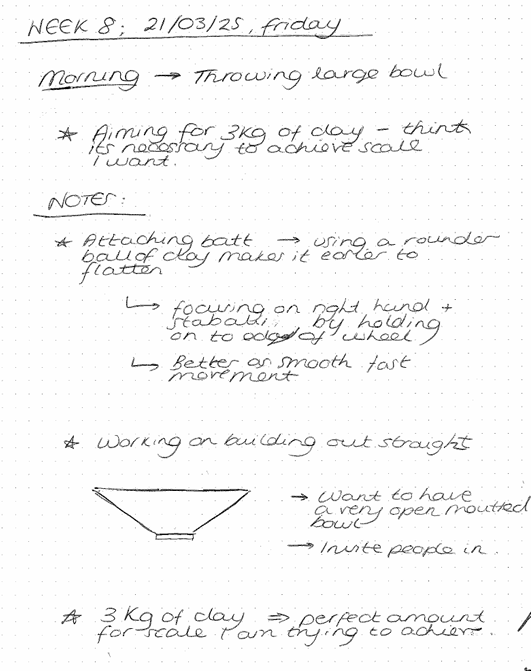
WEEK 8: 17/03/25, Monday
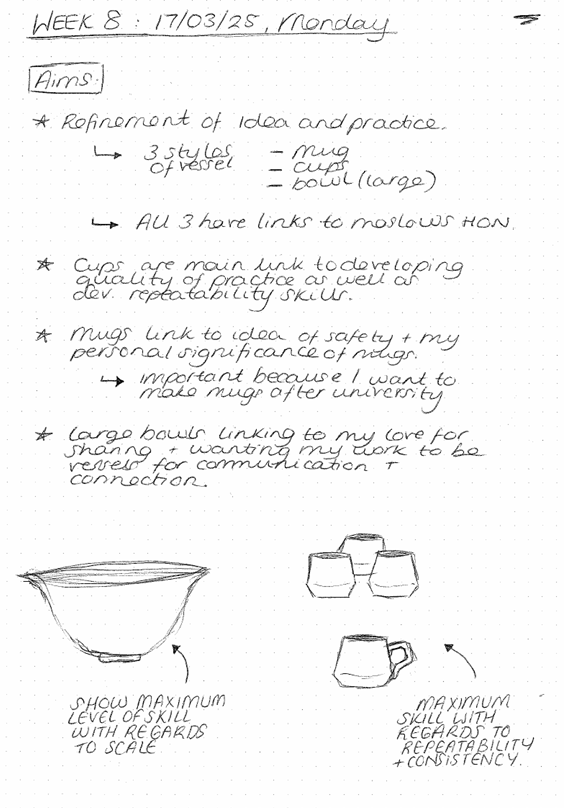
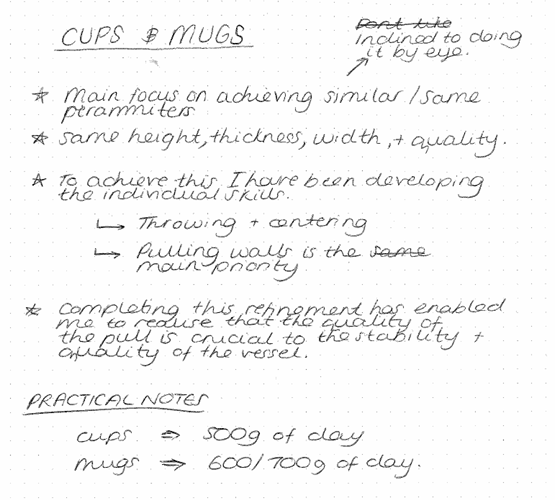
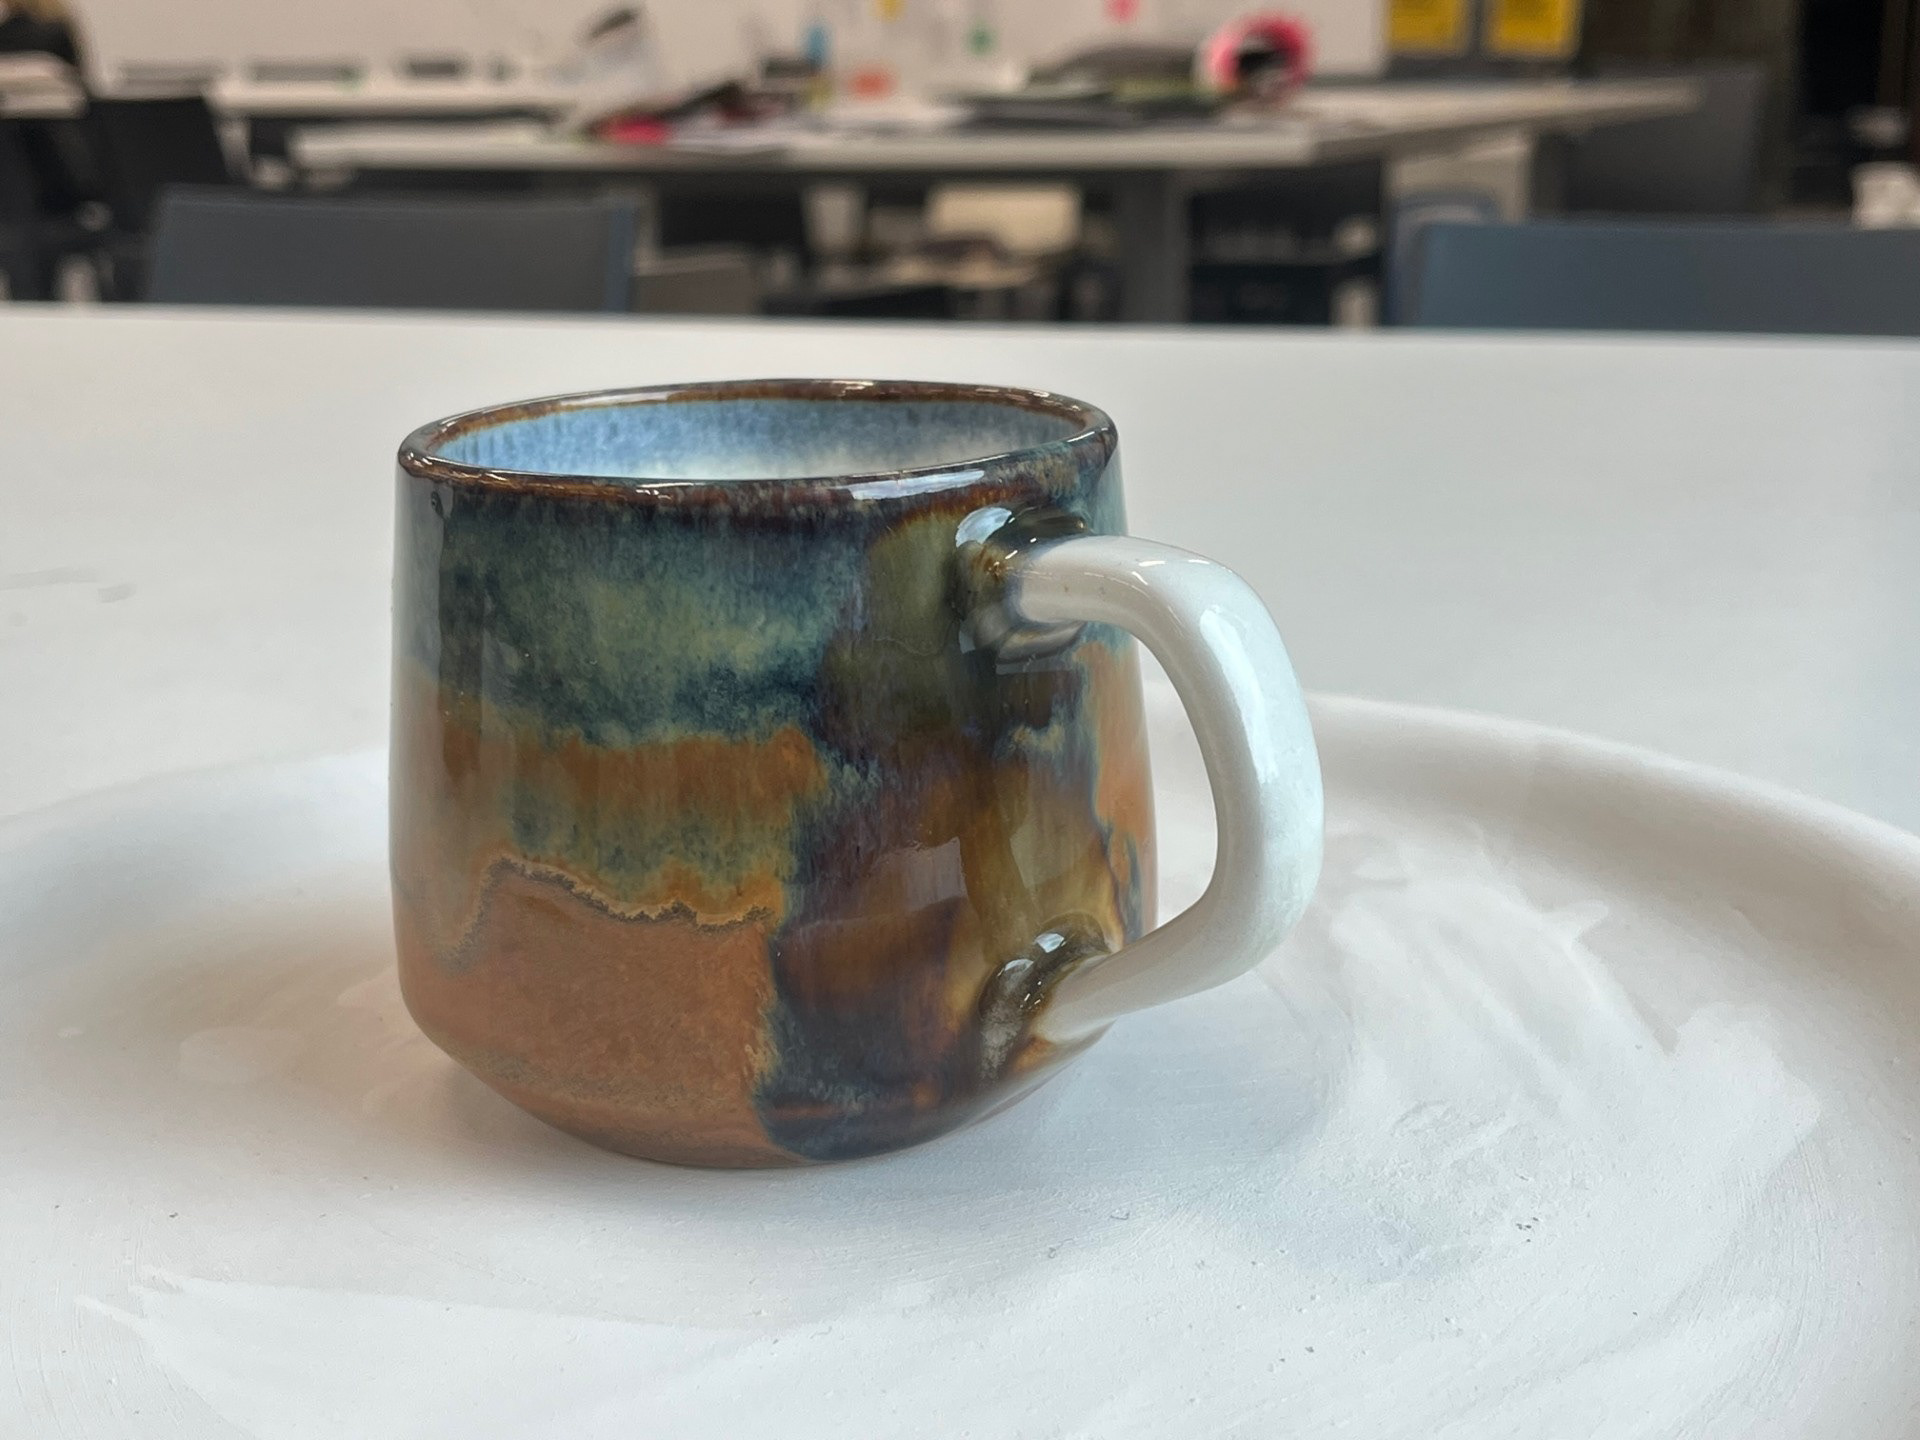
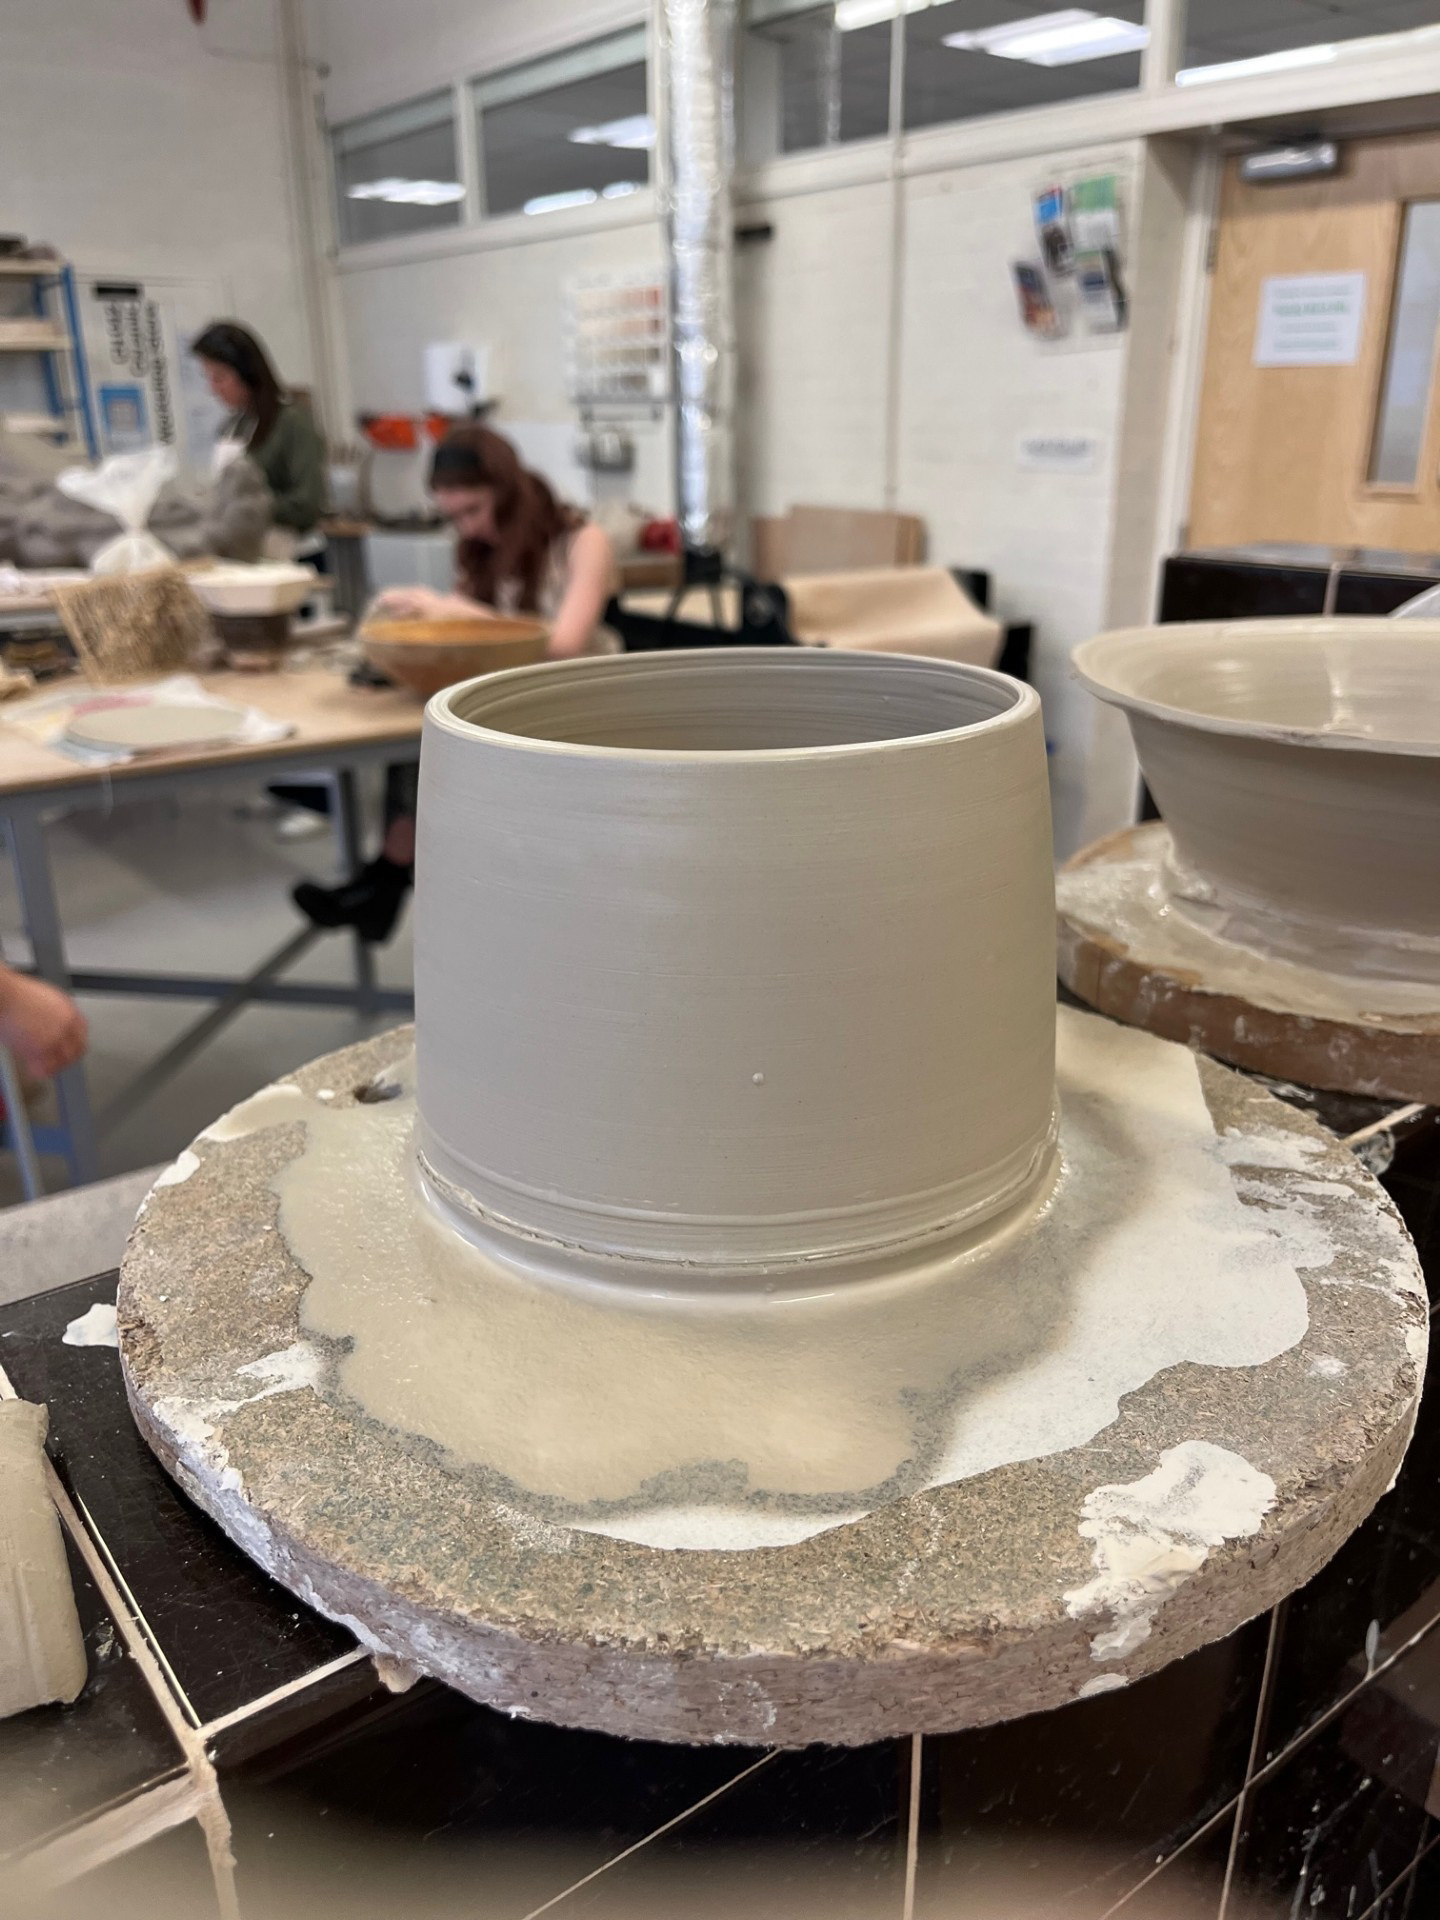
At this stage, my plan is to create a set that includes bowls, cups, and mugs. While this may seem ambitious, I believe it's essential to fully realize my overall vision and artistic goals. Throughout this process, my focus has remained on improving specific throwing techniques—particularly centering and pulling up the walls. These were areas I previously struggled with, so it feels especially rewarding to now highlight and strengthen them. This ongoing refinement has made me realize just how crucial the quality of the pull is in creating a strong, technically sound pot. That attention to detail ties into my broader aim of achieving longevity in my work—because the better the quality, the more likely each piece is to stand the test of time and become a vessel for memories of people and place. I think that using 600g for the mug bodies will be good as it is not far off what I'm already working but it makes the size a little bit more substantial.
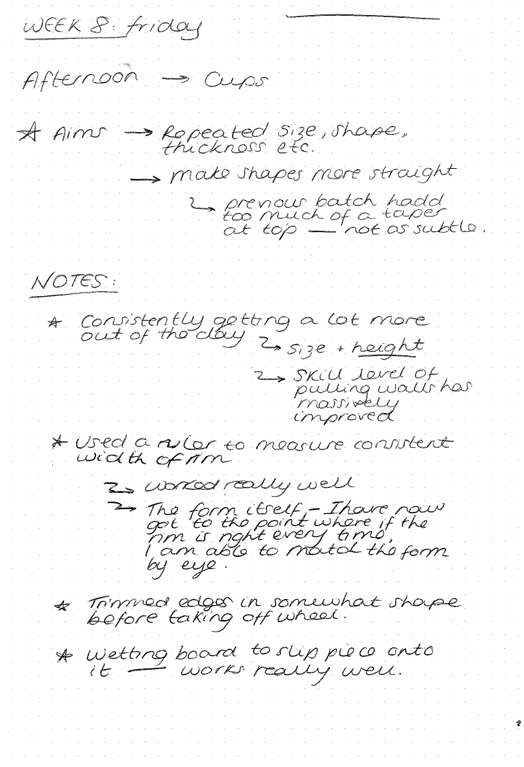
WEEK 8: 18/03/25, Tuesday
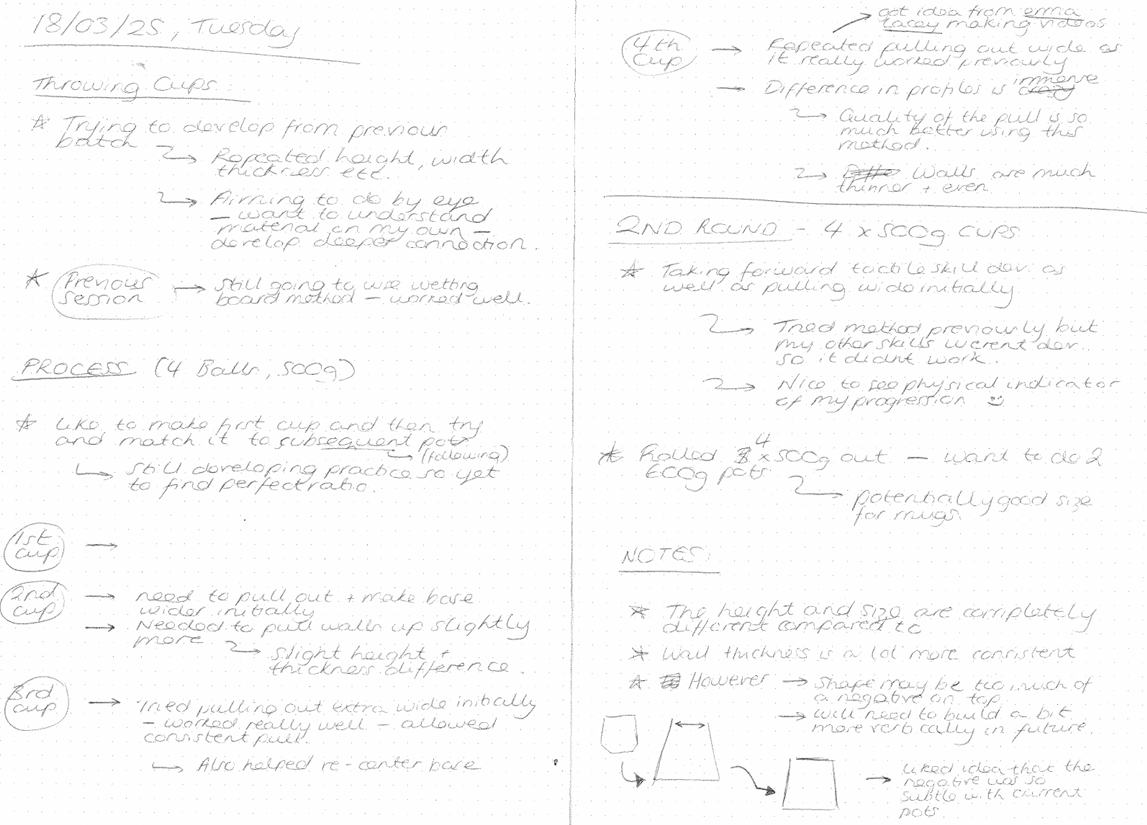
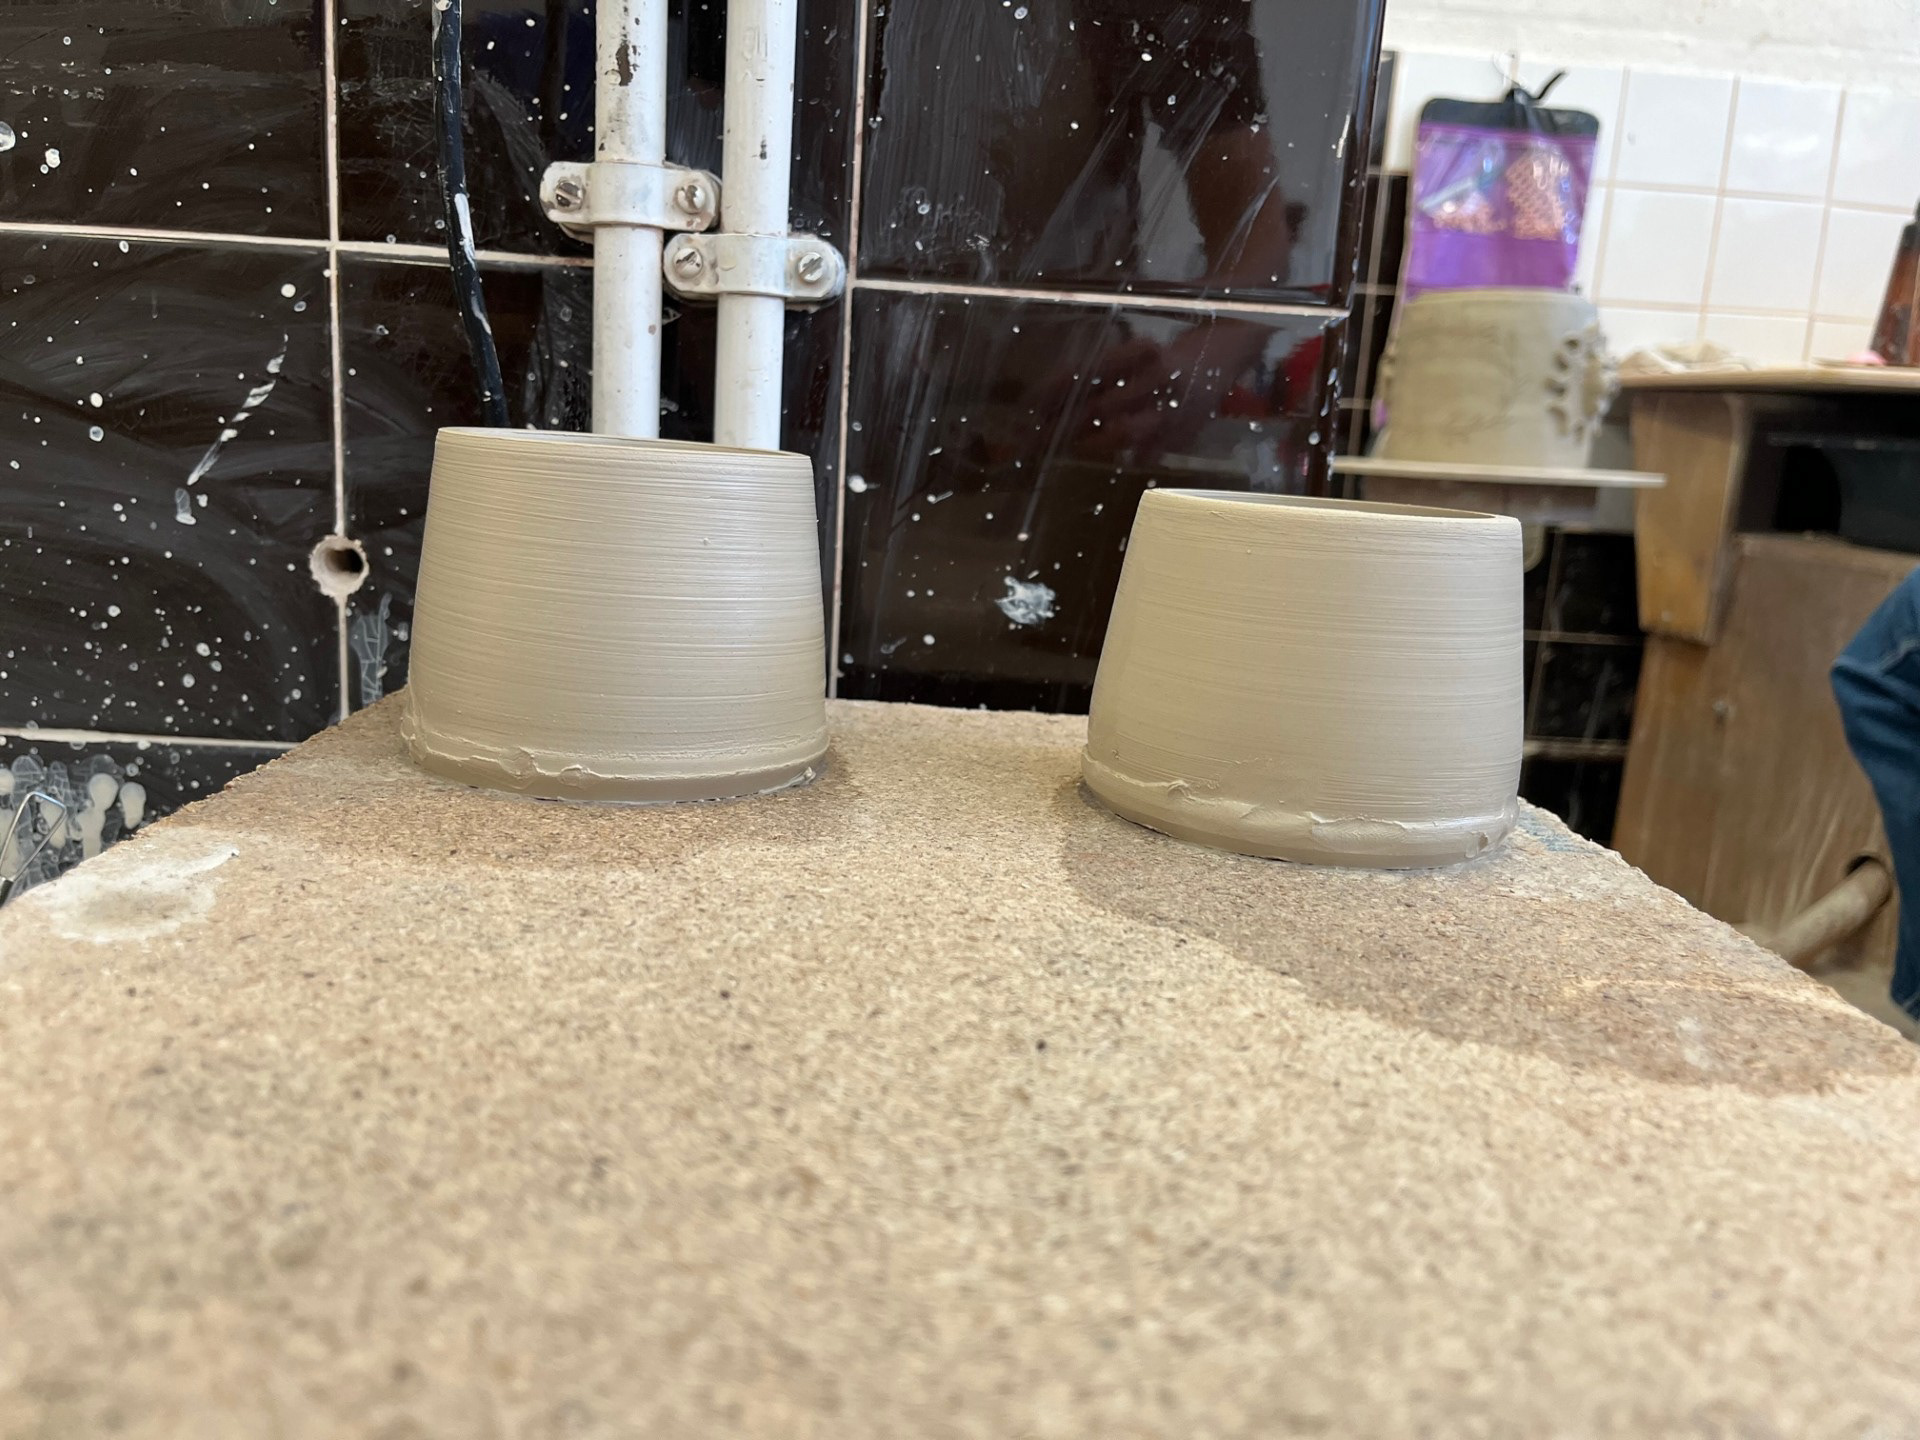
With both of these pots I realised that I need to pull out the bases out the same to start with. I think that this is the reason that my pots have been coming out different shapes so far. The lots do have similar thickness but I think that overall I need to pull the walls up more they are a bit too thick.

For the next 2 I wanted to try the method of pulling it out wide initially and them controlling it from the outside as I bring the walls up. I found this method from the ceramicist Emma Lacey who also implements this technique. I found that this helped to make them a bit more consistent so I will definitely be trying this method again. I also put more focus on pulling the walls up more and it was successful. Putting more of my focus on hat helped me make the walls a lot more consistent all round. I think that doing this documentation method was really beneficial as it helped me break down the process so that I can learn more about what I am doing in the moment. I can already see the improvement in just these 4 pots.
Proceeded to make further cups:


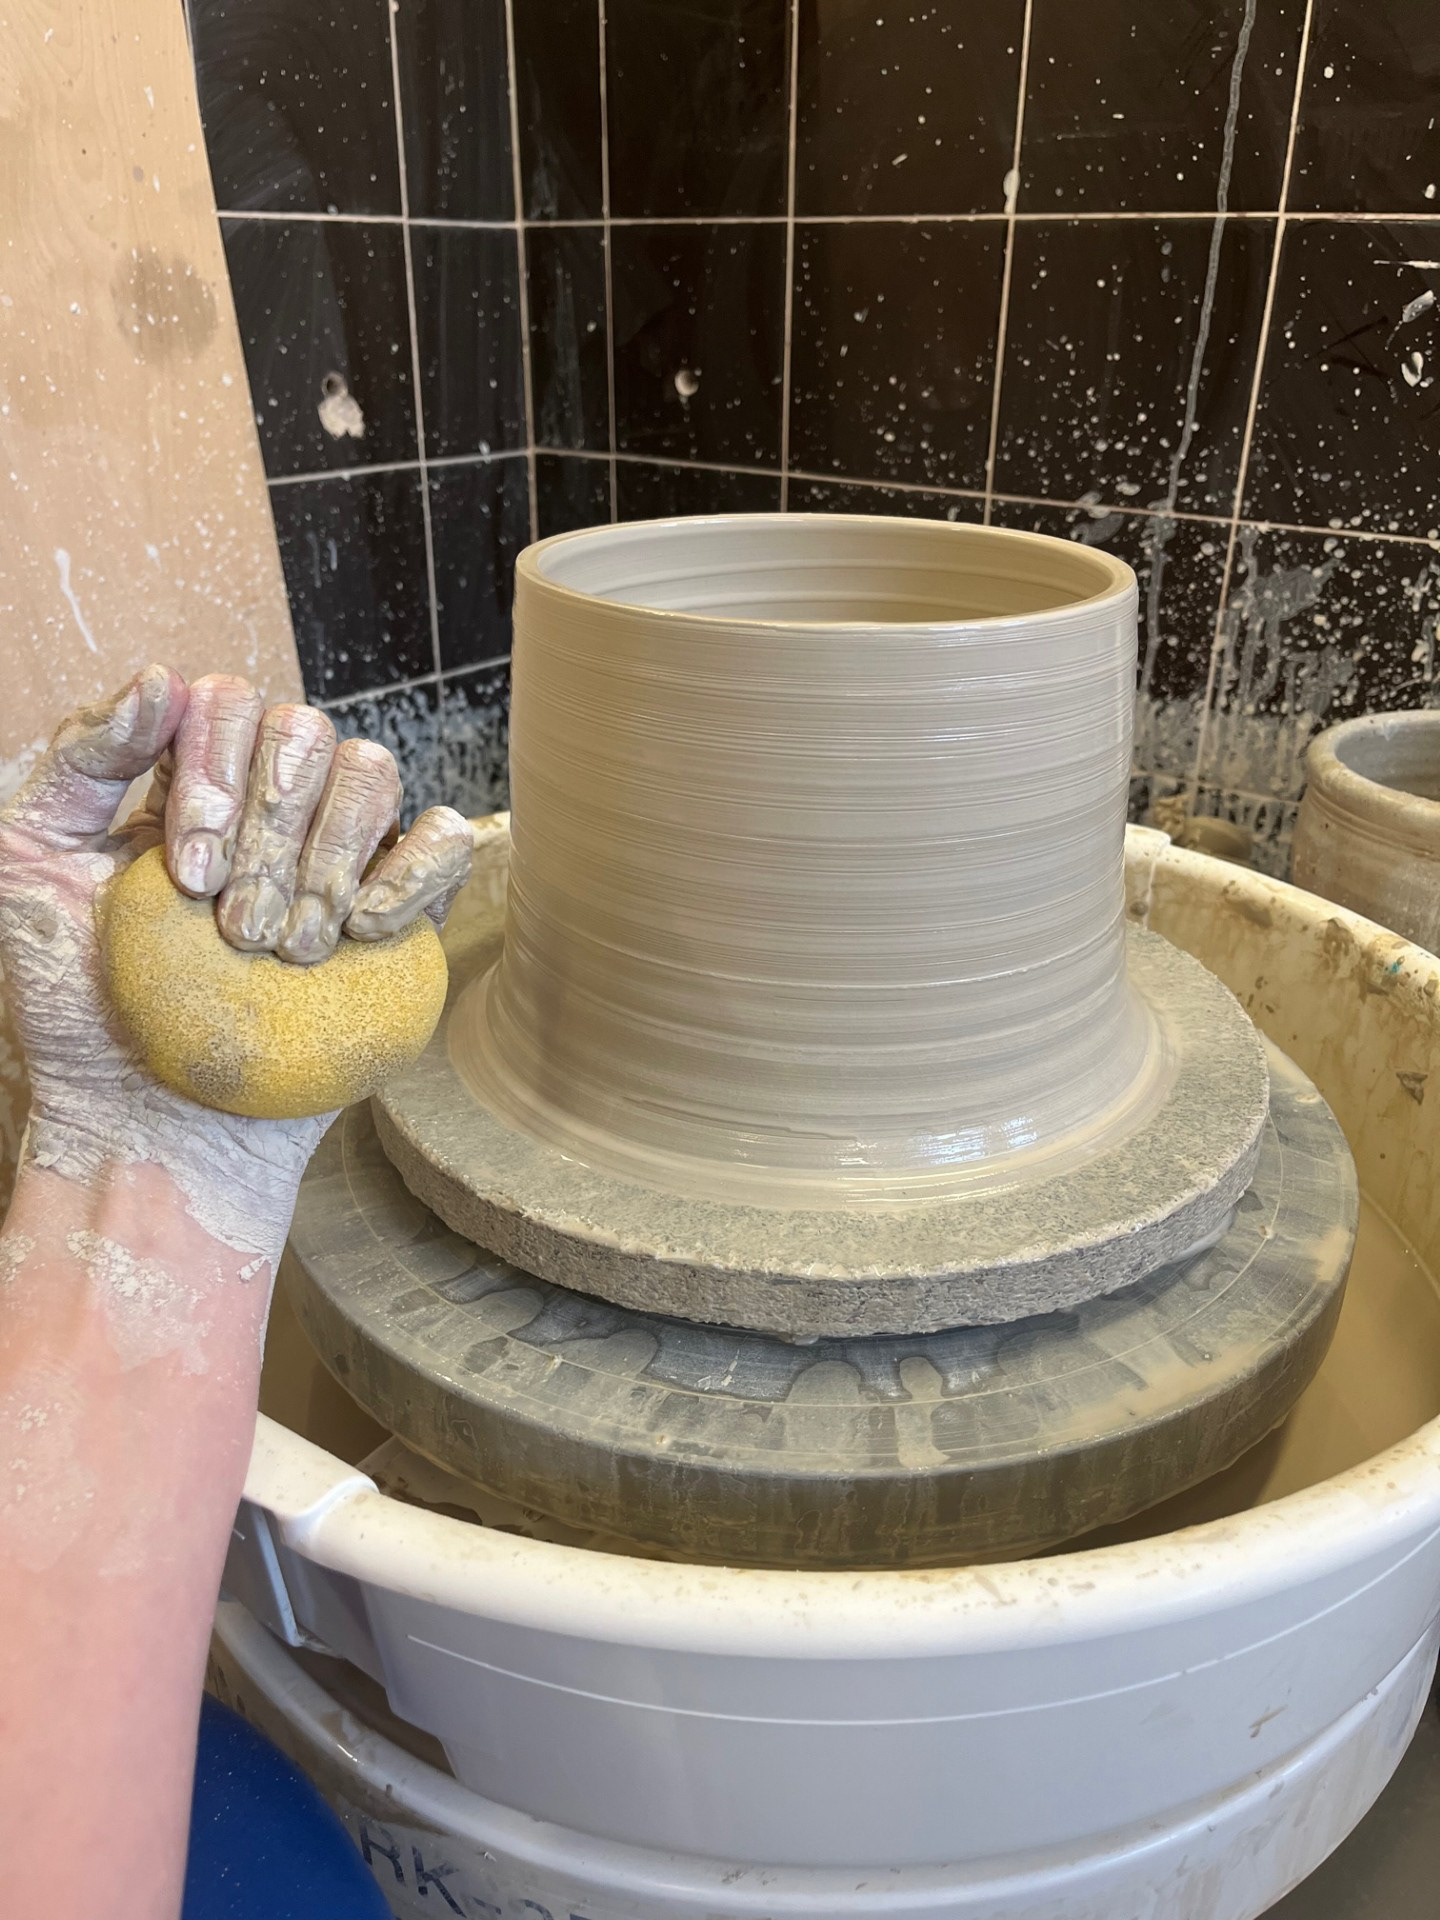
Tuesday Afternoon:

Lately, I’ve seen a big improvement in my ability to attach the batt securely—my setups are coming out much sturdier and more reliable. The only drawback right now is that I only have one batt, which limits me to making just one bowl per session and slows down my overall progression. To ensure the batt is flat before I start throwing, I’ve developed a simple but effective method using a pen as a pin tool to detect any raised areas—this has been working really well. As I’m now working with larger amounts of clay, I’ve been putting a stronger focus on taking my time during the centring process. I tend to rush and force it, which only adds frustration and creates unnecessary tension between myself and the clay. In terms of technique, I’ve been starting each throw by building the form vertically. This approach seems to really help in creating more consistent wall thickness and allows me to apply the skills I refined while making cups directly to these larger forms.
TUTORIAL: 19/03/25
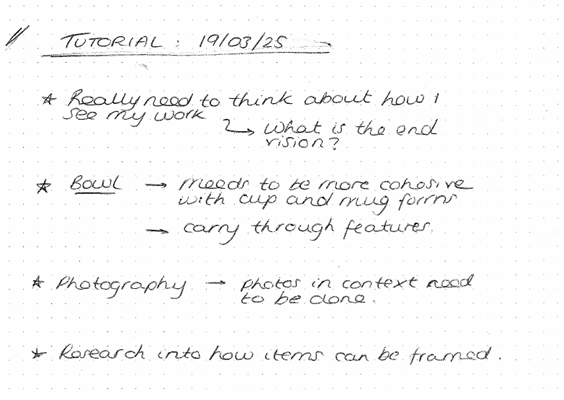
Ideation and Development: Response to tutorial
What is my vision?
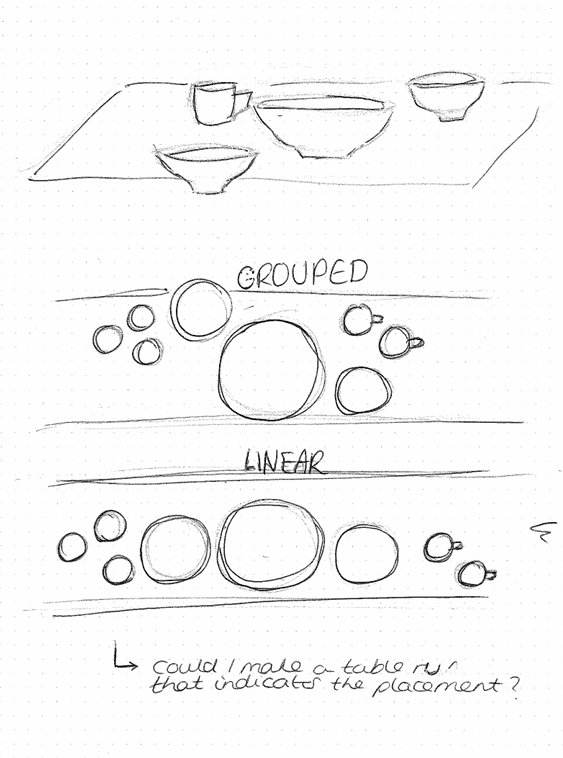
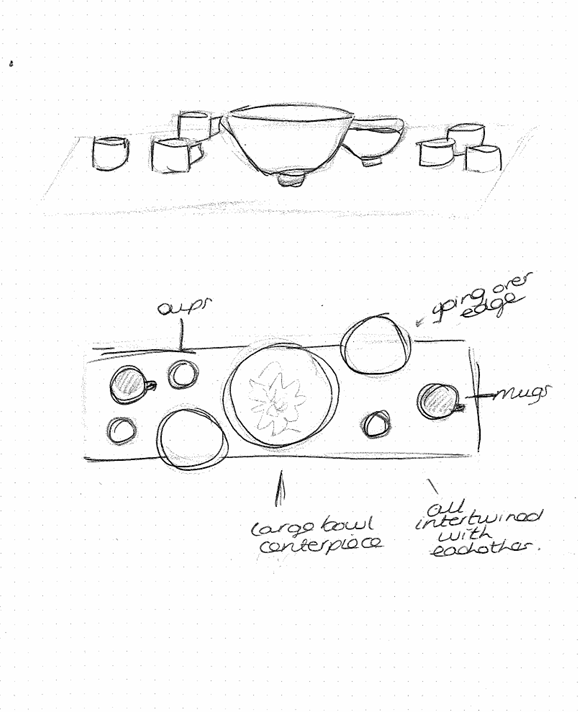
The idea of vessels as tools for connection and communication ties back to my initial making session this term, where I discovered my love for creating multifunctional work that could be used in social settings. I envisioned presenting this body of work on a table, possibly along a table runner, to encourage interaction and engagement. However, one challenge with this setup is that it primarily benefits bowls, which are best viewed from above. The importance also lies within the cups, where the glaze and refined profile are key aspects of their design, and these features may not be as appreciated from a top-down perspective.
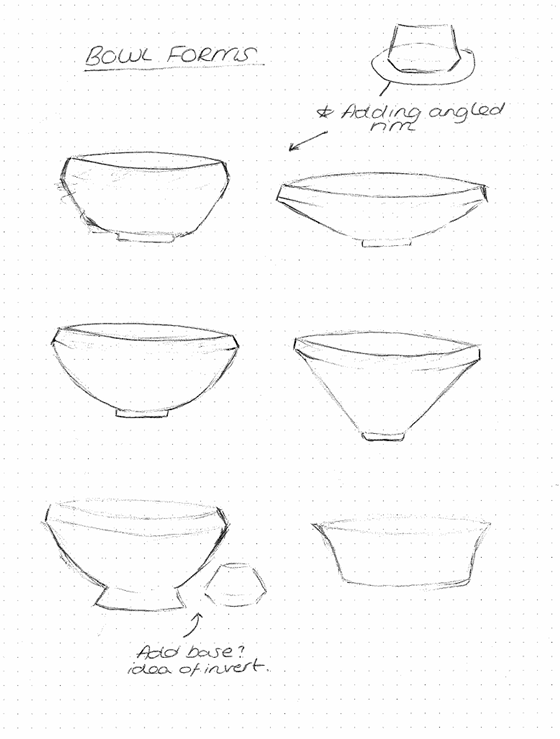
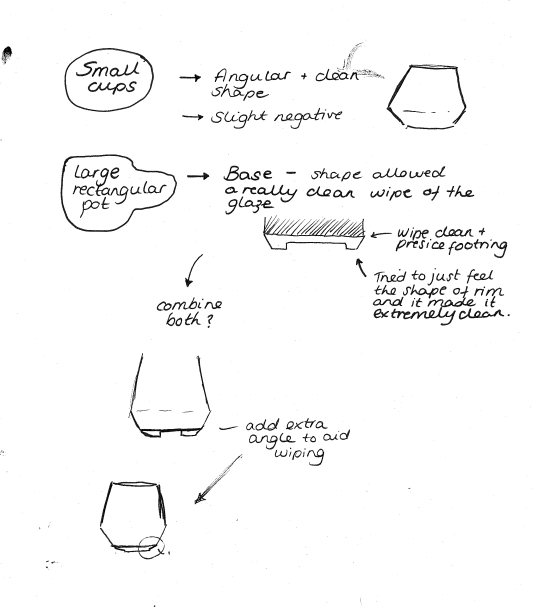
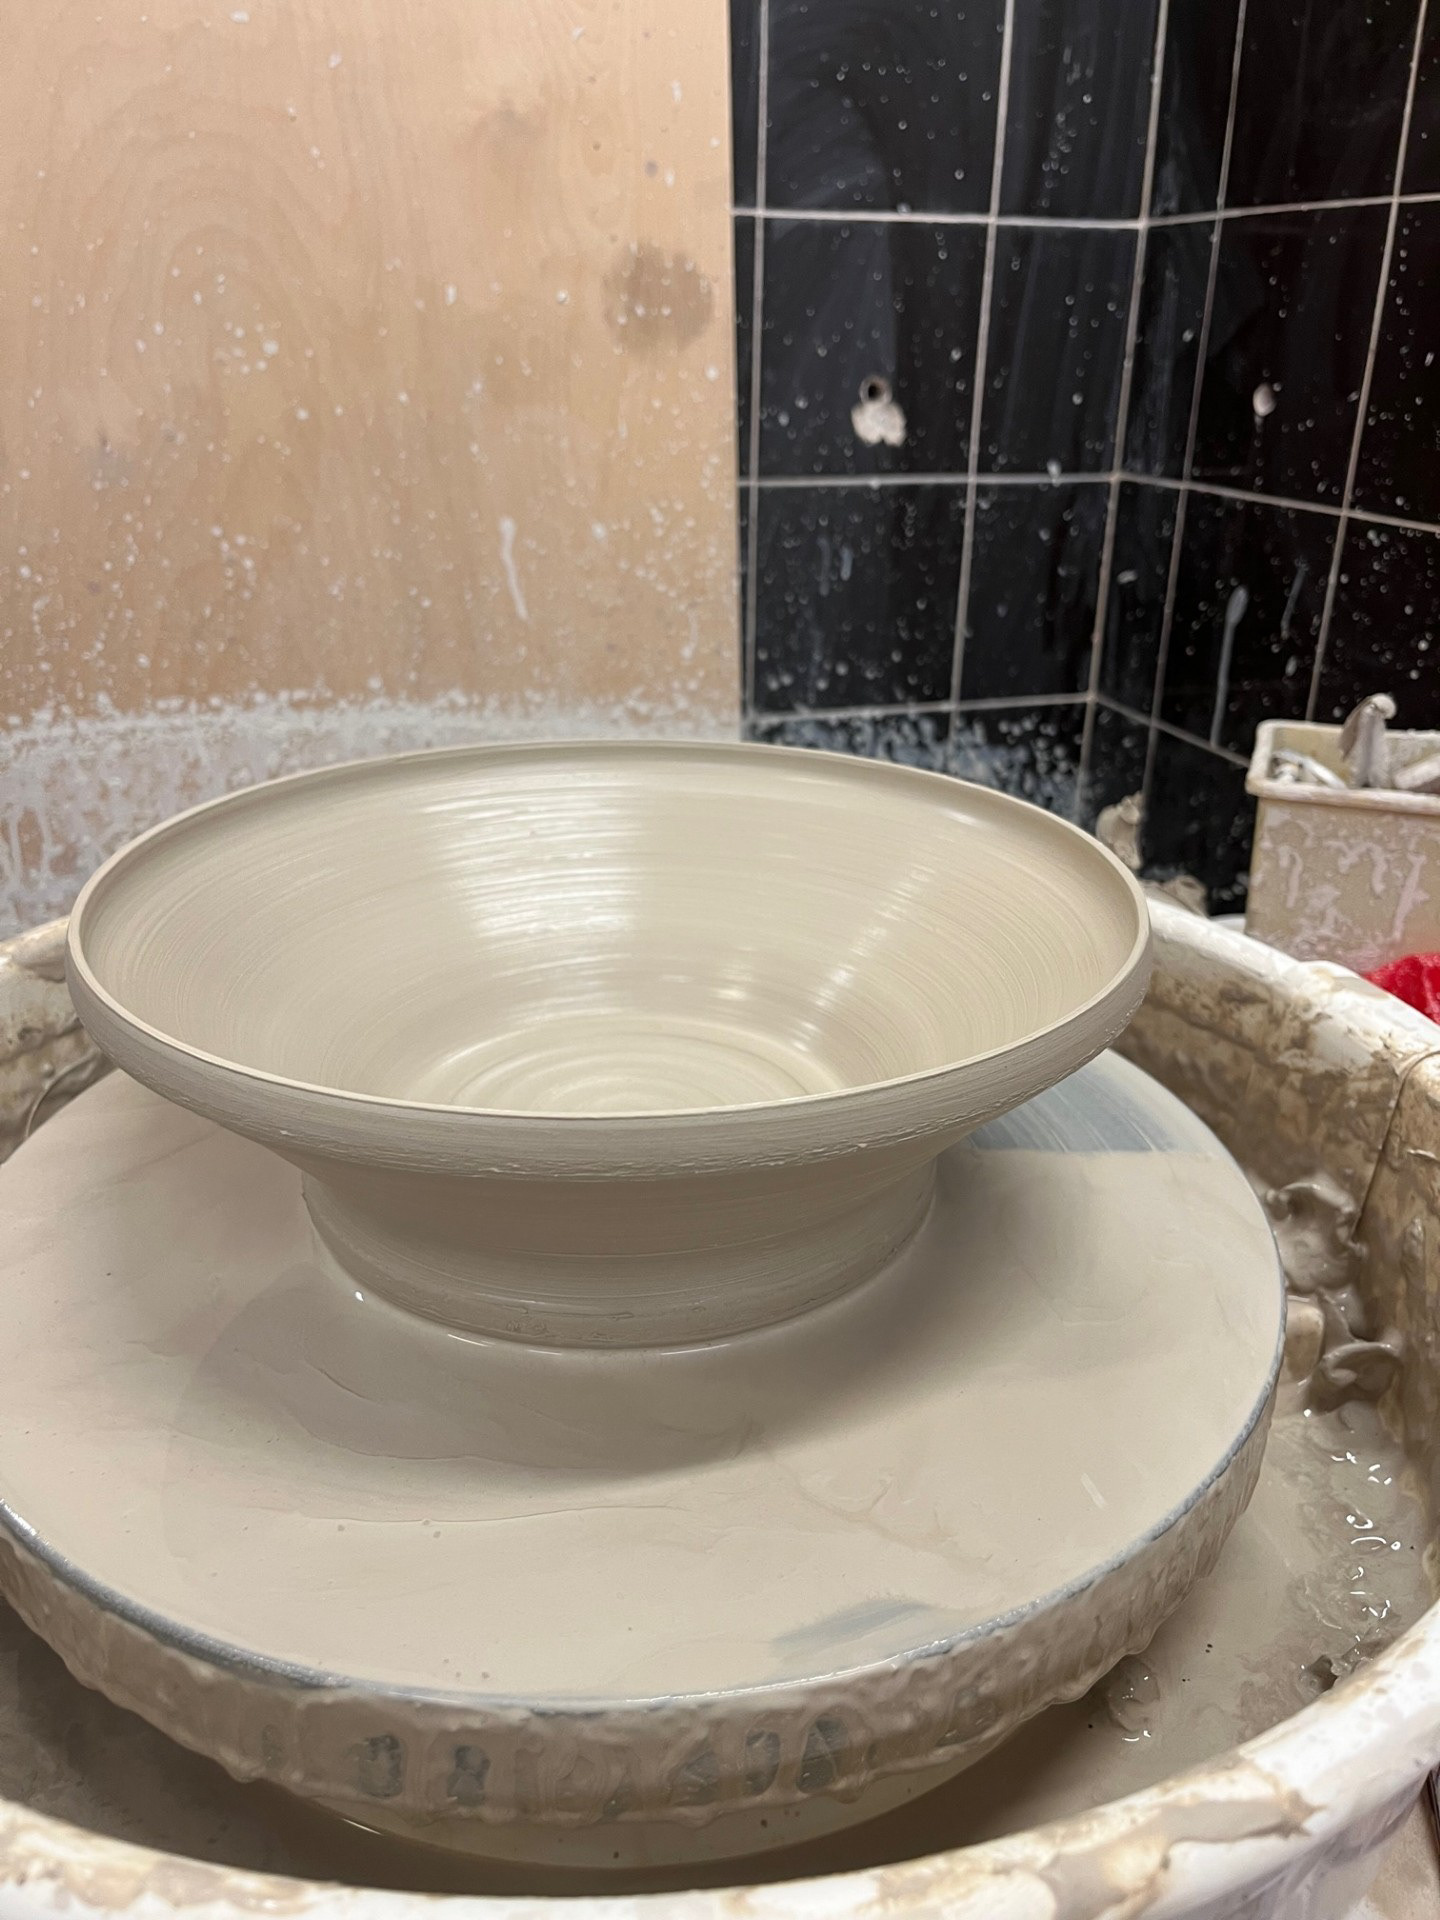
Another thing that was touched on within the tutorial was that the forms of the bowls that I am currently making aren't very cohesive with the profile of the cups. the cups are very angular and uniform whereas the bowls were very rounded and soft in form. To make the forms more cohesive, I had the idea to add an angled rim to try and emulate the angled base of the cups; somewhat inverting the profile to the cups.
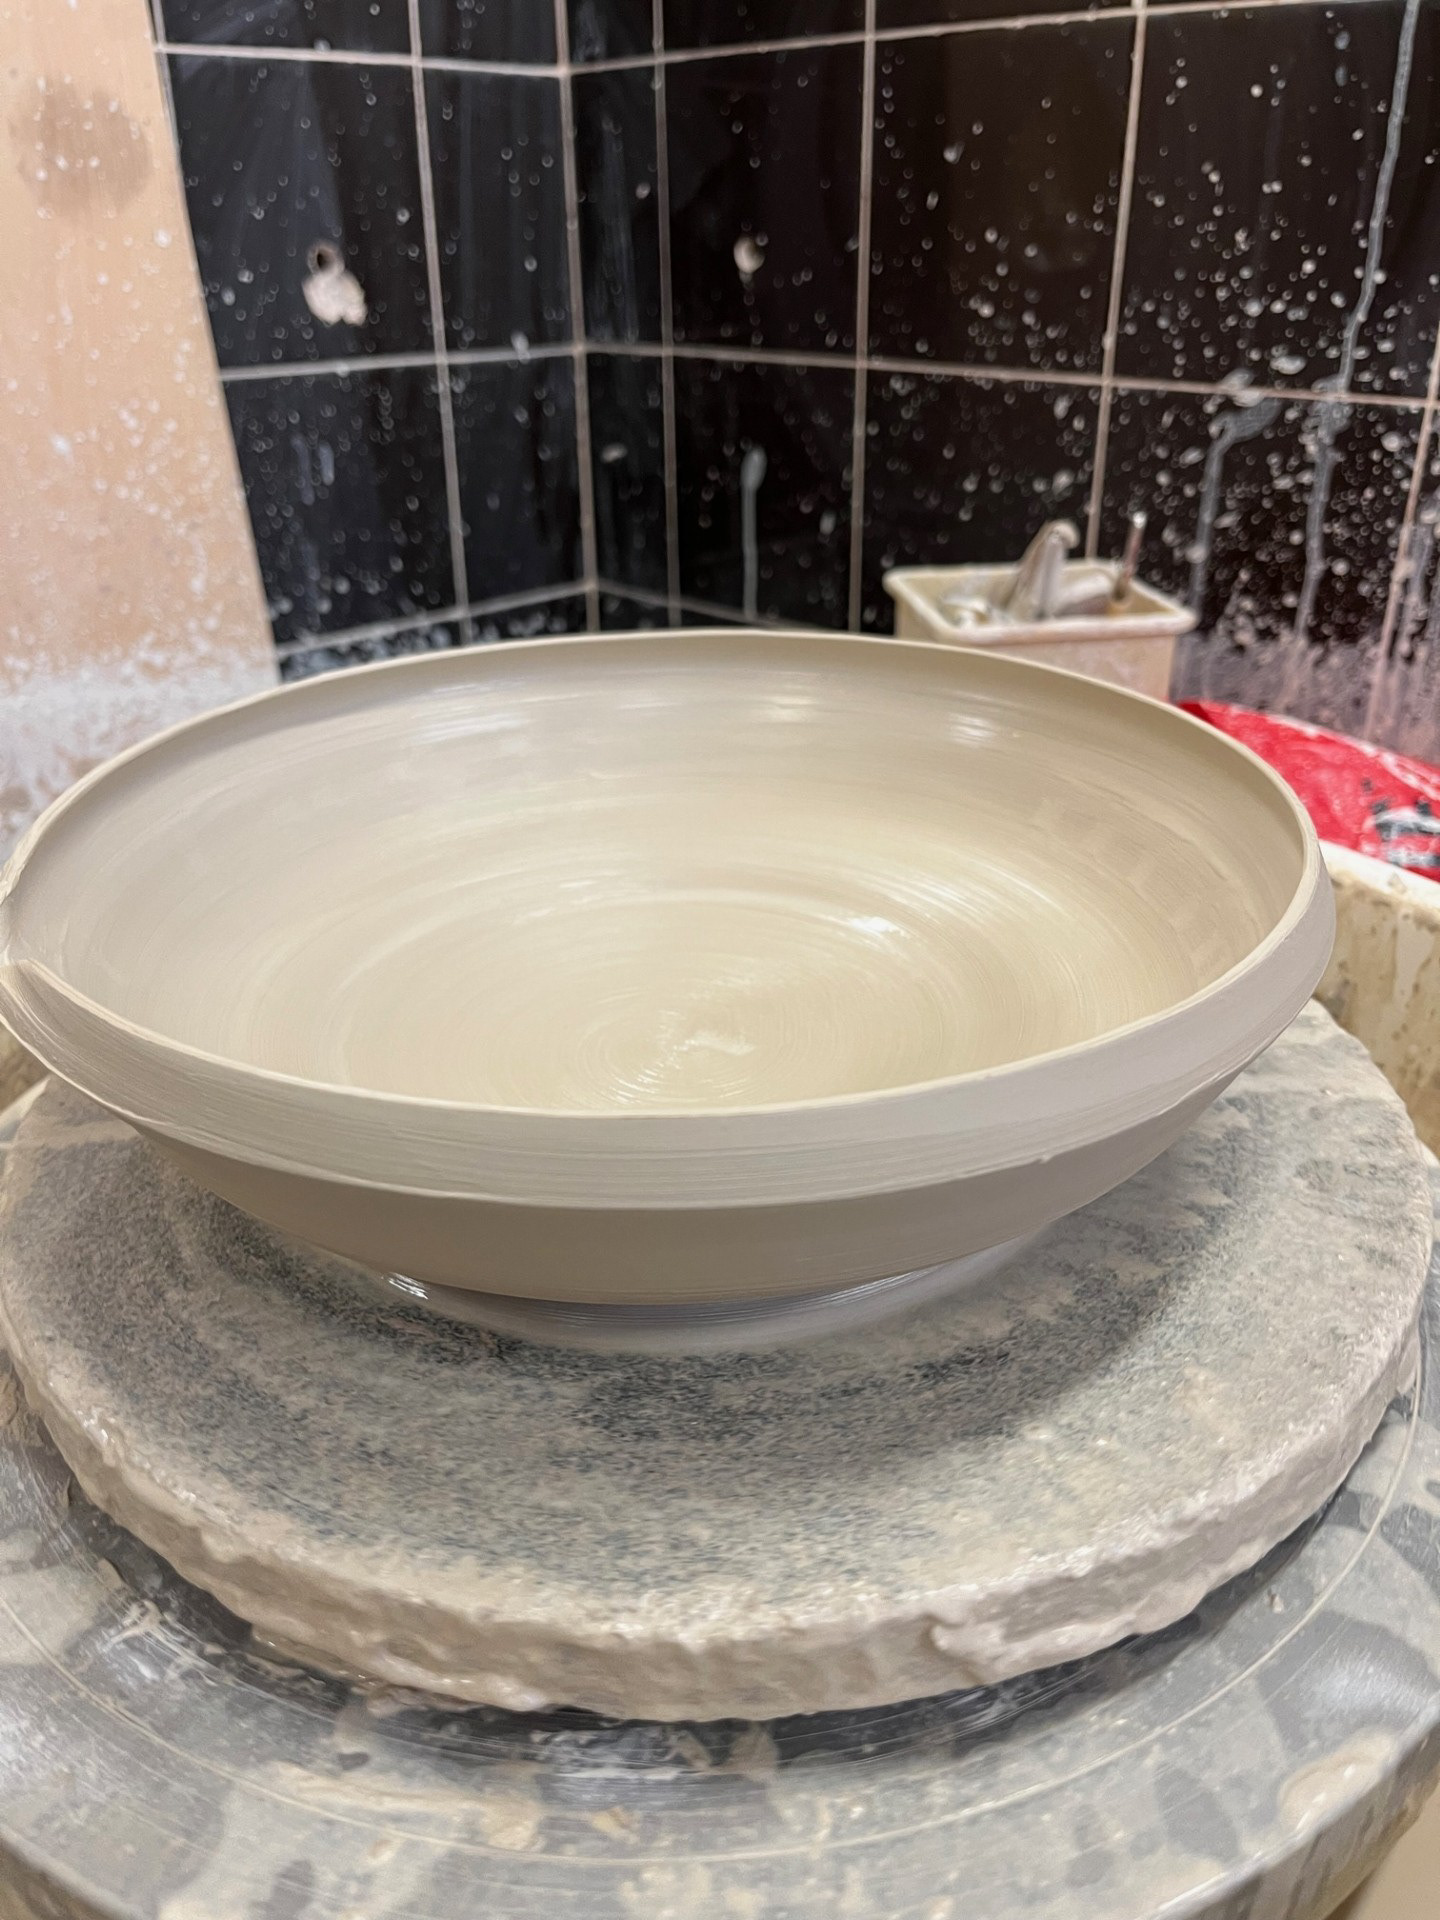
Currently I am leaning towards the two top right forms because I like how open they are. For the bowl, I want them to look as open as possible because they are being made to be shared. in my eyes, the more open the bowl, the more it can fit in it as well as more people experience it.
After this tutorial, I wanted to go straight into the workshop to try and create vessels with an angled rim as I have never attempted anything like this before. I need to test to see whether I can execute both the complex rim and also the straight style of the bowl as I have never really done that before (usually create bellied pots with a flared rim). I also wanted to get in the workshop because there is limited time left before submission/ easter so time is of the essence with this avenue. See below for images:
Reflection of process:
This round of testing was prompted by feedback that I had received mentioning how I the bowl forms that I have been working with weren't very cohesive with the cups. Upon reflection I very much agree as this allowed me to see that the cup forms were extremely angular whereas the bowls were very rounded. I think that I did find this process a little tricky as I was going into this using completely new styles of skills and I felt like I was learning and trying to pick up a lot as I went along. Looking back, I actually really like the rimmed feature as it acts as a somewhat invert to the angular bottom of the cups. Although the process will take some more refinement, I would definitely be interested in trying to refine this design and its process further.
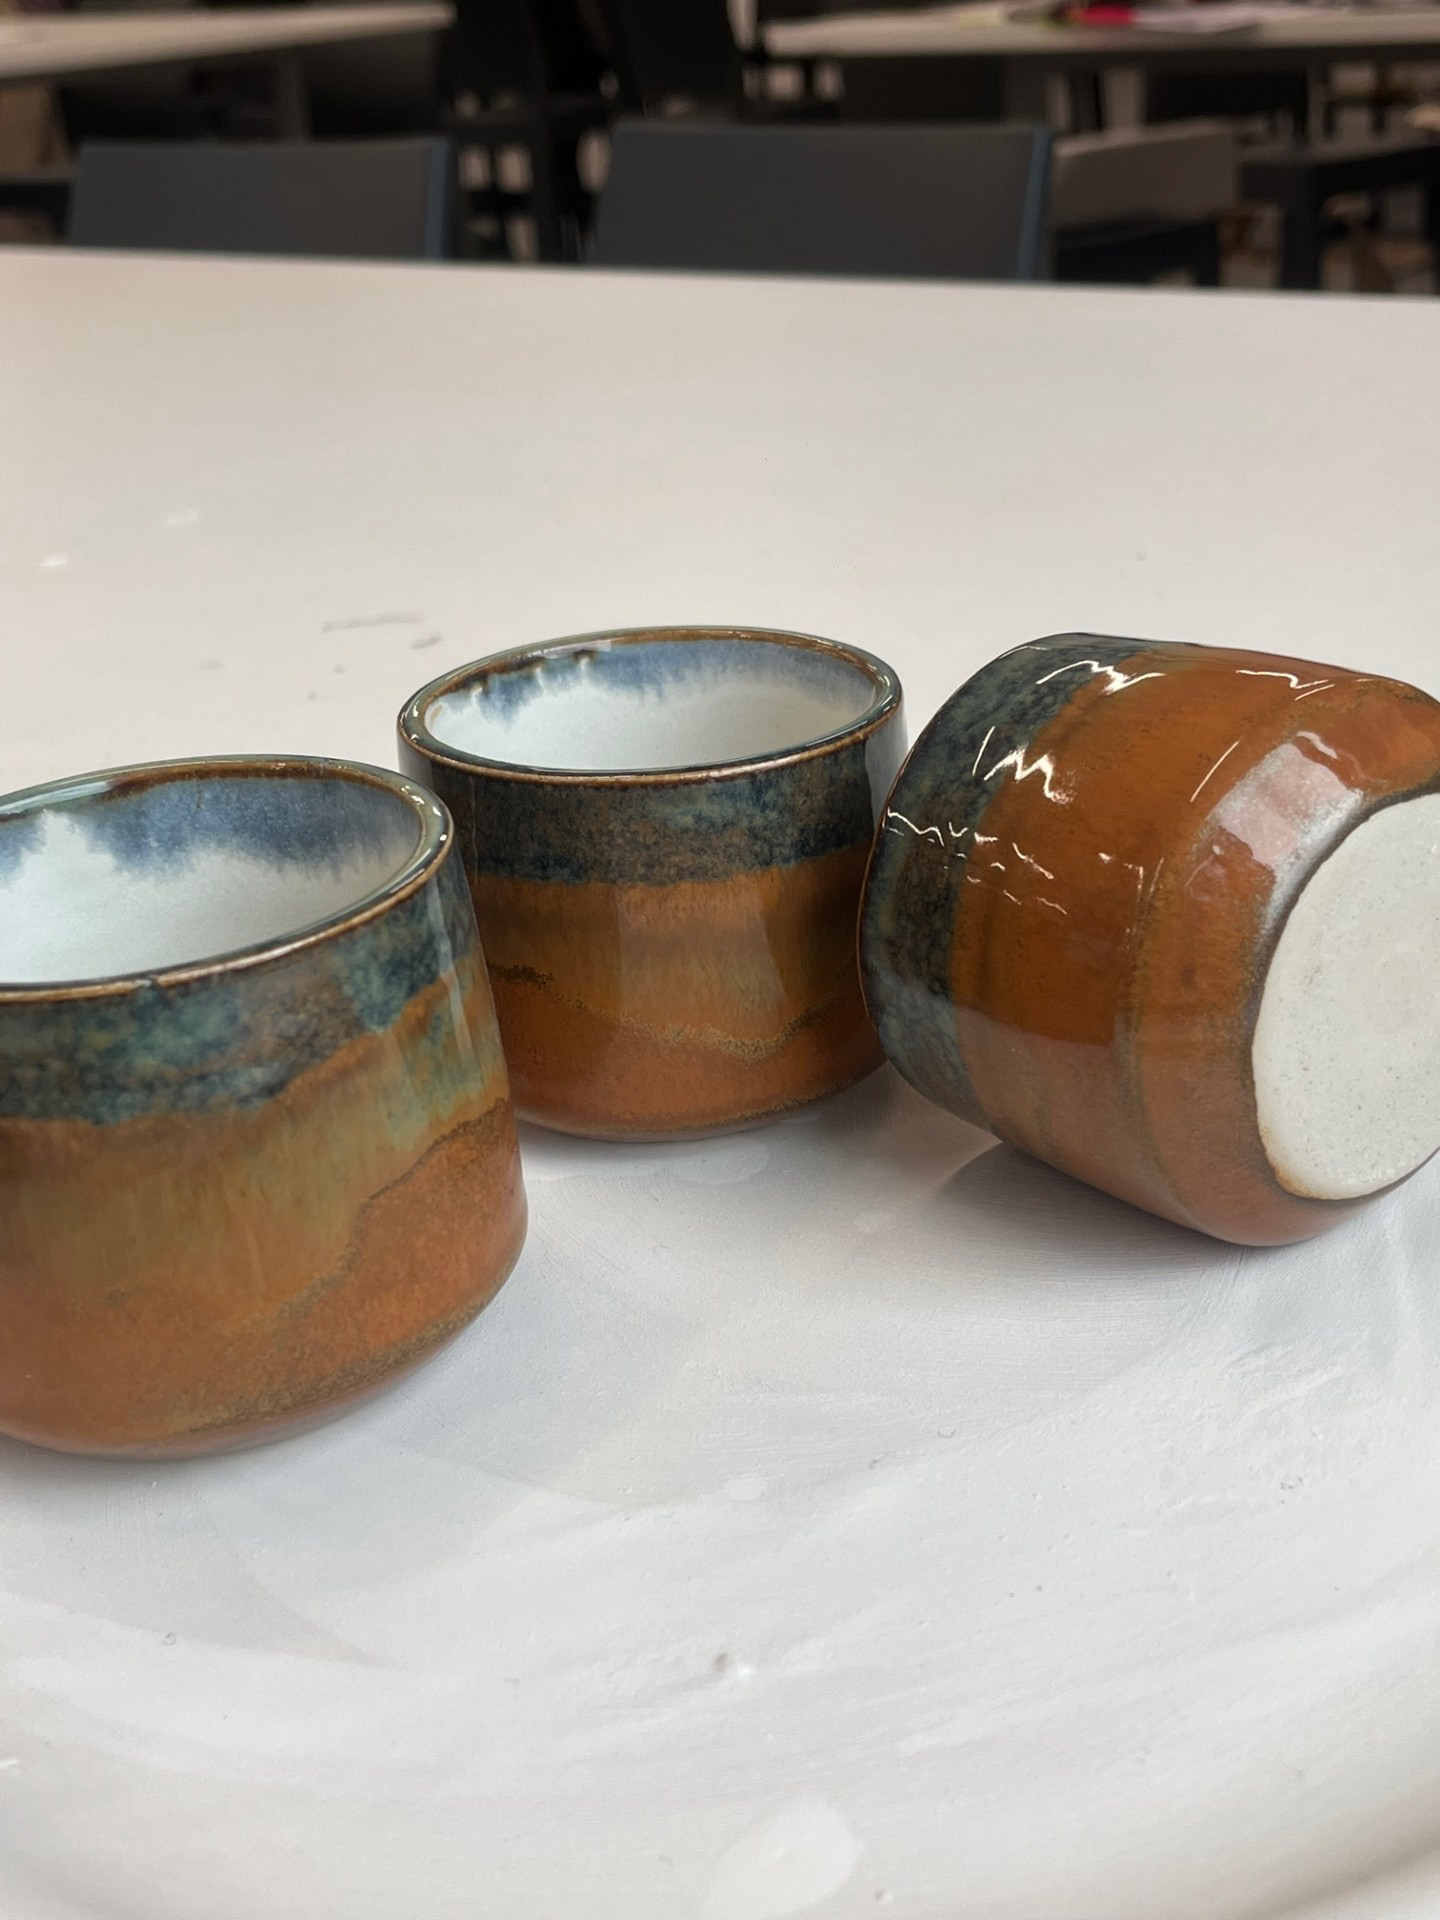
Glaze Testing: New Glaze
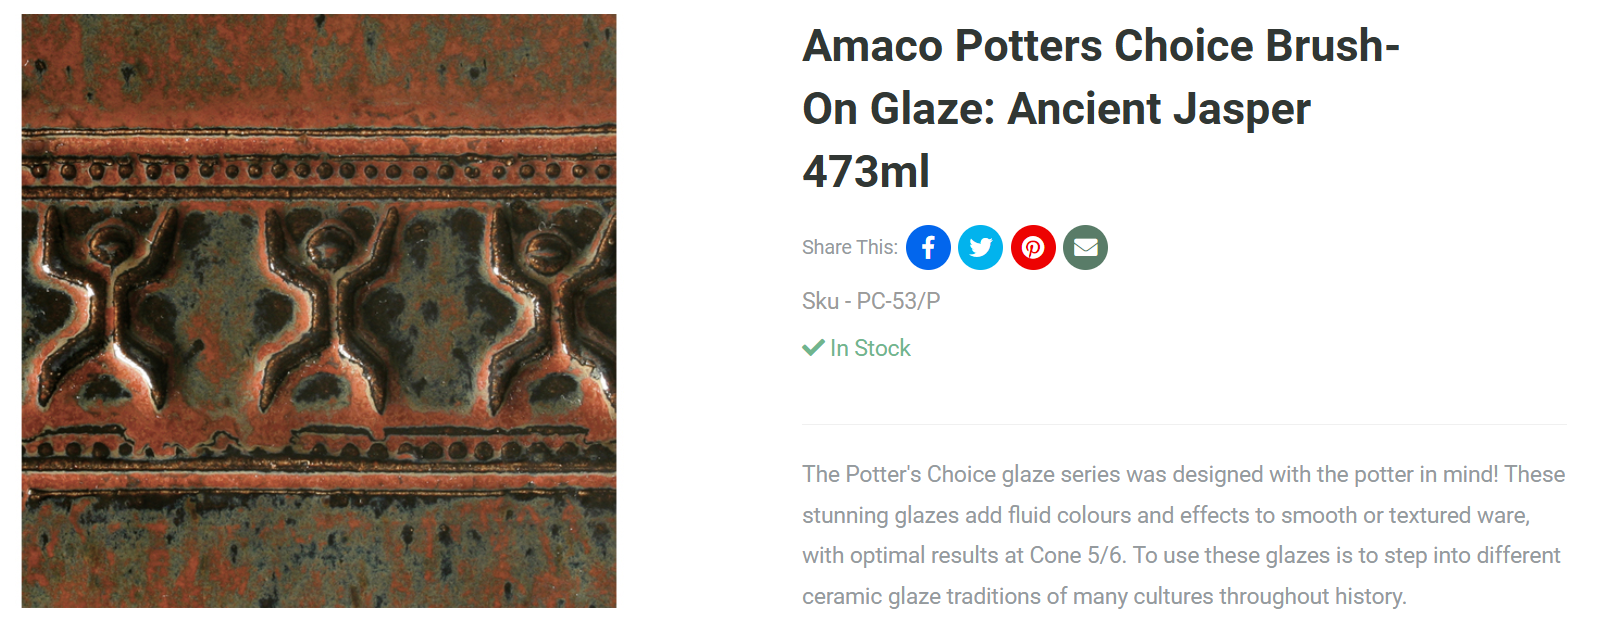
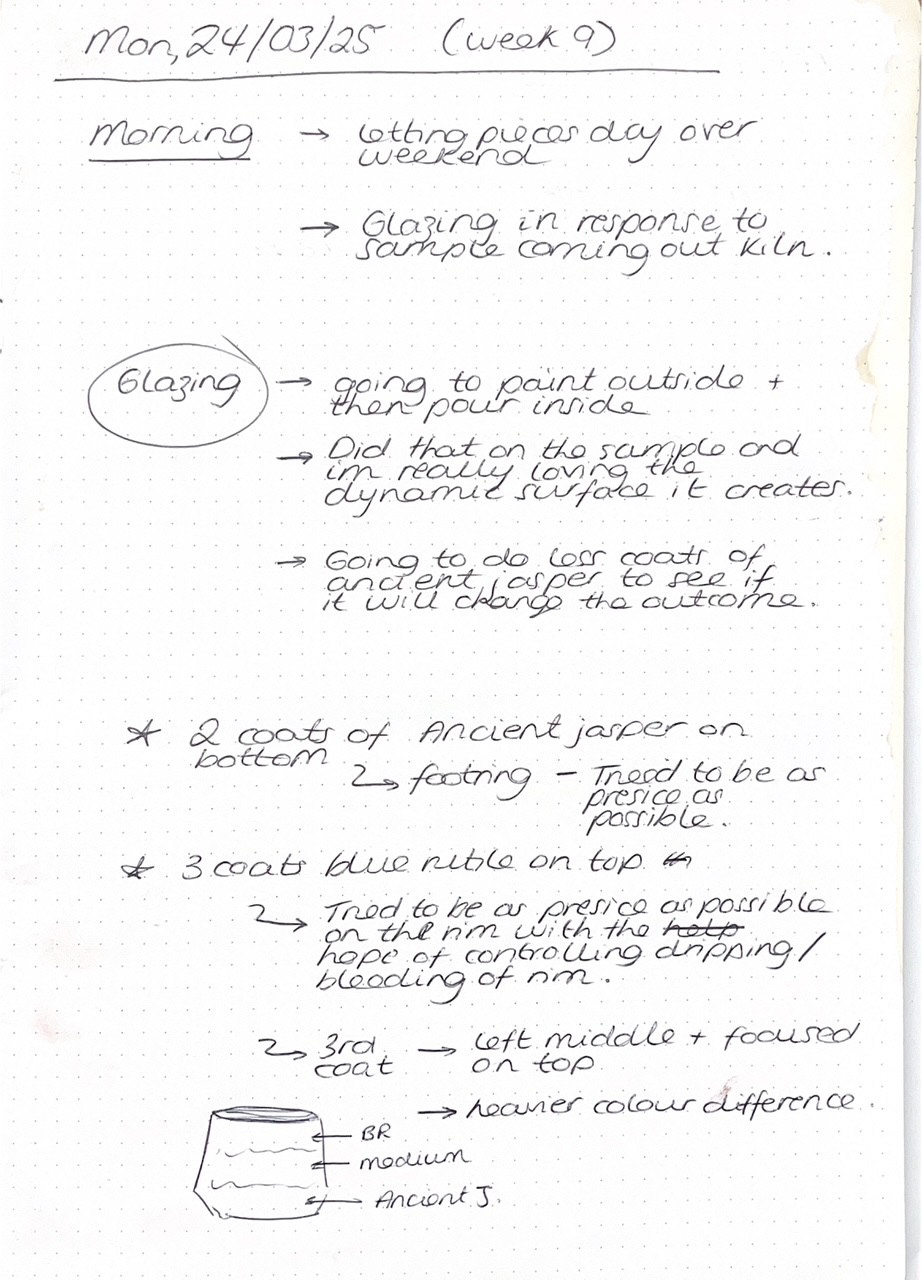
I decided to order a new glaze because I wasn’t completely satisfied with the colour combination I had been using. The amber glaze, in particular, felt too deep and overpowering for the aesthetic I’m aiming for—I tend to prefer glazes that are more stylised and subtle. One of the key issues with the previous combination was that the surface lacked dynamism; it didn’t have the visual complexity or organic quality that I’m drawn to in ceramics. I’ve always loved glazes that create natural, unpredictable patterns—like those seen in Japanese tea bowls or the outcomes of raku firings—because of their expressive, almost elemental surfaces. With that in mind, I began searching for a glaze that felt richer and more earthy in tone. That’s when I came across Amaco’s Ancient Jasper, a red-brown glaze with subtle metallic qualities. I chose it not only because of its depth and warmth, but also because I felt it would pair beautifully with the Blue Rutile brush-on glaze I’ve been using throughout the project. The metallic flecks in the Ancient Jasper glaze also reminded me of the textures found in tea bowls and raku pieces, which made it feel like a natural and exciting direction to take my surface exploration.
See below for images of old glaze and new glaze:

For the application, I will be working with the same pattern as I have previously which is half and half of each glaze. I loke this method as I feel like it creates a beautiful landscape across the whole pot where the glazes merge. I also have chosen to put white zirconium on the inside so that I can get a full vision of what the combination looks like. I did this part slightly rough so made the glaze drip over the edge as I poured it out; purely because this is only a sample.
See Below for outcome:

I think that this is a very successful outcome and I'm happy to be producing a sample that fully met my expectations, both visually and conceptually. The combination of Amaco’s Ancient Jasper and the Blue Rutile glaze created the natural, unpredictable surface dynamic I’ve always loved; Stemming from my admiration for the aesthetics of Japanese tea bowls and raku firings. The rich, earthy tones of the Ancient Jasper, enhanced by its subtle metallic flecks, added a depth and warmth to the piece that echoed the expressive qualities I was aiming for. This sample confirmed that the pairing of these two glazes is a strong direction for my work and has opened up new possibilities in my surface exploration. With the drip that I chose to leave, I am actually pleasantly surprised at the outcome since it was quite a last minute decision to leave on. I feel like this feature perfectly adds on to the idea and view of the surface, it gives you more to look at as you explore the surface. I thing that overall this was a very significant turning point as I have found out multiple new features that I will hopefully take forward into my next stage of development.
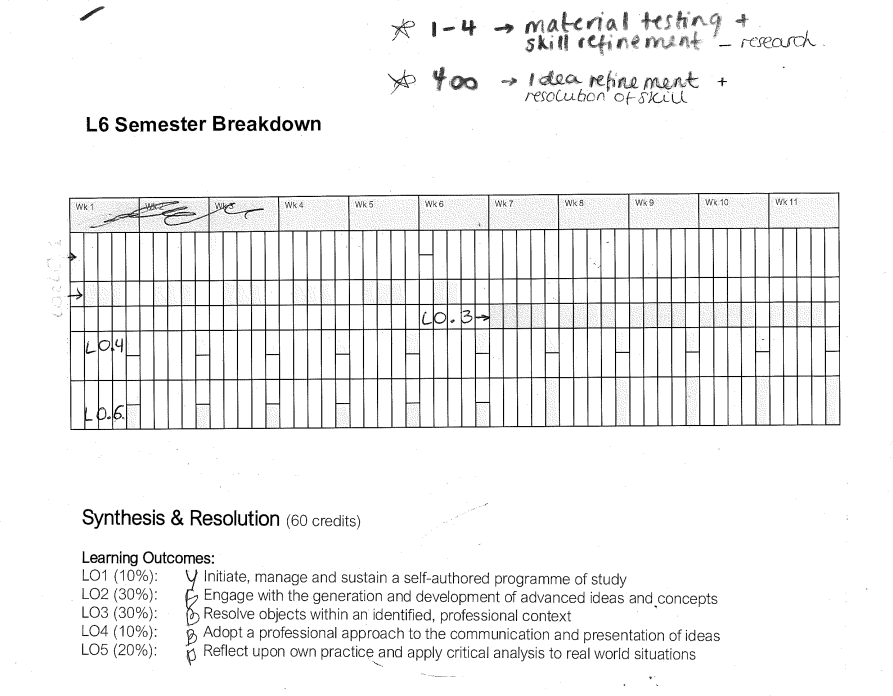
WEEK 9: Formative Review 2 - Resolved objects
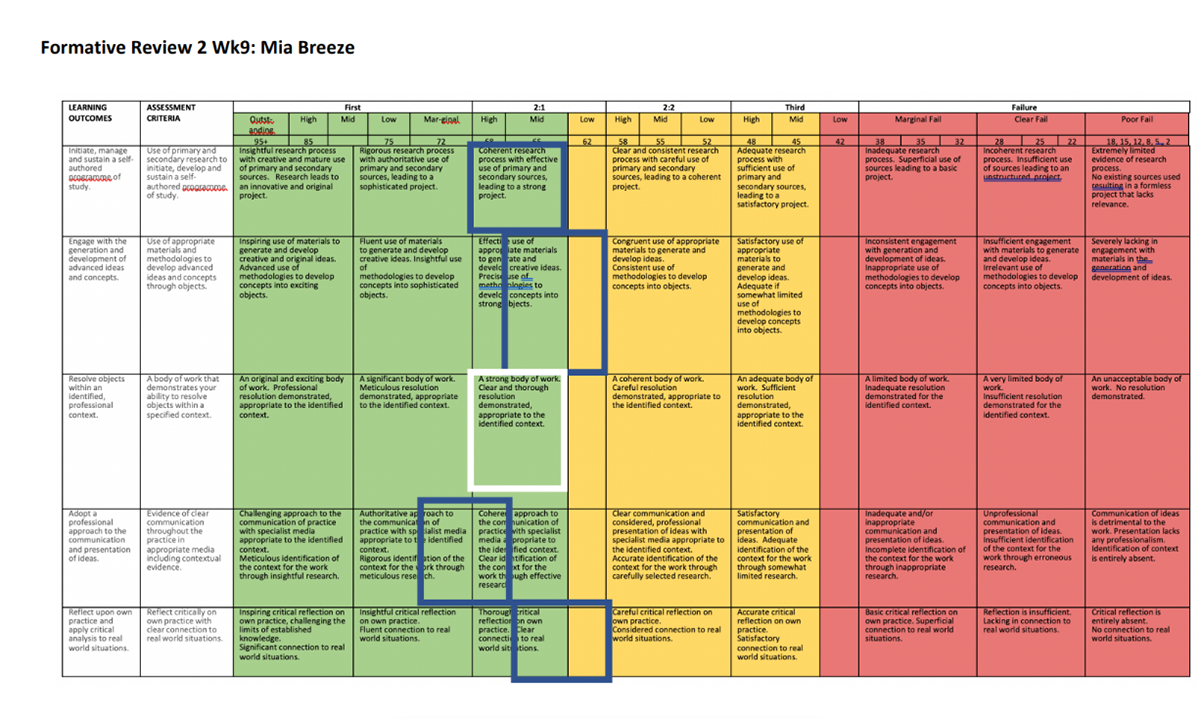

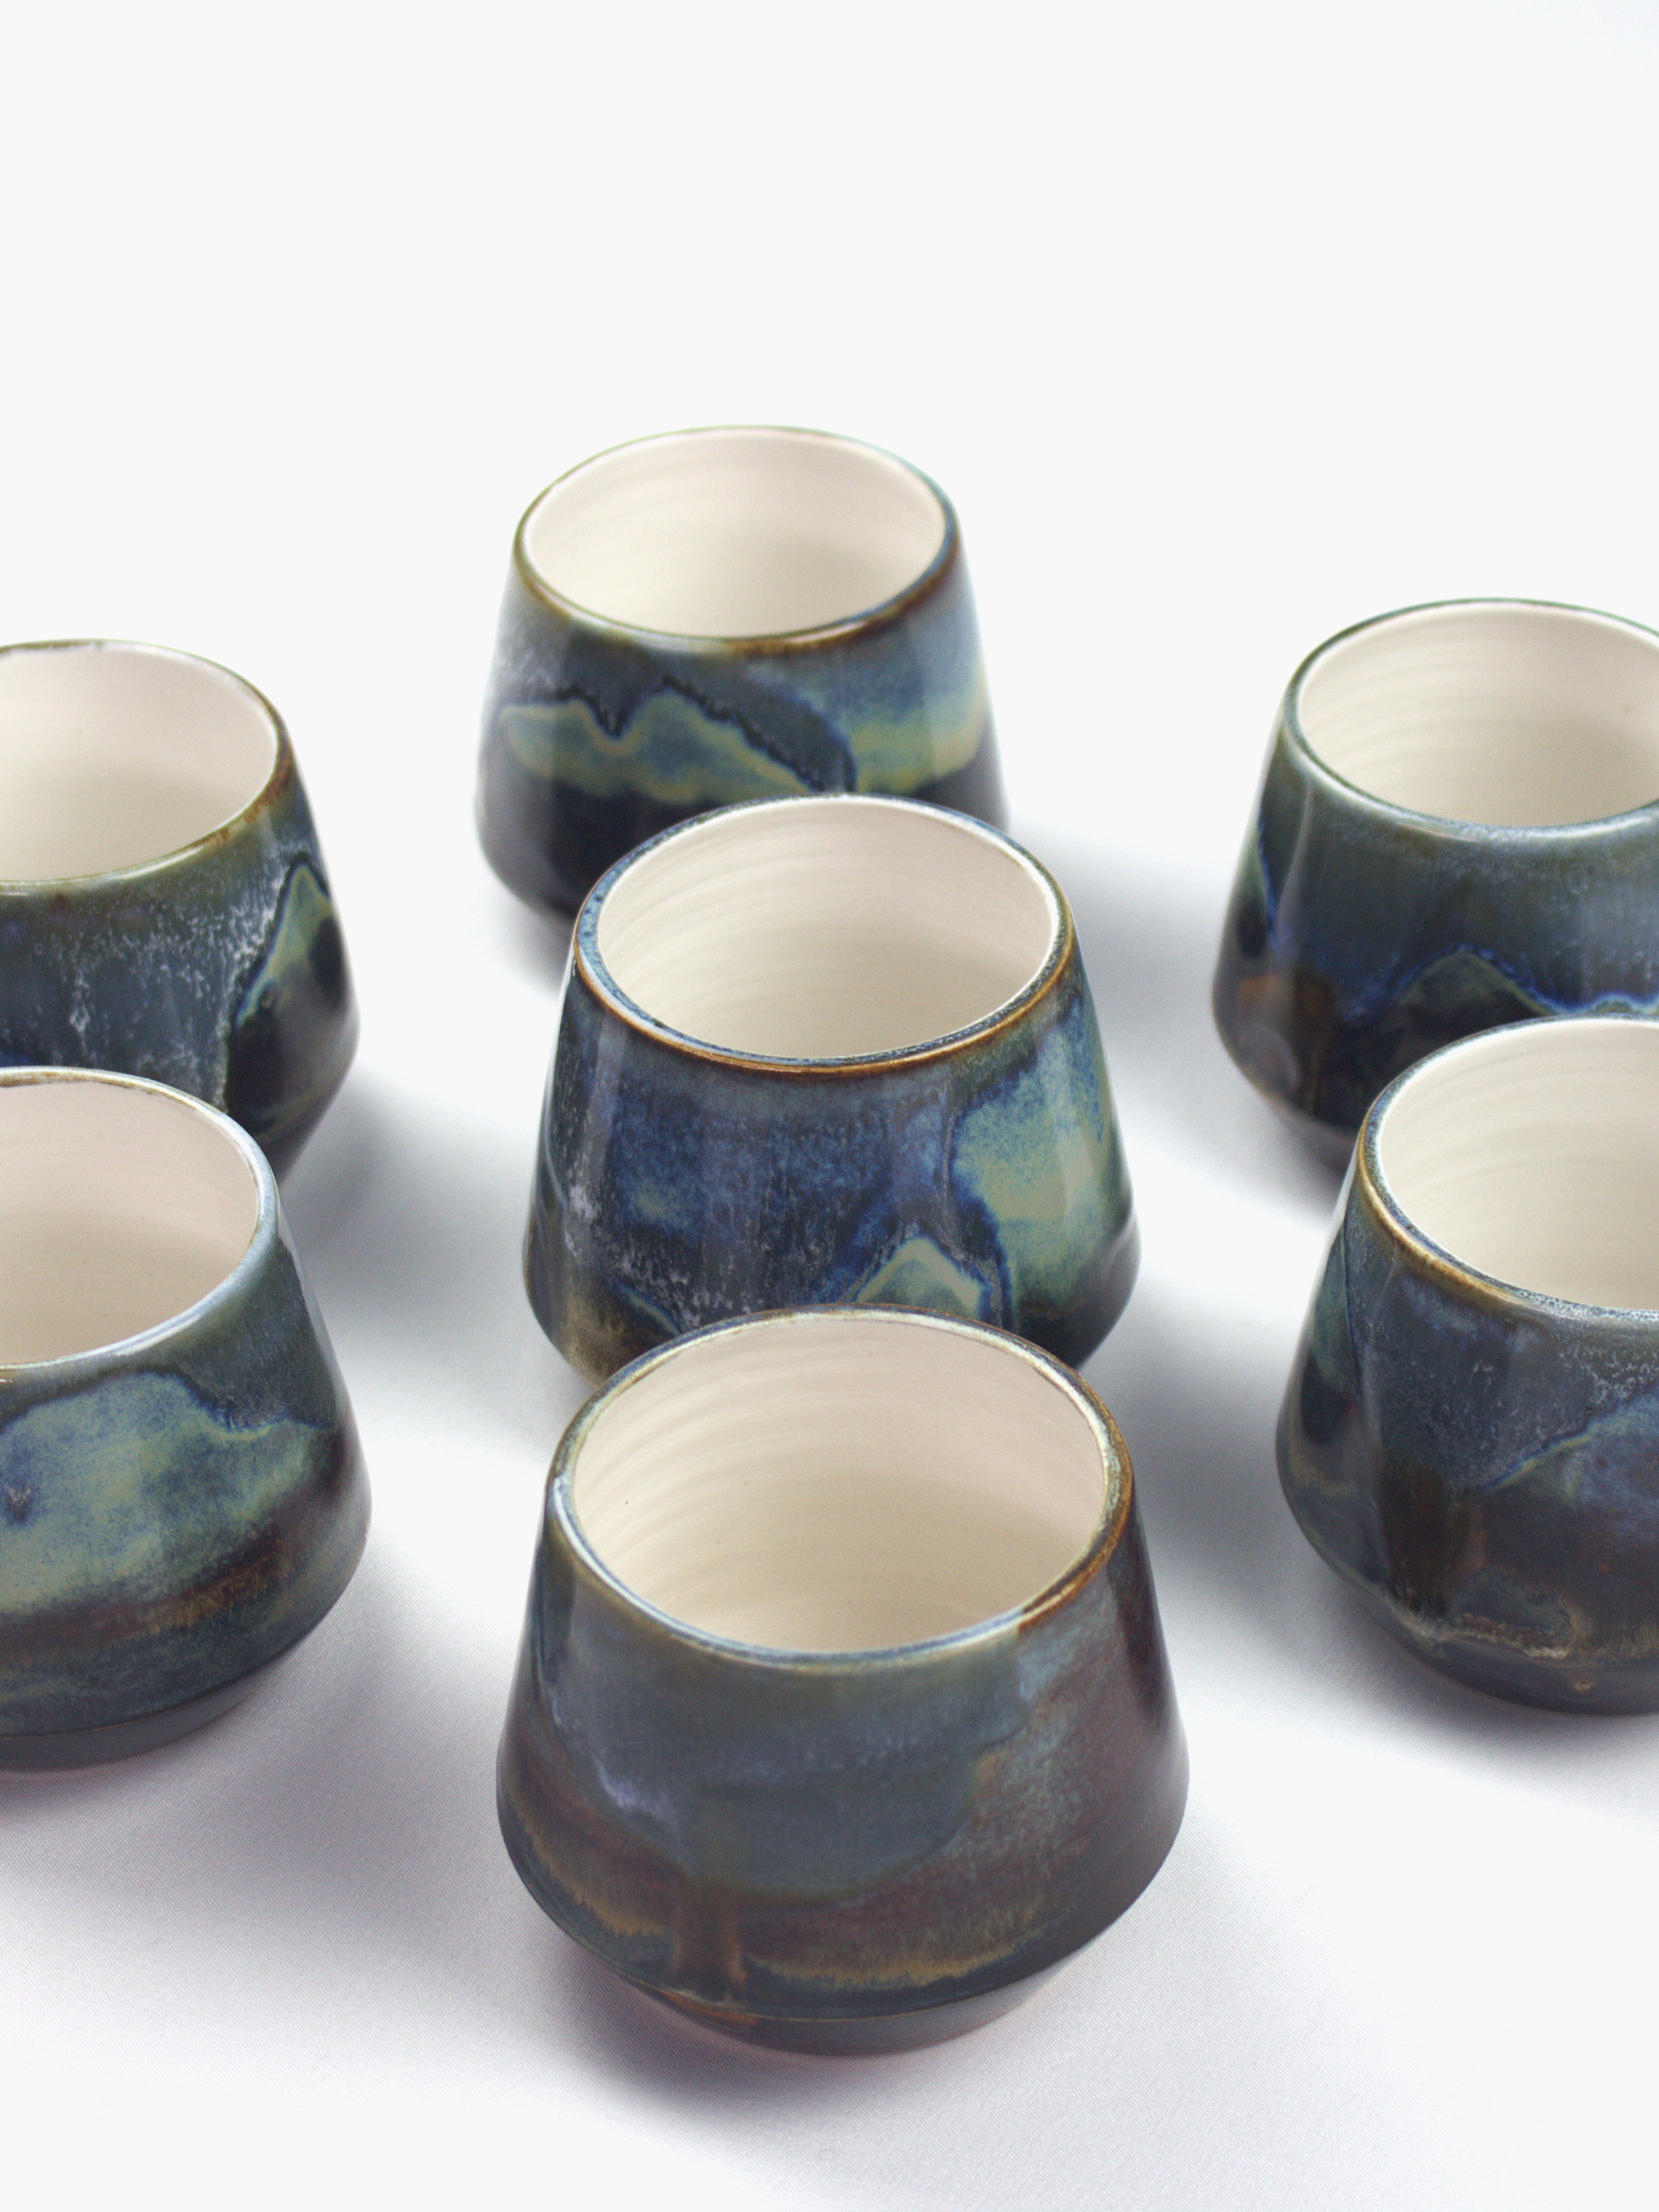
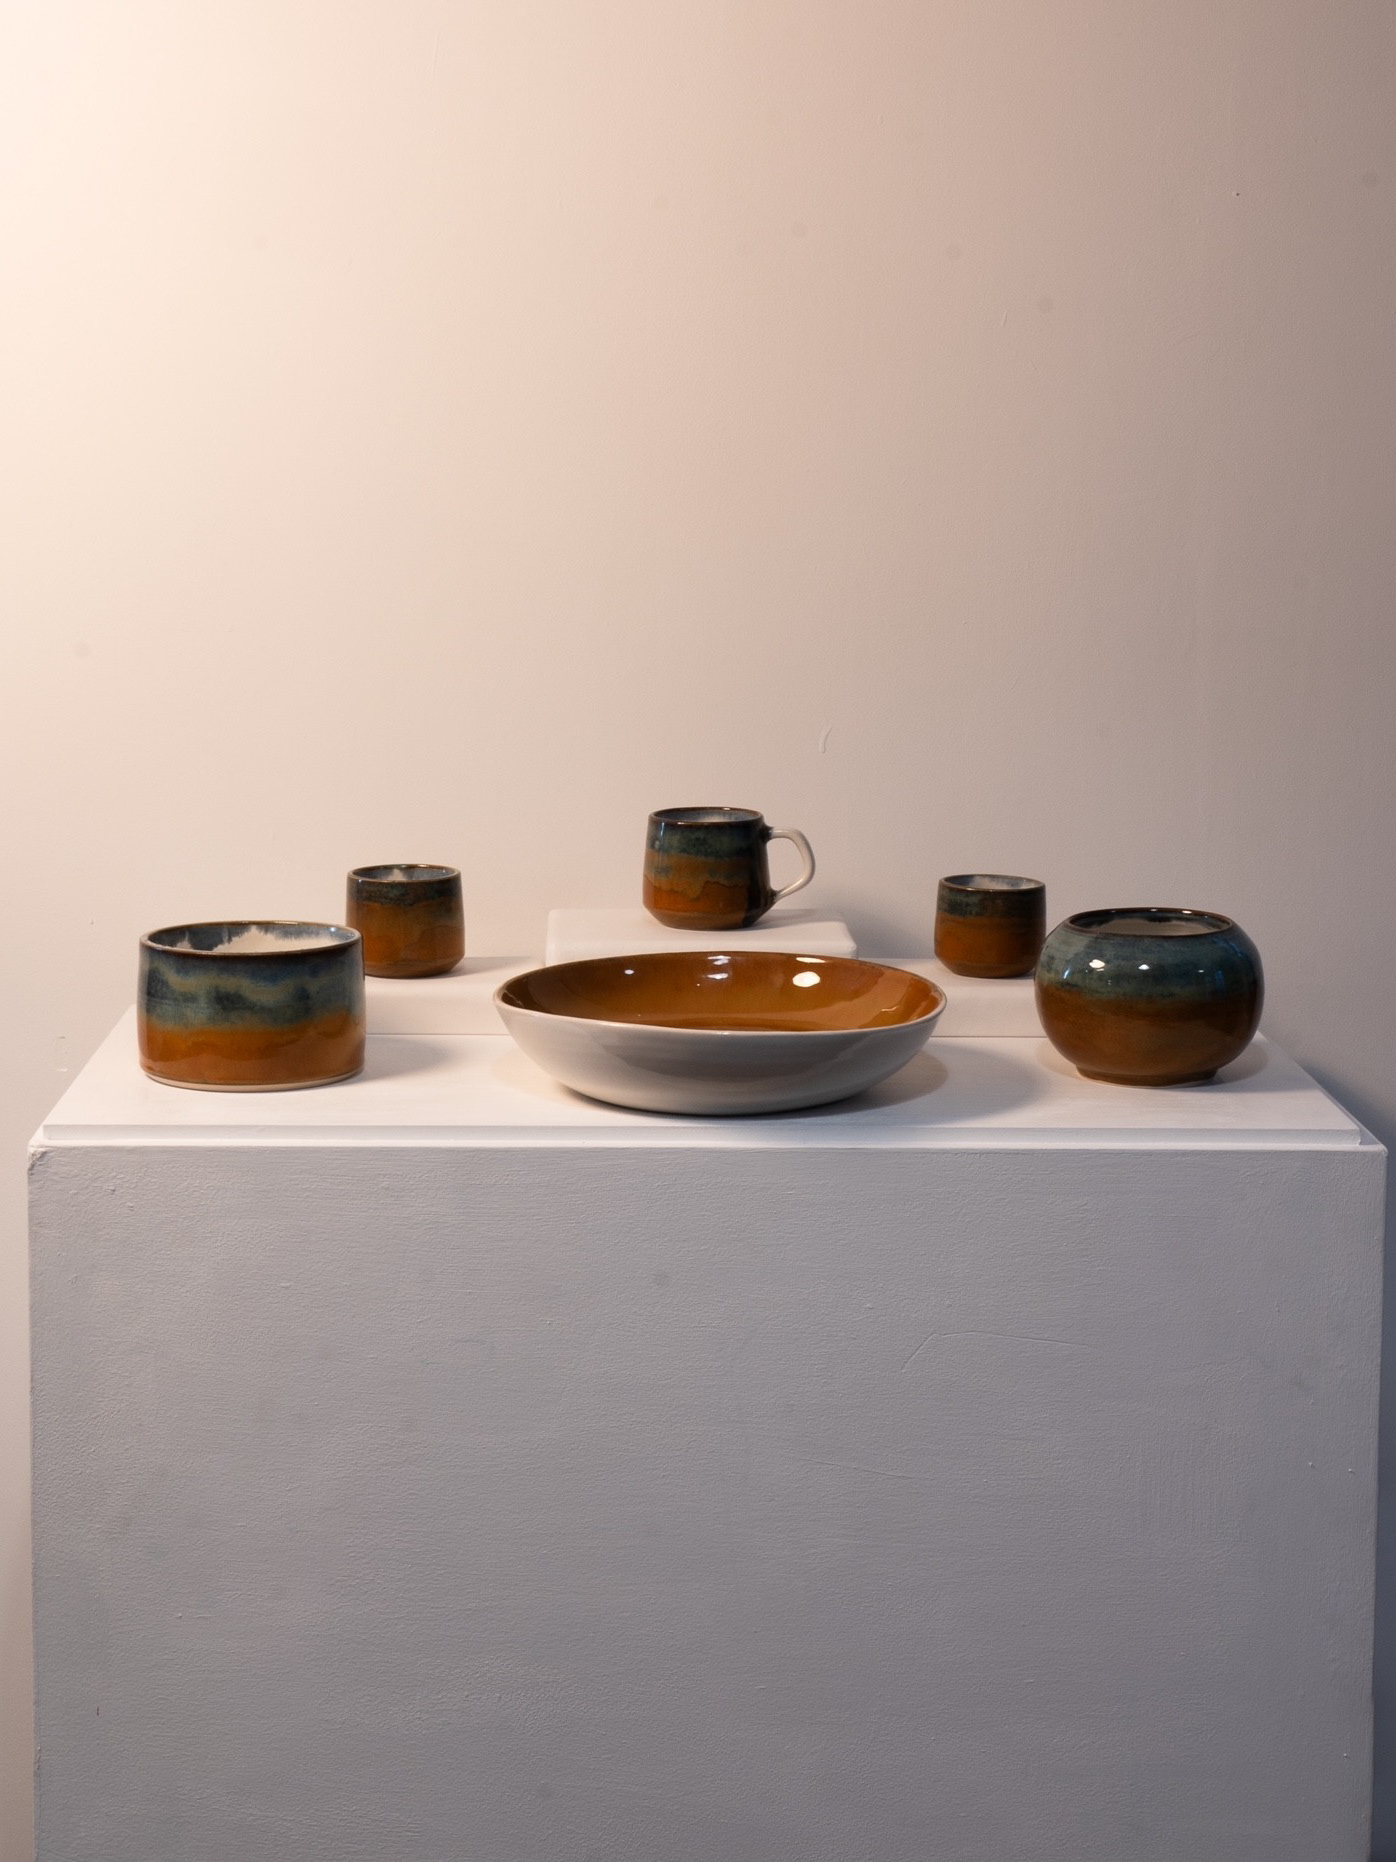
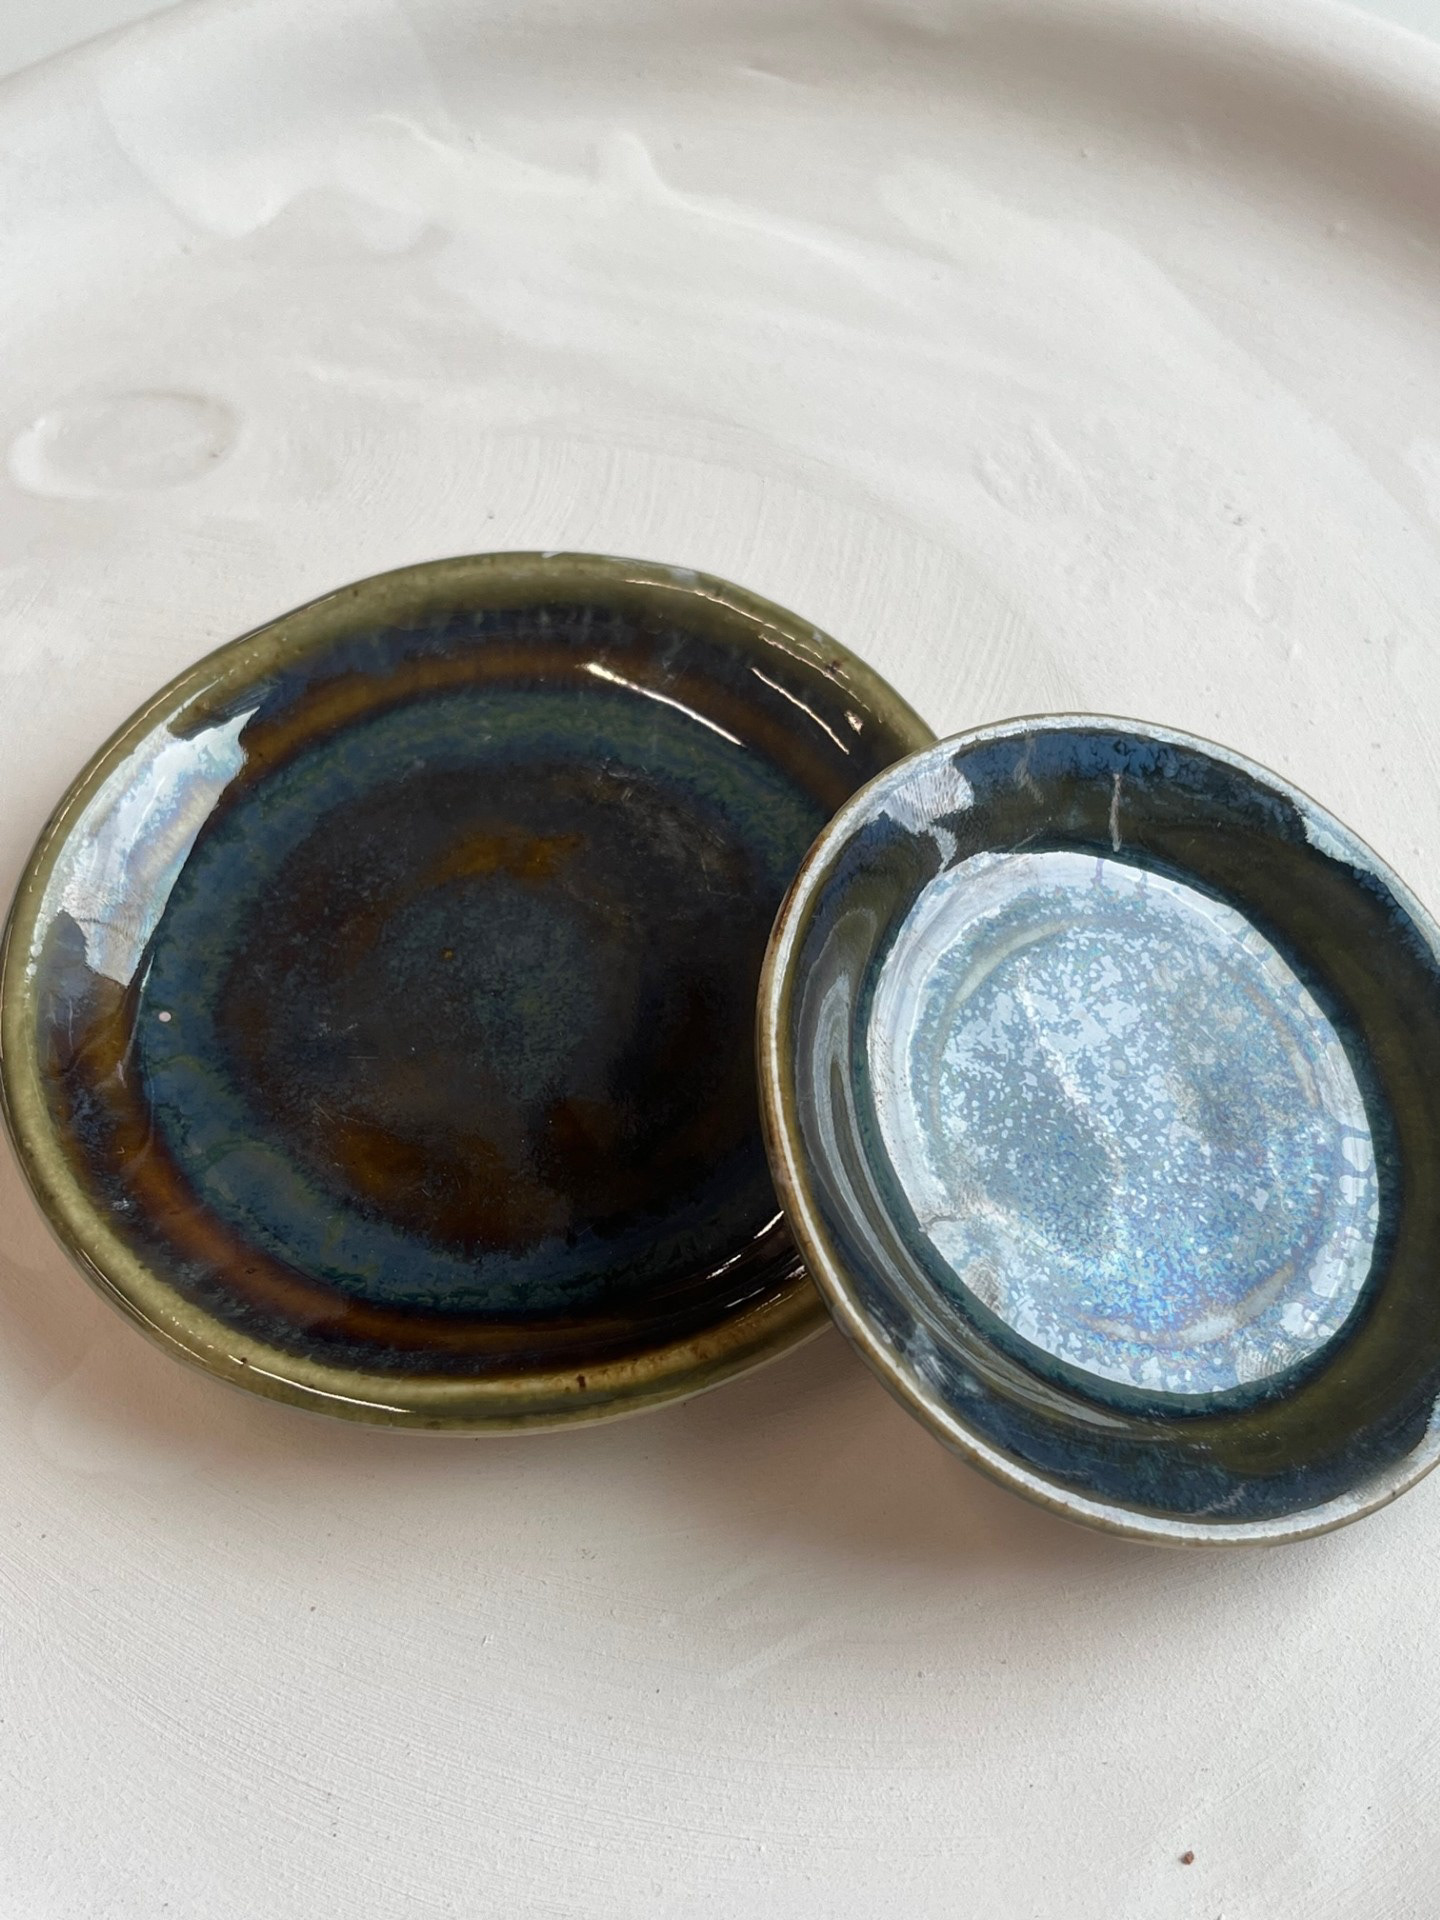
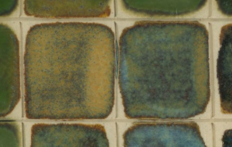
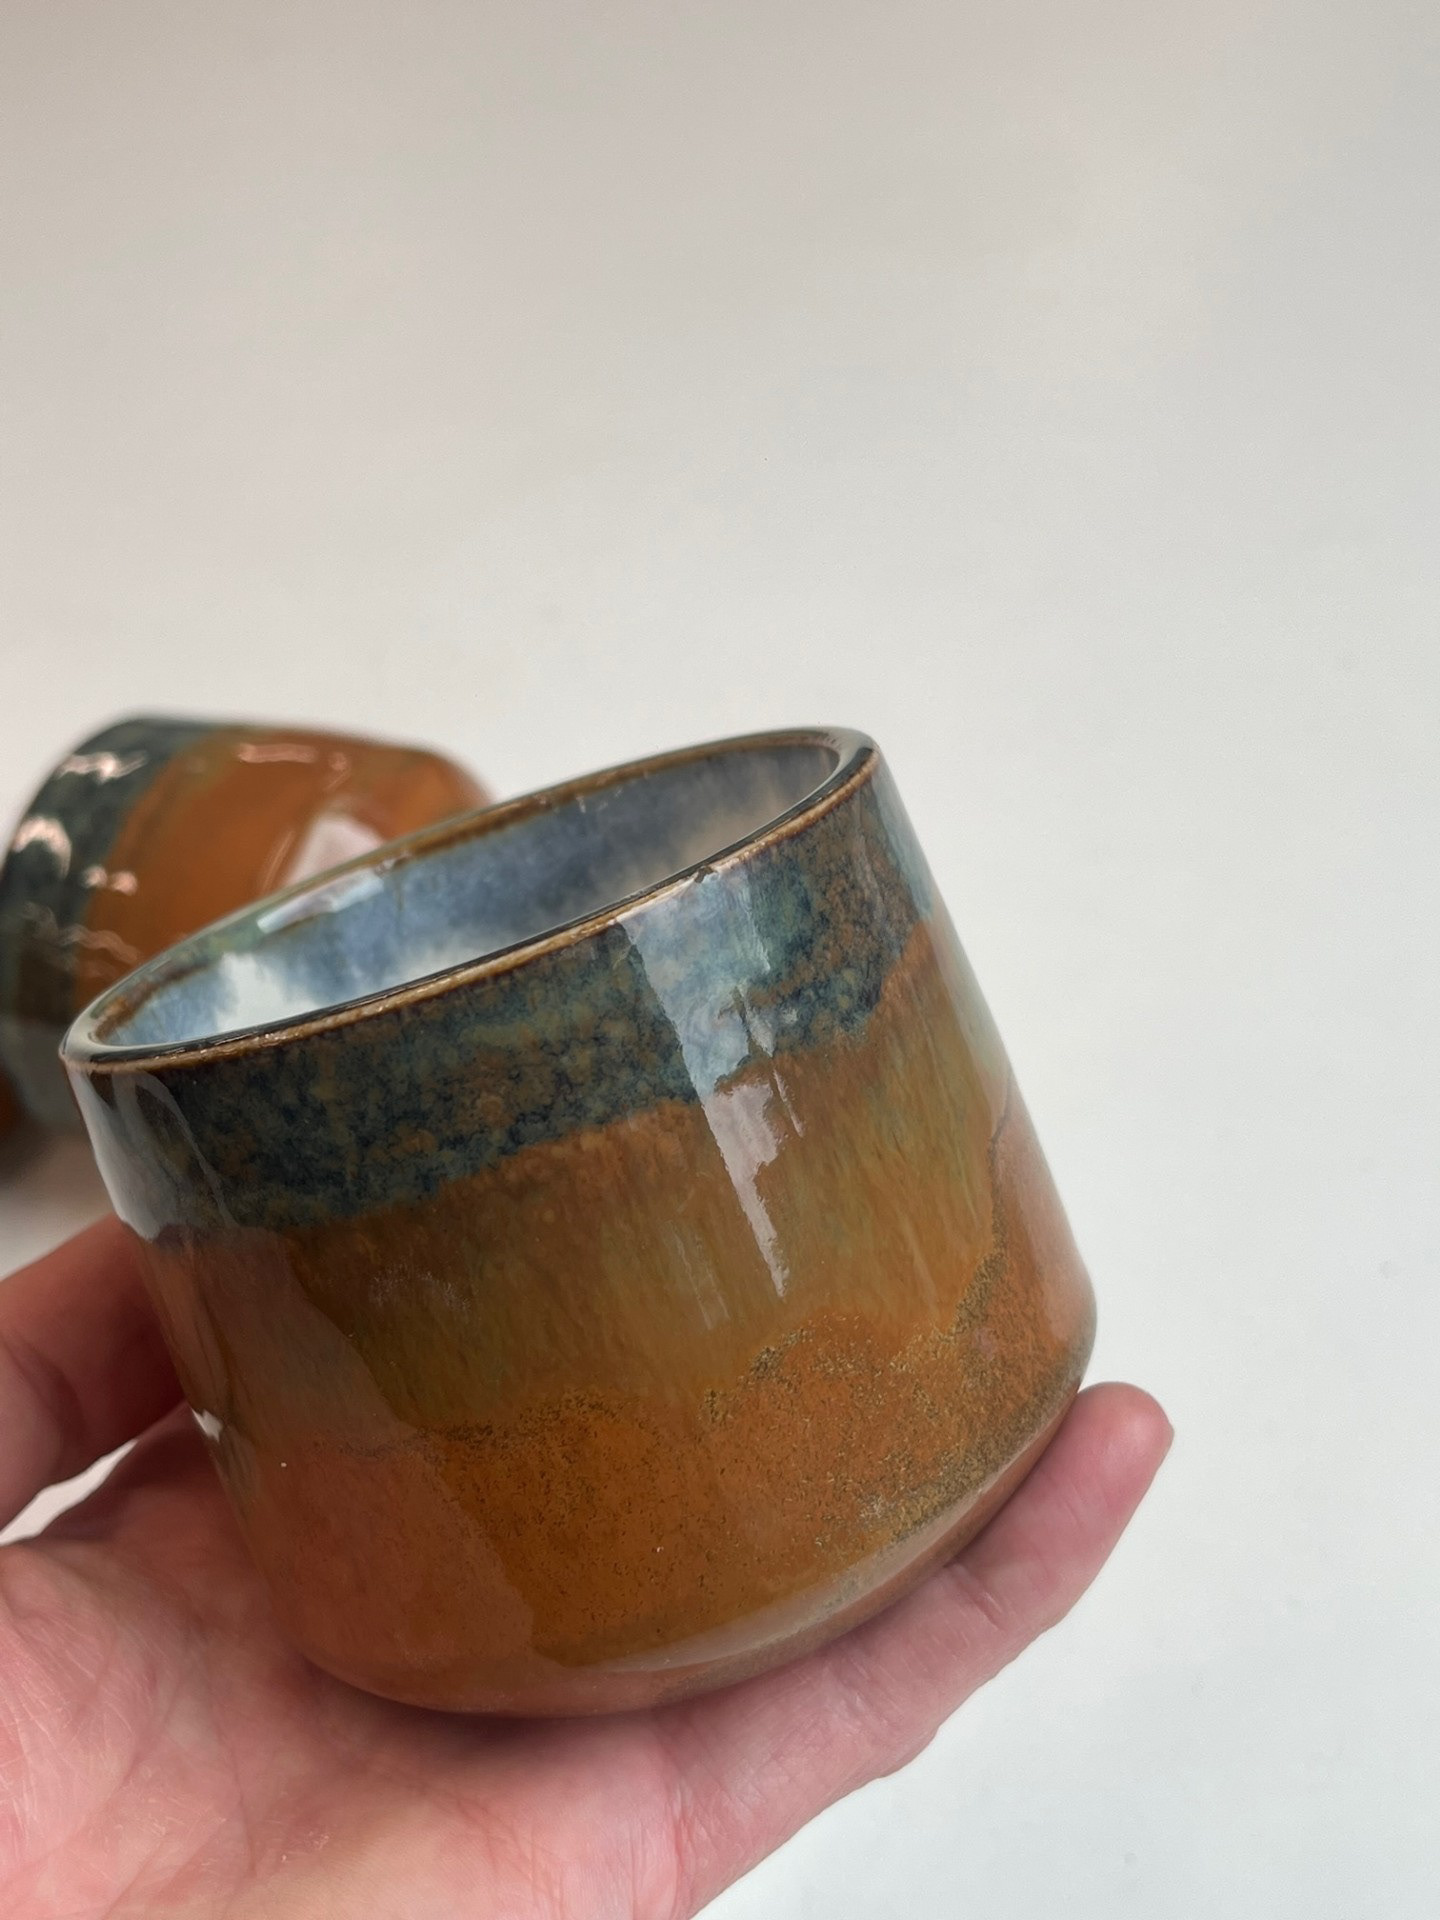
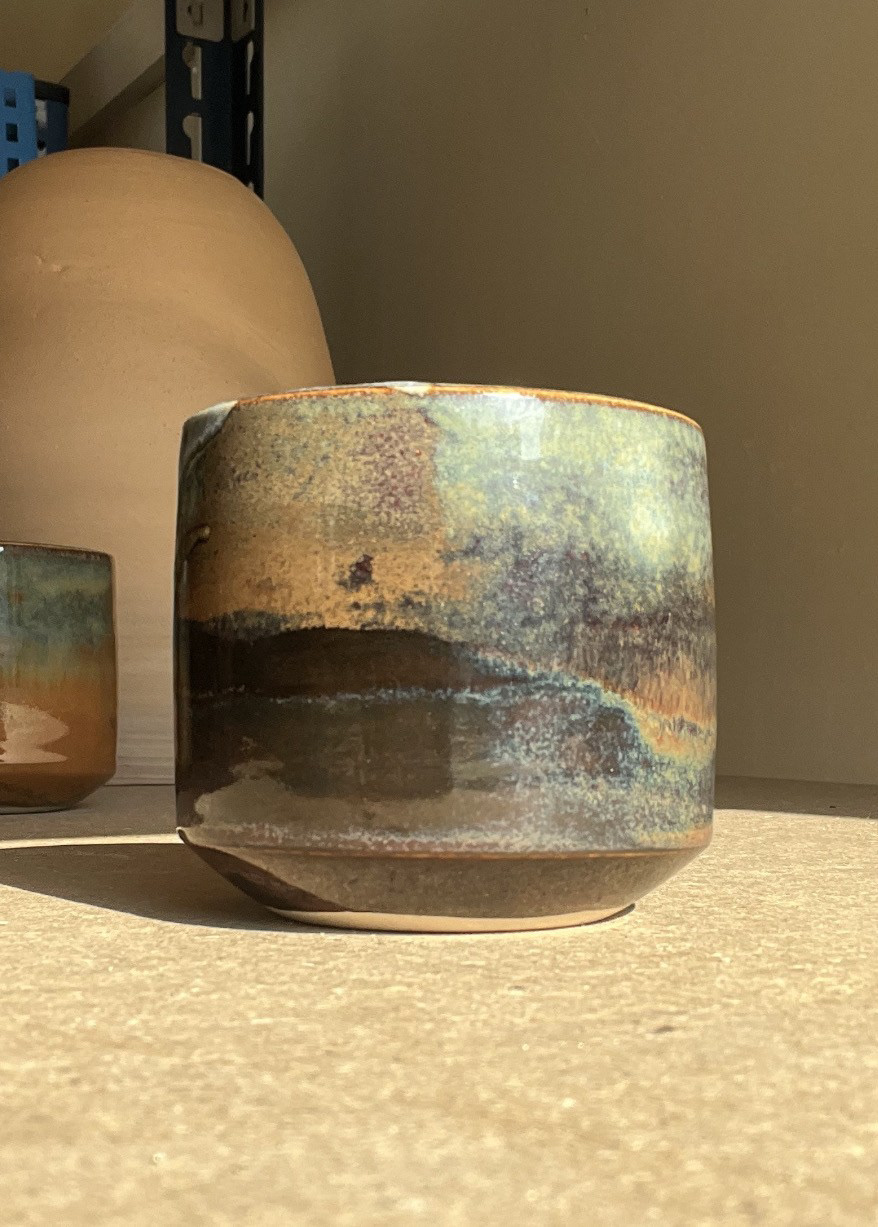
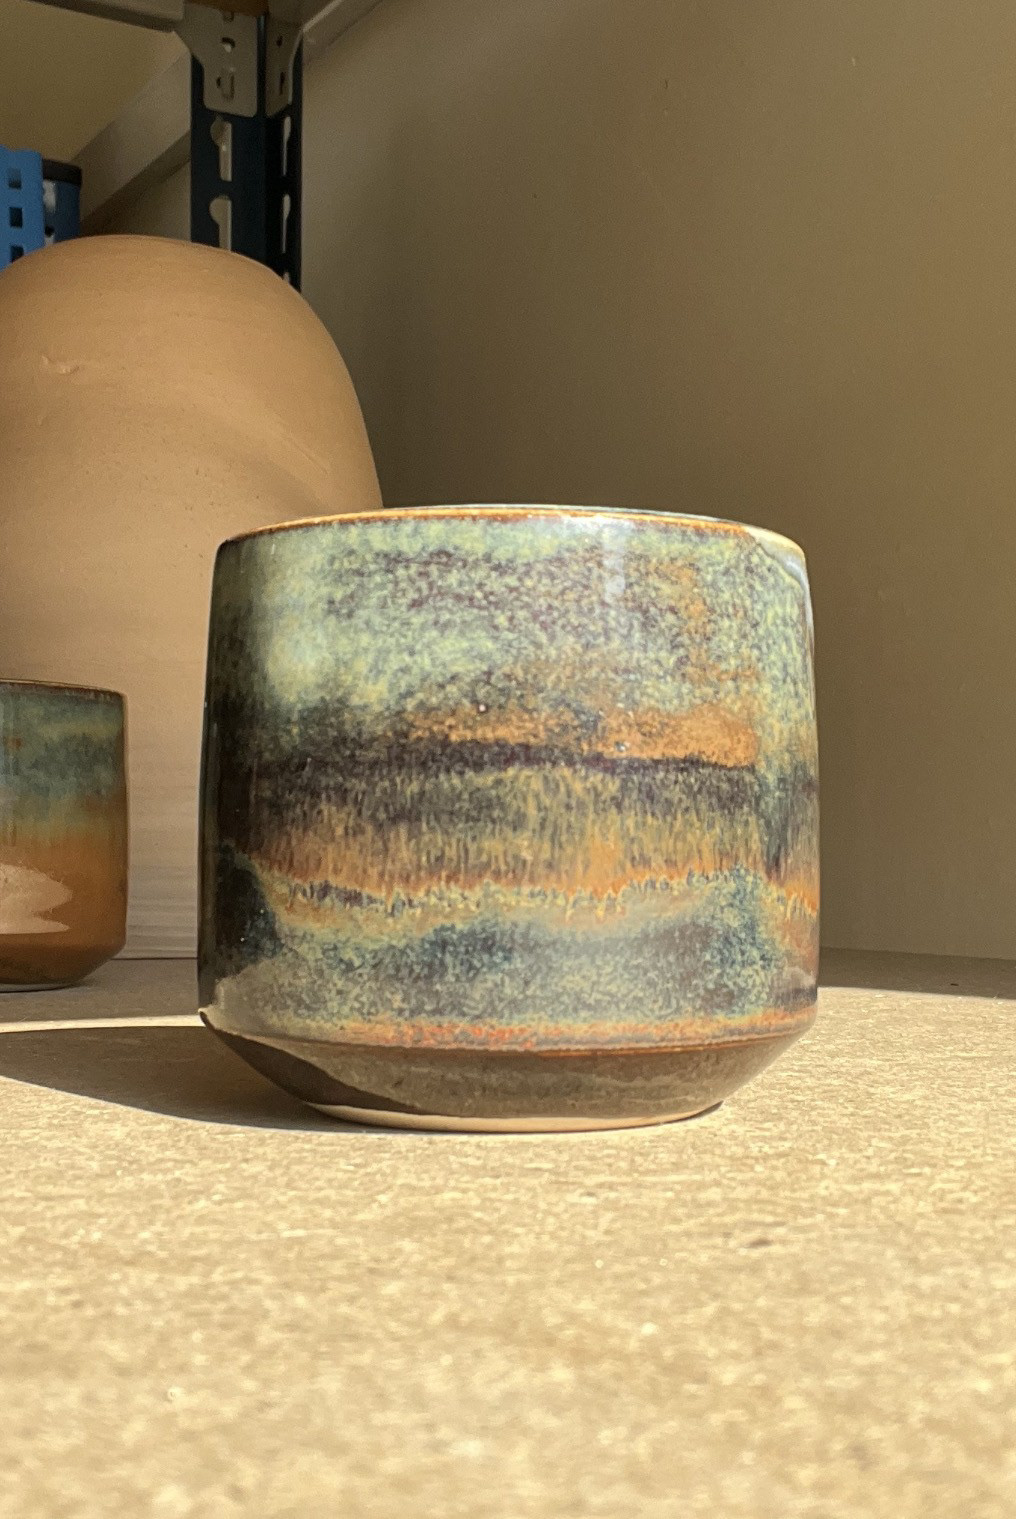
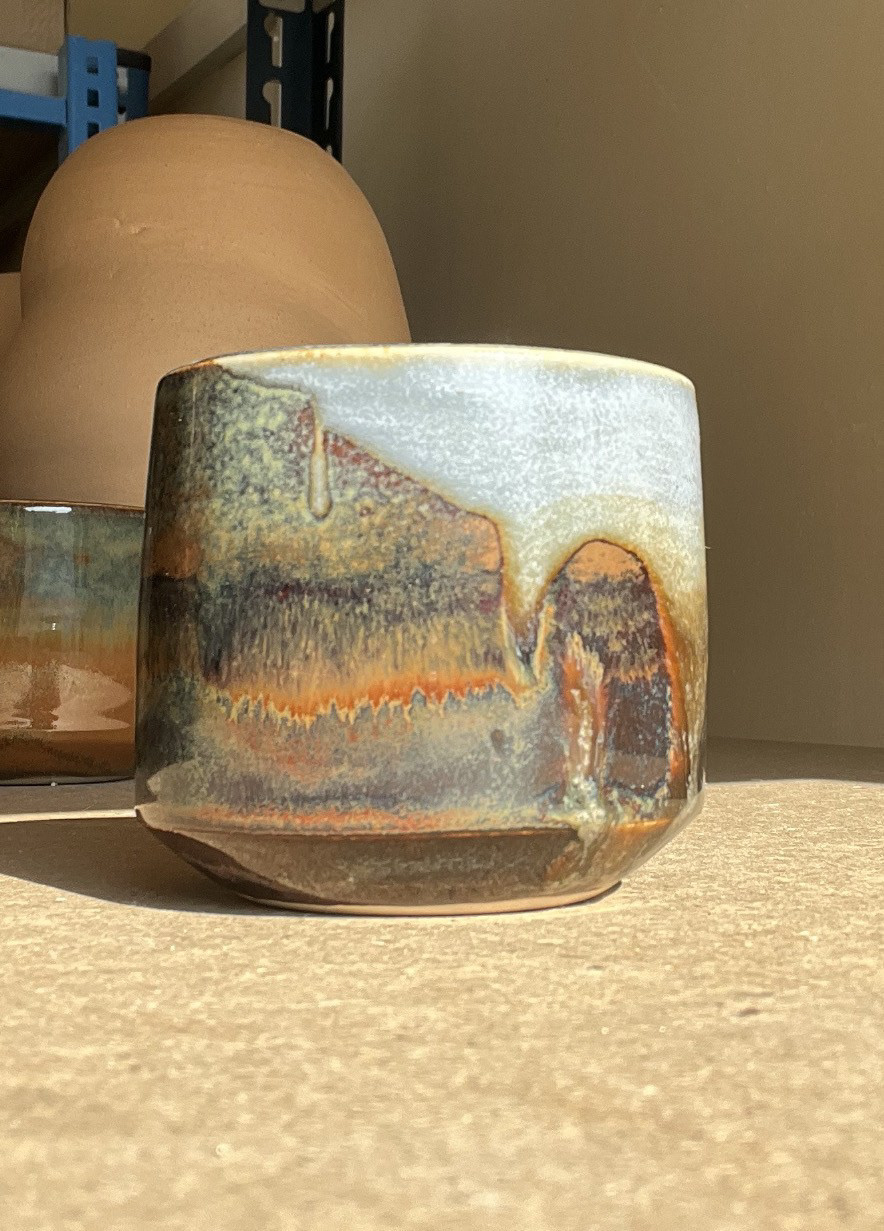
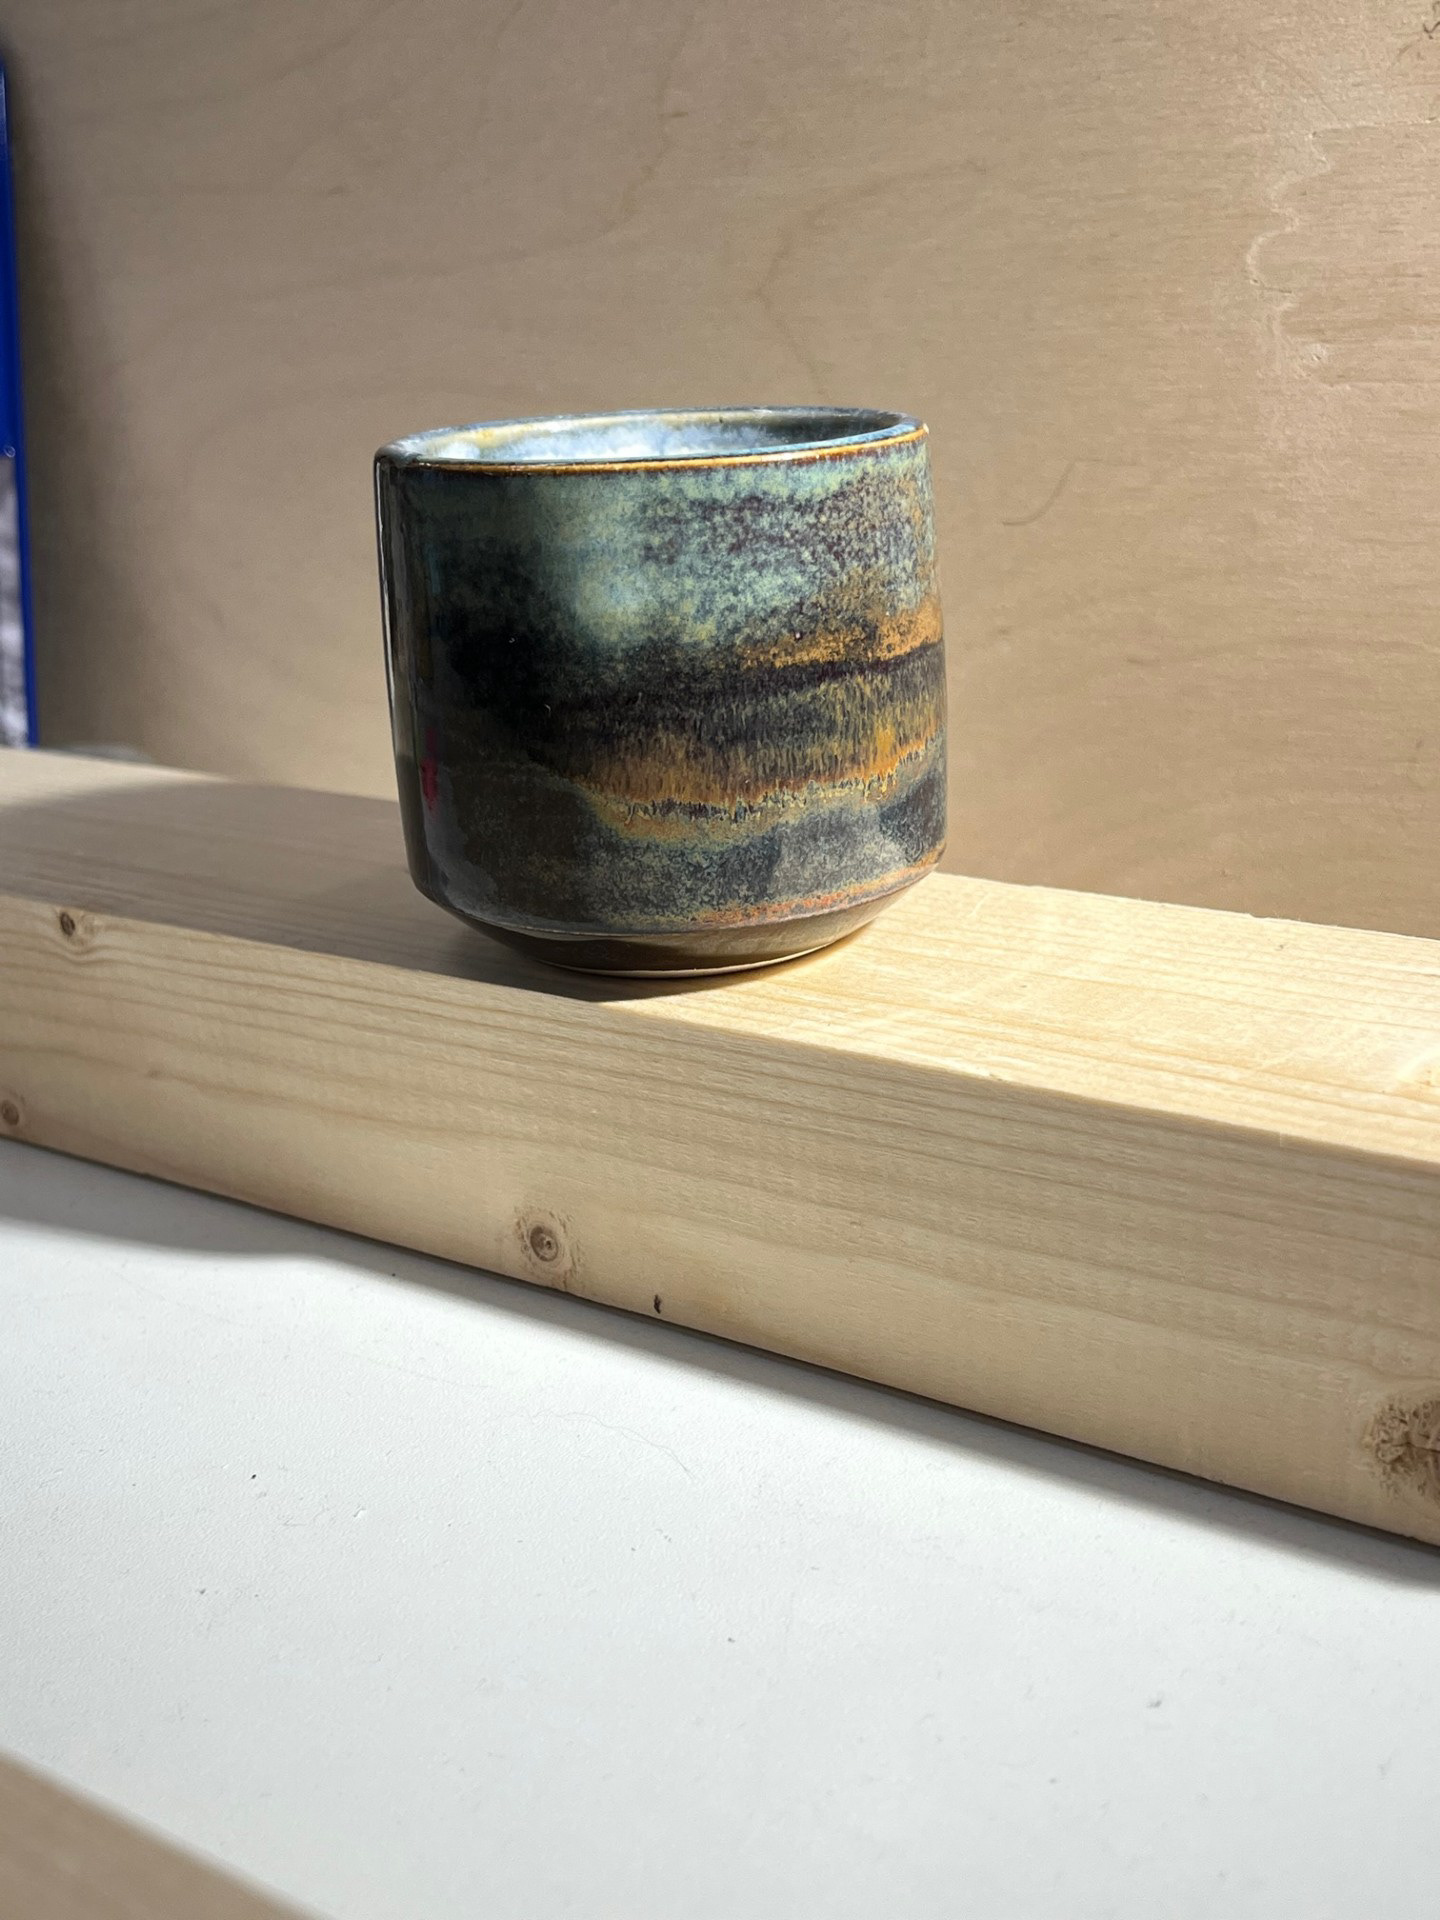
This formative review was solely an assessment on the resolved objects learning objective. this LO relates to the refinement and final resolution of the practical element of this current project. On the left, you can see one of the main objects that I presented at this review. The reason I chose this object is because I feel it is representative of the dynamic surface design and bold glaze that I want to be at the forefront of my final resolution. i feel like this glaze best represents my personal sense of style and really shows how I chose to express myself through glazing. I showed another cup that was representative of the refinement in form and general skill. I think that my level of skill has come so far and the outcome of my samples currently really show the effort and work I have put into refining the cups in relation to things like weight, shape, consistency etc.
In relation to the feedback, one of the main things that I took from this was that the improvement of my cups has been very positive. In this meeting, I also presented a mug and a bowl that I had previously made as going into this my idea was to have a range of vessels that would fulfil many different roles within a social setting. As my cups have been the main focus of my refinement, it was suggested that my cups could be the focal point if the submission; meaning I just submit the cups. I had never thought of this but I realised that it made the most sense because they are the most representative element of my practice as I feel that they showcase everything I have been striving towards. The cups themselves are clean, refined, colourful, and are objects that can be conversated over; vessels for connection.
Another element to this is that because all of my time has been spent on refining the cups, anything else that I make may not be refined enough for the final resolution. Although my idea for this was that I wanted to represent the maximum capabilities of my skills with both repeatability and refinement as well as scale elements; I want to be able to show the highest form of my work. This is why I agree with the fact that having bowls that may not be as refined could distract from the quality and detail of the cups.

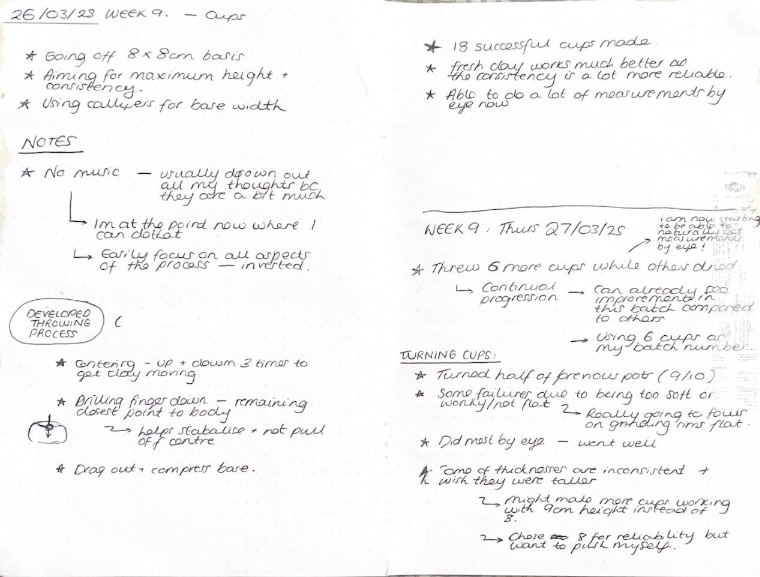
WEEK 9: 26/03/25, Wednesday & Thursday
Following the resolved objects formative review, the decision was made to make my resolved idea purely just cups. Once again, I am ok with this choice because it means that I will be presenting the most refined and resolved aspect of my making. I have also put the most time and effort into refining the cups so I am glad that I will be able to showcase them. After the review, I came to the conclusion that the only way to achieve my most refined work is to just make as many cups as I can and the refinement will naturally come after that.
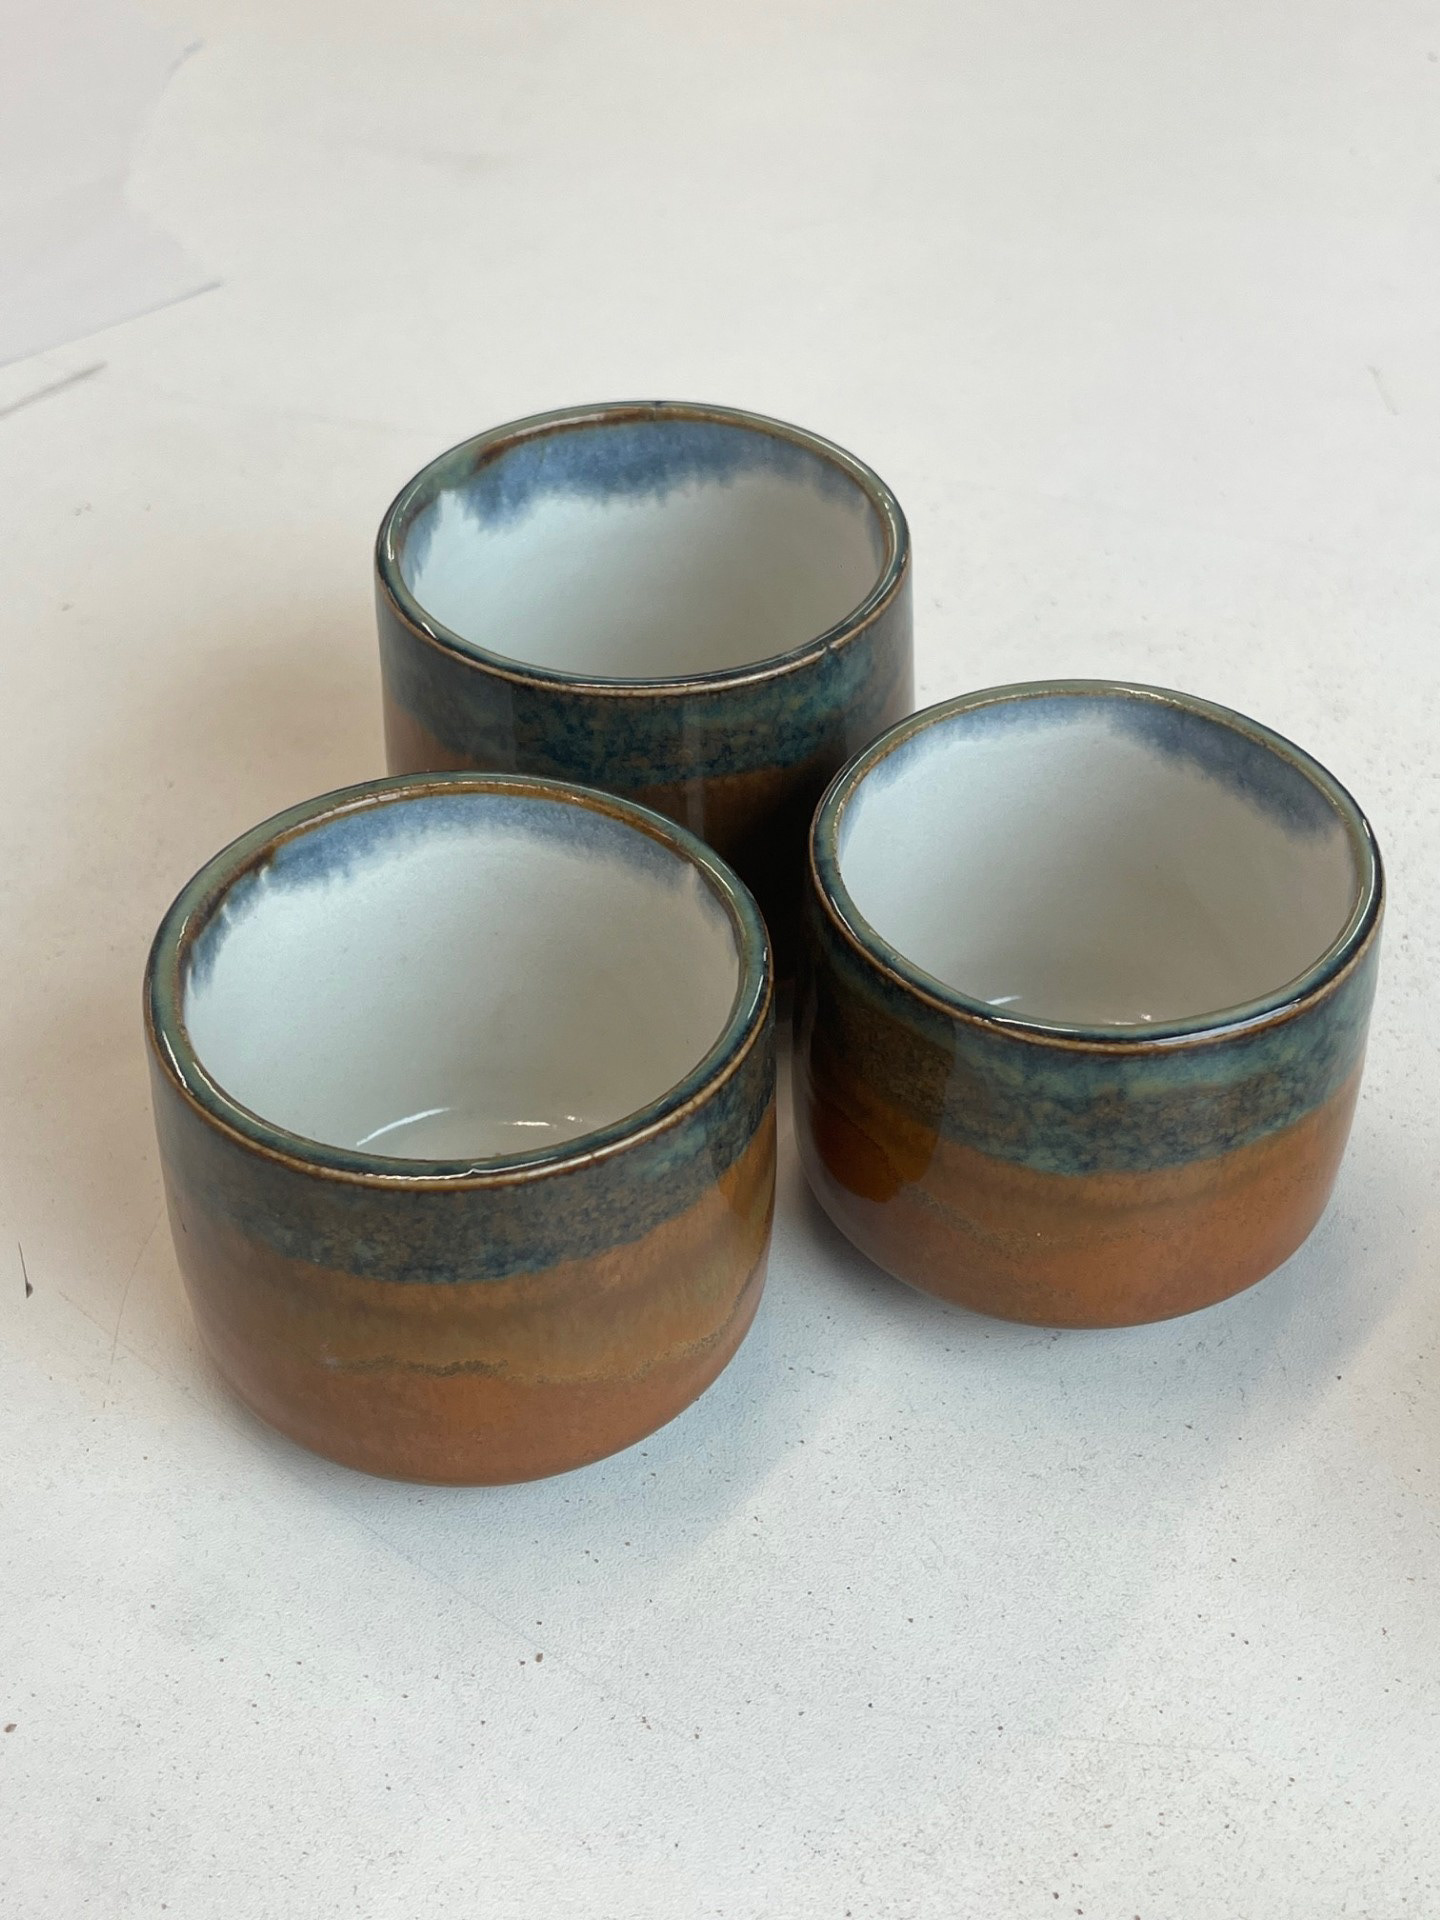
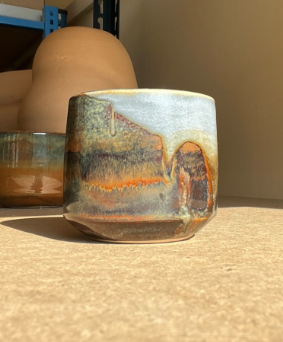
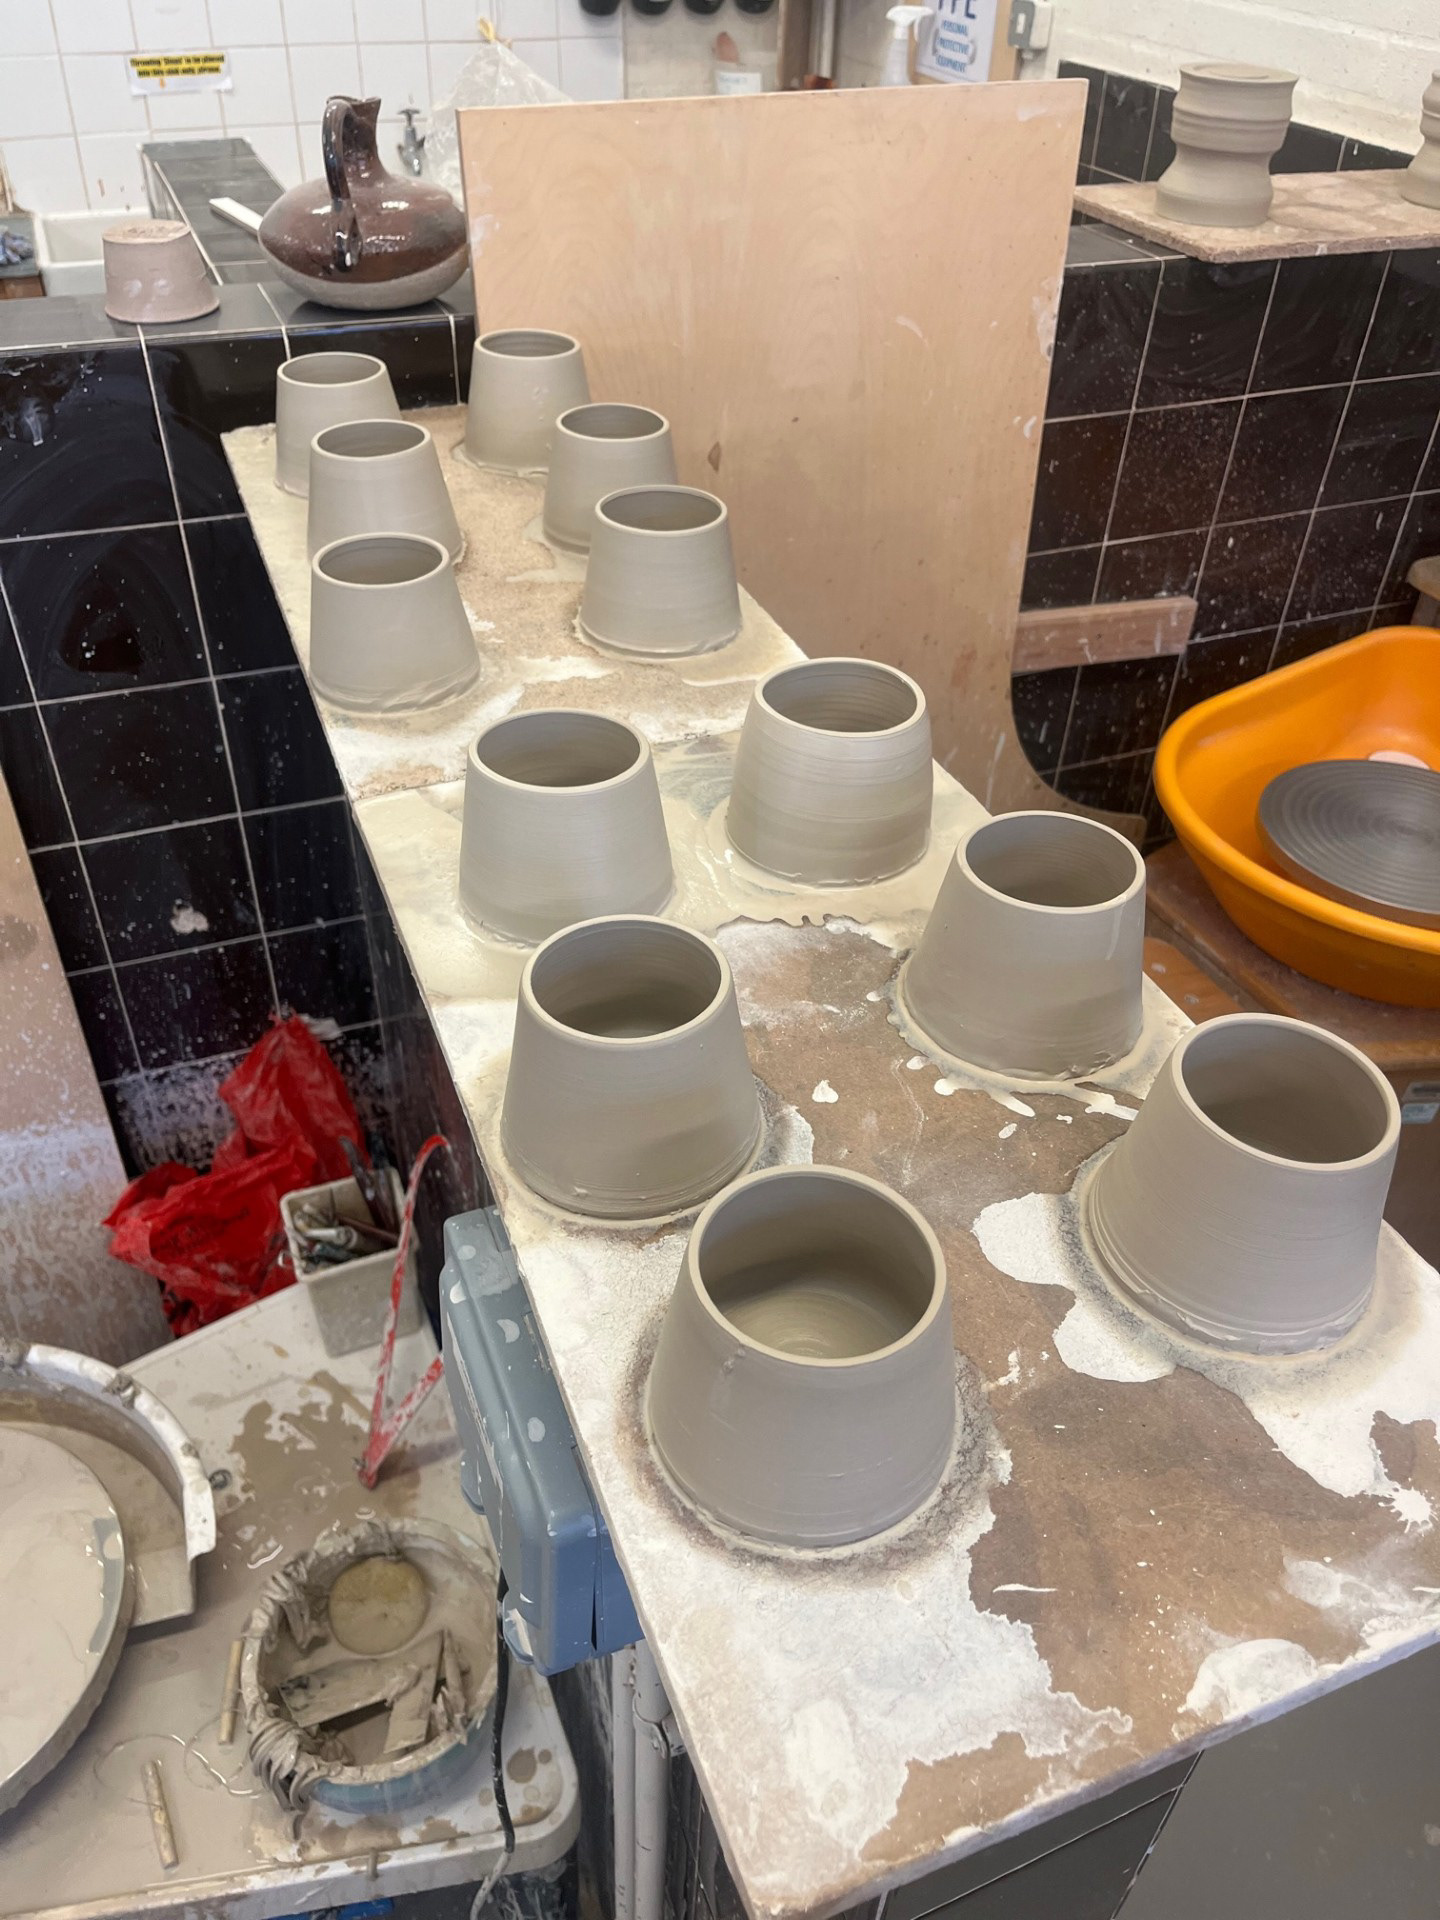
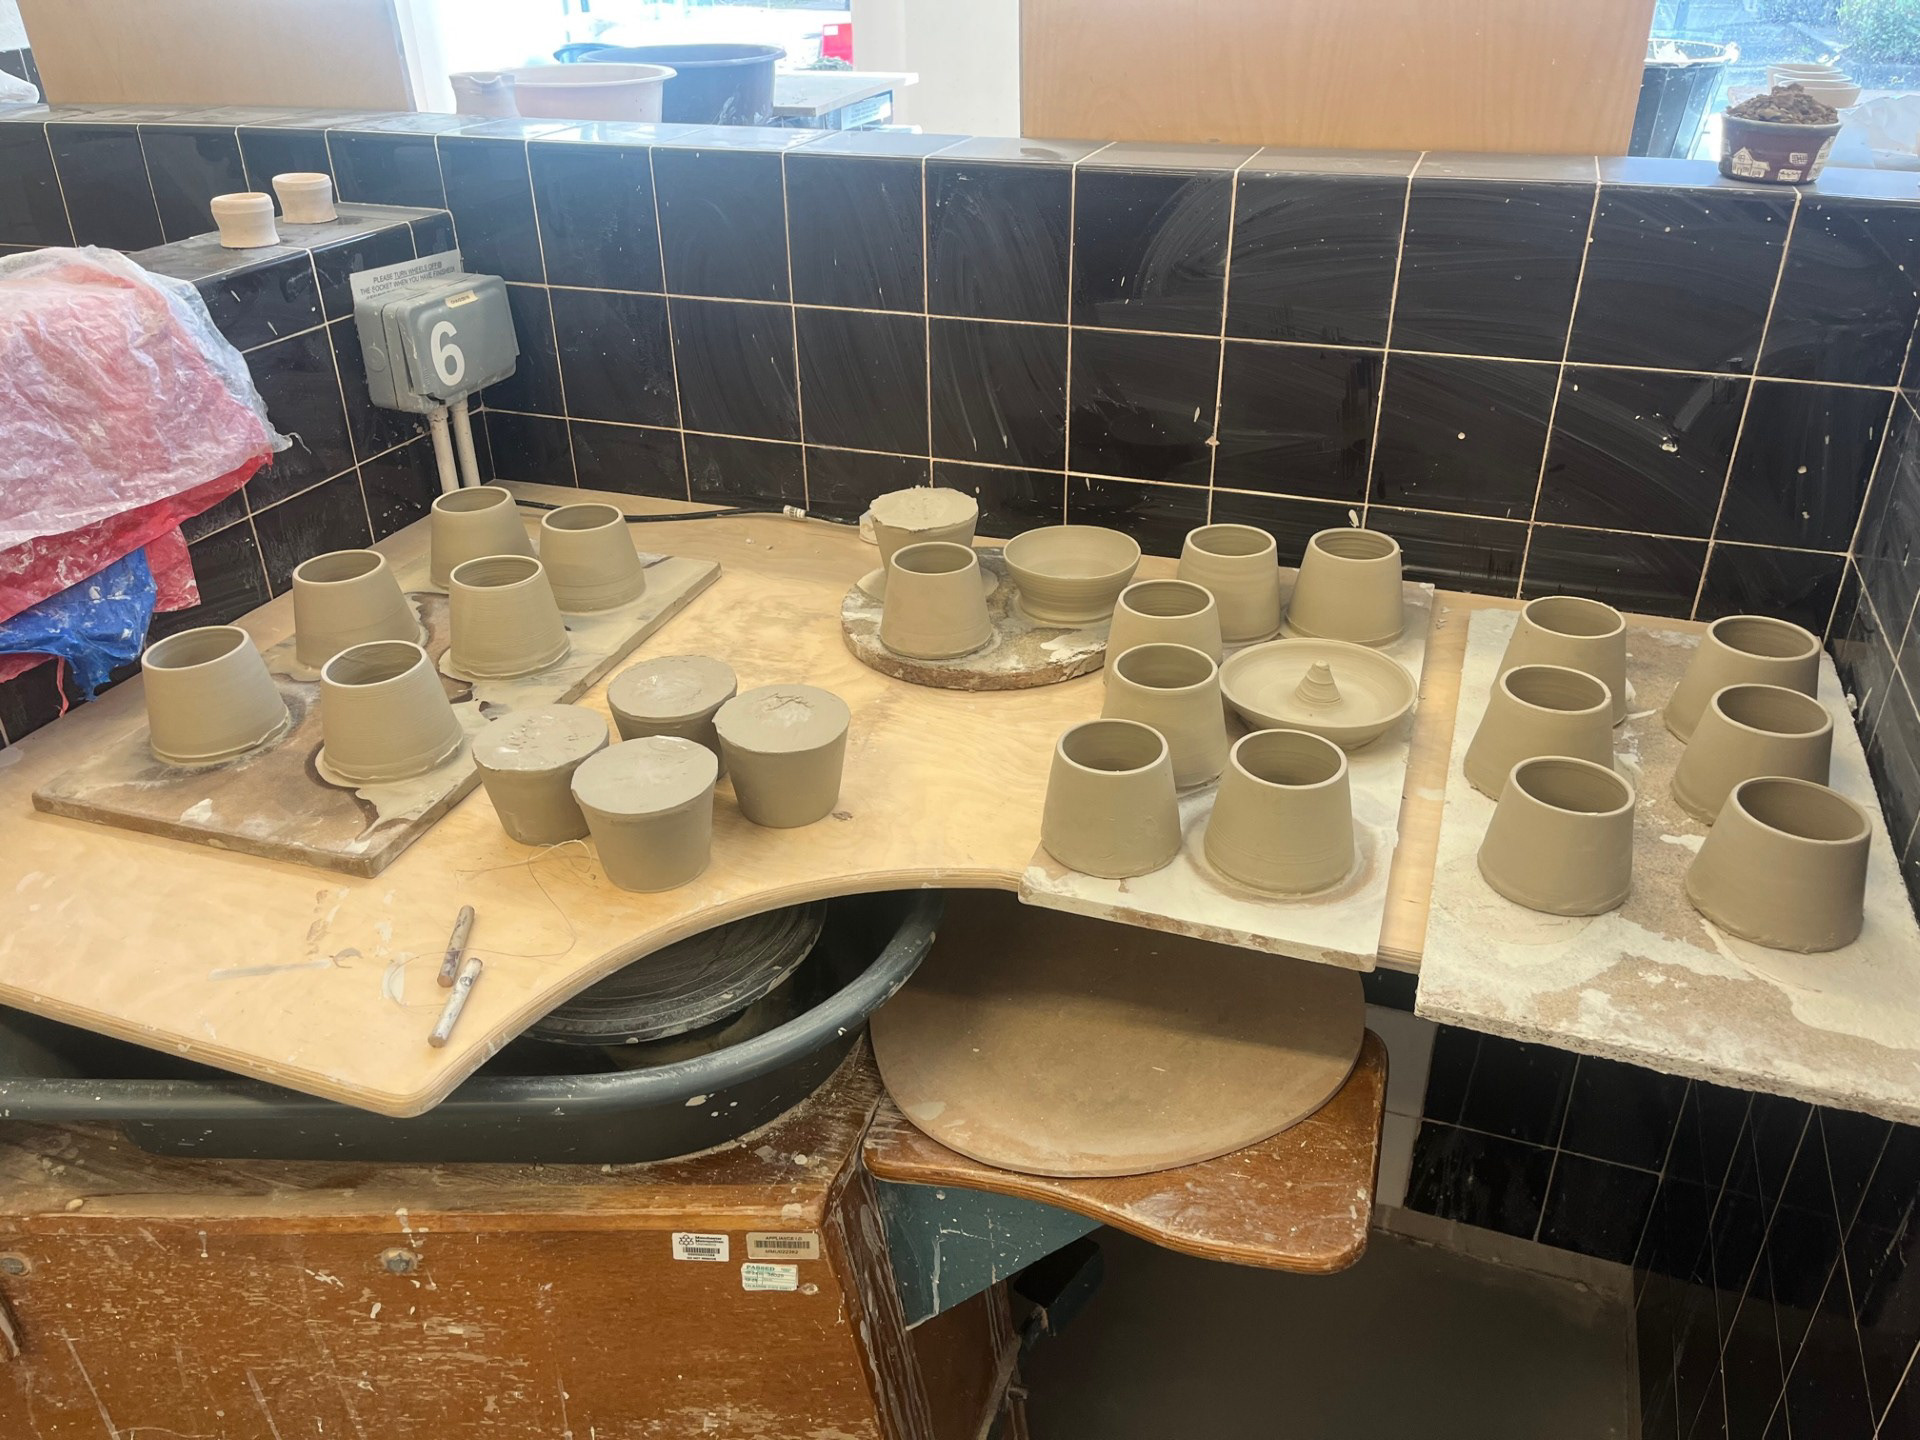
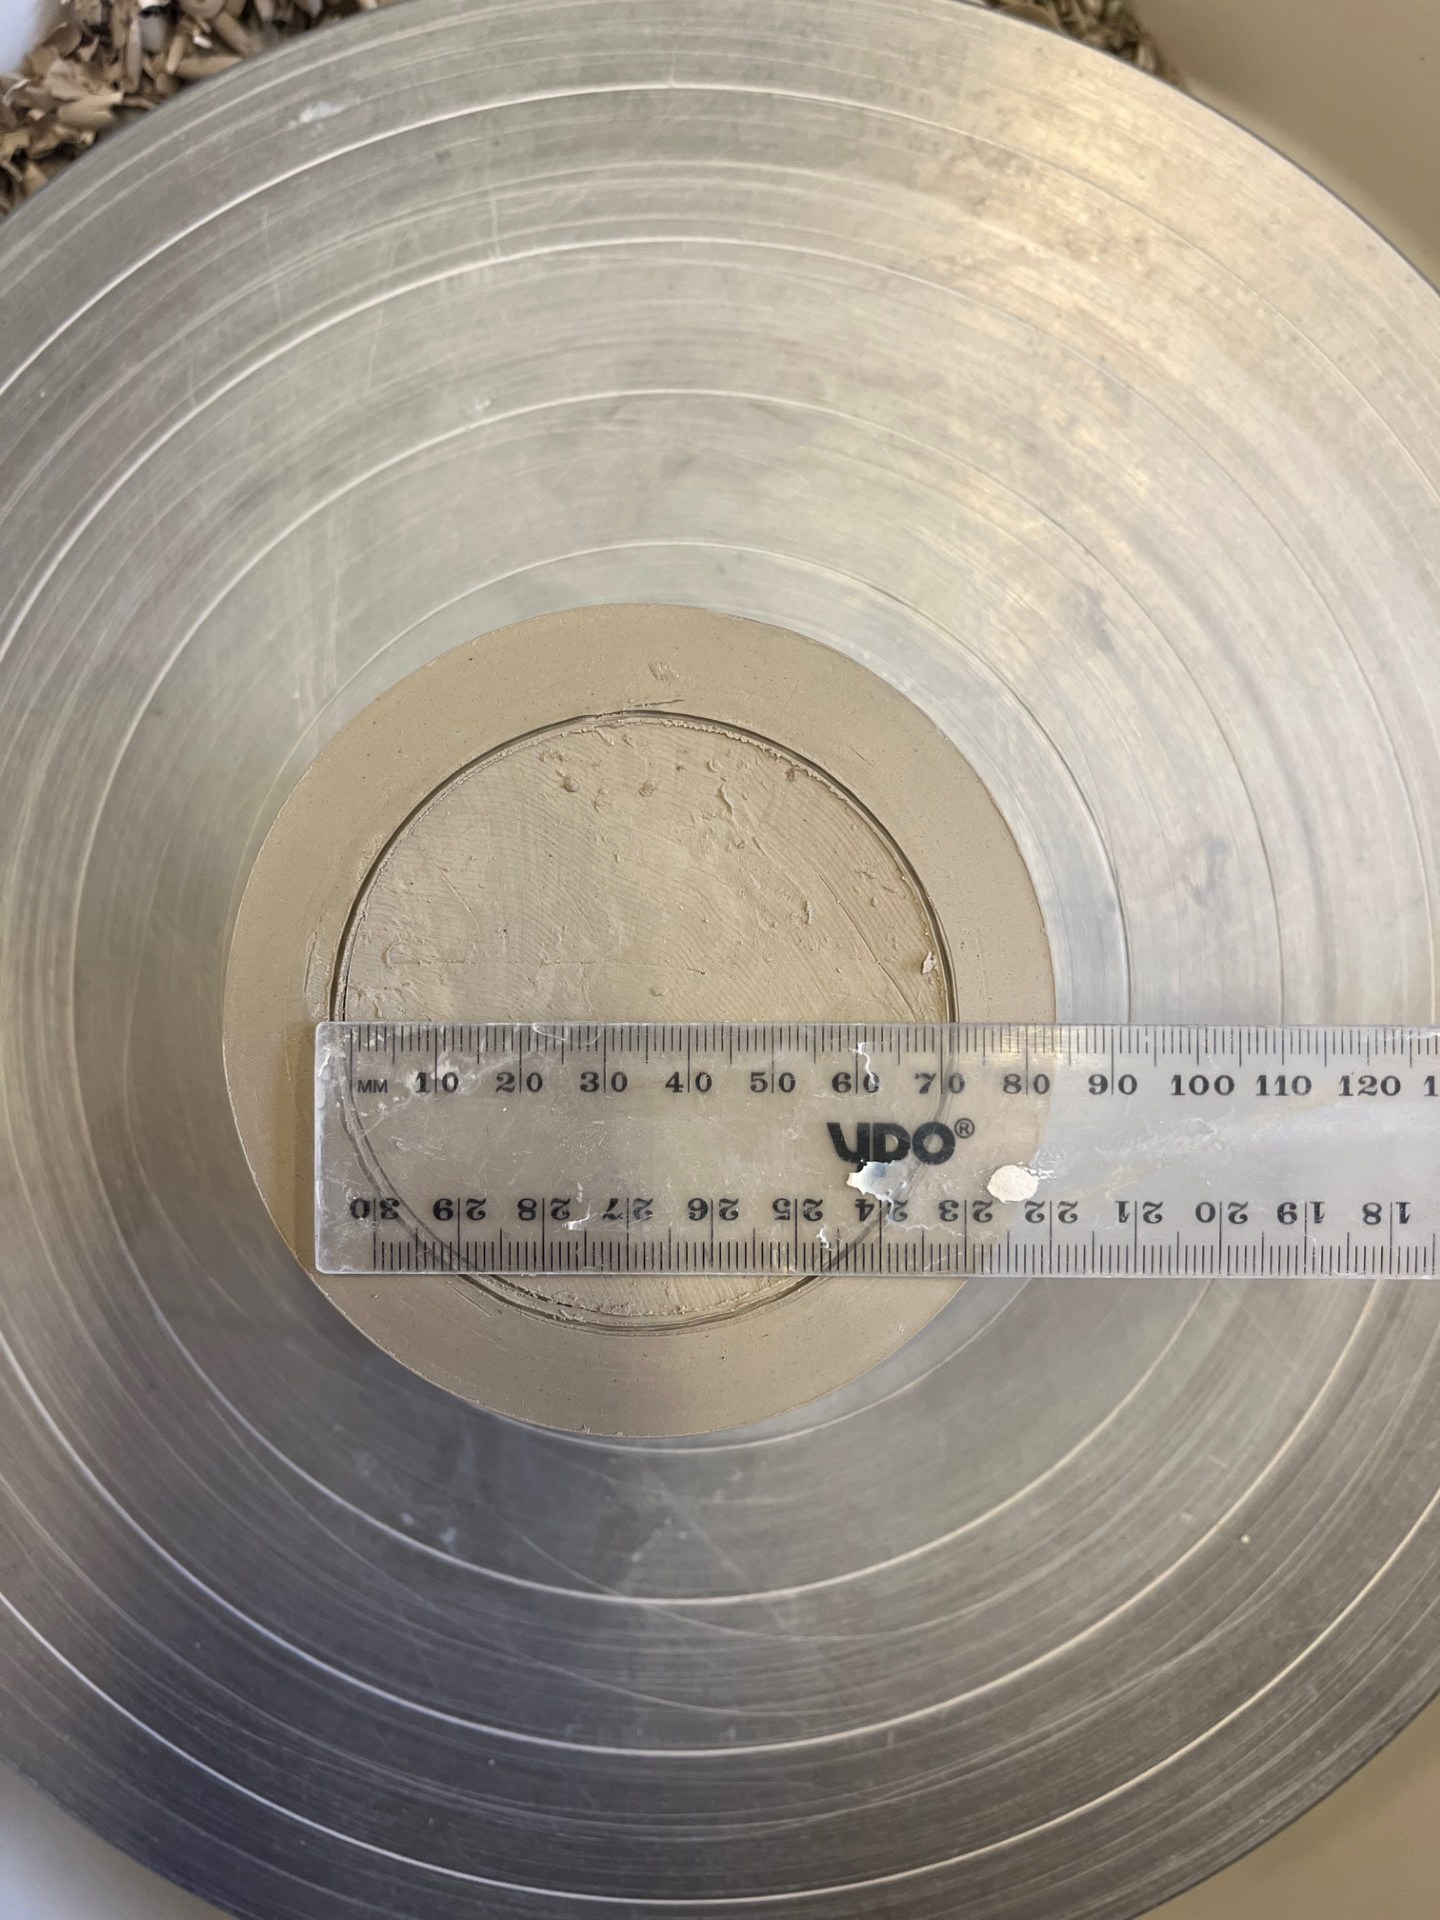
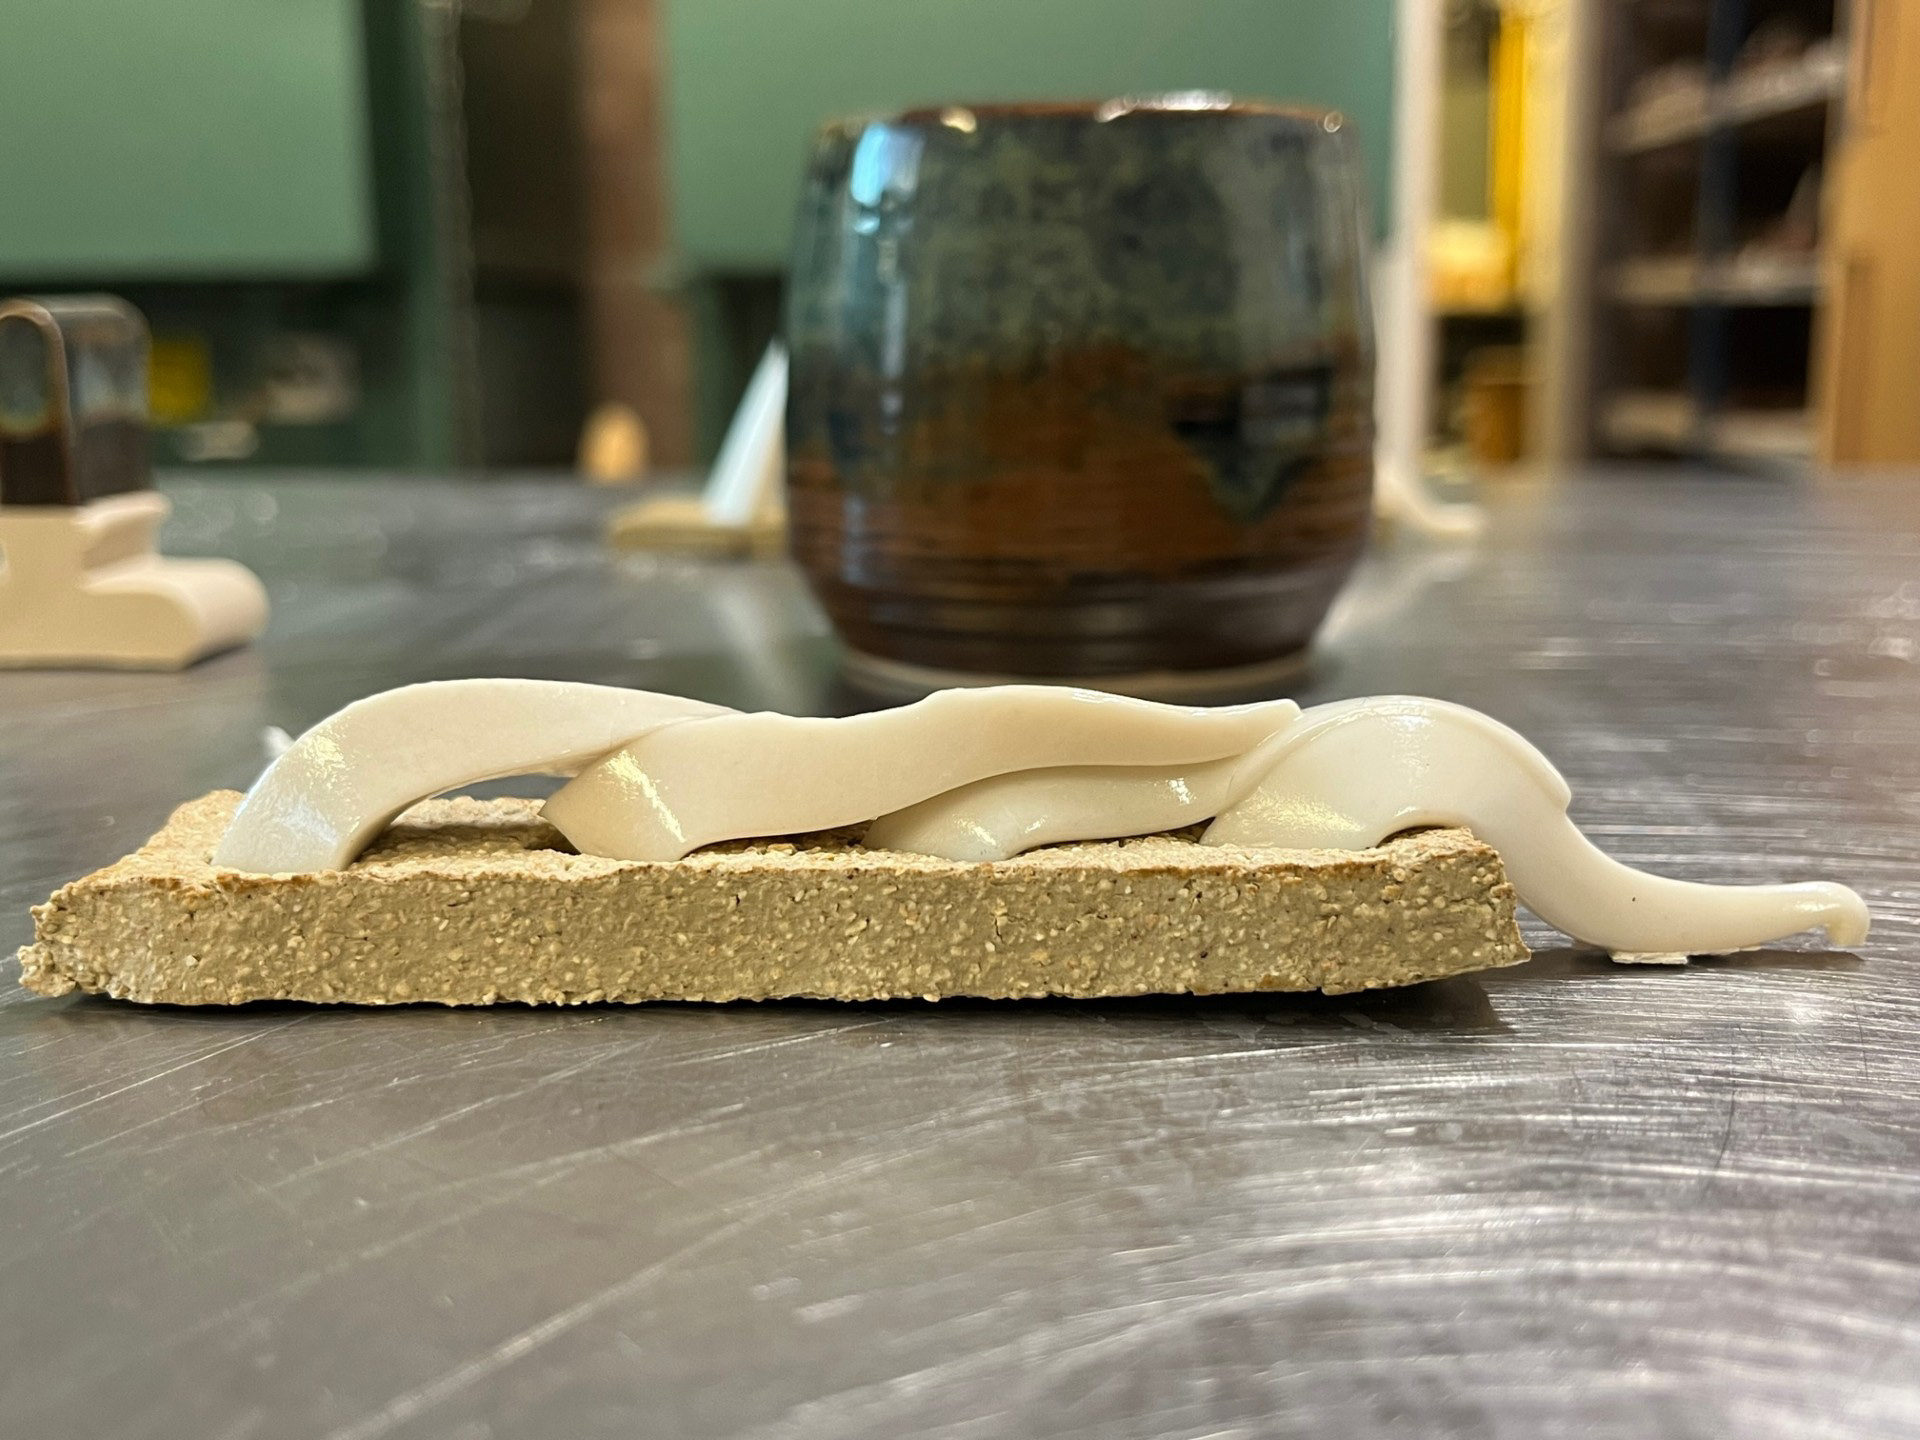
In this session, my aim is to make as many cups as I can, sort of working on a production line type of basis. To make the cups as similar as possible, I am going to be working off 8cm H, 8cm W which is a ratio that I have tried previously and have liked the outcome. I will also be using callipers for the base to make sure that is also repeated. As I like to really focus on process, I think that by the end of this process, I would like to be able to consistently make 8x8 cups by eye without measuring during the process. I would like to have this as an aim because for me it means that I understand my material and my personal craft; I like the idea of building a strong relationship between me and my material allowing me to understand the capabilities of the clay along with myself. See below for images from session:
Reflection:
After weeks of testing and refinement, I’ve settled on working from an 8cm x 8cm basis, which I’ve found creates cups that feel comfortable and natural to hold. Using callipers to measure the base at 9cm has been especially helpful in achieving a consistent, subtle negative angle in the form. I’m glad to be at this stage of completion so early, as it gives me a solid buffer before the submission deadline—around a week to focus on final refinements, photography, and editing, without the added pressure of rushing.
In terms of throwing, one major improvement I’ve made is learning to keep my hands anchored when pulling out the walls. Previously, my clay would often become uncentred during this stage, which not only affected the symmetry of the piece but also made turning more difficult later on. Through this process, I’ve also come to realise that I struggle to articulate the technical changes I make while working. My process is highly tactile. There’s a feedback loop between my hands and my brain that guides my decisions in real time, and stopping to document every small change often interrupts that flow. Despite this, I’ve made a conscious effort to improve my note-taking, especially in capturing my thoughts and reflections on the process, which has always been a challenge for me. In many ways, it feels like the roles have reversed, but I’m glad to see growth in areas I’ve previously struggled with. Overall, I’m proud of how far I’ve come—my consistency has improved significantly, and the weeks of focused refinement are clearly paying off.
Glaze Testing:
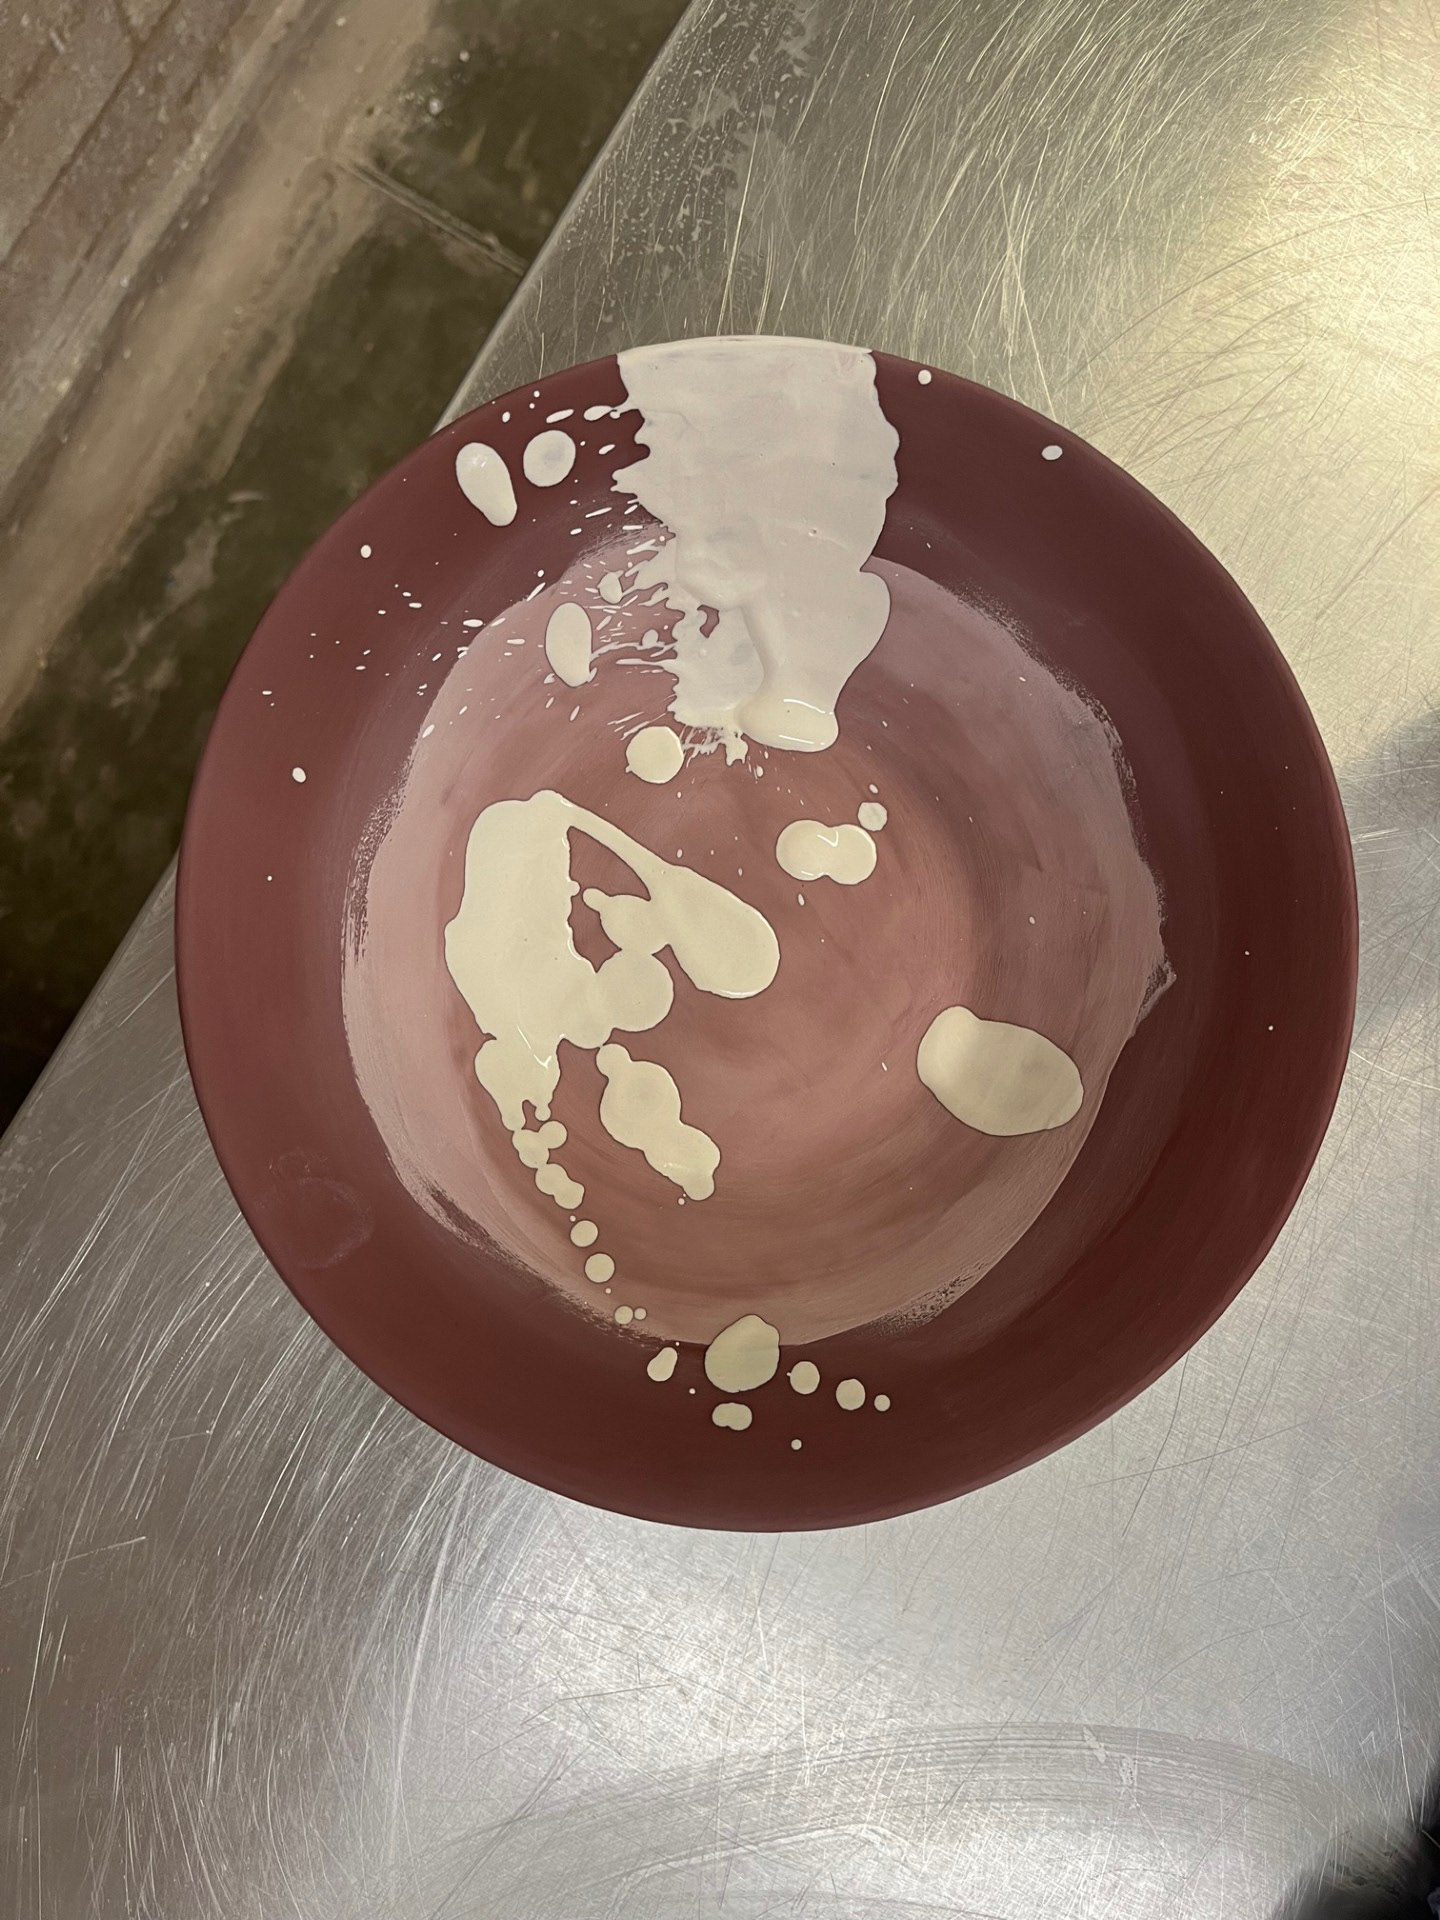
In response to completing the previous glaze sample on one of my initial cups, I have chosen to do some further testing. For this I am going to be continuing with having blue rutile on top and then ancient jasper on bottom. I the previous sample, I really loved the drip that was created by me doing the inside glaze last. for the sample, I was just doing a rough tester so I wasn't very careful when pouring out the glaze hence the drip. But I really liked the outcome of this effect as it made the surface pop and created a much more dynamic surface. One of the main things I am focusing on going into this is the controlling of the glaze on the rim. in previous tutorials, we have discussed the possibility of making the bleeding of glaze around the rim more controlled. Previously, i would roughly apply the blue rutile glaze to the rim but it resulted in a lot of beading of glaze and therefore a really inconsistent rim. My aim is to be a lot more careful with the application, being very careful not to apply an inconsistent amount.
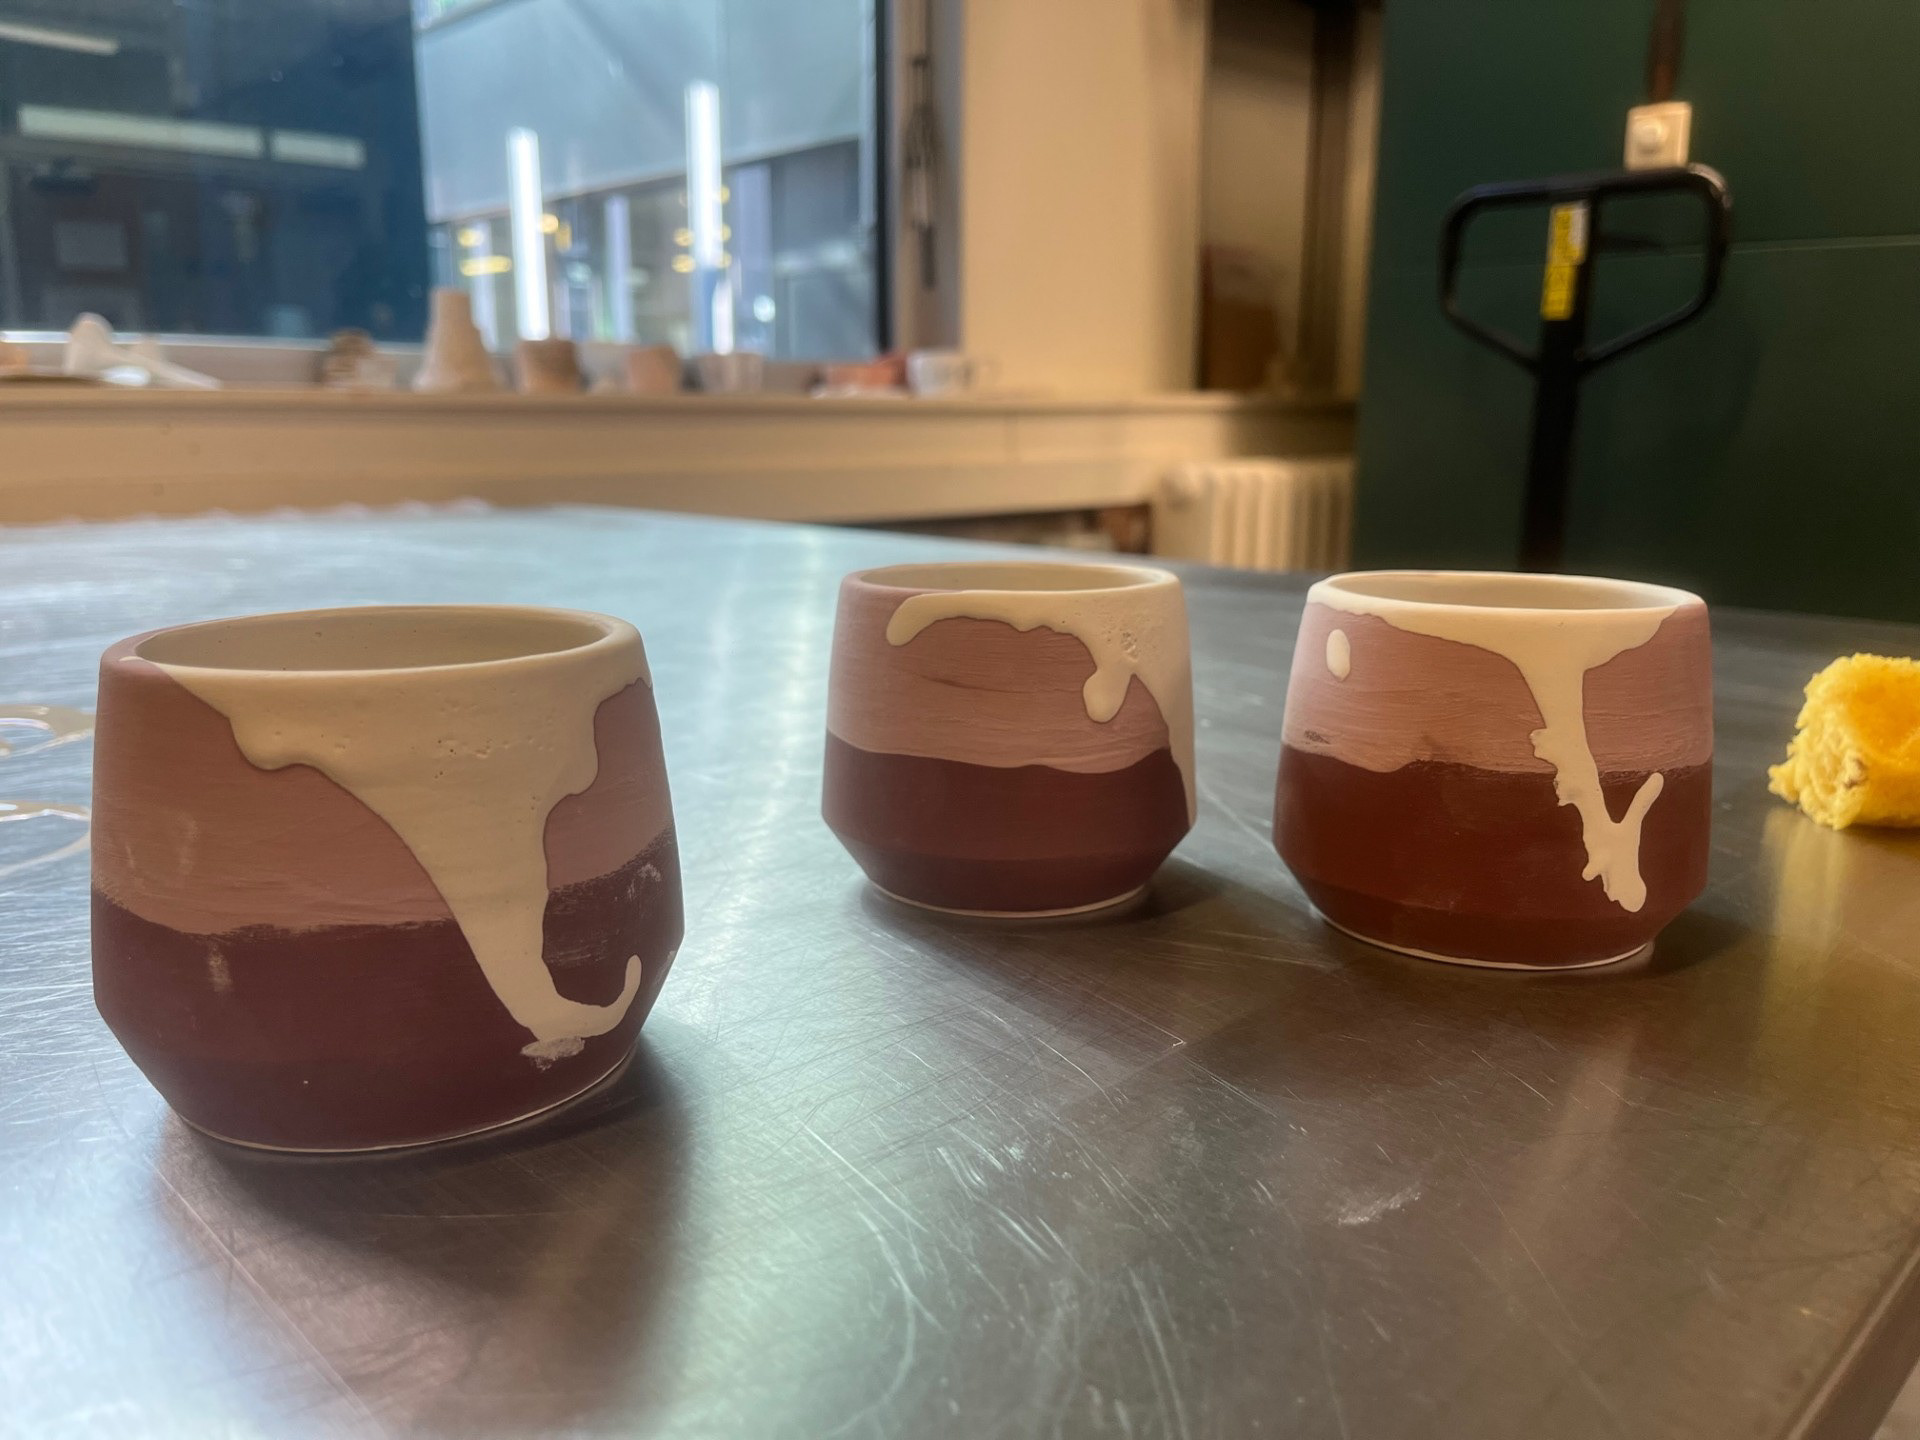
When making an effort to control the rim a bit more, all I did was just have a little less glaze on the brush so that it didn't bead on the rim. I then applied thin layers of glaze on the rim making sure that the brush was somewhat horizontal so that it could glide across the rim. This worked quite well and even before it went in the kiln I could visibly see how much of a difference it made. In the second image, you can see me trying to replicate what had happened in the initial glaze sample where the zirconium from the inside spilled out onto the surface of the pot. To replicate this I poured the glaze into the pot and when pouring it out I allowed it to spill. Upon repeating it, I realised that I really like how every one is different. Since beginning ceramics I have always loved the ideology that people can have pots that are unique to them. This feature allows that to be the case while still allowing the aspect to be repeatable and aesthetically refined.
I’ve already thrown all of my final pieces and I’m really happy with the outcome, both in terms of the forms themselves and the progression of my practical skills throughout the project. However, I’ve noticed a bit of a gap in my glazing process that still feels unresolved. Although I’ve done a number of tests, each glaze outcome has turned out slightly different, and I’m not entirely sure why. This inconsistency has highlighted that there’s still a lot I need to learn and understand about glazing. Rather than seeing this uncertainty as a setback, I recognise it as a sign that there’s more information I need to gather—more experimentation, more observation, and a deeper understanding of how different variables affect the results. This gap has become a clear next step for development in my practice.
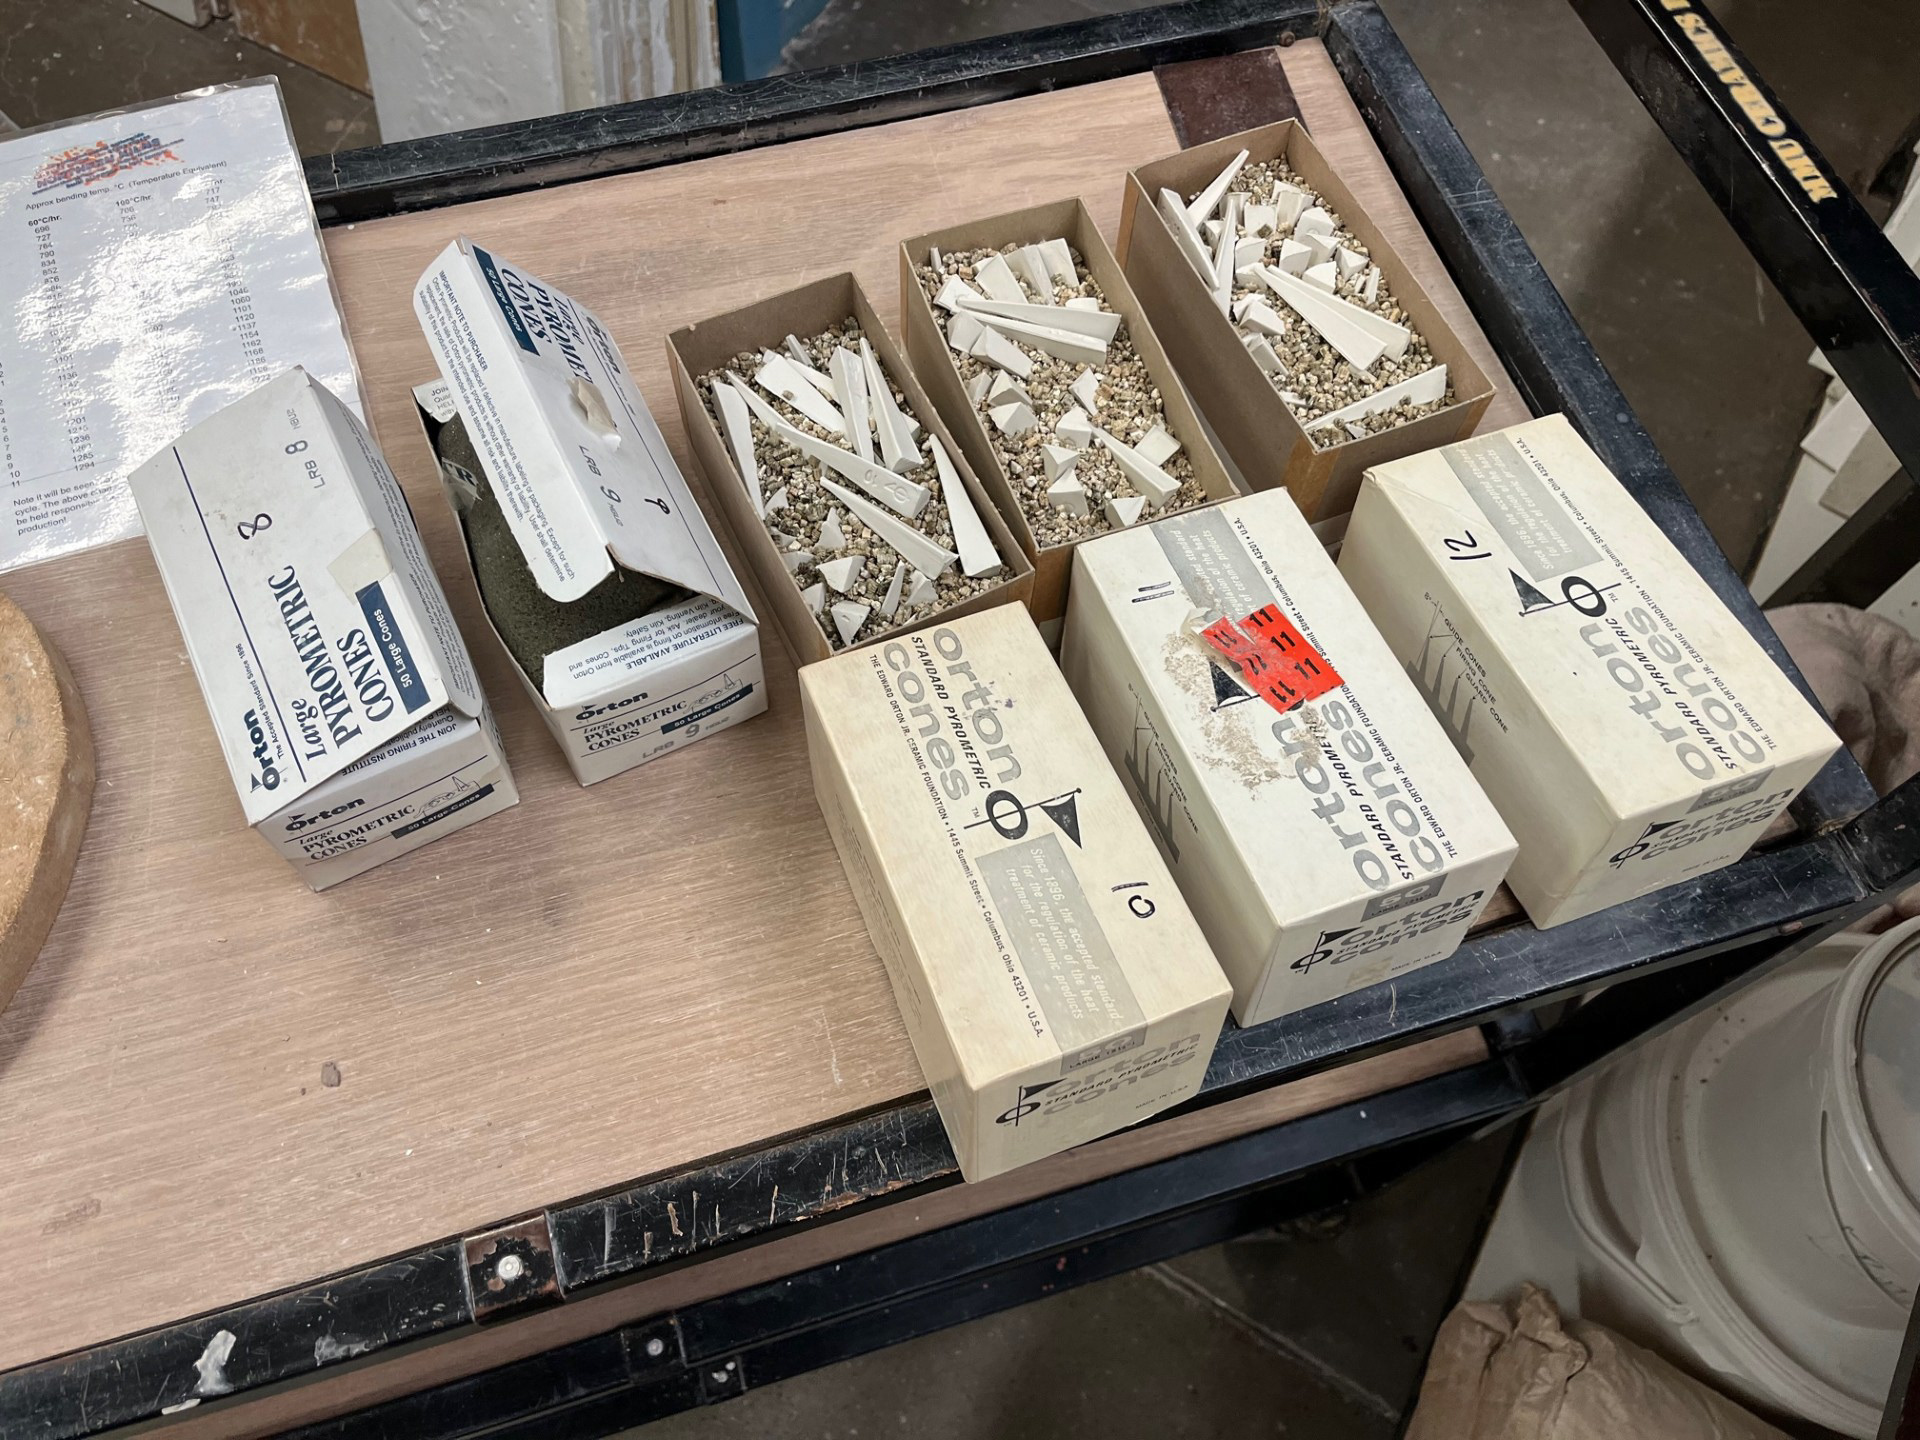
Kiln & Cone Tests:
Up until this point, I have completed multiple phases of testing on sample cups using my chosen glazing combinations. I have been a bit confused because all of them have come out slightly different although the same application process was completed. I need to figure out what is causing the inconsistencies and from speaking to Rudi, I have realised that the most likely culprit was the difference in all of the kilns. Some of them fire and heat up in different rates, some are inconsistent with the demographic within the kiln e.g, vast difference in the outcomes in the front compared to the back of the kilns.
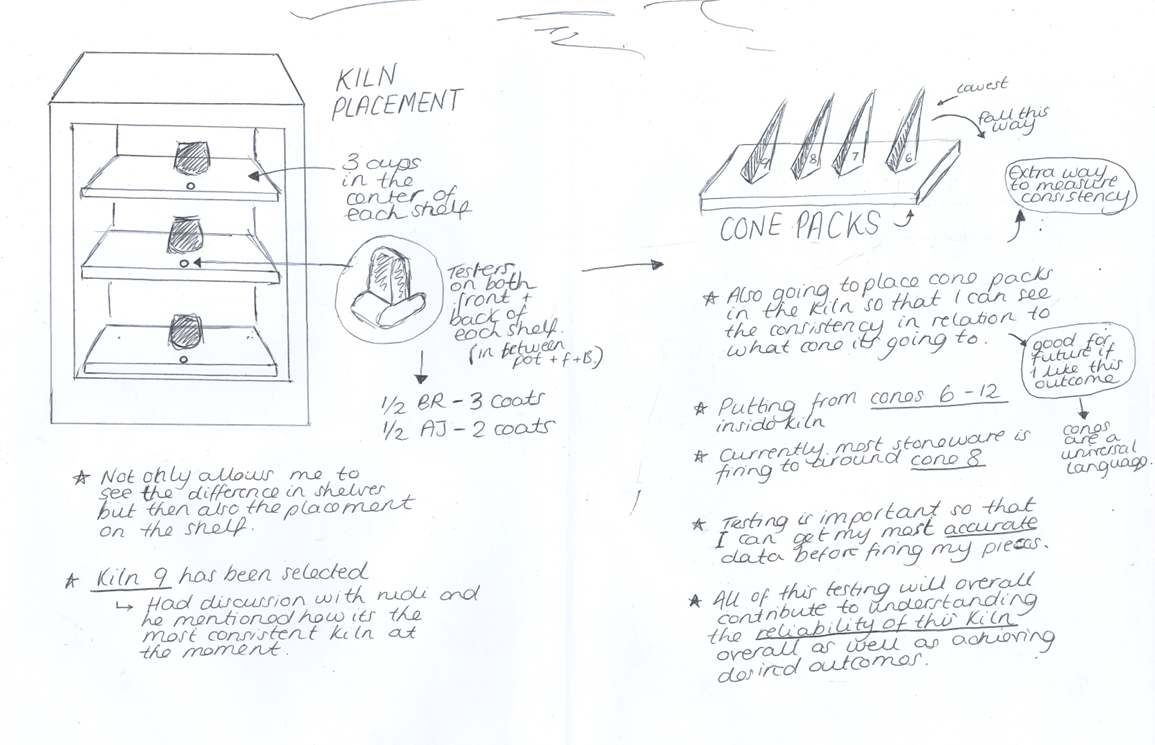
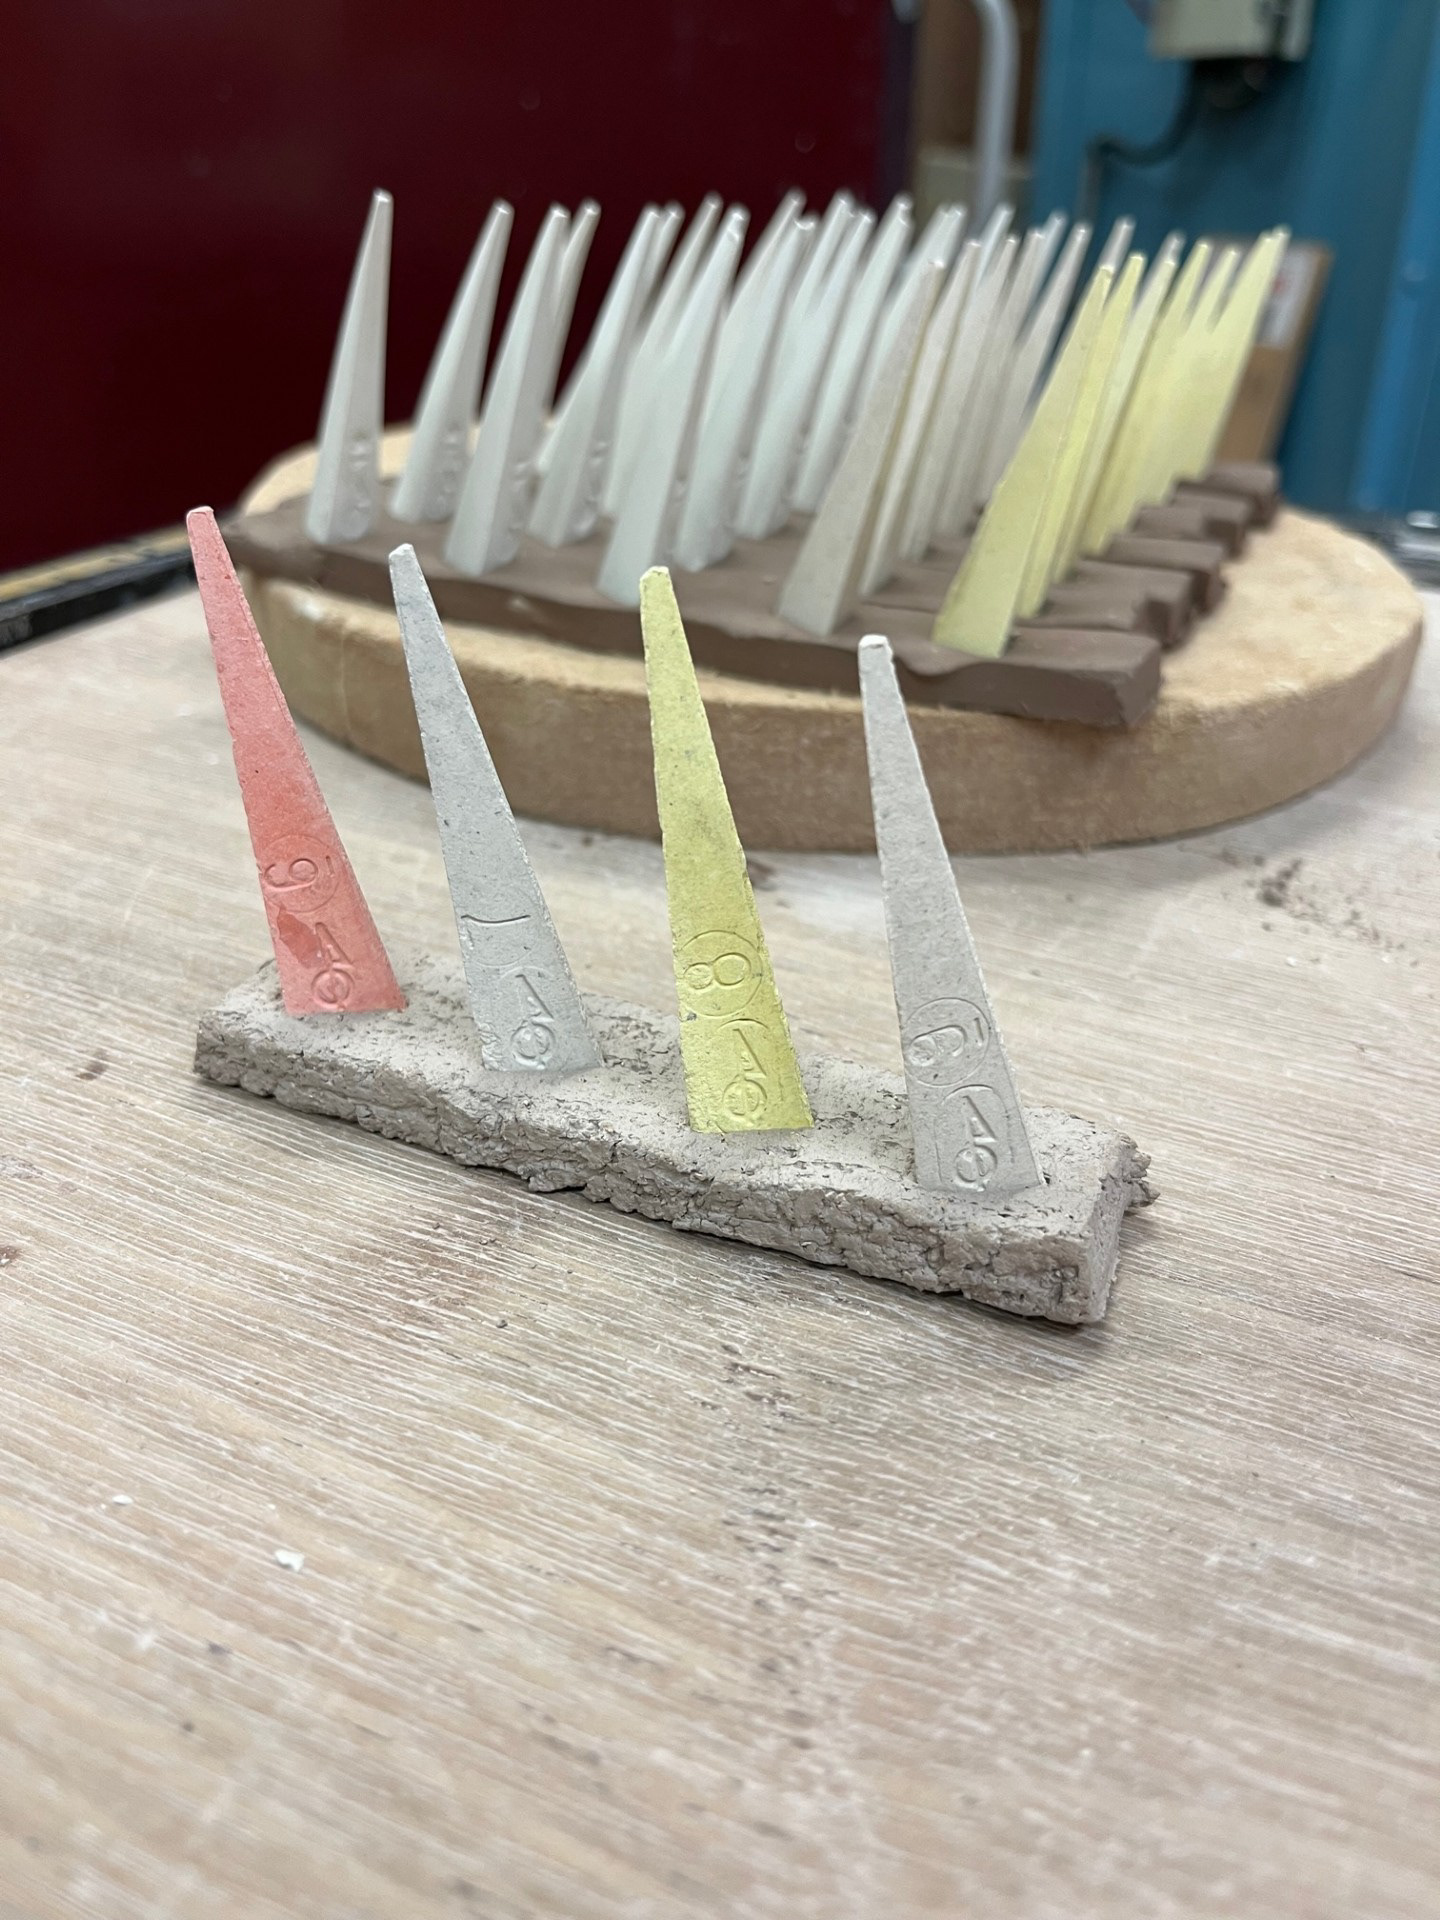
I decided to speak to Rudi to discuss whether I could put all of my pieces in the same kiln. He said that the most consistent and reliable kiln at the moment is Kiln 9 so, as it is doable, that would be the best choice to complete my testing within. To add another element of testing, I have decided to include cone packs as well as samples/testers so that I can gather a full understanding of the demographic within the kiln. The cone packs will give a physical indicator of whether the inside is consistent in relation to Cones as well as whether the kiln is firing to the right cone; could be over-firing or under-firing.
See below for notes:
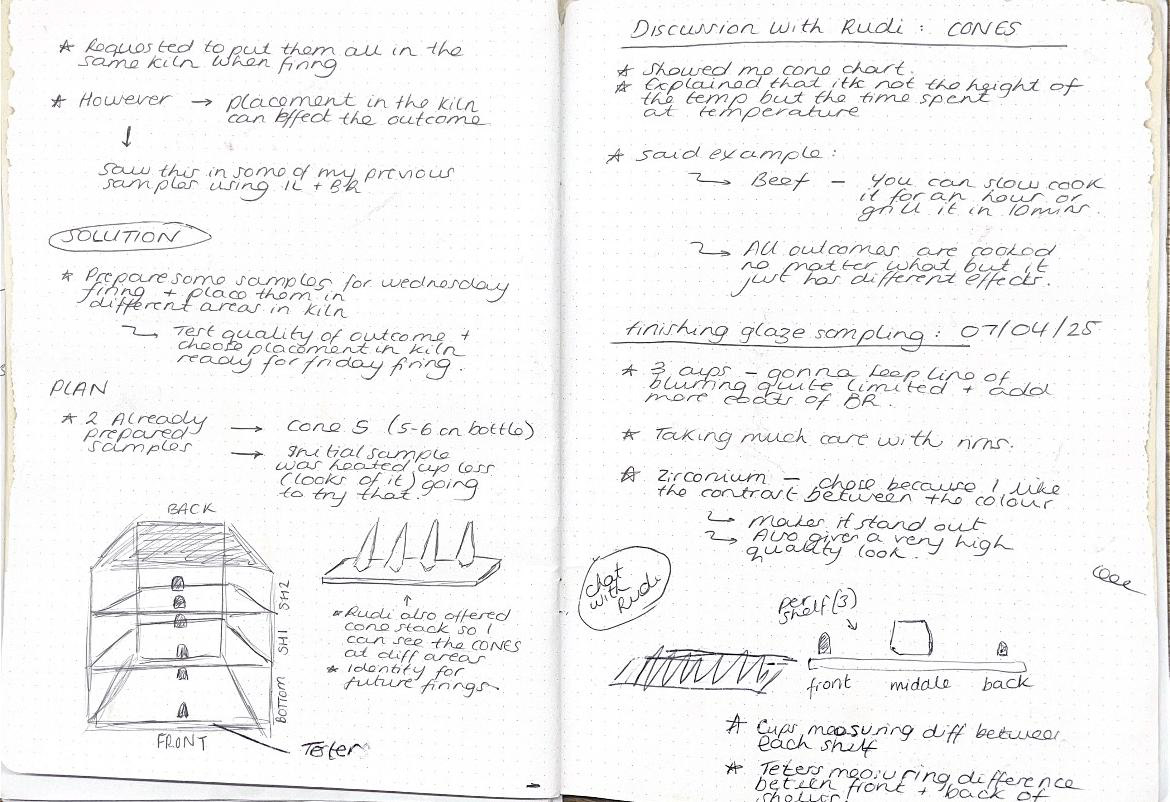
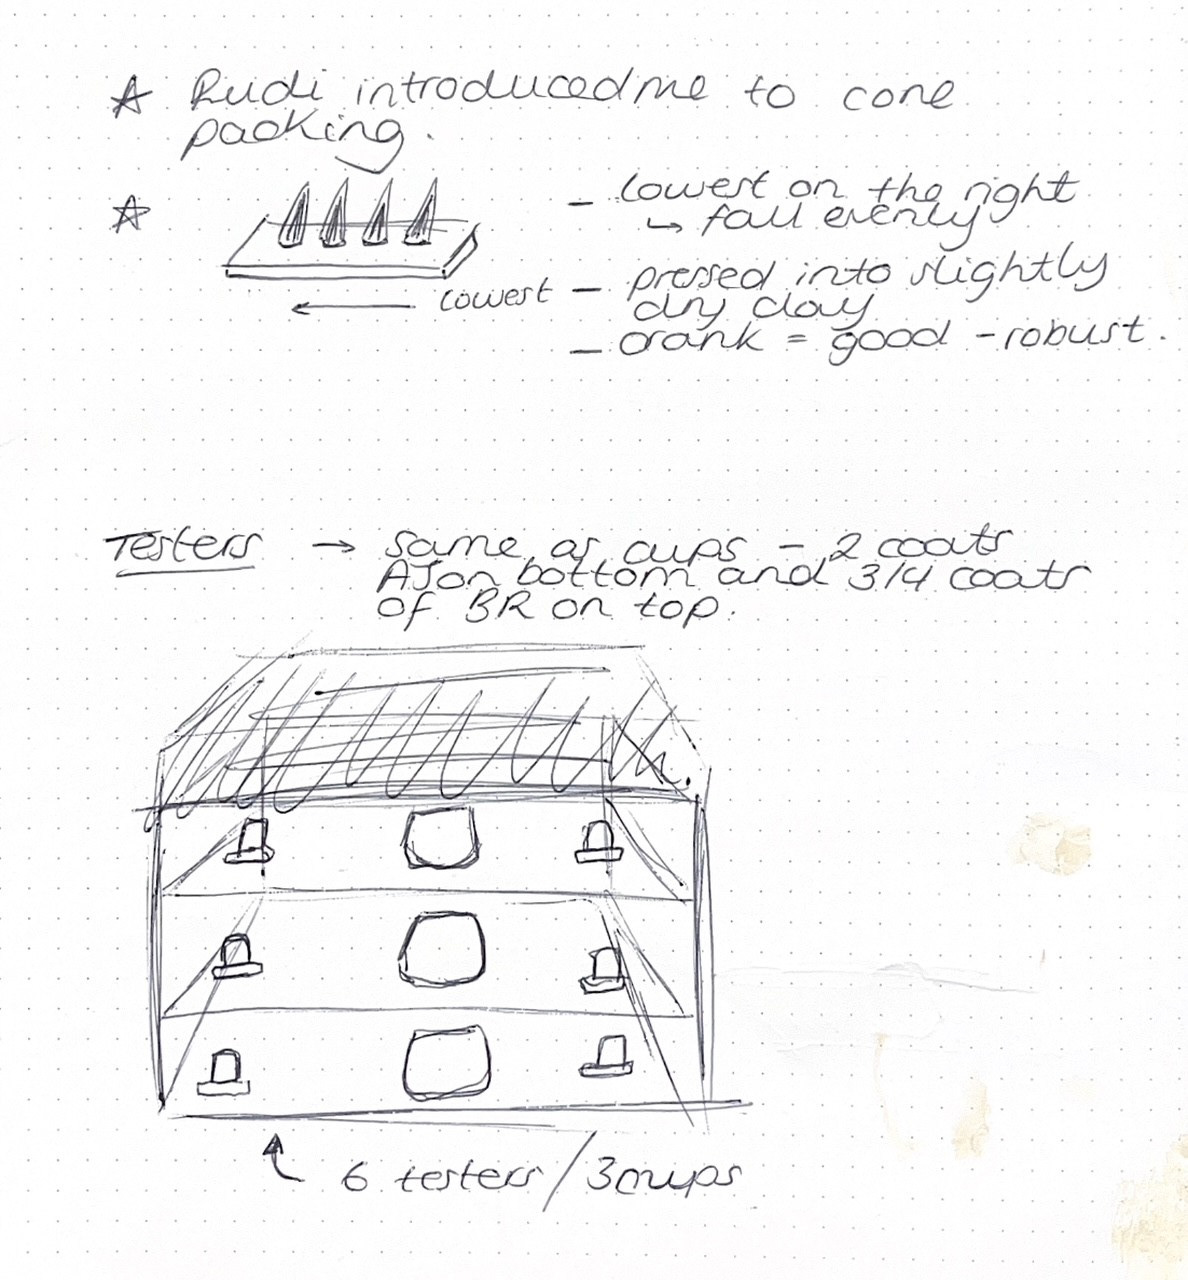
Making Cone Packs:

Loading Kiln:
Once all of the samples were completed, I knew it was the right time to move forward with this testing, as I wanted to gather as much information as possible. The volume of samples going into the kiln should give me a solid understanding of how consistent the kiln is across different areas. By placing cup samples on each shelf, I can assess whether different shelf levels produce varying results, while the smaller glaze testers placed at the front and back of each shelf will help determine if placement within a single shelf impacts the outcome. This process is not only valuable for my current project, but also a great skill to develop for the future, especially when considering technician or ceramic studio roles after university, where understanding kiln behaviour is highly valued.
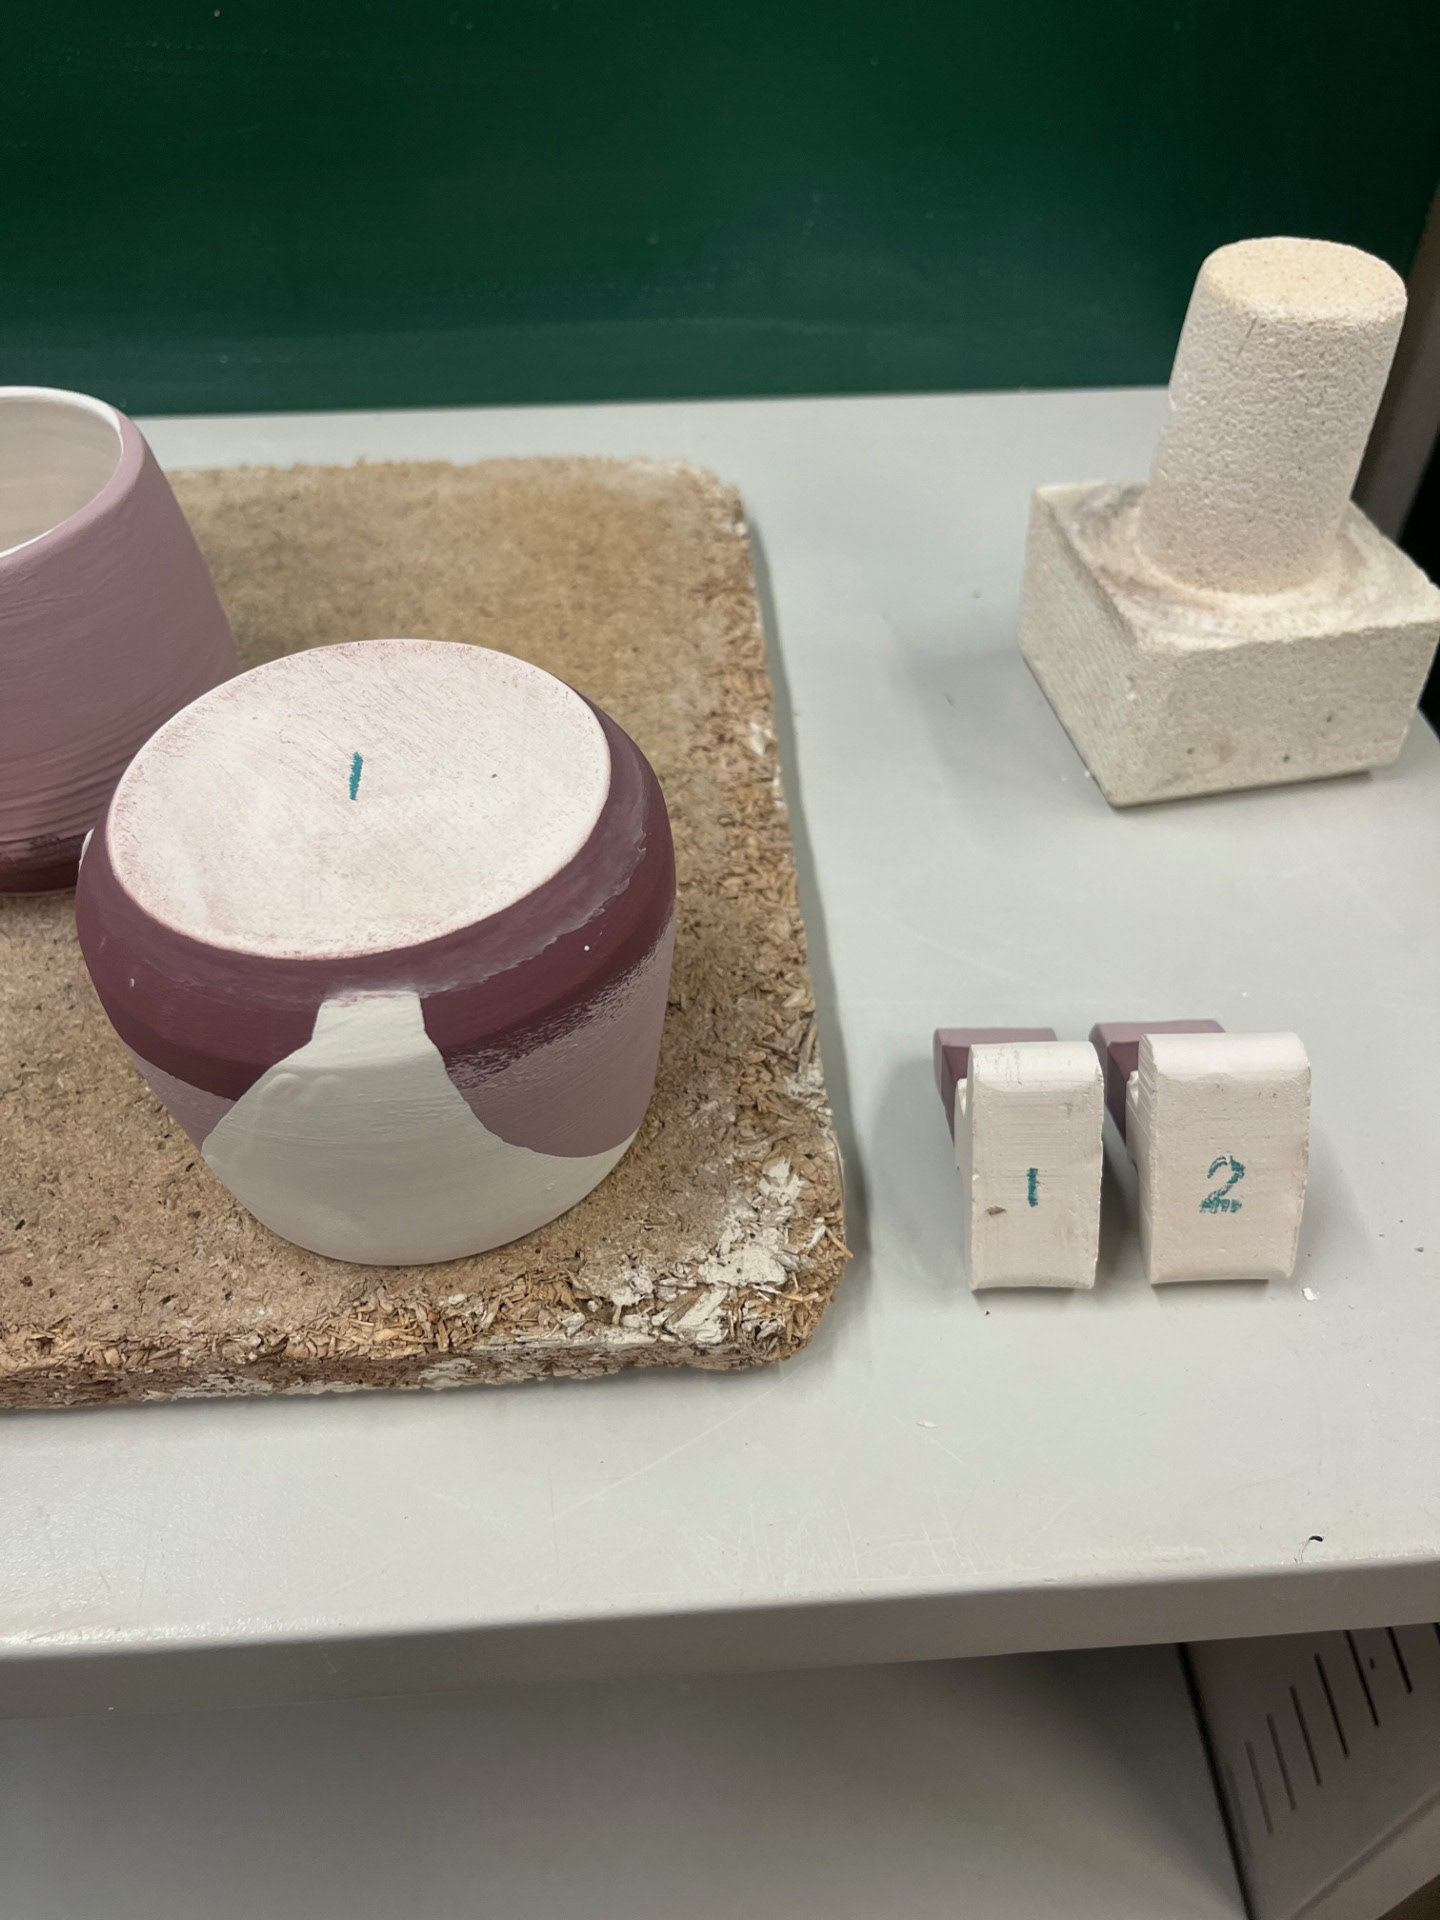
How I labelled the pieces
General placement for each shelf
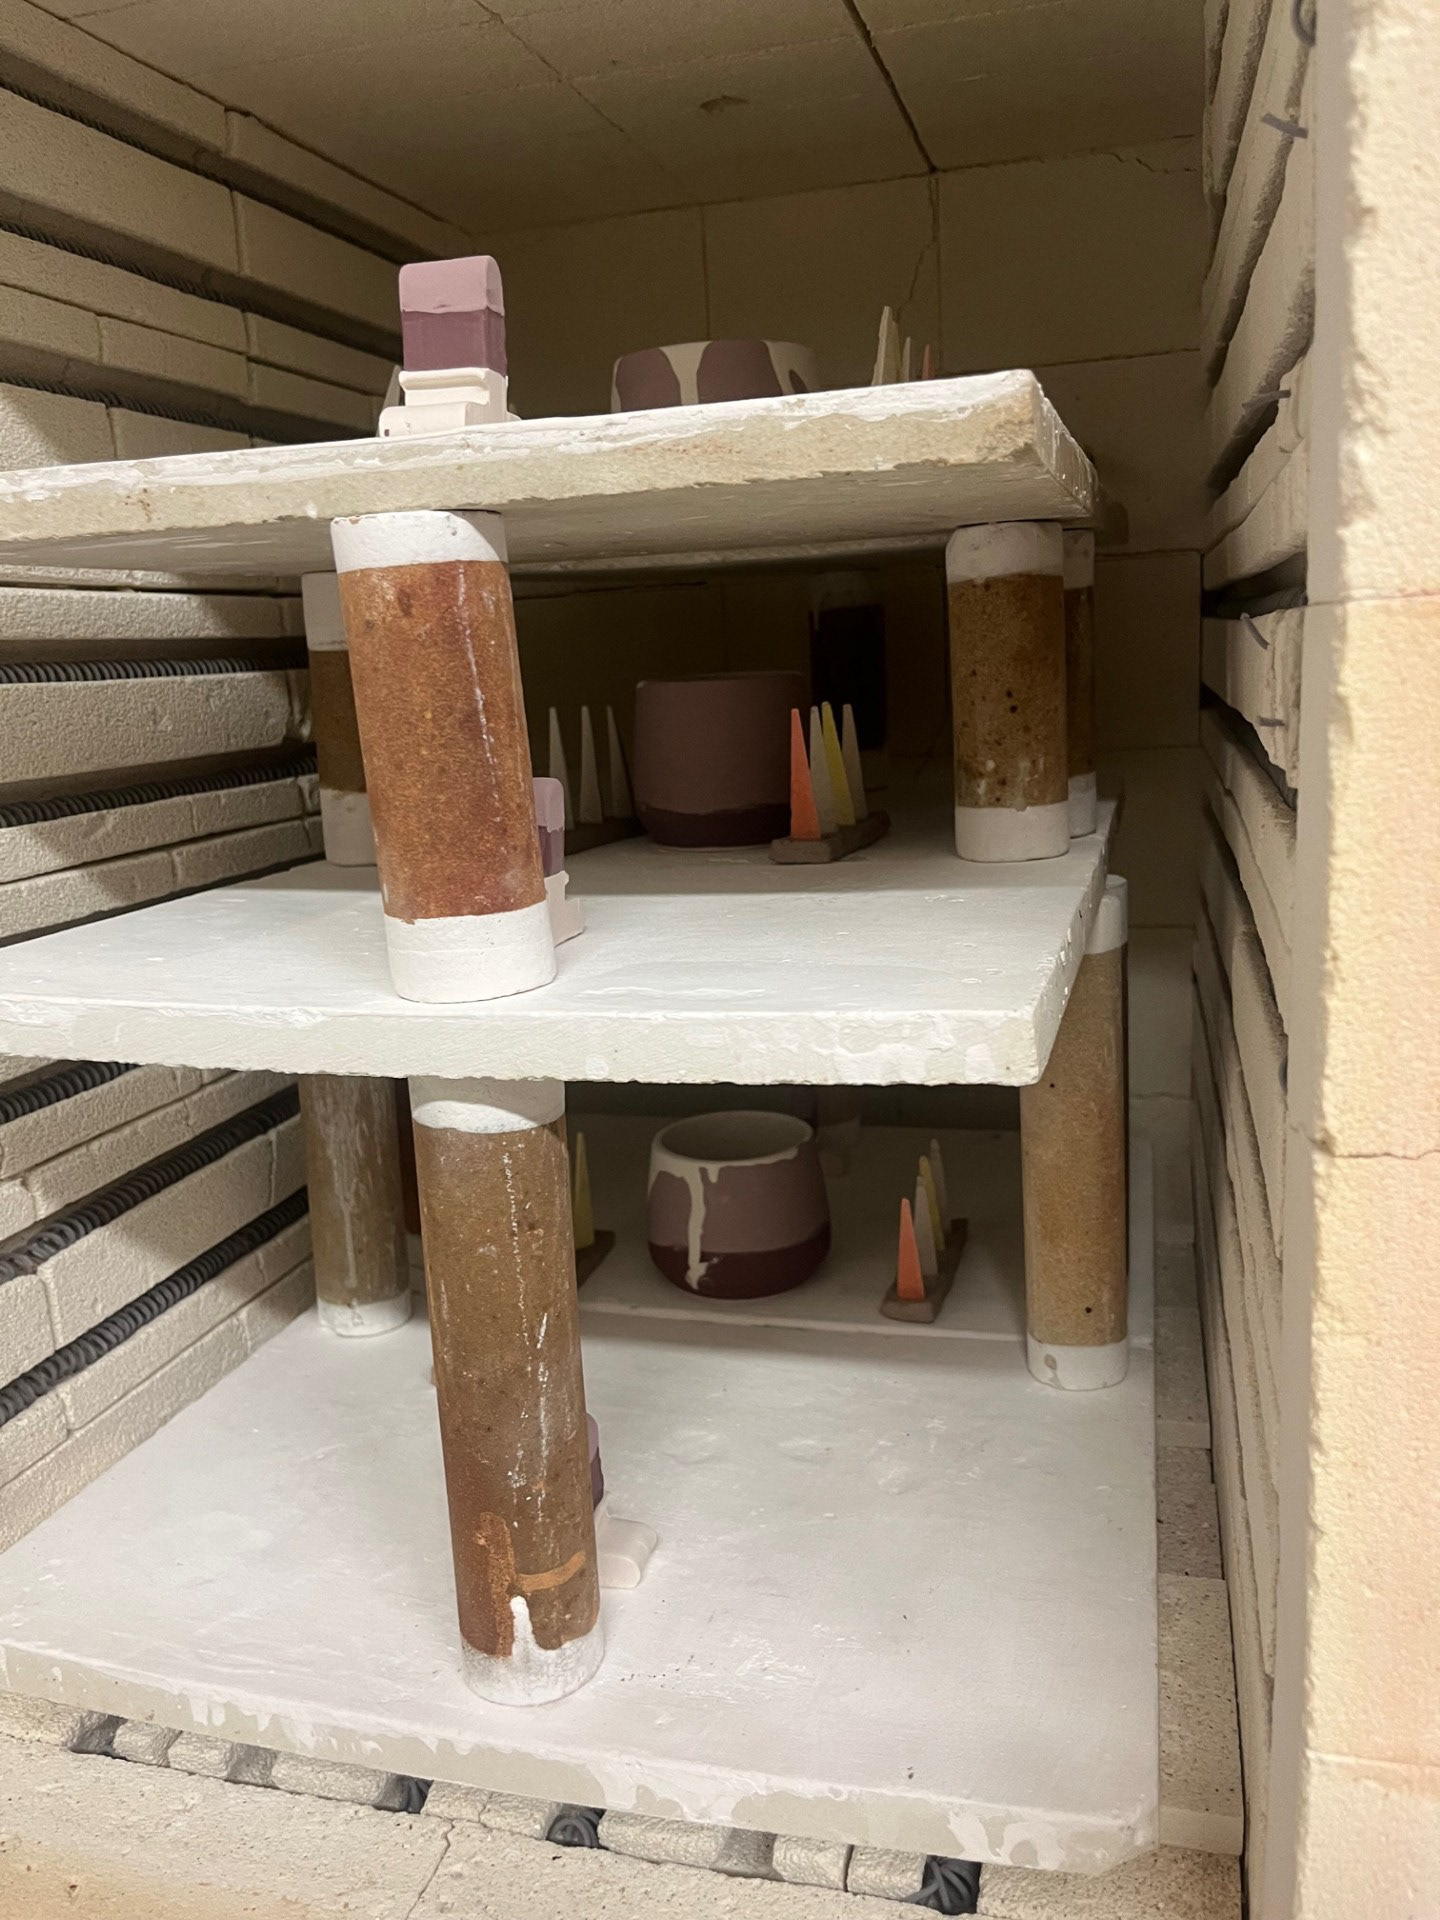
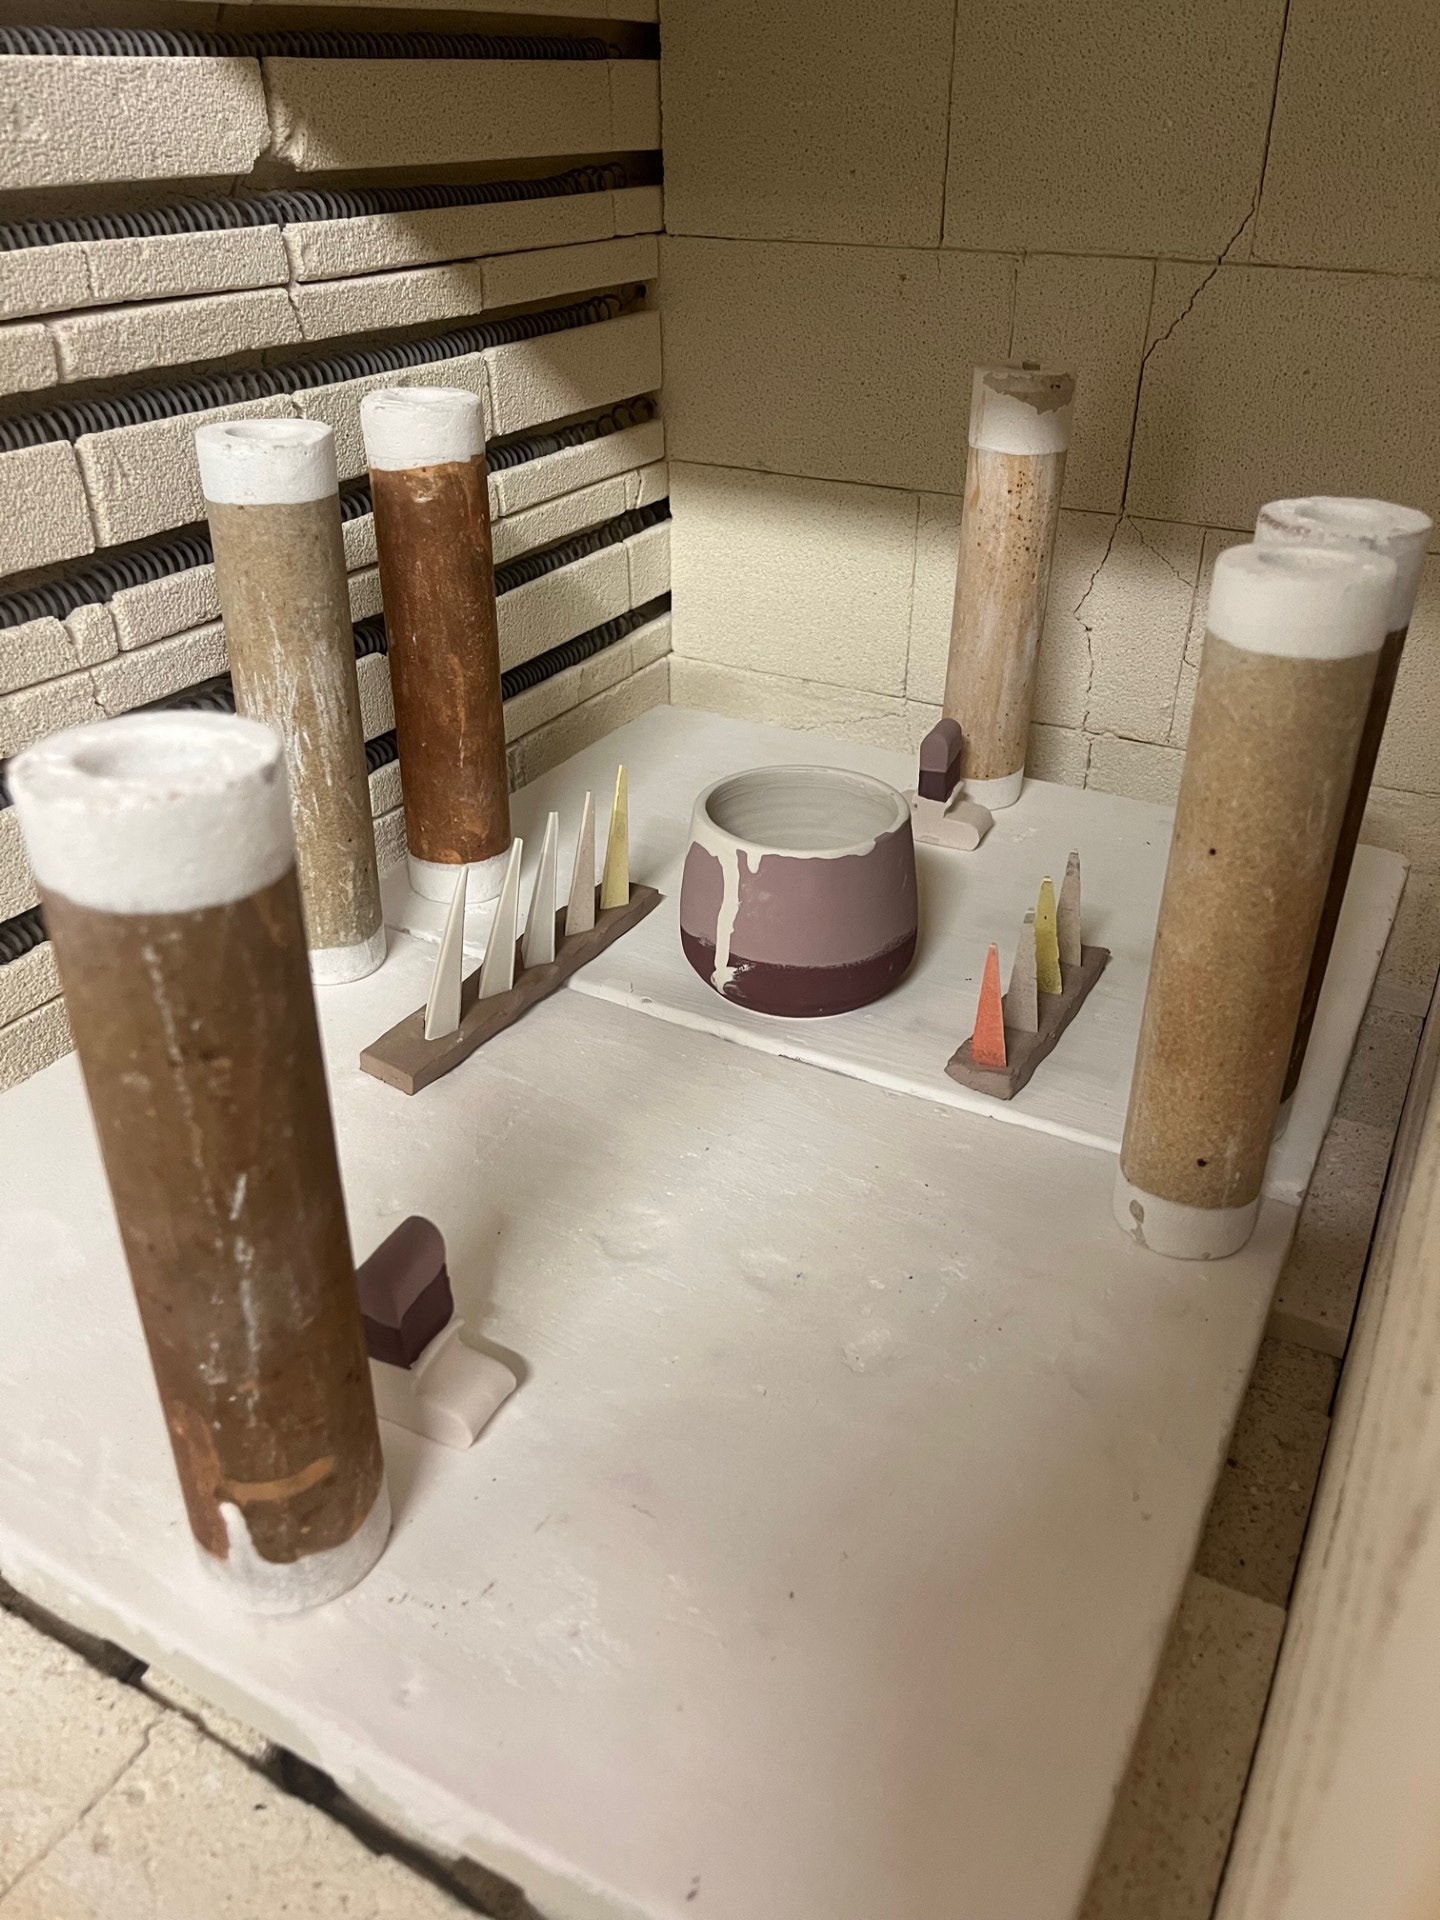
Whole kiln loaded with samples
As well as doing a test to see the consistency of Kiln 9, I also wanted to do a test of putting some of the cups through CONE 5. I wanted to do this because most of the samples that have came out so far have been CONE 6-8 and I wasn't a massive fan of the outcomes but I just assumed that that was what they were meant to look like. The main feature that made me think about putting them through a lower firing was that all of the samples so far looked like the glaze was becoming extremely liquid in the kiln; and aesthetically, that's what was putting me off. I am hoping that this firing will give me an outcome that will enhance my knowledge about my process and practice so that I can move forward and be in the best position possible.
Testing Results:
CONES 6 - 9
Samples - Same for all
All cone packs - Left to right going from lowest to highest shelf
The outcomes themselves were all very much the same which suggests that the kiln is very consistent. I am glad that there weren't any drastic differences because it has shown me that this kiln will be reliable in all aspects. The consistency was important to test because for my final resolution, there will most likely be 20 - 30 cups within my final firing so understanding the full demographic within the kiln is important.
On the left are cones 6-9 which are all completely melted which isn't good as it means that the kiln is completely overfiring. On the right, although my cone packing skills aren't the best yet, you can see that they all have begun to melt. The general stoneware firing at the moment is meant to be fitting at around CONE 8 but this suggests that it is going as high as cone 11 and 12 which is not good. From this, I was able to gather that putting my work through stoneware isn't the best option as it means that the outcome can be very unreliable due to the overfiring. I think that from now I will only be firing with specific cones because it means that I will get a more accurate and reliable result that can be repeated. Working with specific cones when firing is also good for after university because cones themselves are a universal language meaning that wherever I go, the understanding of cones will be shared and understood; therefore allowing me to bridge the gap between ending university and entering the professional world.
CONE 5 Firing:

With the Cone 5 results, I was actually really happy with the outcome. I was much more happy with the way that the glaze has reacted on these samples. The colours and interactions presenting on these pots are much more representative of what I envision for my final resolution. For the final resolution, the main thing that I wanted was a dynamic surface on the outside of the pots and this really fulfils that aim. Another thing that I wanted, which wasn't present in the other cups, was that I wanted an element of vibrancy. All of the other samples previously had a dynamic surface but they were lacking the striking and eye catching vibrancy that I was after; all of the tones were much more muted.
However, one issue with this firing is that the zirconium on the inside wasn't able to fully melt at such a low temperature. This means that I will have to make a decision between either doing a higher firing, like cone 7/8, so the zirconium can melt or choose to find a white shiny glaze that will melt at cone 5. I think that although there isn't much time left, I am going to push achieving a successful cone 5 firing as I am so happy with the results and I think that if I can achieve this, it would level up my final resolution. See below for notes/ summary of results:
Glazing Final Cups:
Although there is still elements to investigate to do with the firings, the actual glazing itself is remaining the same. Glazing the cups will be fairly simple as this is a style of application that I have been working with for a while. A couple of things will be on my mind that has been touched on in previous tutorials that relate to execution and refinement. One of which being the controlling of the bleeding on the rims which just requires me to take a but more care making sure the application is even all round. The other aspect relates to having a refined bases where the glaze is wiped away. During this development I have been trying to just make it neat purely through application. This was proving difficult because I am looking for a higher level of precision than I would be able to achieve with doing it by hand.
A couple of things will be on my mind that has been touched on in previous tutorials that relate to execution and refinement. One of which being the controlling of the bleeding on the rims which just requires me to take a but more care making sure the application is even all round. The other aspect relates to having a refined bases where the glaze is wiped away. During this development I have been trying to just make it neat purely through application. This was proving difficult because I was never able to get it perfect. In this session I had the idea to try a method that I had seen online where people use a large sponge to wipe away the glaze on the base.
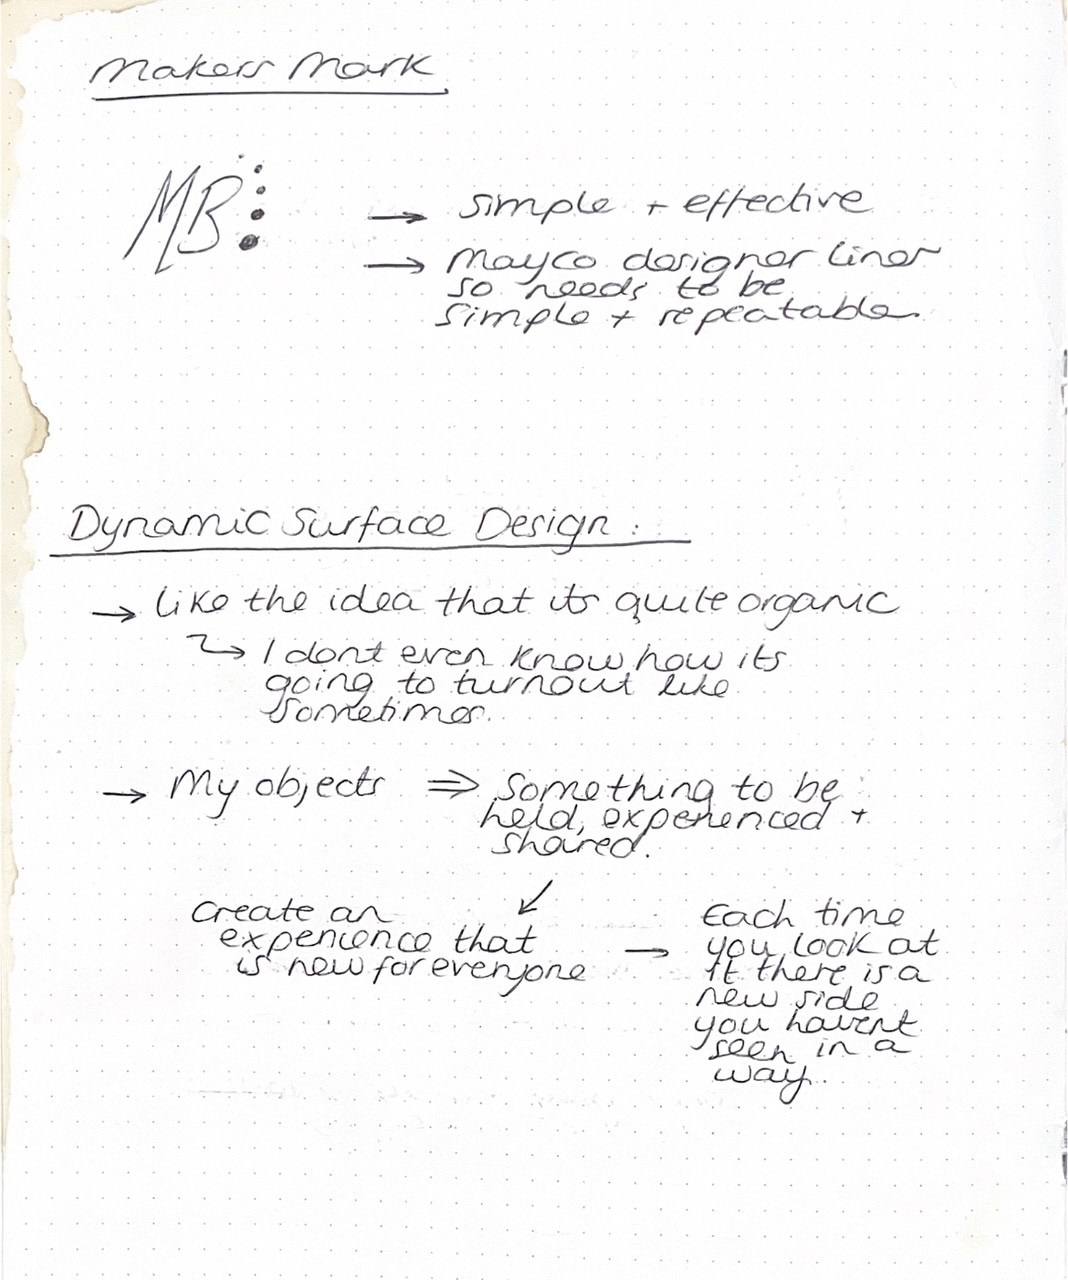
To execute this I simply slightly wetted the sponge and gently twisted the base of the cup on the sponge. I tried my best to do each cup on a different area of the sponge to avoid smudging but that became difficult as I had quite a high volume of cups. One issue I found with this was that it did create some smudging but I think that that was partly due to the fact that I got the sponge a but too wet. It was also an extremely old sponge so I think that that was the main reason for its slight lack of effectiveness. For the first batch, I also realised that I would need to do my makers mark as the final step because a few of them got smudged by the sponge.
Although they have all been wiped and finished to as high a level that I can produce, there is still one aspect that I was not able to hang. When wiping the bases, I wasn't able to remove the glaze within the pores of the cups. This may be an issue however I know that it was caused by me wiping the pots after they had been turned, therefore giving them a porous texture. This can be solved by turning the bases with as much accuracy ass possible so that there is no need to wipe the bases. However, as I have never worked with this high a volume of work before, it was never an issue that I had come across nor noticed but I am glad I know now so that it an enhance my future practice.
In future, I think that using a large sponge for the bases would be an amazing element to feature in my practice as it made the process very quick and efficient. Efficiency is also key because I will hopefully be making high volumes of studio pottery after university so I will need a method that is quick, repeatable and reliable.
Glaze Testing: Monday, 28/04/25
Although it is late to be completing testing, this for me comes under refinement of my resolution as I am committed to pushing my abilities as much as I can to create a final outcome that I am proud of. Prior to the previous glaze testing, I wasn't very happy with how the glaze was looking on my work which is what made me want to push myself to understand and figure out how I could make it better. The outcomes of the cone 5 tests then added to this as I finally liked the outcome of the outer glaze but this now meant that I need to find a glaze that worked well not only at cone 5 but with my pieces.
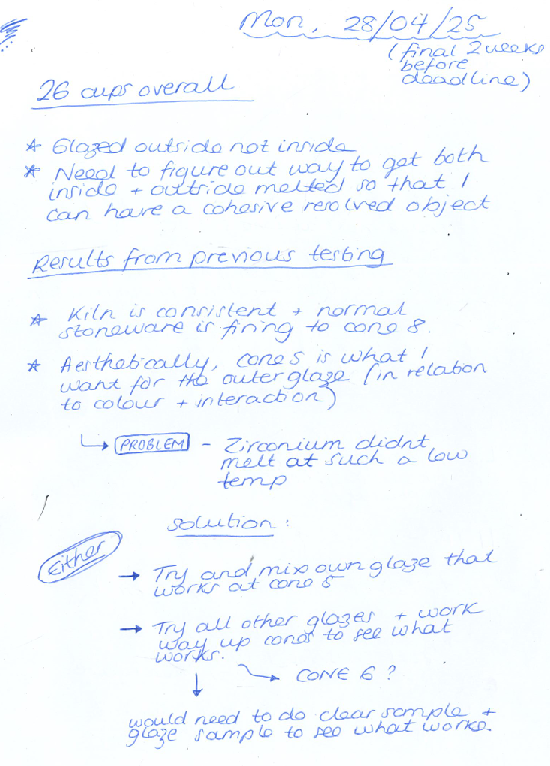
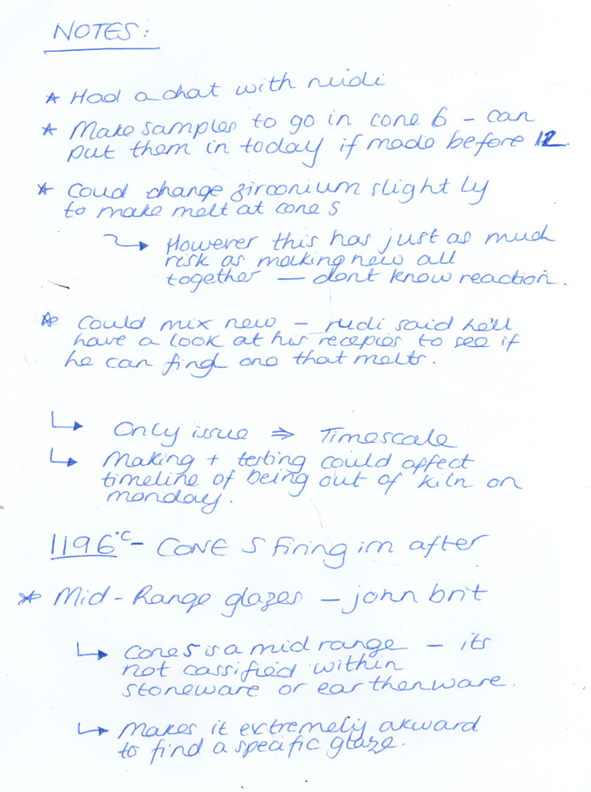
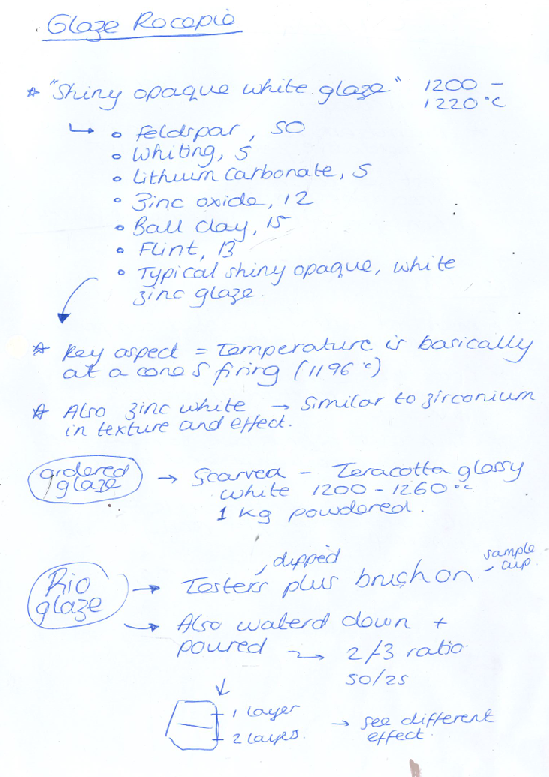
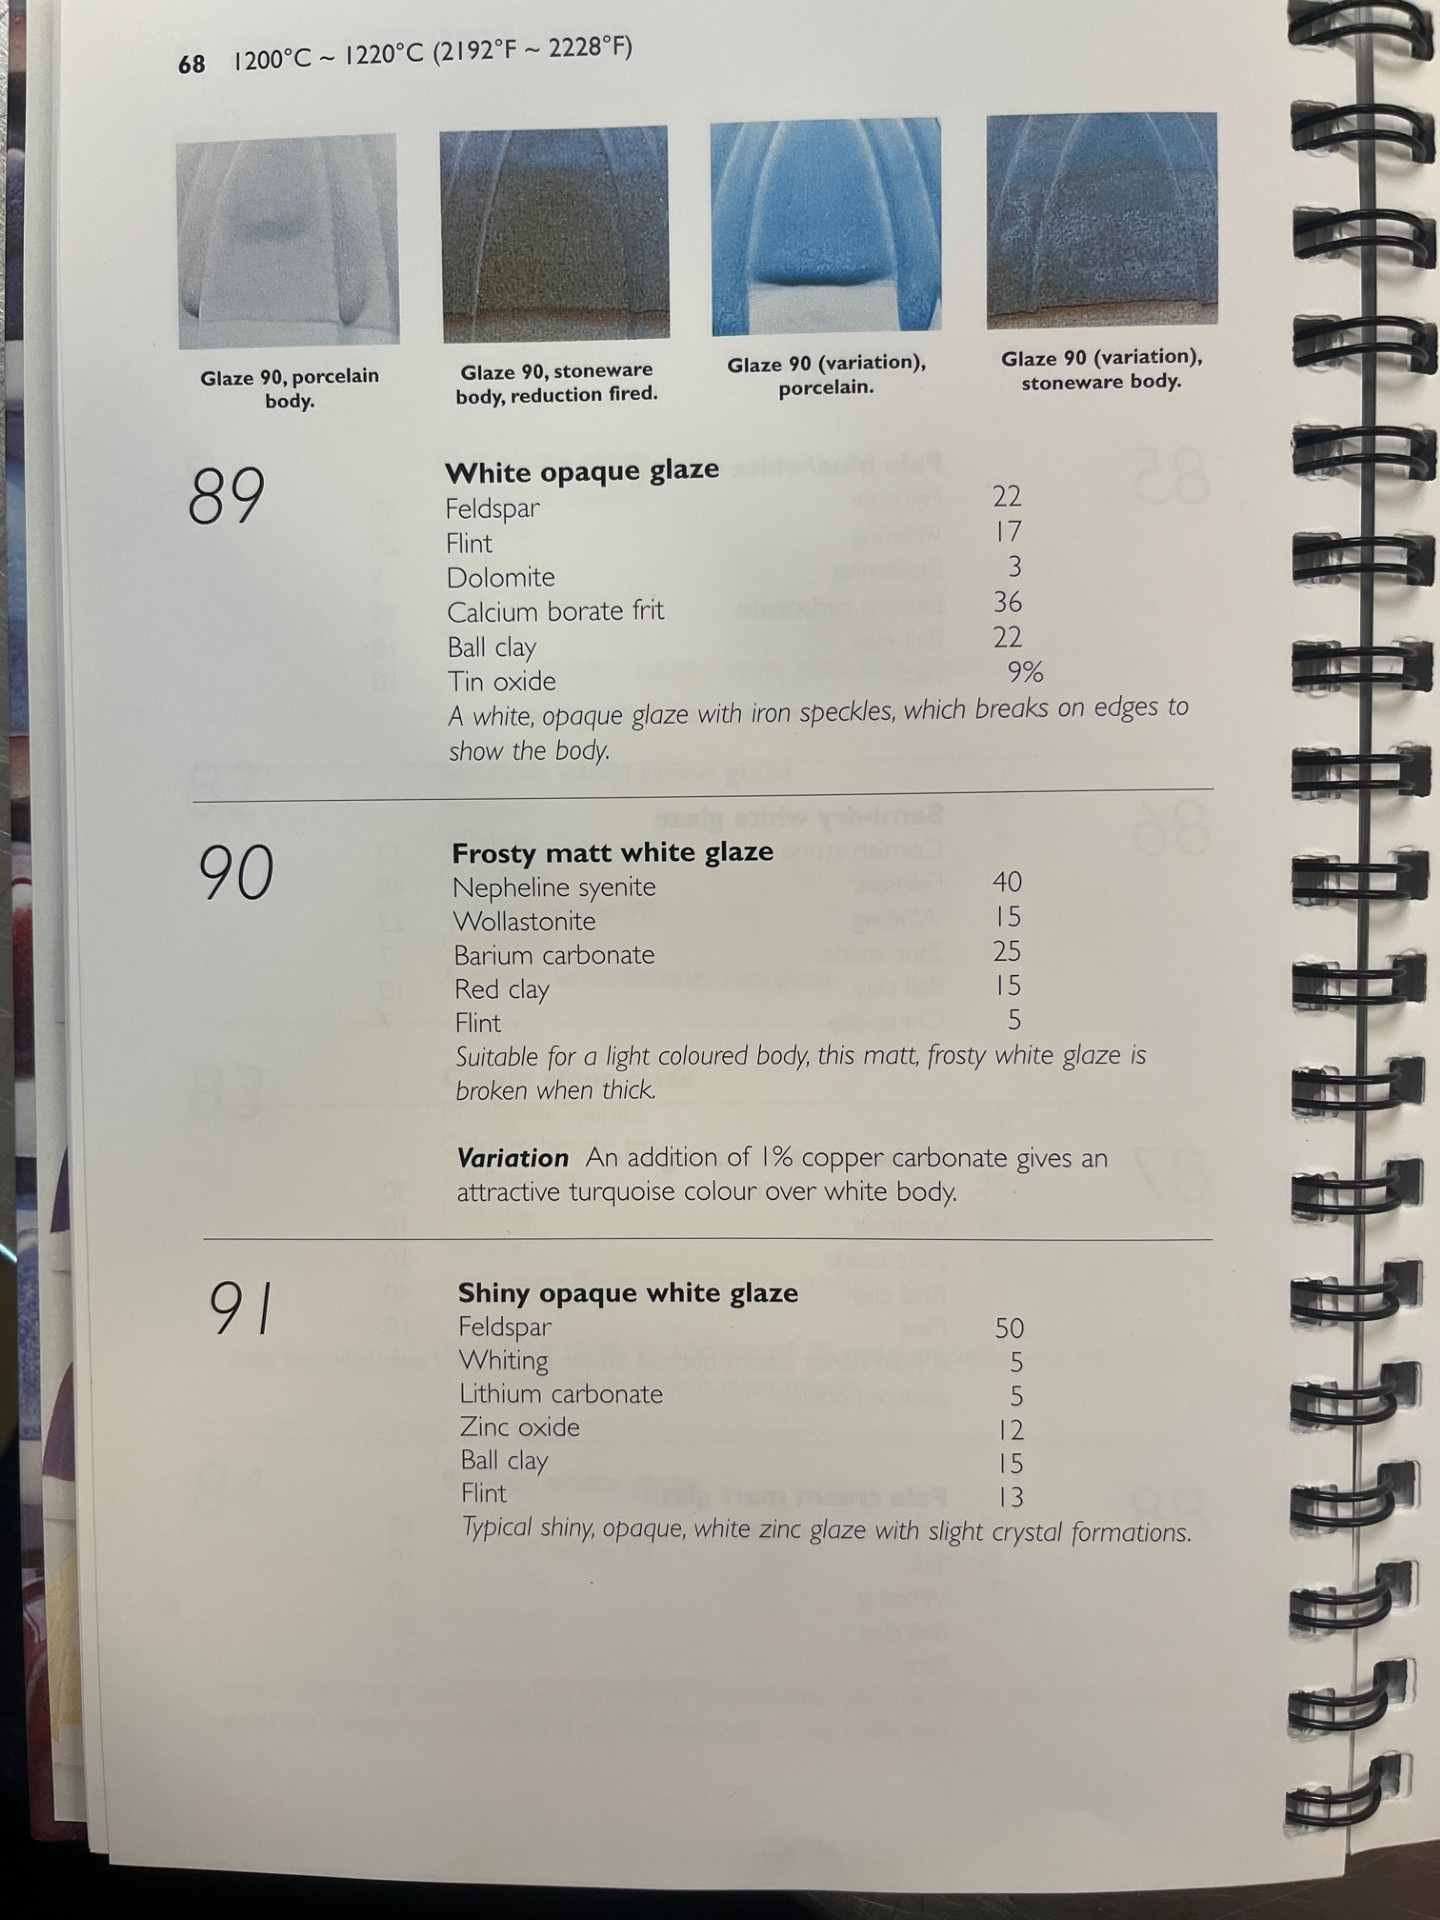
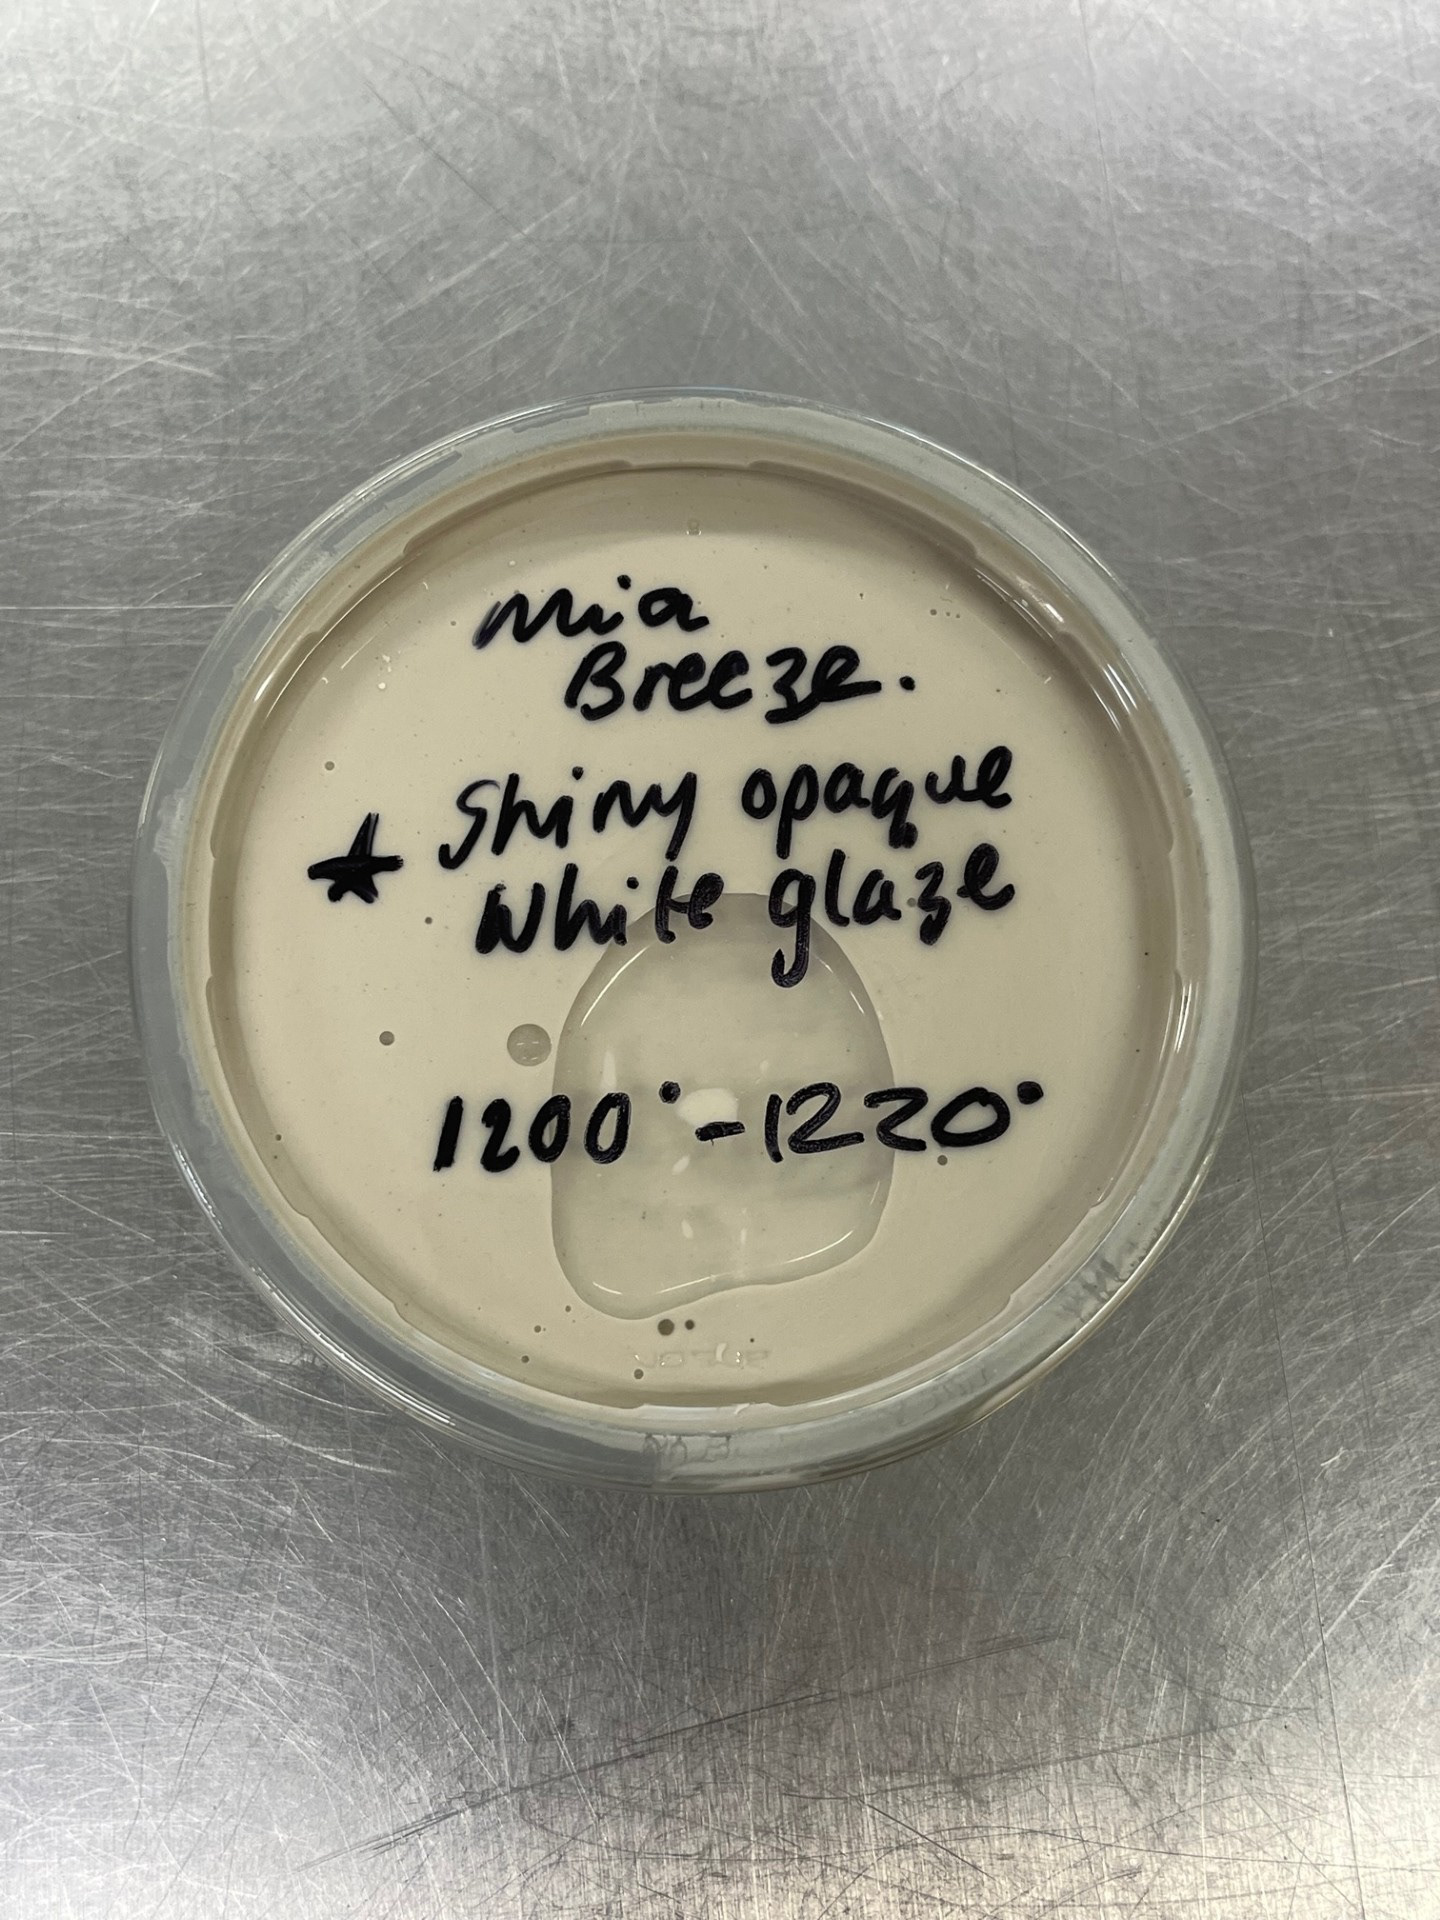
My plan for the next week of testing is to try a multiple number of avenues so that I can see what works. The first option is mix my own glaze that is suitable for cone 5. This is a good option because everything is already here to mix most glazes and it would be ready the day after mixing; so would be ideal because of the time pressure. The other potential option is working my way up the cones to see whether I can achieve an outer and inner outcome of the cups that I like. The first step that I am going to take is to research into the glaze mixing. This is the most reliable first choice a the materials are already in house and my technician already has books that I can look through. However, Rudi the technician did mention that I could prove difficult as Cone 5 is classed as a mid range firing. This means that it doesn't classify within stoneware or earthenware as it is something in between. In one of the books however, I found a glaze labelled '91: Shiny Opaque White Glaze' which has a firing temperature of between 1200-1220 degrees celsius which is only a fraction off the cone 5 firing which is around 1196 degrees celsius. See Below for glaze and further notes:
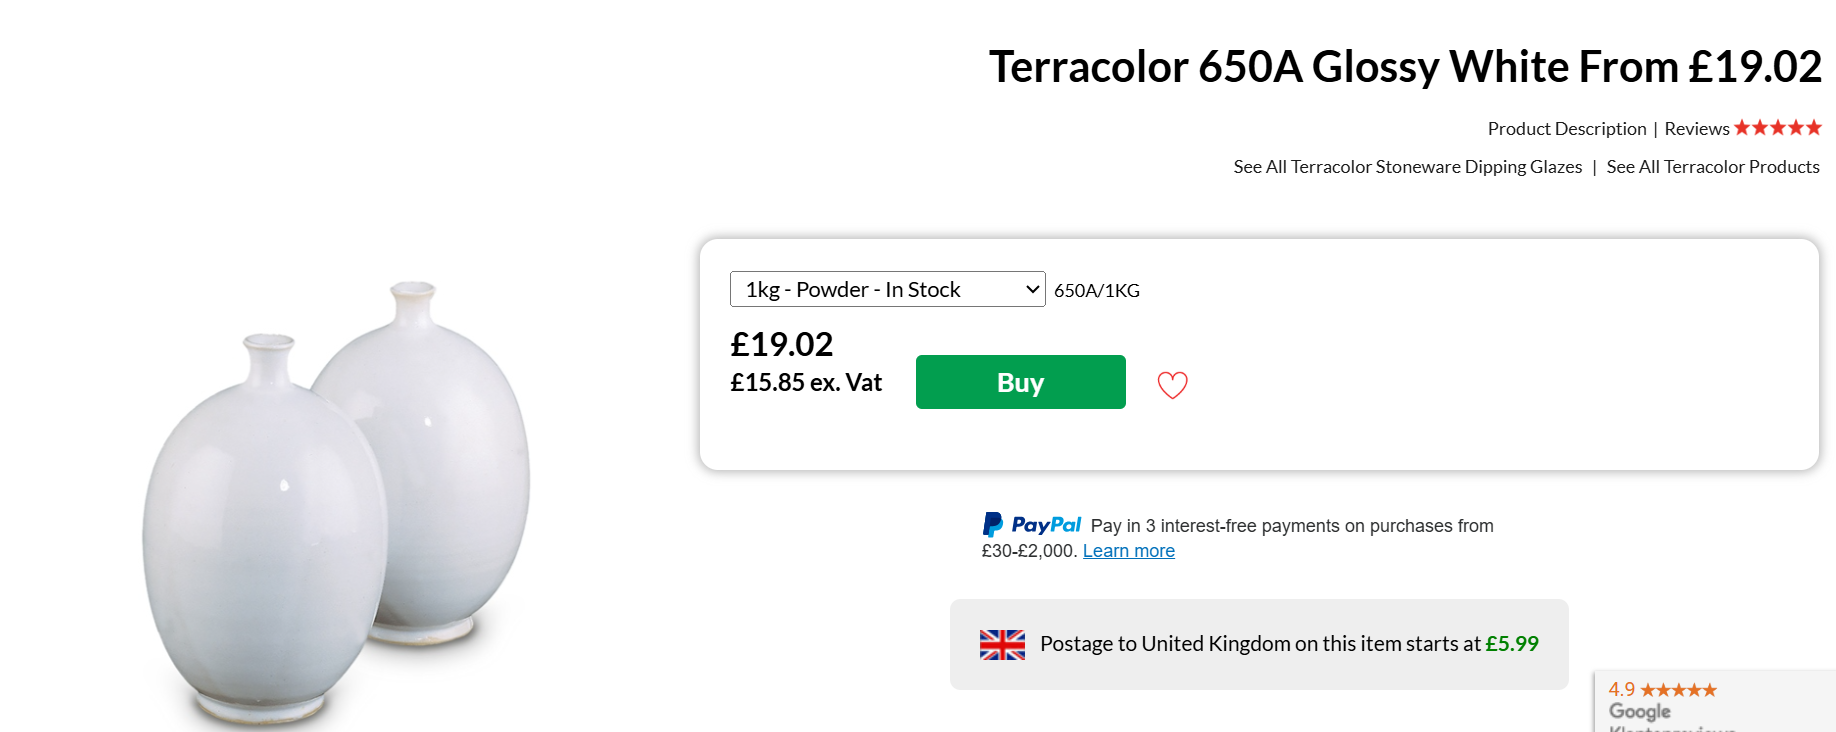

Terracolor Glossy White has been ordered but will be used as a back up for next week if the glazes don't work this week. This glaze will hopefully be suitable as it is labelled as a cone 5 white shiny glaze; However, there is potentially a low likelihood that this will come in time. The Botz white glaze was gifted by a friend who didn't need it anymore and it is a cone 6 glaze. I'm giving it a go by putting it on the inside of some sample cups with my glaze on the outside into a cone 6 to see if both the glazes work at that temp/ whether I like the outcome. Seeing the effect cone 6 has on my glazes is hopefully going to serve as a back up option for if the cone 5 firing isn't achievable. For one of the samples, I have chosen to water down some of the Botz so to see if it works as it would make it more pourable. That is the method I have been using for the inside of the cups and It would also make the glaze go a lot further.
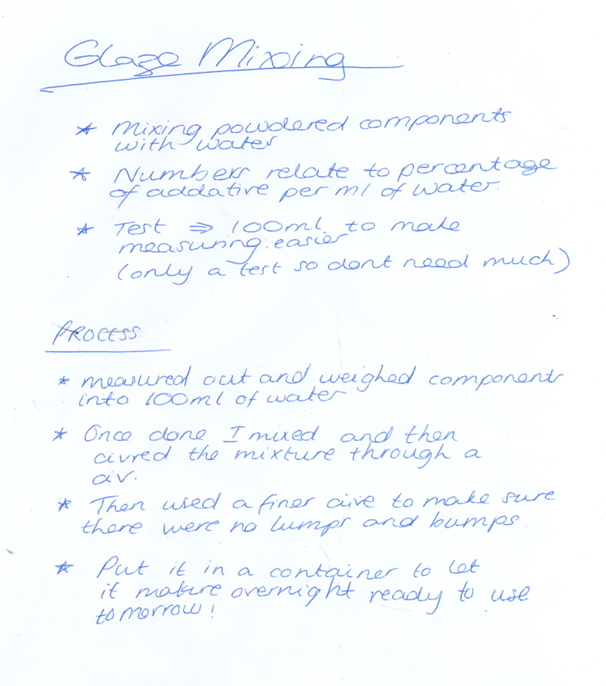
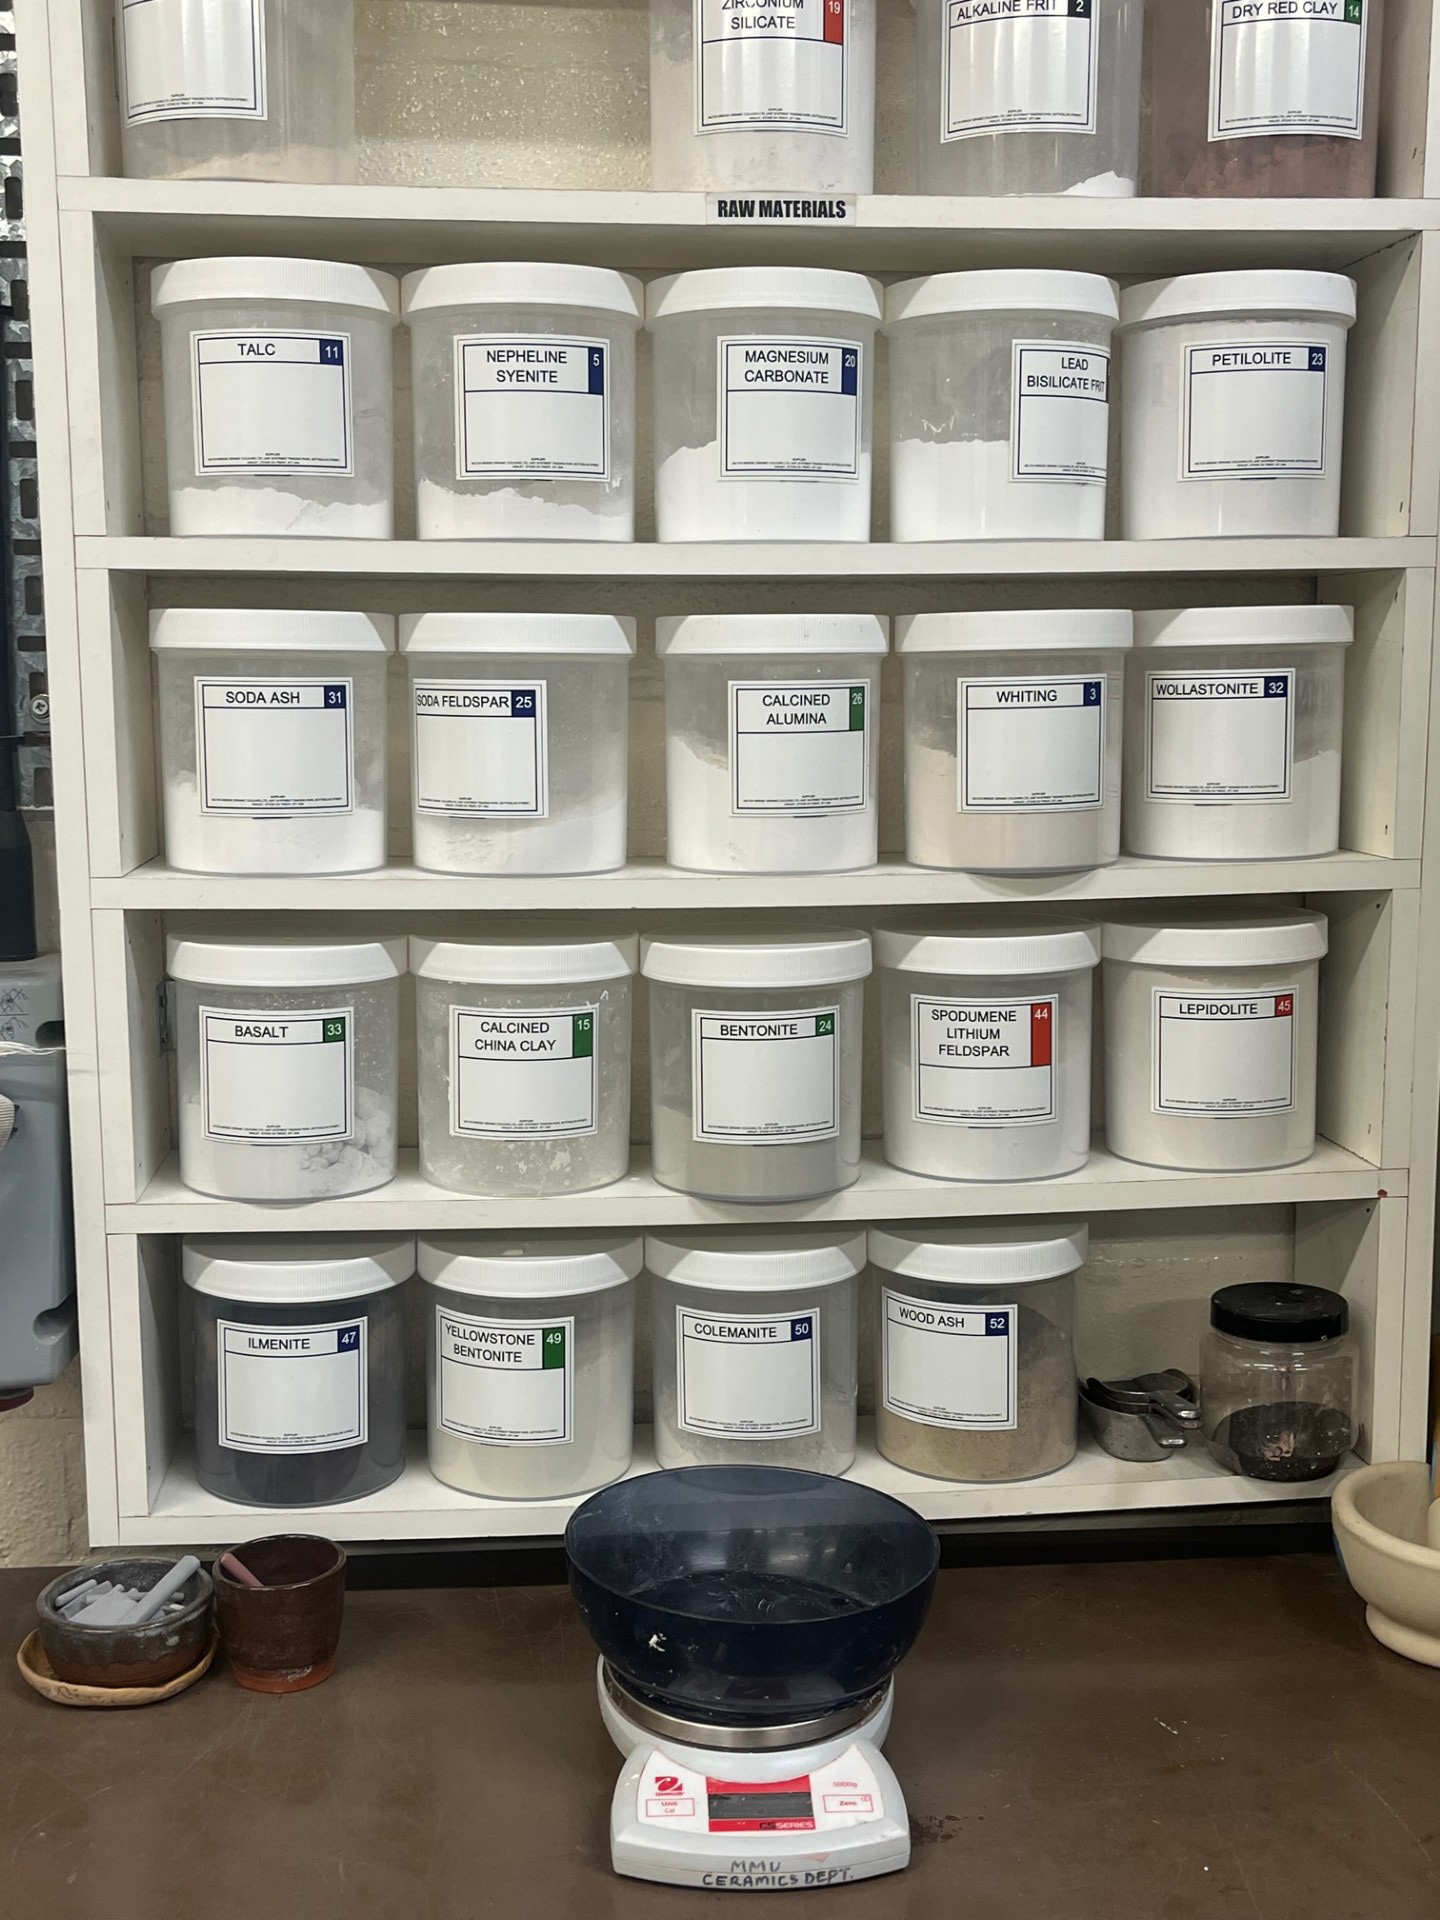
Glaze Mixing:
Mid Way Reflection:
Ideally I wanted to have all of my pieces glazed by the end of this week so that they would be ready by Tuesday and then allow time for final images. As I have decided to go down this testing route, it may mean that this timeline could change. Although this testing could jeopardise the timeline I believe that it is worth it because I would rather be pressed for time and have a resolution that I am happy with than have loads of time left but have items that didn't fully represent me or my practice. My whole ethos relates to both aesthetics and myself as they both come hand in hand. My craft is about bringing beauty into everyday life through utilitarian objects and the routines surrounding them; but then that beauty is a reflection of me and my minds vision of beauty. This is part of the reason why I am glad to be doing this testing as I am giving myself the best opportunity to achieve my ideal resolution by exhausting the possibilities in the time that I have.
Within my craft, I soon identified that glazing would be my form of self expression and how I communicate my personal essence through my work. I am incredibly grateful that in the past few weeks I have been able to learn more about my practice than I have in the past few years ready to take all of it forward into my practice once leaving university.
Cone 6 Testing: Outcomes, 30/04/25
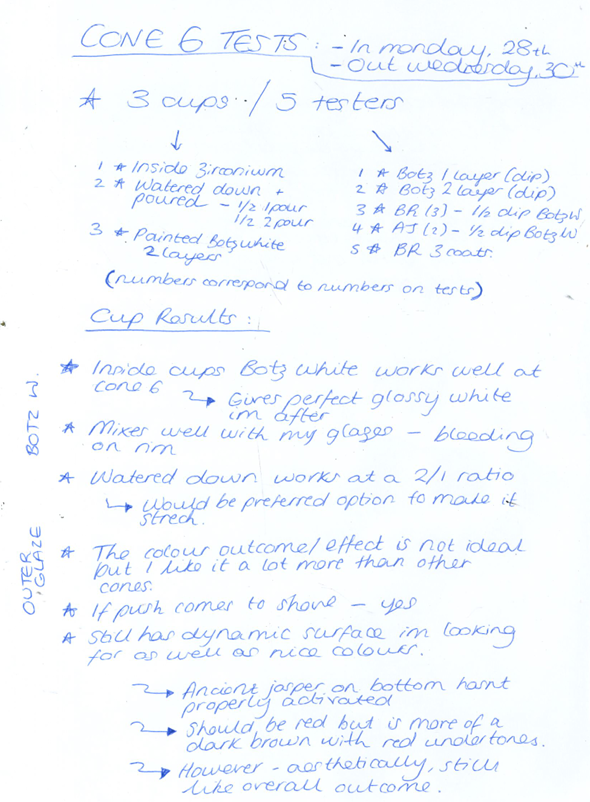
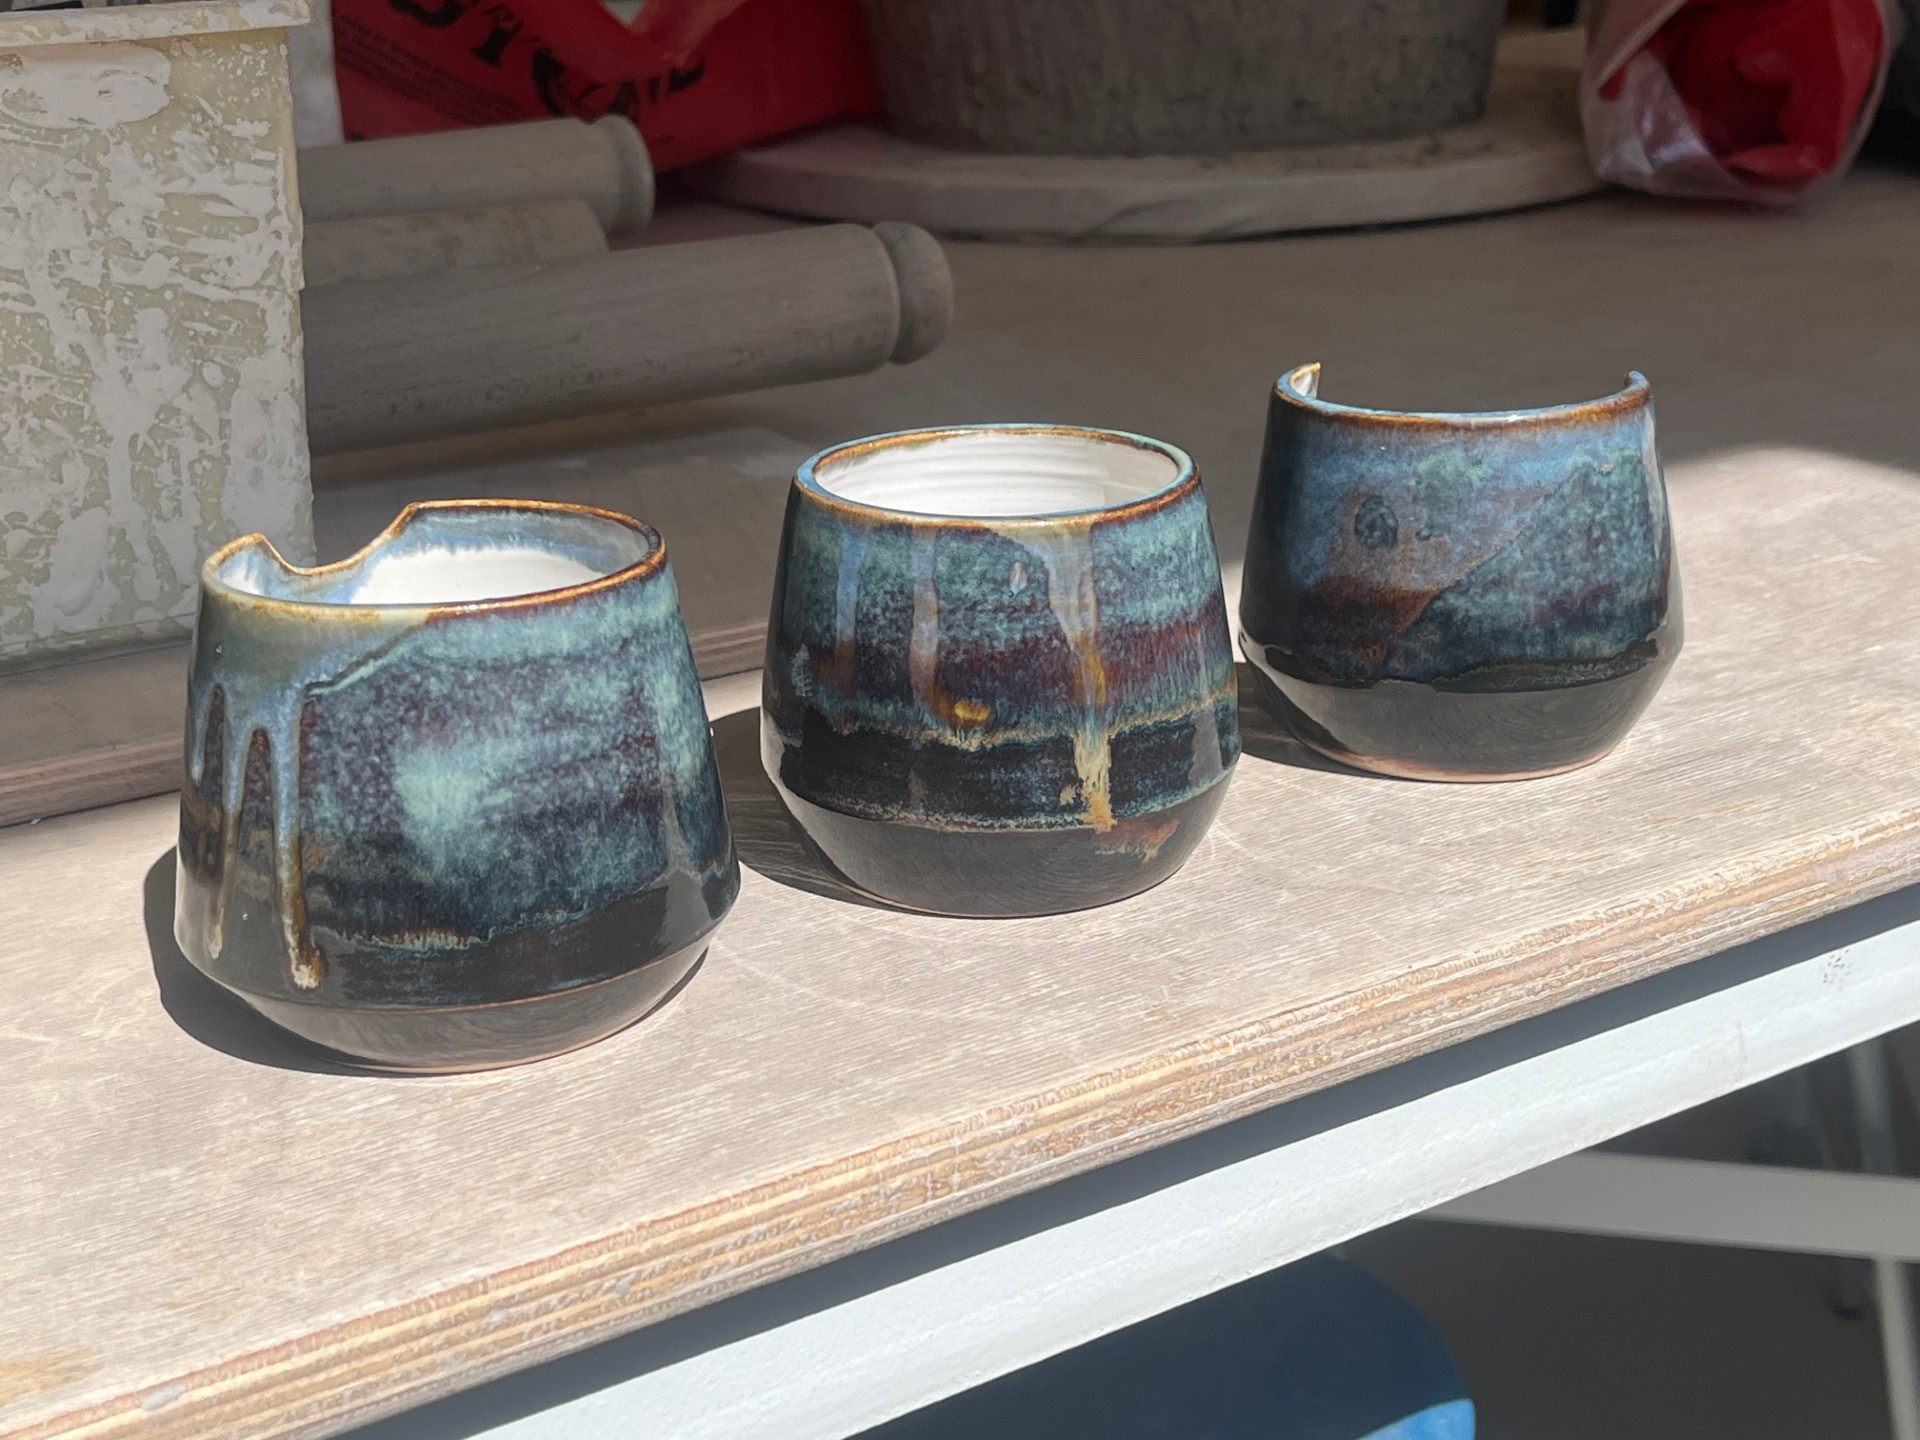
Outer Glaze Outcomes:
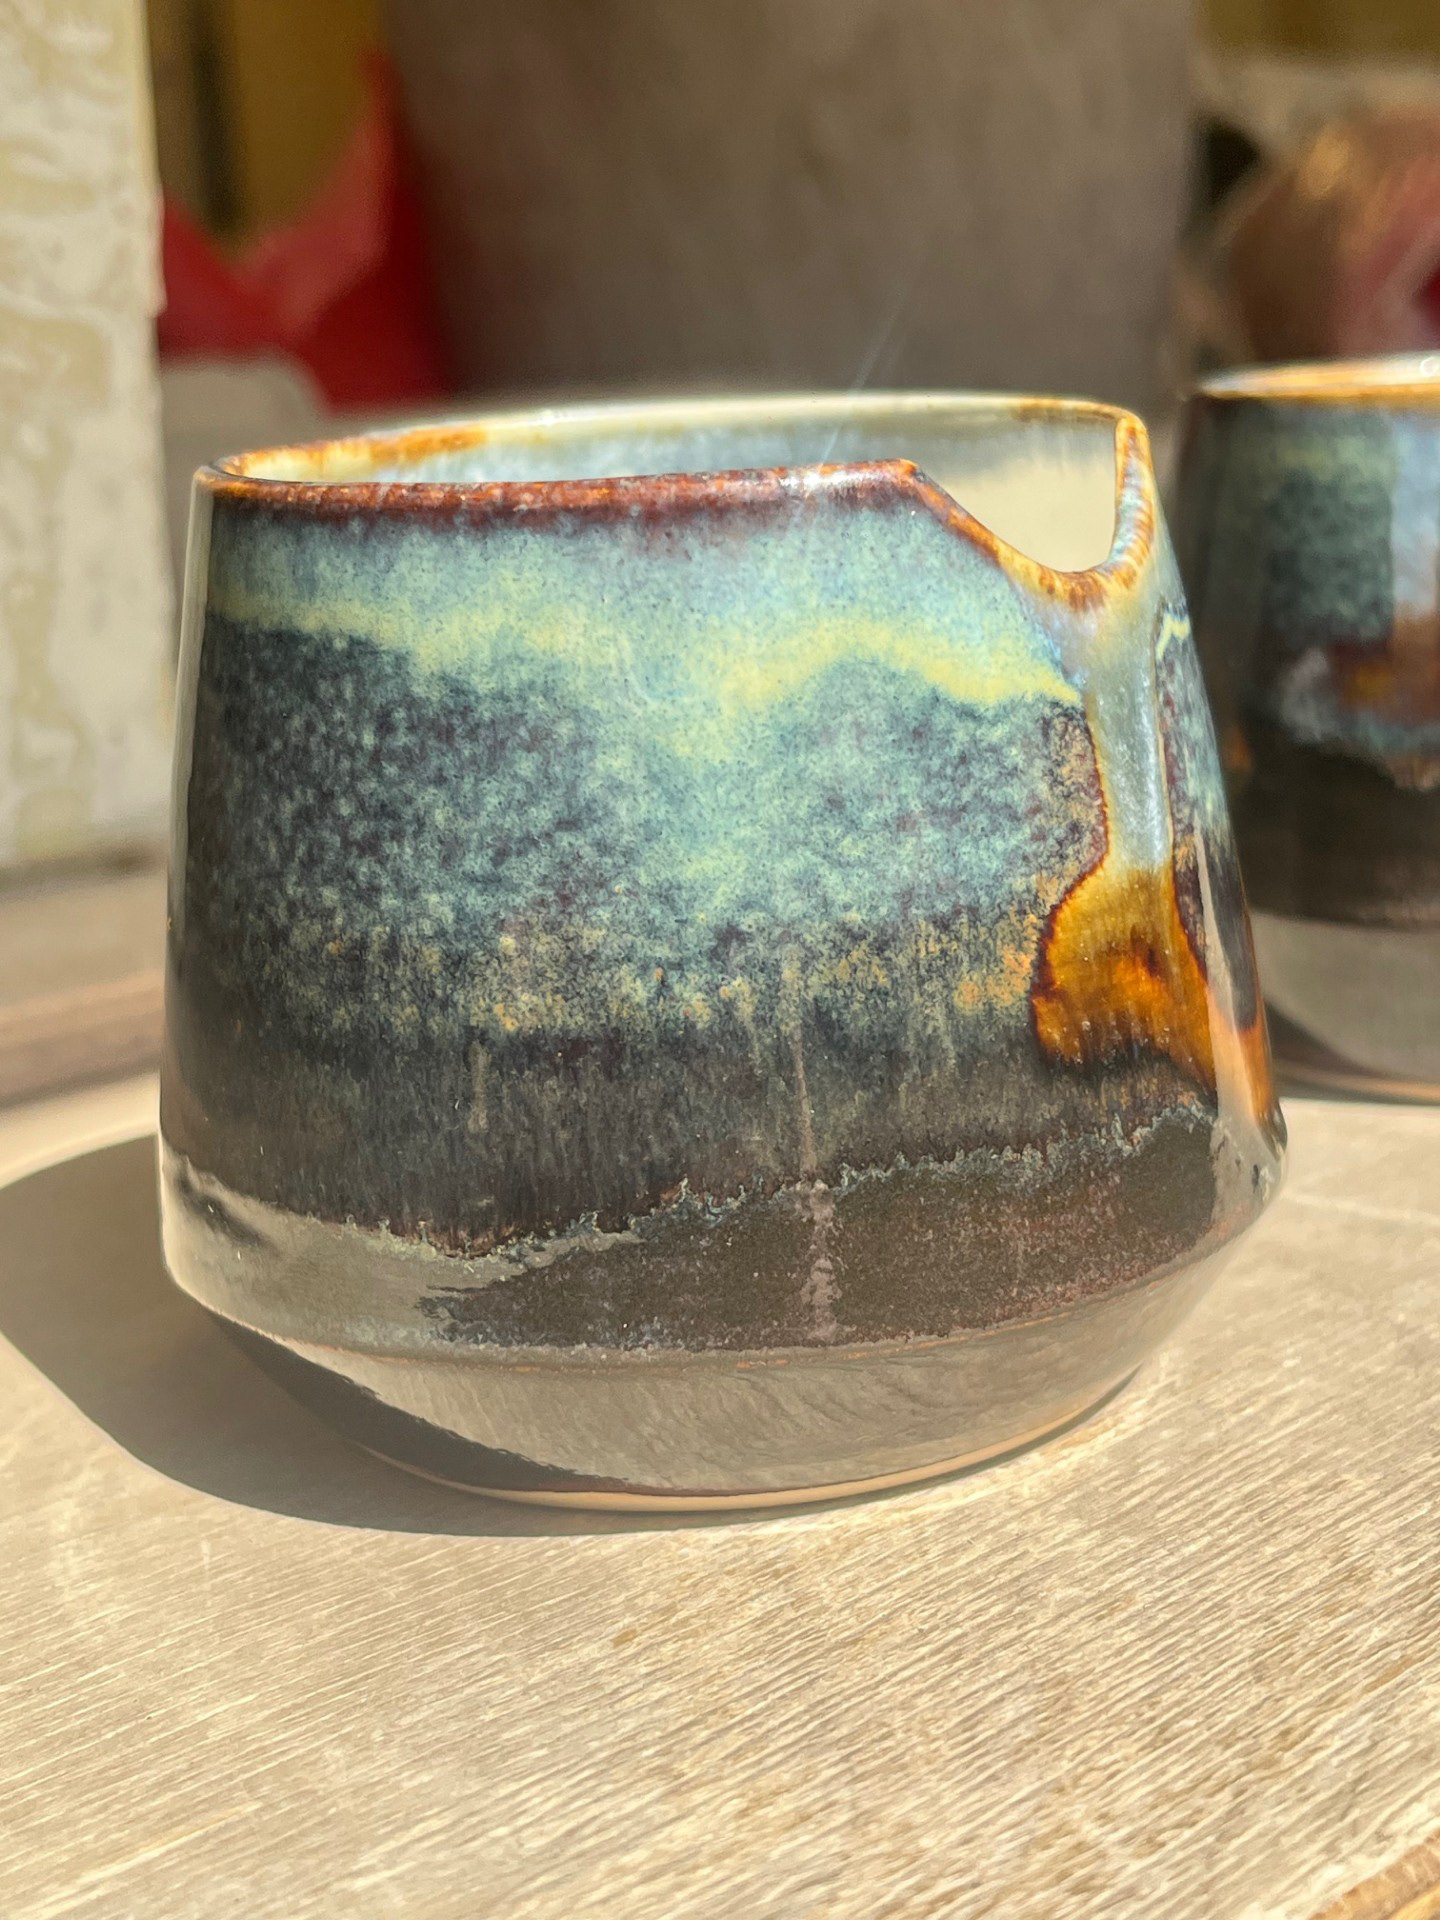
For these glaze tests, as said above, I am actually ok with the outcome. I think that although this doesn't create the specific vibrancy within the colours that I am after, this firing still creates quite a dynamic surface which was one of my main aesthetic aims for the glazing. I much prefer these to the other current alternative which is firing them at Cone 8 which is the general stoneware firing. I think that this would be the back up option if the white glaze options that I have completed don't successfully work for Cone 5.
Tester Outcomes:
For the testers, the results are very similar to the cups. One thing I can see is that I'm not sure if the BOTZ White works very well over the top of the Blue Rutile or the Ancient jasper glazes. This could be due to the fact that there are many coats of the glazes applied and then I dipped the testers in the white; meaning that there could've just been too much glaze for such a small tester. All of this however I think is something that can definitely be tweaked in future as I think the testers have given me all the information I need to proceed with the project. Overall, this phase of testing, although late, has given me a lot of helpful information regarding the project. I am also very glad that I have completed these testers as I will be able to take these forward throughout the rest of my future in the ceramic industry.
Cone 5 Tests: Final tests
I am testing as much as I can in this final test as after this I will need to glaze my final cups. in this testing I used testers to see how the two whites, my own mixed glaze and the Botz cone 6 glaze works with a cone 5 firing. Going into this I wanted to see whether the cone 6 Botz white would melt at cone 5 as that is the ideal colour, finish and consistency for my ideal outcome. I am also hoping that the shiny opaque white glaze that I mixed works fine so that it can be a potential option for the inside of the cups. Rudi mentioned that there was a risk with this recipe as it was a rather old book however he was hopeful that it could work. See below for workshop notes and images:
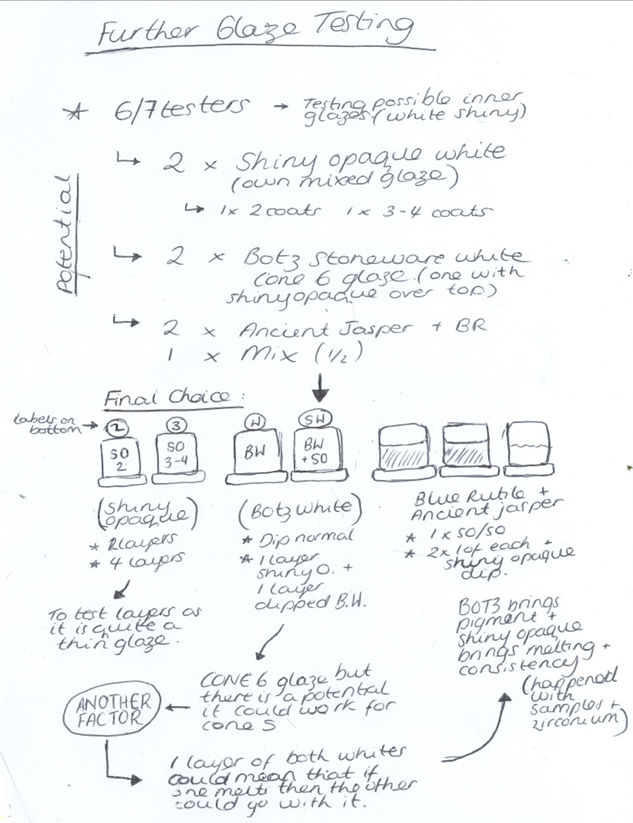

Shiny White Opaque Cone 5 Glaze (own mixed)

BOTZ White Cone 6 Glaze
For the shiny opaque white testers, I painted on the glaze as I put the sample amount in quite a shallow container so I wasn't able to dip. I wanted to do two testers with different levels of coats because I wanted to see if the glaze came out any differently. For the botz white, I also did two testers however 1 was just a singular drip and the other was 1 layer of botz white with the shiny opaque over the top. The final 3 testers were just of the 2 mayco glazes, blue rutile and ancient jasper, to see whether I would get the same colour results as the initial cone 5 firing.
The outcome of the shiny plaque glaze wasn't exactly how it was expected as it came out as just a clear shiny. Im glad that I got a glaze out of it that actually worked however I was really after that white shiny effect as I feel like it would really levelled up the pieces. As I said, I am still happy that I have successfully made a cone 5 clear because it is a good glaze to have for future. Rudi also mentioned that I could try remixing it and adding more zinc after deadline as it will give it the crisp white look. However, the Botz white surprisingly worked at cone 5 and this was the one that was potentially a bit of a long shot. There was a chance that this glaze wouldn't melt as it is a one 6 glaze however it did. This makes the bots white probably what I am going to use for my final pieces as it is the one that is most similar to zirconium with its shiny white finish. the coloured glaze samples came out the same however I have realised that using the testers for the coloured glazes isn't very representative as when on actual cups, they react completely differently when they are on a larger surface.
Final Resolution: Glazing Final Pieces
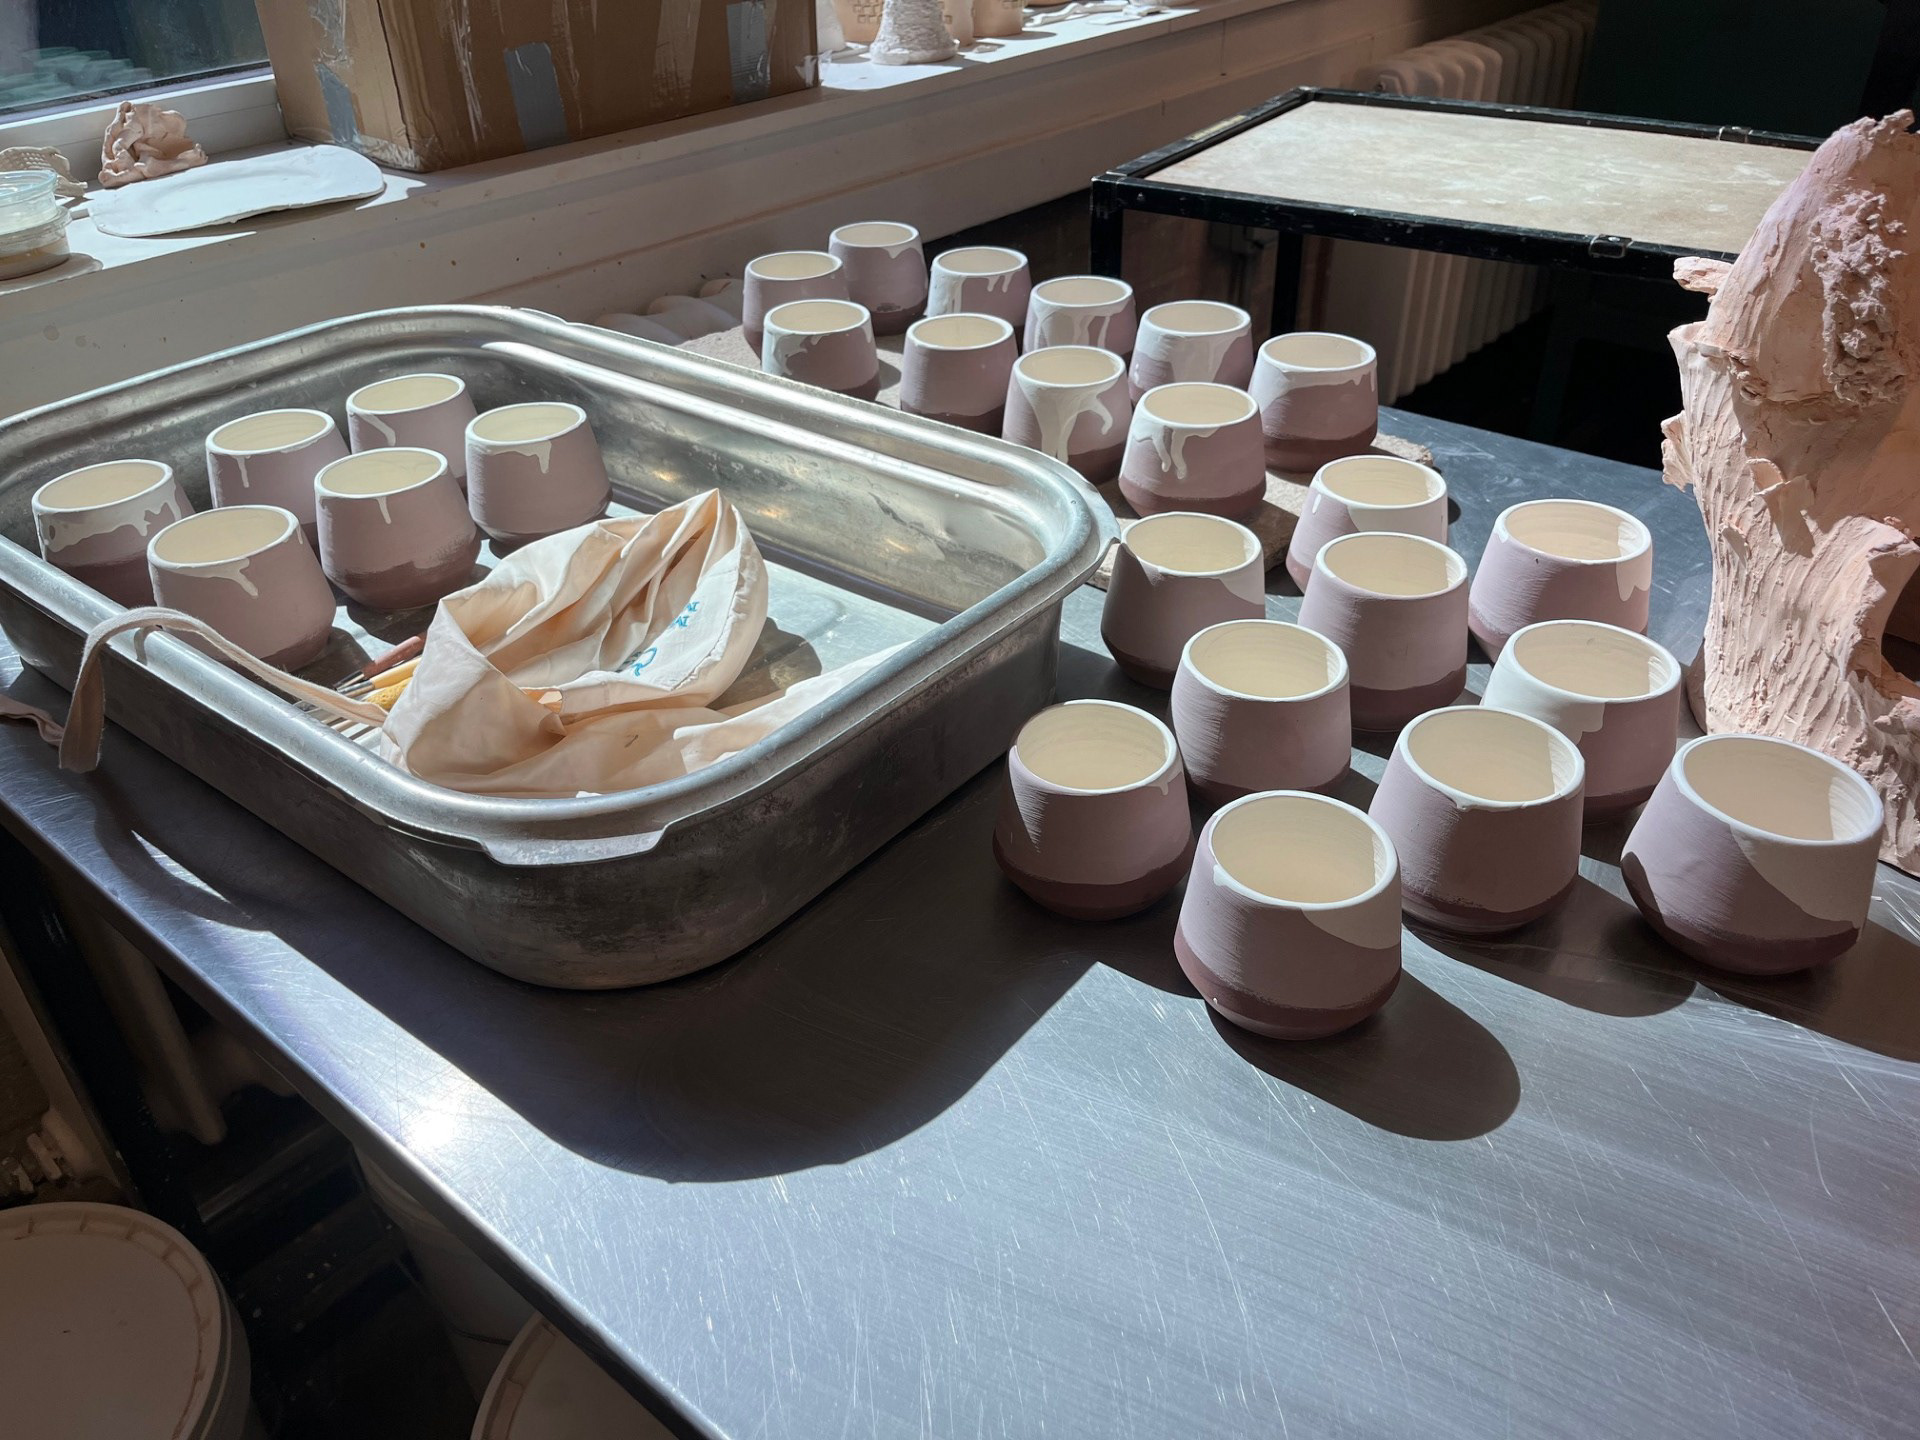
For the inside of the pots I used a water down botz white which is a method that I have tested before and it hasn't really effected the outcome. I wanted to do this because it would make the glaze go further as well as make it more pourable. One thing that i needed to remind myself was to keep stirring the mixture as because it's watered down, it's more likely to separate and settle. I also painted on extra layer around rim as it didn't look as thick as bottom. The info from previous cone 6 samples also suggested this as the top felt a lot thinner than glaze on the bottom.
Final Outcome of Cups:

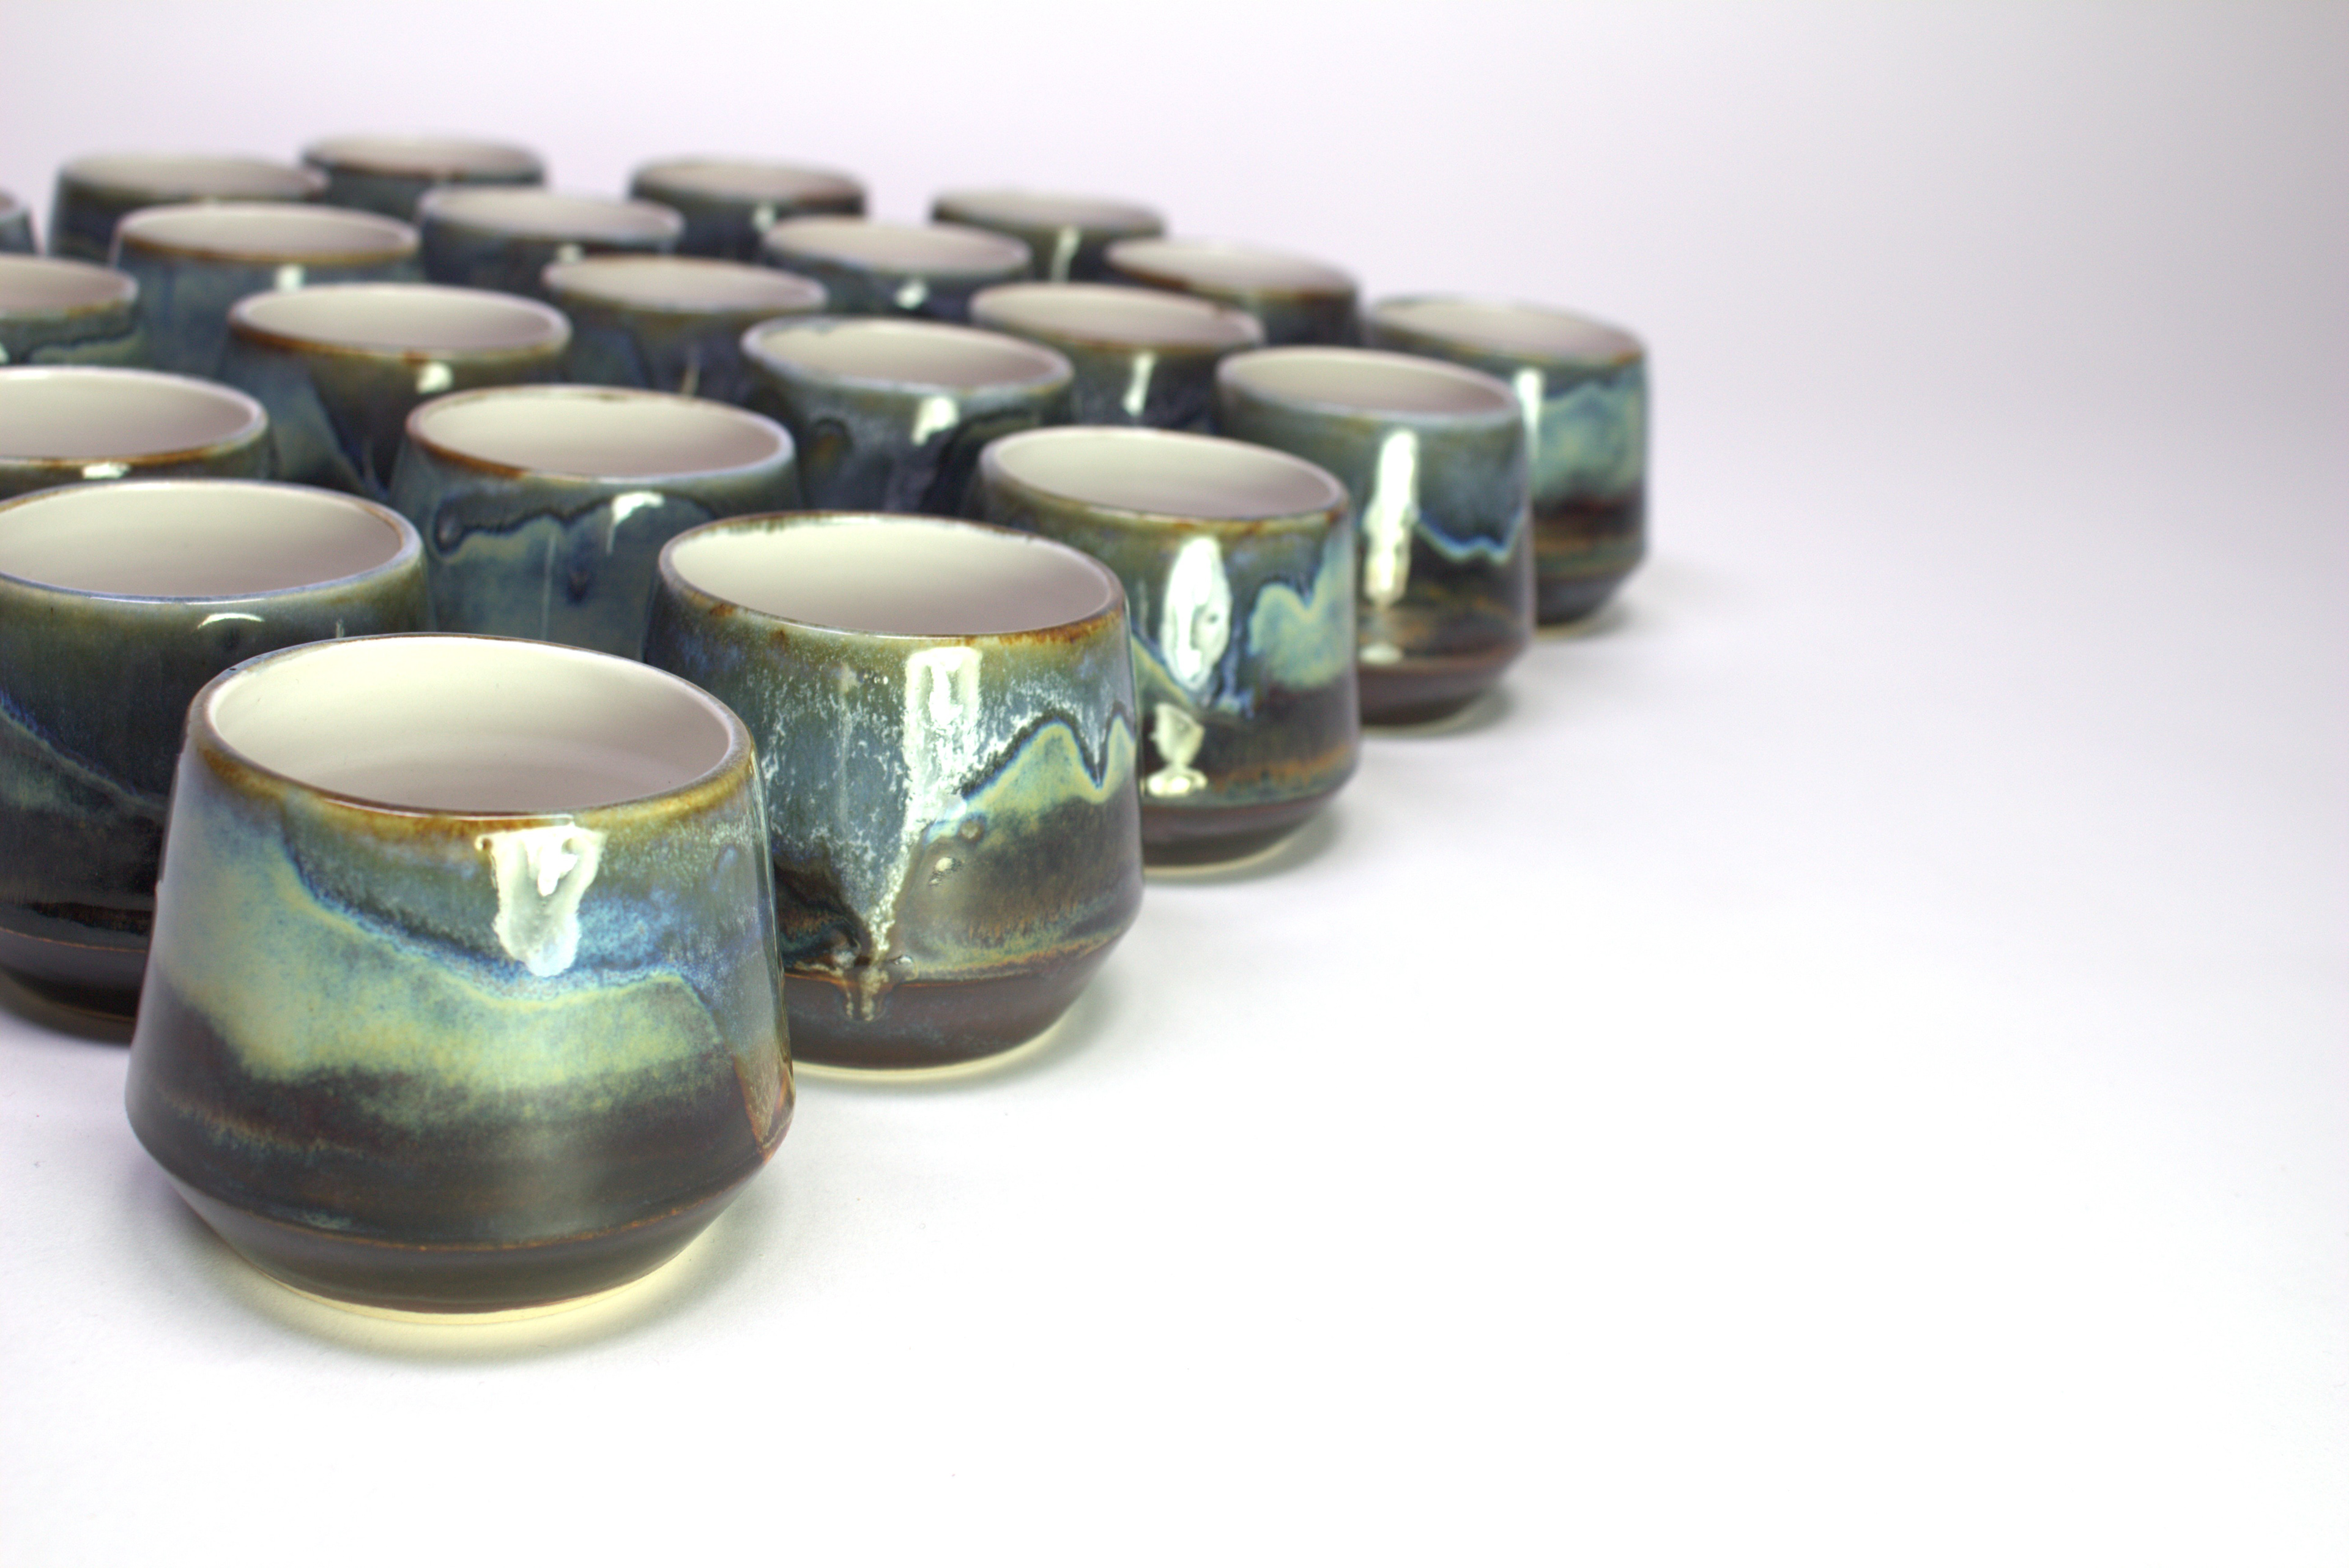
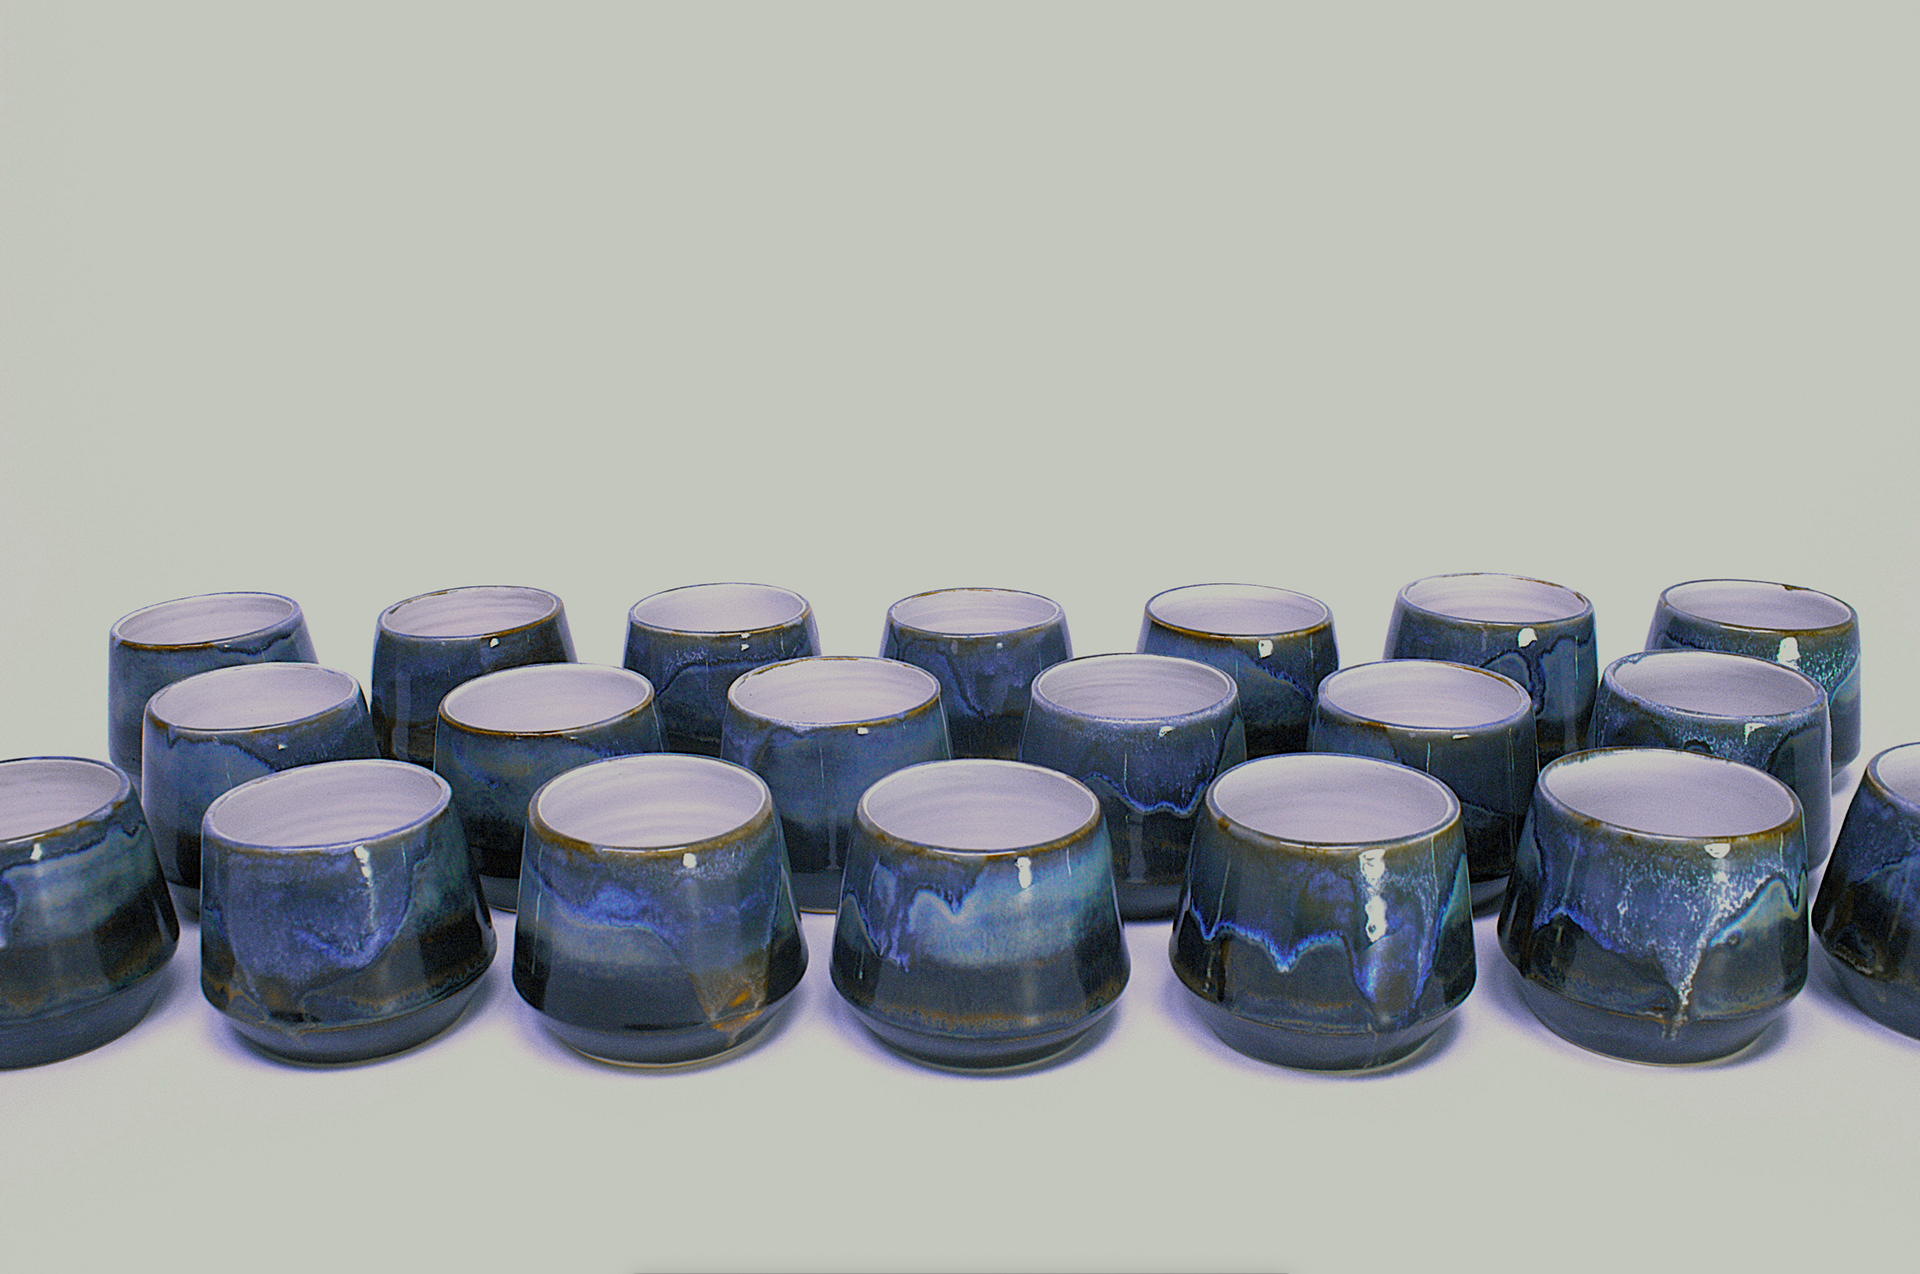
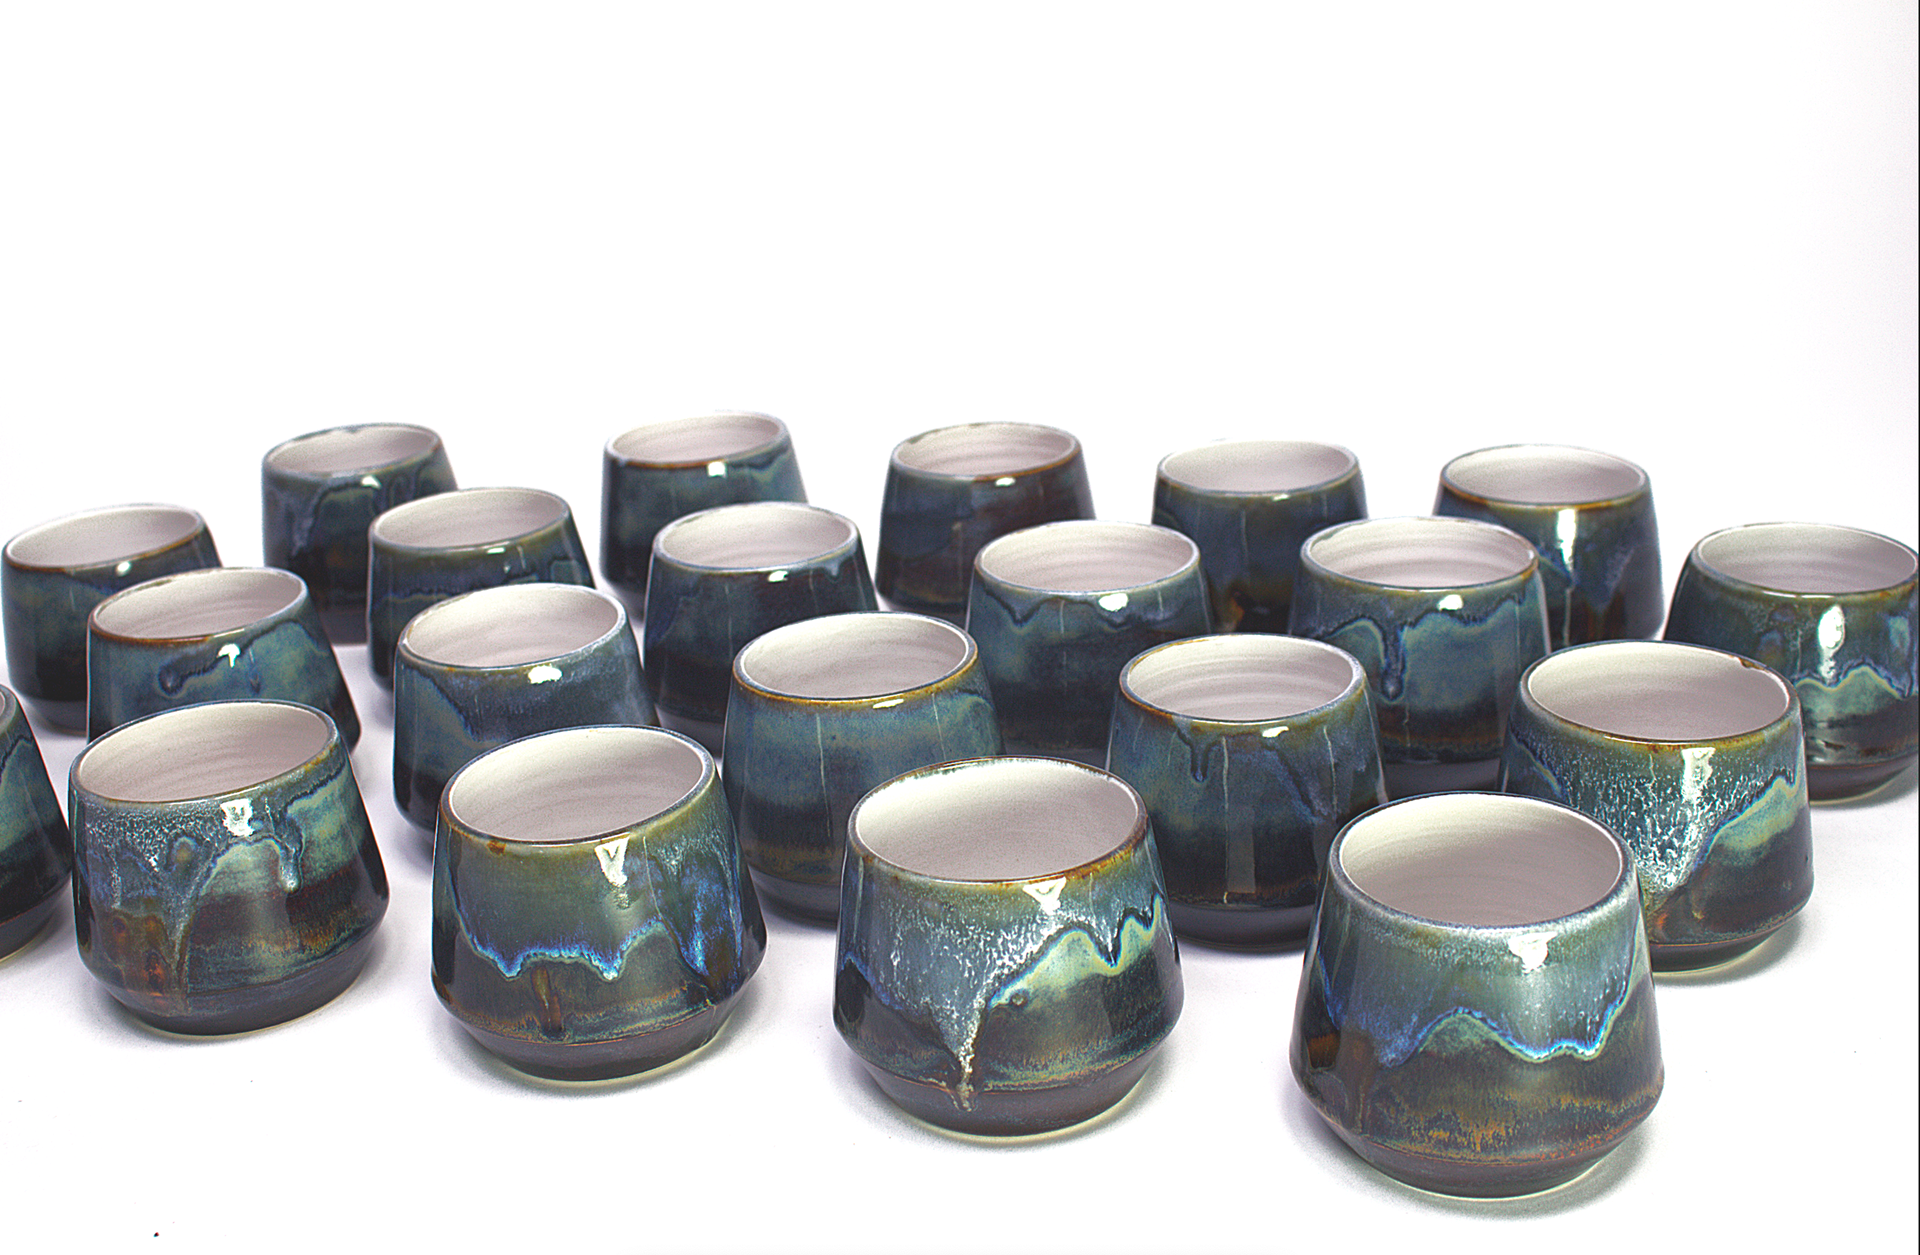
Final Object Reflection:
I'm really happy with the final outcome of the pots, and I'm especially glad that I completed the testing near the end of the process—it truly helped me achieve the results I was aiming for. The glaze turned out to be a perfect representation of my vision and goals in ceramics, with dynamic surfaces that feel both vibrant and earthy. Importantly, the work embodies the notion of a handmade object; for me, the goal is not perfection, but the refinement of practice. I’ve always appreciated the philosophy that imperfections reveal the presence of the maker—something that resonates with the ideas of Soetsu Yanagi and his reflections on craft. While some of the cups aren't perfectly straight, this is something I can improve by checking each piece more thoroughly before firing. A few pots have warped, possibly due to over-firing, although I didn’t have time to fully investigate this. It's likely an issue beyond just my own firings, but it could be helped by using a chuck during turning to prevent the rim from distorting as much. In this firing, I made the conscious decision to create some pots at a height of 9cm, which is ideally the size I want them all to be. However, at my current skill level, producing that size consistently in high volumes isn't yet feasible. That said, I actually prefer the slightly larger size—it feels more substantial and versatile, able to hold a broader range of contents. Although I'm proud of the cups, the size is something I'd like to refine in future work, and I’m excited about the opportunity to continue developing this aspect of my practice.